As a photographer, you want to surprise your audience. Your ultimate goal is to produce images that will cause people to take a second look. Regardless of genre or topic.
This is why I love infrared photography. Read the article below to get started too.
Visible and Invisible Infrared Photography
I don’t always have the ability to travel everywhere I want to. This means that I can find my local landscapes underwhelming at times.
So here’s what I did to get over that:
I found a small, simple and cheap piece of equipment. This allows me to make common scenes’pop’. By making the “invisible”, “visible”.
The act of ‘seeing’ involves mapping the environment we are in. According to the kind (and intensity) of light, reflected by the objects surrounding us.
Yet, there is much more out there than what we can perceive with our natural senses. These are past the visible light spectrum.
When we speak about the light we see, we are talking about electromagnetic waves. These are lying within very specific ranges of frequencies (or wavelengths).
We called this ensemble of waves the ‘visible’ region of the electromagnetic spectrum. With higher frequencies than visible light, we have ultraviolet (UV) light. At lower frequencies, we find the infrared light.
At times we can sense infrared as heat on our skin, rather than with our eyes.
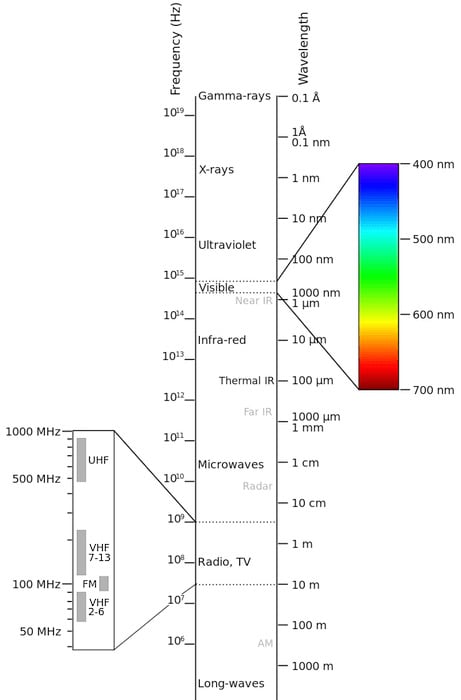
The electromagnetic spectrum (credits: Wikipedia)
Technology gives us the tools to reconcile our sense of sight with the entire electromagnetic spectrum.
This equipment can generate images in false colors that make invisible light, visible. Take a thermo camera, for instance:
This camera senses heat. It shows the hot and cool parts of the scene in front of you. These are bright and dark areas in the digital image produced by the camera. So you can photograph heat.
A note on the terminology: there are different kinds of infrared light.
Near-infrared light has a higher frequency than thermal infrared light. We can sense this as heat and see it with thermo cameras.
For the sake of clarity, I will use the generic term "infrared” (IR) to substitute "near-infrared”.
Photographing Infrared Light
Capturing a photograph using IR light is what makes the invisible, visible.
While not new, infrared photography is not common, particularly nowadays. For further history and uses of IR photography, refer to Wikipedia.
Our vision is often better than that of our cameras. Particularly when it comes to dynamic range. This is the level of brightness we can perceive.
But we cannot see IR light – the sensor of your Nikon or Canon camera can. This is why we can create digital infrared photography.
You buy a photo camera for the ability to snap attractive, infrared pictures of what you see. Mixing visible and infrared light will degrade the image quality of your camera. You don’t want that, right?
Camera manufacturers do not want that either, so they place a filter in front the sensor to block IR light.
Infrared filters can stop you from creating infrared red images.
Luckily, no filter is bulletproof. Some IR light still reaches your sensor. This means we can do IR photography with straight-out-of-the-box (SOOTB) digital cameras. Even if there are some compromises to accept.
The effect of the IR blocker placed in front of the digital sensors is the same as using a 10 stops neutral density filter.
In both cases you are reducing the amount of light that will hit the sensor in a given amount of time.
To expose your infrared photos you must keep the shutter open for a longer time. In the end, infrared photography with a SOOTB camera, is long exposure photography.
How to Avoid Using a Long Exposure for Infrared Photography
If you want to regain full control over your shutter speeds, you have two options:
- Send the camera to a camera lab and have it converted for IR photography. Your converted camera then becomes a dedicated infrared camera.
- Dust off your old film camera, grab some IR film and go from there.
Option 1 is usually quite expensive. You will be replacing the IR blocker with a filter. So you will also not be able to use your camera for anything other than IR photography.
Option 2 is more flexible, but it may be challenging, too. Infrared films, such as the Ilford SFX 200 Infrared B&W, may be scarce. And you will probably have to deal with a fully manual DSLR camera.
Also, finding a photo lab able to properly develop such a film may be difficult. Digital infrared photography may be the way to go.
There are Three Other Problems to Face with Infrared Photography
Most electronic systems (in-camera light meters and handheld light meters) and exposure rules (sunny 16 rule, etc.) work with visible light in mind.
IR scenes may require a different exposure. Ensure that you do some bracketing before calling it a day.
Also, Infrared photography can fool your autofocus. If you are using an unmodified camera, it is like trying to use the AF to focus on a subject at night. Inside a dark room.
You are better off with manual focus as focus speed should not be an issue in this scenario anyway. Digital infrared photography allows you to do this.
And then there’s the infamous infrared “hot spot". Lenses are built with visible light in mind. Due to the internal coating of the lens barrel of some lenses, an IR Hot Spot will appear in your images.
A hot spot generally appears circular, in the middle of the frame. It is brighter than the surrounding part of the image. And it has a different tint/color temperature.
Lens quality varies and performances may differ depending on the aperture value used. Wider apertures are often better than narrow ones.
You can correct faint hot spots during editing.
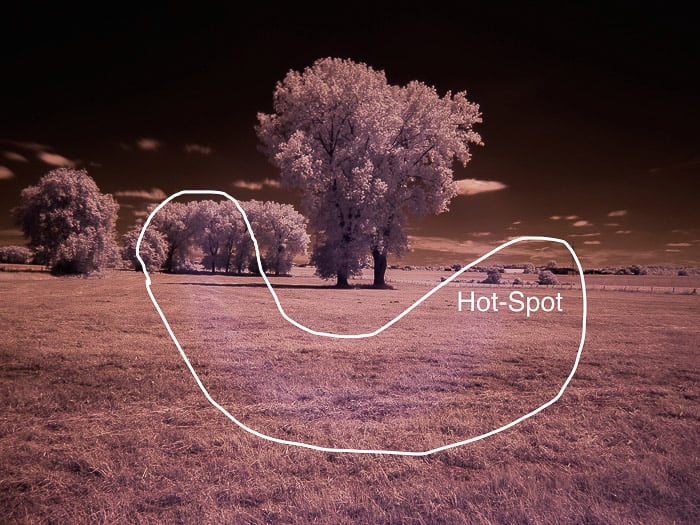
The infamous infrared hot spot. Sometimes, it is more visible in false colors than in black and white images.
Here’s a helpful database for the IR performance of various lenses.
The Remote Control Test: Is Your SOOTB Camera IR Ready?
Using your TV remote control, hold down a button and point it at your camera. Can you see (or photograph) the light coming from the remote IR emitter?
If you can, then you are good to go!
The brighter you can see the IR emitter, the better it is. Even though this means that the IR blocker installed in your camera is not really that efficient.
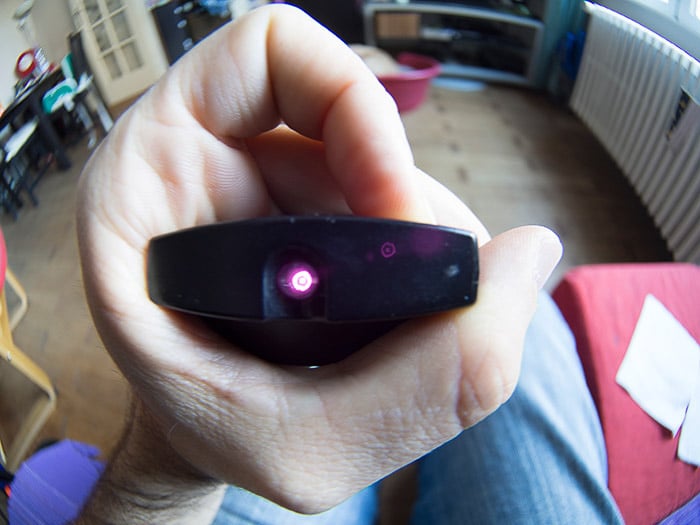
This is how the SOOTB Olympus OM-D EM-10 sees the light from the IR emitter of my TV remote. You do not need to use an IR filter to perform this test.
Must Have Equipment to Start Infrared Photography
- A camera with a sensor that can see IR light. Most infrared photos shown in this article were shot with a SOOTB Panasonic Lumix DMC-GF2. I used the standard 14-42 kit lens.
- A sturdy tripod. As I said before, if you do not mod your camera, you will be doing long exposure digital infrared photography. The use of a sturdy tripod is unavoidable.
- An IR filter. You need to place a filter in front of your lens that will block UV and visible light, while letting IR light pass. A good filter to begin with is the HOYA r72 IR filter. This filter is cheap. And it will block all light with a wavelength shorter than 720nm. In practice, this means that a bit of visible red light will still pass through the filter and hit your sensor. This is not bad at all. That awfully red image you will see on your LCD, while ugly, is very useful for composition and manual focusing.
Forget About Golden Hours, Overcast Skies and Stormy Weather: All You Need Is Sun
Landscape photographers swear by the golden and blue hours. This is to take advantage of the best quality of natural light.
If you are like me, with a family and a 9 to 5 job, chances are that you are not going to see many golden/blue hours. It is also unlikely that you can chase storms to capture the most dramatic skies.
But the IR golden hour is midday Capturing great digital infrared photography is much more achievable.
The IR Photography Wow Factor
Infrared photography has the inherent WOW factor of displaying familiar scenes in a new way.
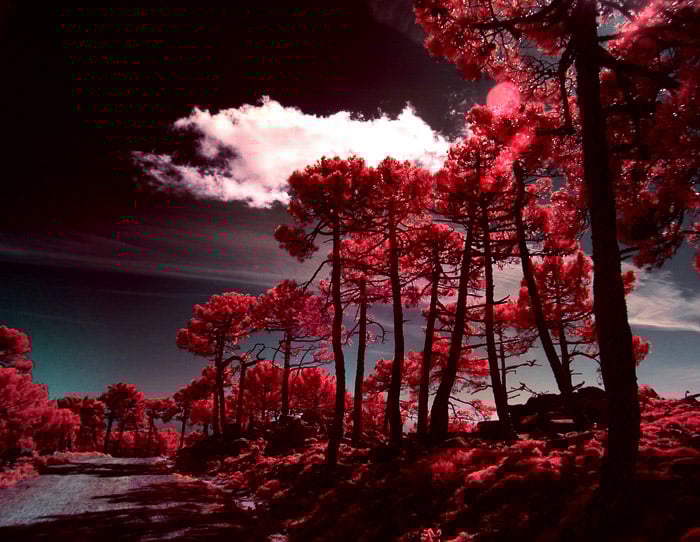
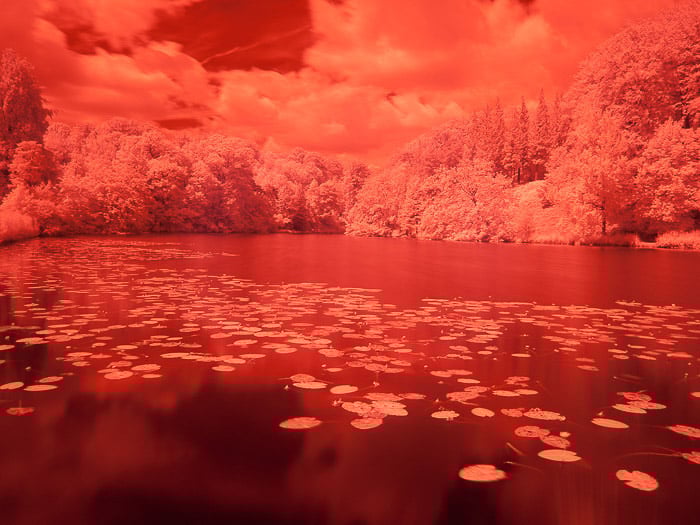
The photo below was taken in a park outside of Brussels, on a sunny Sunday in July, at around 1pm.
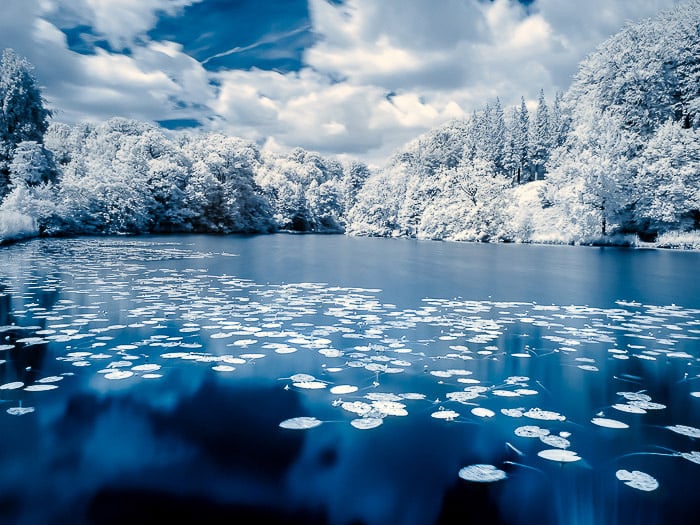
False color infrared photo of the pond in the "Domaine Solvay – Chateaux de la Hulpe", La Hulpe (Belgium).
Surprised? I hope so. If you know the location, you might even think “wow”.
This is all you need to make your audience strongly connect with your work. Show them what they are familiar with, in an unfamiliar way.
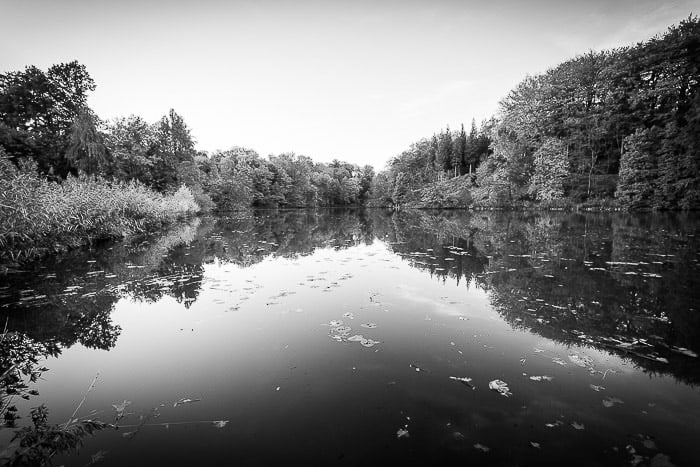
Below is the same location, captured in visible light. The photos were taken months apart, but you get the idea.
This pond has potential, but would you pause to take a second look at this photo?
Would you print it 90x60cm to hang it in your living room? I doubt it.
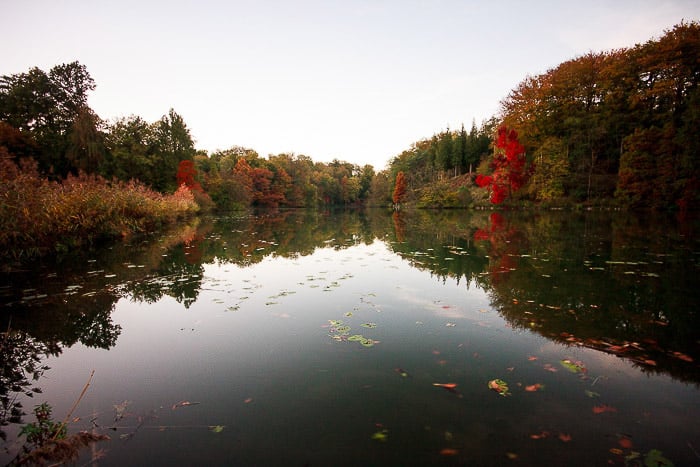
The same pond photographed in visible light.
Subjects for Infrared Photography
The most common subjects for IR photography are landscapes. That’s because they can appear unusual and unexpected.
Water and blue skies absorb IR light. But grass, large-leaf trees and puffy clouds reflect IR light. The essence of an IR image is the contrasts between objects absorbing or reflecting IR light.
Pine and spruce trees absorb quite a lot of IR light. Try a black and white conversion of your IR photo. You will see a black sky with puffy white clouds, black water, dark grey pine trees and white leaves and grass.
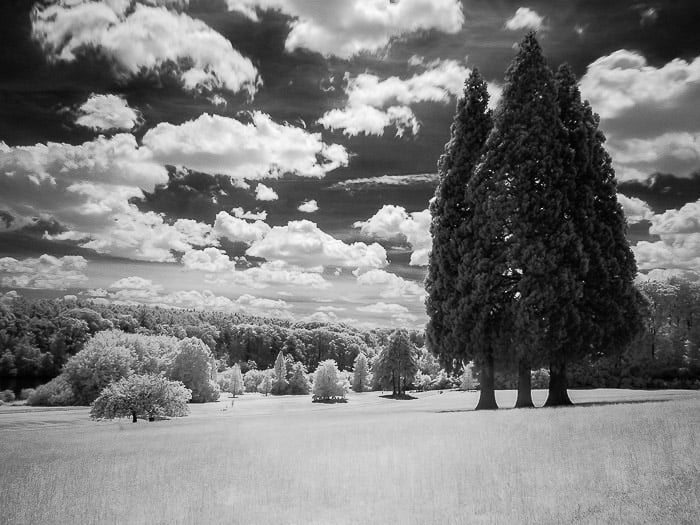
Invisible contrasts in the Domaine Solvay (La Hulpe, Belgium). As you can see, Sequoia trees (on the right) also adsorb quite a lot of IR.
You are not limited to landscapes. Try photographing people: they may look weird, almost ghost-like. Try getting some macros of insects – they may surprise you.
Explore the city and see how different materials in the buildings absorb or reflect IR light.
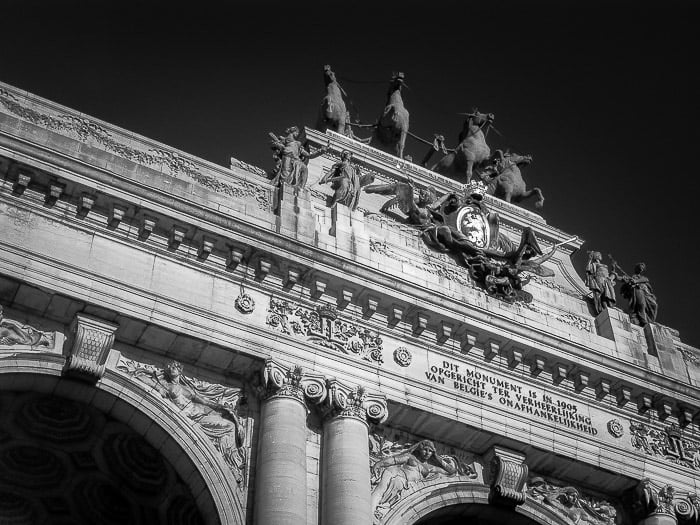
Detail of the Arch of Triumph in the Parc du Cinquantenaire (Brussels, Belgium). I found the deep black sky to be a strong element in this photo.
Infrared photography has the ability to surprise the viewer. It gives an unfamiliar outlook of even a common or simple subject.
But this does not mean that a boring or trivial photo will become a masterpiece in IR. Composition rules still hold true and boring shots will remain boring.
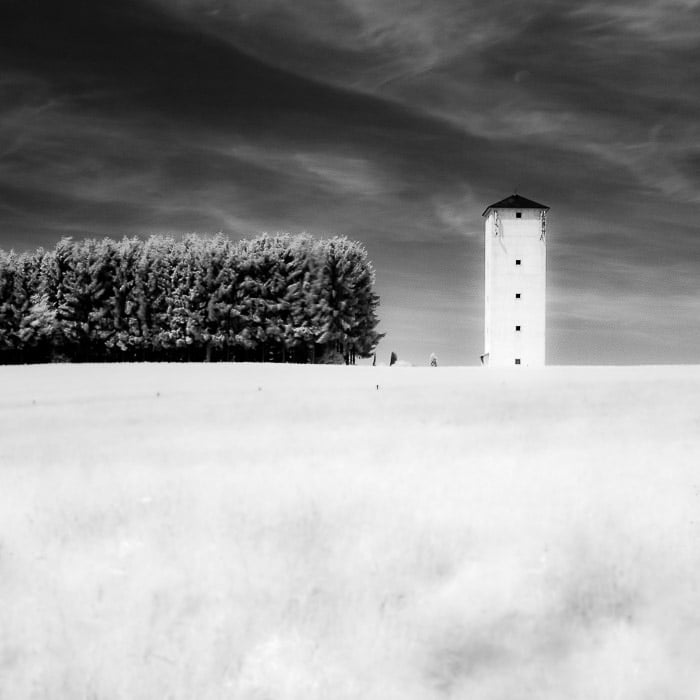
Symmetry is a powerful ingredient when composing a square image. I took advantage of IR light to make all the different kinds of grass in the foreground appear as a uniformly white area, while the blue sky is naturally darkened, thus creating a sort of split frame at the horizon: white below, black above.
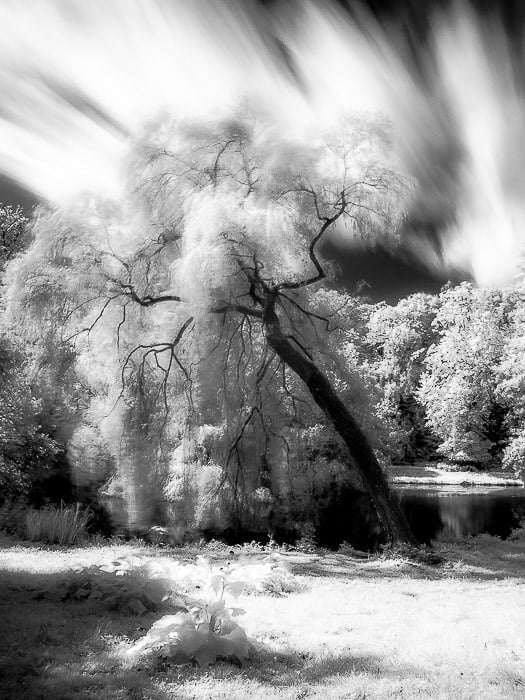
A Lonely tree on a windy day in one of the many gardens in Brussels (Belgium). The dark of the branches contrasts with the white of the canopy. Fast moving clouds add dynamism to the image.
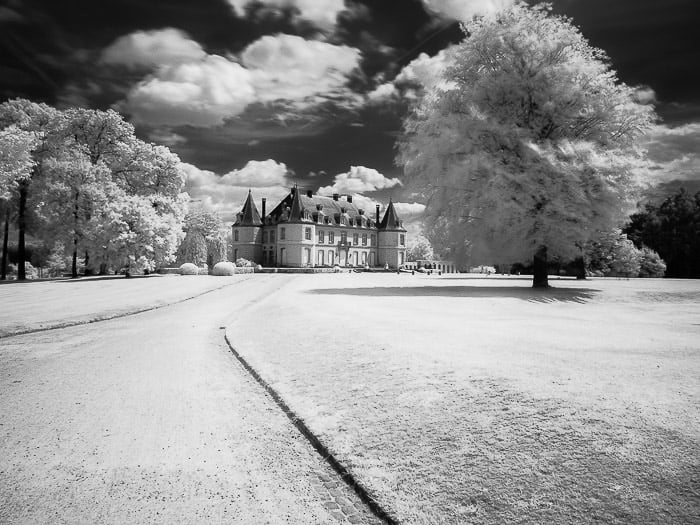
The Chateau de la Hulpe: the white walls of the four towers, forming the corner of the buildings, are in fact, covered in green ivy. The road is a leading line – bringing the viewer in to the frame, right to the castle, naturally framed by the trees on the left and right and by the puffy clouds above.
And let's not forget the side effect of removing people and traffic from your scene.
You’re already doing a long exposure. People and vehicles moving across the scene will be blurred away or removed.
This is great for taking urban shots of buildings, monuments, and busy squares. As well as landscapes in city gardens and crowded parks.
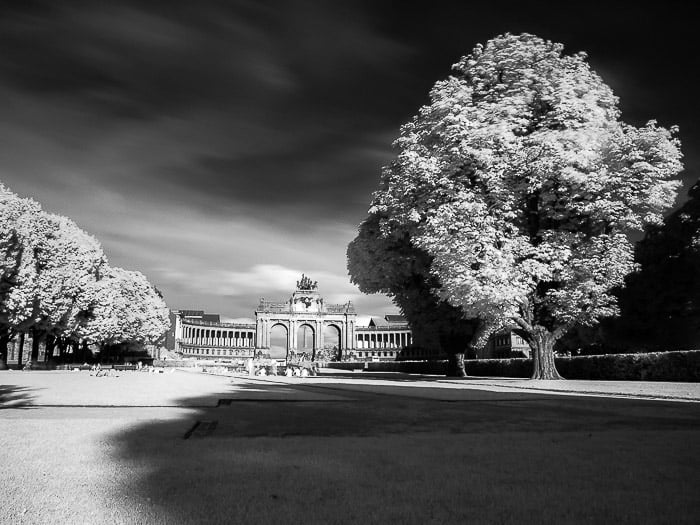
The long exposure time required to get this shot, has emptied the busy Parc du Cinquantenaire in Brussels (Belgium) from passers-by.
Edit Your IR Photographs
Editing your infrared photos will take few extra steps than usual. How many, will depend on the final result you want to achieve.
Below, is a typical raw file obtained with an unmodified camera, using the HOYA r72 IR filter.
Out of the camera RAW image using the HOYA IR filter.
The first step is fixing the white balance. Remember, blue sky and water should be dark. Leaves, grass and puffy clouds should be white.
Next, decide if you want to go for a black and white or false color image and go from there.
Black and White IR
Black and white IR conversions are less surprising at first. But you will still perceive that something is not quite right.
Below, you can see the pond when converted to black and white from visible and IR light. The giveaway detail is the foliage, which is white in the conversion from IR.
Black and white conversion of a photo taken in visible light of the pond in The Domaine Solvay (La Hulpe, Belgium).
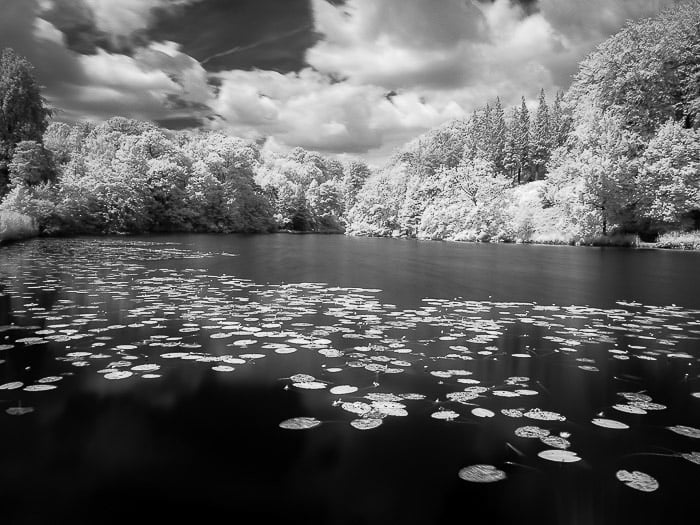
Black and white conversion of an IR photograph.
False Color IR Conversions
A false color IR conversion screams ‘weird’. You can’t be fooled, something is going on here.
The most simple thing you can do is play with the white balance. Try to make the areas that should be white or black, their respective colors.
You will have an image with a general orange tone. Surprise!
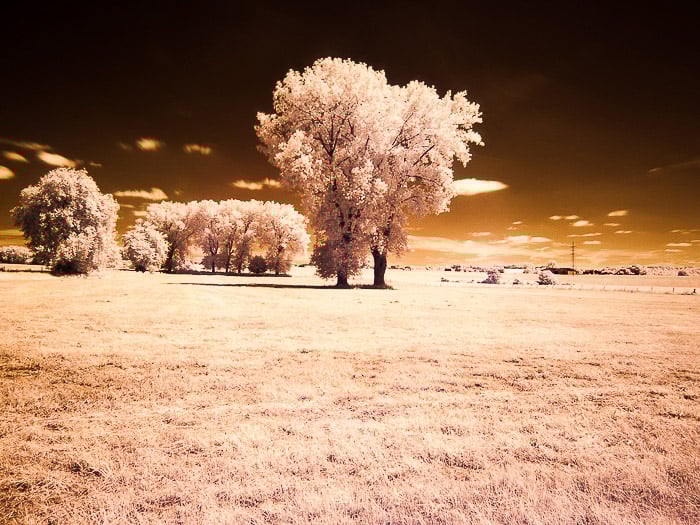
Lonely trees in the Belgian countryside. Note that the IR hot spot that appears in the second photo has been corrected in this final version.
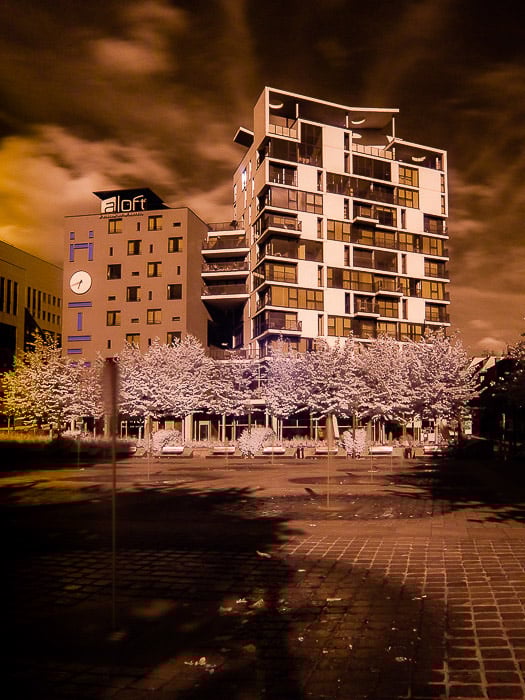
The aloft Hotel in Brussels (Belgium).
You can also try to restore a more natural color to the sky and water. To do this, swap the red and blue channels.
You can do this with the channel mixer in Photoshop. Or, if you have Photoshop Elements, set the hue for the master to 180.
The result is something like this:
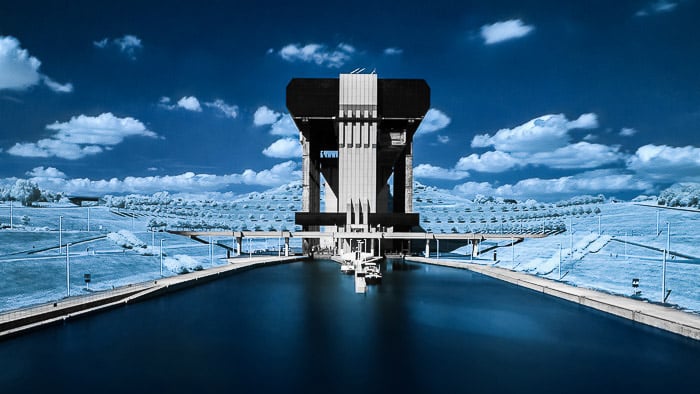
The Strépy-Thieu boat lift near Mons (Belgium). It is, at the moment, the tallest vertical boat lift in the World (source: Wikipedia).
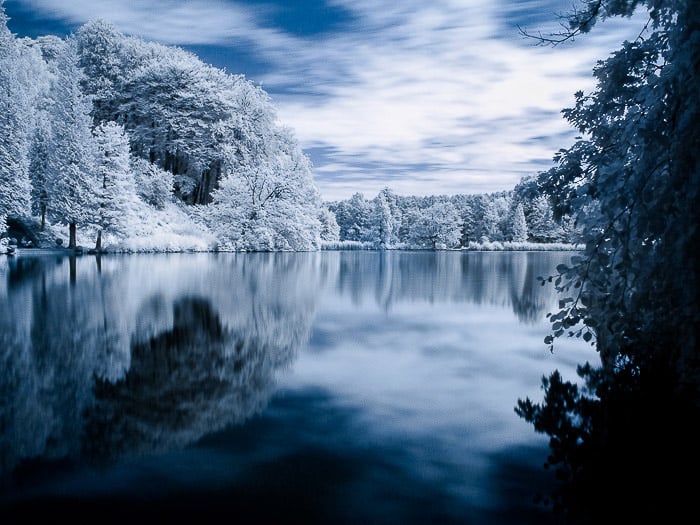
Another view of the pond in the Domaine Solvay (La Hulpe, Belgium).
You can go further by mixing IR and visible colors. I did this in the photo below of the Justice Palace in Brussels (Belgium).
This image is the result of blending together a black and white (the building) and false color infrared photography (the sky).
It was further blended with a photograph taken in visible light. This reintroduced the actual color of the golden dome.
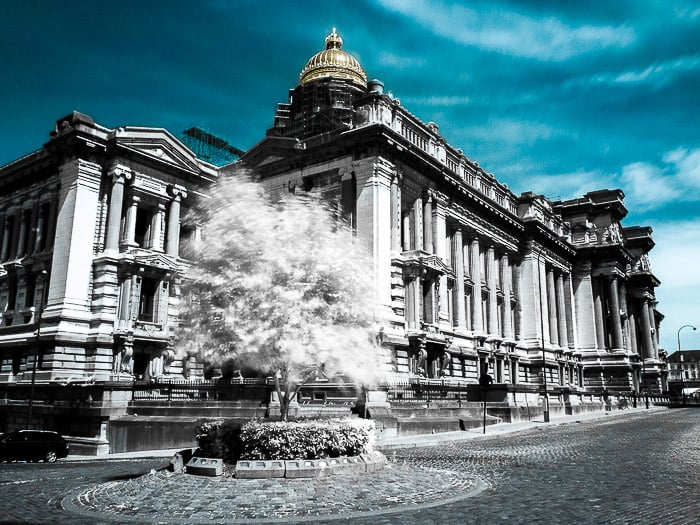
The impressive Justice Palace in Brussels (Belgium).
Conclusion
I hope that this post has inspired you and it will help you to unleash your creativity.
I find that infrared photography is brilliant for the unexpected results I can get.
It has the power to make your audience connect with your work. Especially when you show them the unseen beauty of places they go past every day.