Still life photography is a great way to improve your photography skills. And our article will show you how to get those perfect still life photos!
But what makes up a still life photo? A still life image is the photographic counterpart of still life painting. Common subjects for still life photography include inanimate items like flowers, food, plants, rocks, etc.
And tabletop photography is a branch of still life photography that focuses on capturing items placed on a table. The most common photography subjects are food, products, and found objects. These are the main types of still life photography.

© Brad Switzer
Beginner’s Guide to Still Life Photography
We take you through four case studies to show you how to make a still life photo. Then we review three lighting setups and give you tips on focusing and focus stacking.
We also look at some fun still life ideas to boost your creativity. There’s also a section on the gear you need for still life photography, so you can kit up before you next photoshoot.
Use the links below to navigate through the article.
- What is Still Life Photography
- Four Still Life Photography Setups
- Three Still Life Photography Lighting Styles
- Still Life Photography Focusing
- Still Life Photography Ideas
- Gear for Still Life Photography
- Still Life Photographers
What Is Still Life Photography?
Still life photography is when people take pictures of objects like fruits, flowers, or everyday things. They make them look interesting and artistic. It’s like creating art with a camera!
A still life photo could be a neatly arranged stack of books with a pair of glasses resting on top, creating a cozy reading scene. It captures the beauty of ordinary things in an image.
Why Should I Try Still Life Photography?
You can learn a lot from still life photography. For example, you can observe how different kinds of light affect the scene. Did you know that sidelight from a low-light source is great for revealing textures?
With still life and tabletop photography, you are totally in control of every aspect of your photo. It is all your decision, from staging the scene to firing the shutter.
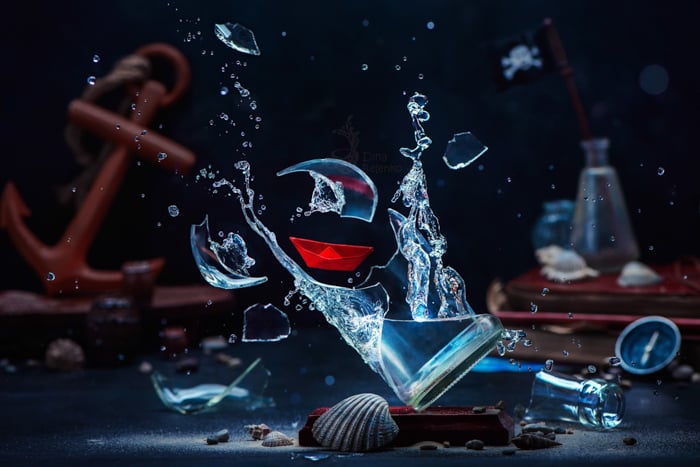
Despite the commercial nature of still life photos, you don’t have to shoot them commercially. You can always create a nice storytelling image like the one below.
Four Still Life Photography Setups
If I were to tell you everything about still life photography, this post would never end. Instead, I want to show you what you can do with cheap and basic equipment in four case studies. We go from the simplest setup to more complicated ones.
We listed my gear and whether I used low or high key light. Note that “key light” refers to the main light source.
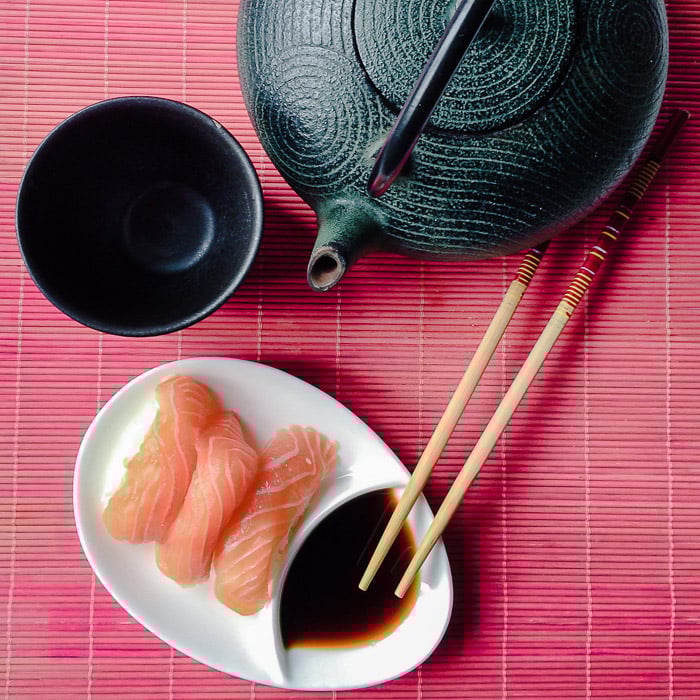
1. Simple Overhead Shot
Gear Used
- Camera: iPhone 5S
- Light Modifier: Circular reflector
Lighting Setup
- Setup Type: High key
- Key Light: Natural window light to the left of the scene
- Fill Light: Circular reflector on the right of the scene
Note: A photography backdrop screen is pictured but not necessary. Use any tabletop.
This is the simplest setup you can create. It is most suitable for food photography and small scenes.
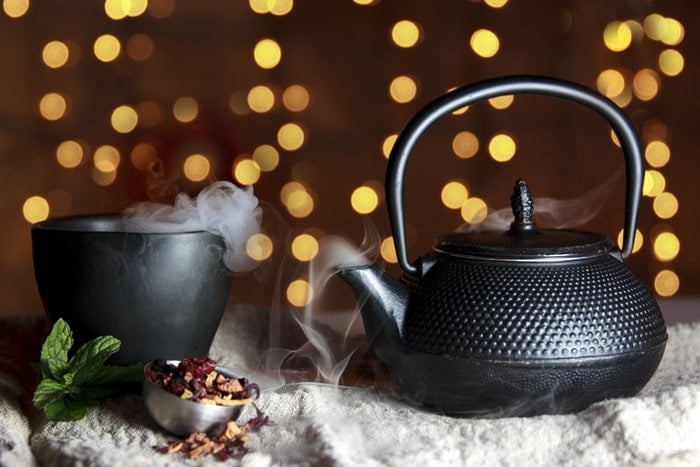
I could not fill the frame with the sushi because I had no macro lens for my iPhone. I had to stage a scene with props for this overhead shot. I used a pink bamboo placemat and placed a nice cast iron teapot with a cup.
I displayed the sushi using a small plate with some soy sauce. And a pair of chopsticks added a nice finishing touch.
2. Classic Food Setup
Gear Used
- Camera: Olympus OM-D EM-10 Mark IV
- Lens: Olympus OM 50 f/1.4 (equivalent to a 100mm lens on a full frame)
- Accessories: Tripod and a +2 close-up lens
- Light Modifier: Circular reflector
Lighting Setup
- Setup: High key
- Key Light: Natural window light to the left of the scene
- Fill Light: Circular reflector on the right of the scene
White cardboard as the background (100 x 70 cm) and the stage (50 x 70 cm).
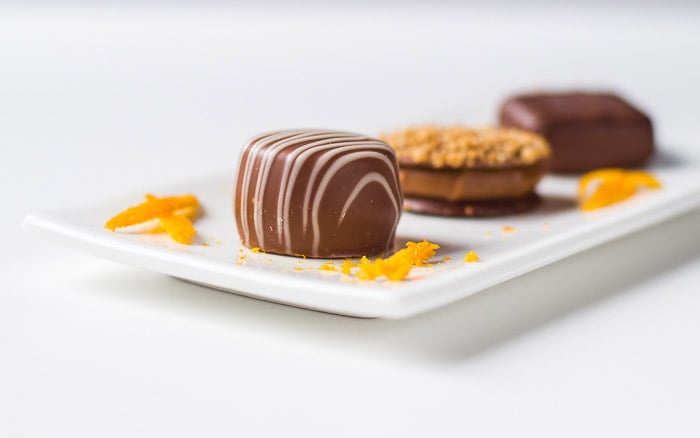
This is a classic setup in food photography. I decided to photograph dark chocolate Belgian pralines, creating contrast by shooting a nice high-key image.
I used a long, narrow white plate decorated with orange peel to display the pralines. And then, I set focus on the first chocolate.
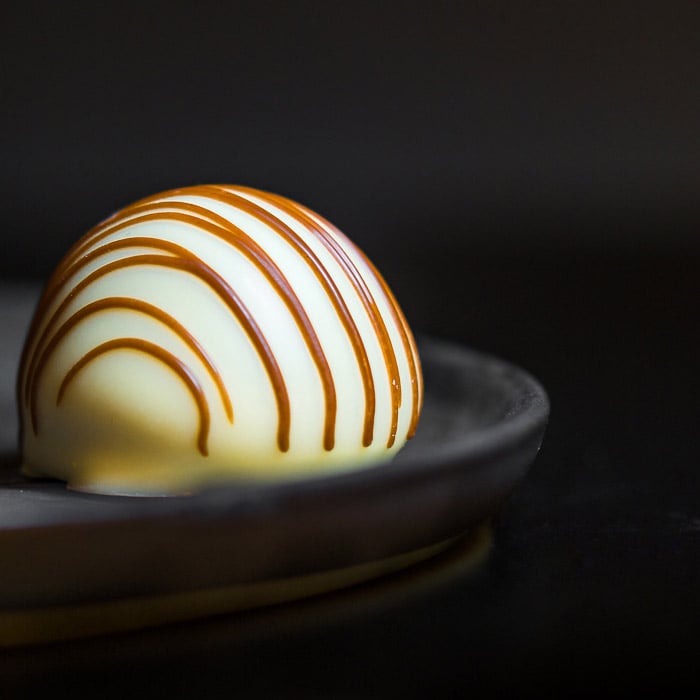
3. Low-Key Close-Up
Gear Used
- Camera: Olympus OM-D EM-10 Mark IV
- Lens: Olympus Zuiko OM 50 f/1.4
- Accessories: Tripod and a +3 close-up lens
- Light Modifier: Circular reflector
Lighting Setup
- Setup: Low-key lighting
- Key Light: iPhone 5S running the pro version of the Soft Box Color app from above the scene on the right
- Fill Light: Circular reflector on the front right of the scene
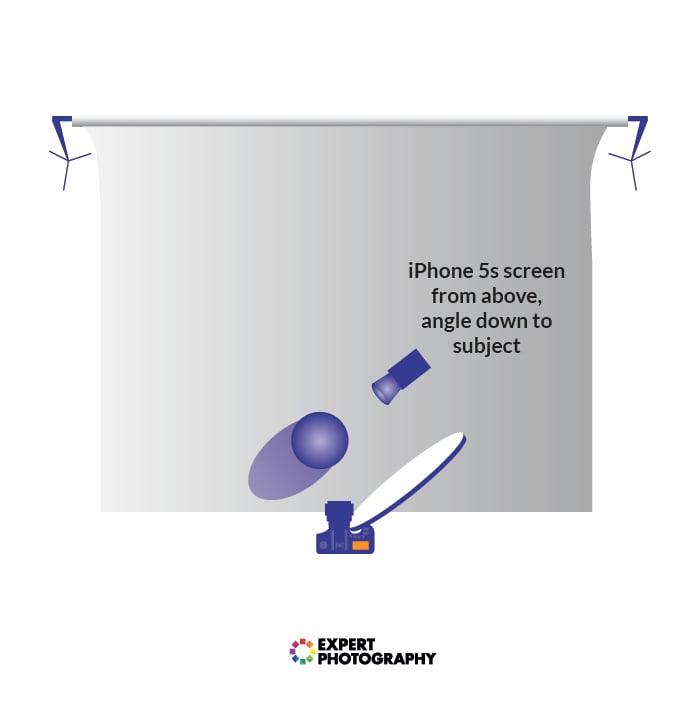
Black, matte cardboard as the background (100 x 70 cm) and black, glossy as the stage (50 x 70 cm).
To stand out, white Belgian chocolate pralines call for low-key images. A dark grey plate displayed a single white praline decorated with caramel.
Using a +3 close-up lens allowed me to get really close to my subject. I then decided to crop the image in a square format with the subject off-center. It provided a better and even tighter composition.
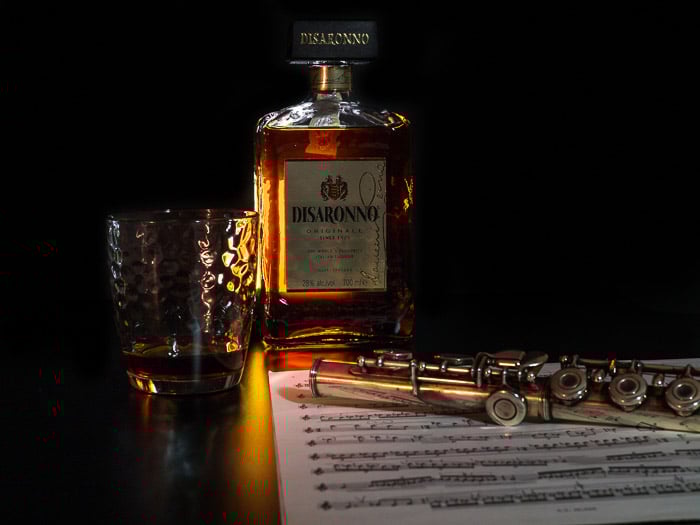
4. Complex Still Life Scene
Gear Used
- Camera: Olympus OM-D EM-10 Mark IV
- Lens: Sigma Art 30mm f/1.4 DC DN (equivalent to a 60mm lens on full frame)
- Accessories: Metz 48 AF-1 flash, tripod, light stand, three-meter E-TTL cord
- Light Modifier: Circular reflector, softbox
Lighting Setup
- Setup: Low key
- Key Light: Flashgun in manual mode, 1/16 power setting, placed on the right side of the scene, two meters away
- Fill Light: Circular reflector on the left of the scene
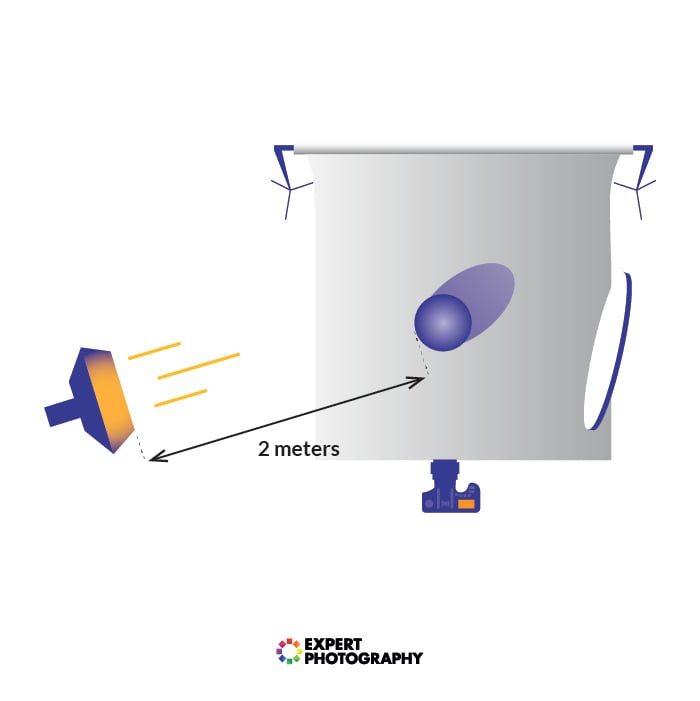
Black, matte cardboard as the background (100 x 70 cm) and black, glossy as the stage (50 x 70 cm).
A more complex setup for this low-key scene is showing my Yashica-MAT LM TLR medium-format film camera from 1950. (Still in working condition, by the way.)
I used a roll of 120mm camera film and my favorite hat as props to fill the scene. I also made sure the Figosa leather strap was clearly visible.
Note that you need not be in a pitch-black environment to take this low-key image. You can do them in broad daylight if you use very narrow apertures.
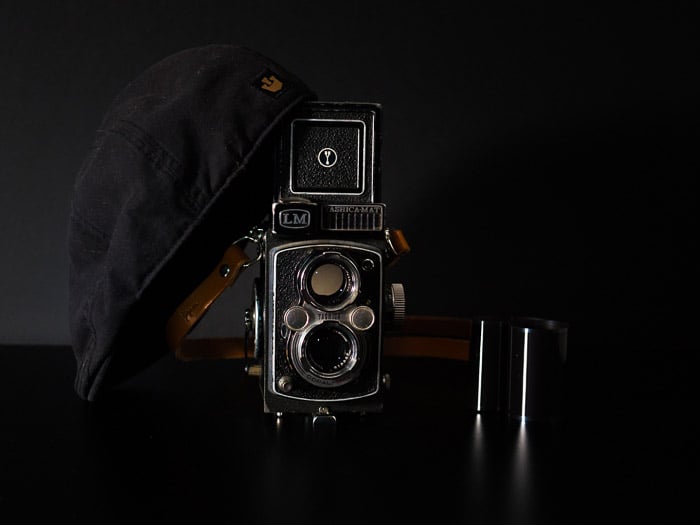
It is best to shoot without a flash to get a black image of the scene. (E.g., use very fast shutter speeds, lowest ISO settings, and narrow apertures.) Then connect the flash and take a real photo. The scene will be illuminated only by the flash, regardless of the amount of ambient light.
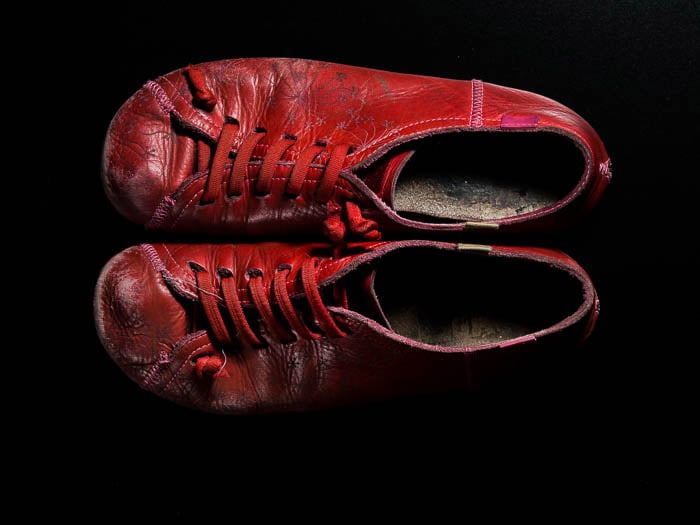
This setup is great for revealing textures and making your shot moody. I did this for a pair of used red Camper Peu leather shoes (in the photo below).
Three Still Life Photography Lighting Styles
Now let’s review the three general setups I used so you can use them for your still life photography.
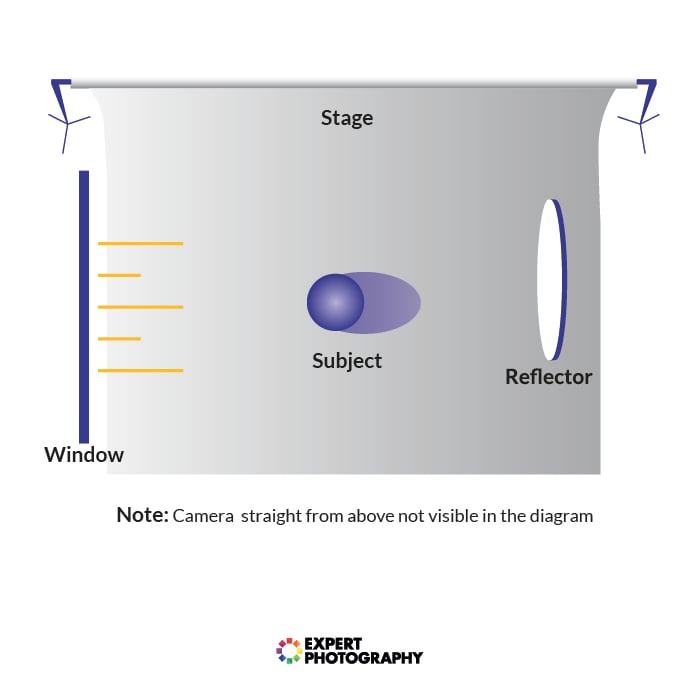
1. Low-Key Setup
For low-key photography, I prefer to work in low light. I build my set with two pieces of black cardboard. The one I use for the stage (50 x 70 cm) has a glossy finish, while the one for the background (100 x 70 cm) is matte.
The flash is off-camera on its light stand. And I usually place it on the front or side of the set. This setup is like the one used in the fourth case study. And the resulting photo is shown below.
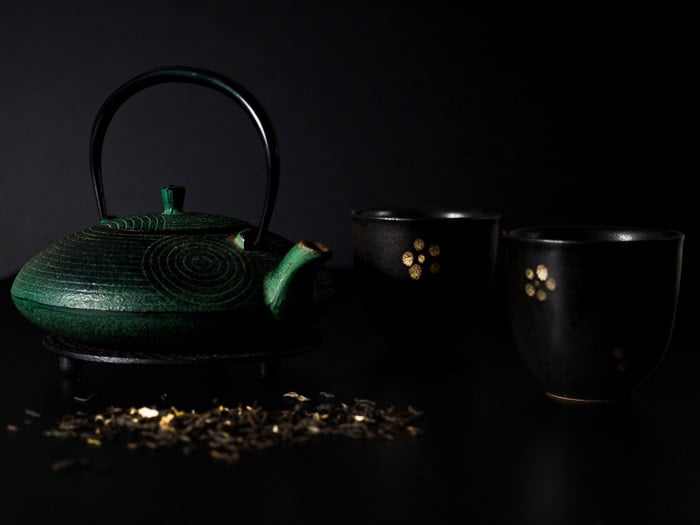
Note the texture and etchings on the cast iron teapot are clearly visible.
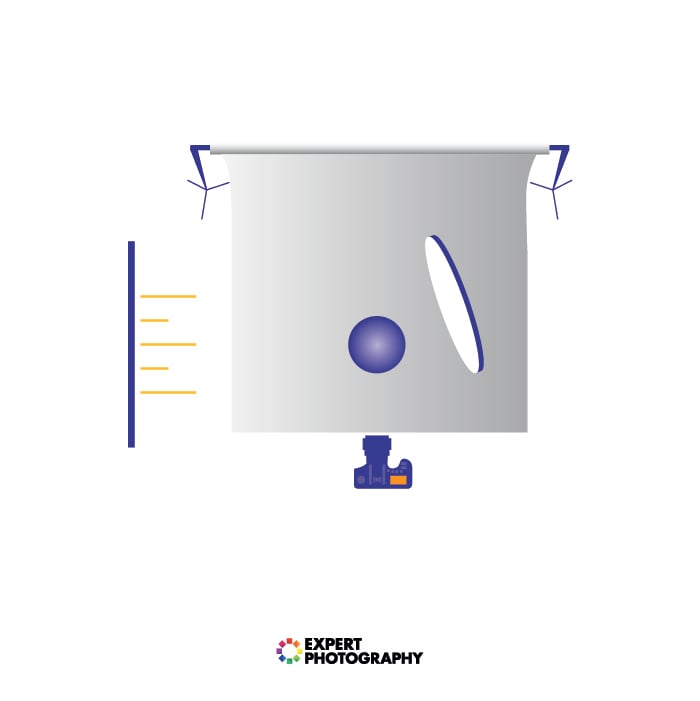
2. High-Key Setup
This is my typical setup for high-key photography with two pieces of white cardboard. The one for the stage (50 x 70 cm) is resting on a coffee table. The background (100 x 70 cm) is vertical and on a footrest.
The setup is next to a window to ensure a good amount of natural light to work with. It is best to avoid windows exposed to direct sunlight because of the harsh light that will land on your set. Overcast days are the best since the sky will act as a huge softbox.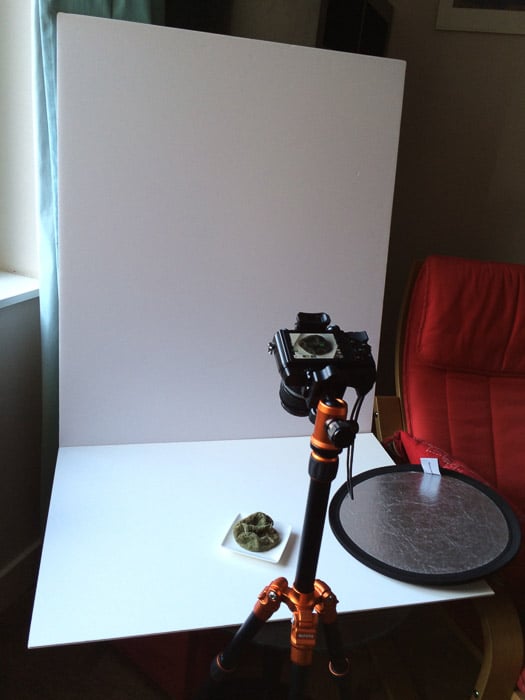
3. Fill-Light Setup
In the photo above, you can see my small Lastolite double-sided silver and white circular reflector. I use it to soften the shadows by bouncing some light back into the scene.
The photo below compares a scene photographed without a reflector (left) and with a reflector (right). As you can see, the shadows in the right image are softer when the reflector is used, and the scene is more pleasant.

Still Life Photography Focusing
First of all, forget autofocus and go with manual focus. You want absolute control of what is in focus and what is not.
If your camera has it, use Live View and turn on any possible manual focus-assisting function you have. This could be image magnification, focus peaking, or combining the two.
For a shot with a narrow (shallow) depth of field, you need to focus manually and mount your camera on a tripod. Use a remote shutter or the self-timer to avoid camera shake.
Be aware of one problem you may face when working with macro or close-up lenses—the very shallow depth of field. Sometimes, you won’t get even a small subject entirely in focus.
Focus Stacking
If stepping down your lens (a smaller aperture is not desirable) or the resulting depth of files is still too narrow, you’ll have to focus stack.
Focus stacking tends to happen in post-processing. But some cameras allow you to do in-camera focus stacking. Several Olympus cameras have this feature, like the OM System OM-1.
In Photoshop, focus stacking is done by selectively merging some photos. Each photo is focused on a different part of the scene. This technique involves loading your images into Photoshop as layers. You then mask the unwanted parts of the images before merging the layers to create the final image.
For example, consider the photo below—an overhead flat lay of some of the finest Belgian pralines. To get this final image, I had to focus stack three different photos to get all the different elements in focus.
The first photo had the wooden board in focus. The second one focused on the coffee beans to the right. For the last one, I focused on the pralines.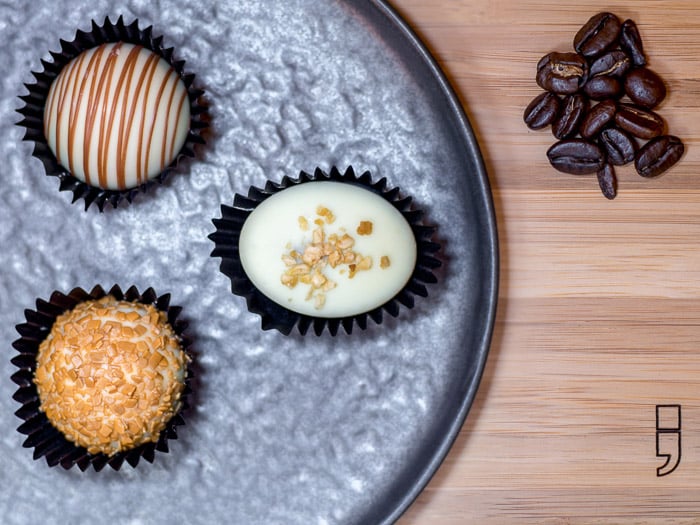
Still Life Photography Ideas
Looking for inspiration for your still life photography? Here are a bunch of easy and fun ideas to try at home.
Create metaphors by comparing dissimilar subjects with a detail in common, like color or shape. Turn oranges into balloons or use a CD as the Earth.
Make dimensional typography from objects like flowers, clips, or spices. Arrange items in patterns, like sweets or leaves, and break the rhythm with different colors. Pick an object like coffee and create 15 stories around it.
Tell a story about a person through the objects on their desk. Draw with chalk to transform ordinary items into a new scene. Flowers are a perfect still life subject, especially when telling a story.
Still life photography ideas are endless, so let your imagination run wild and have fun!
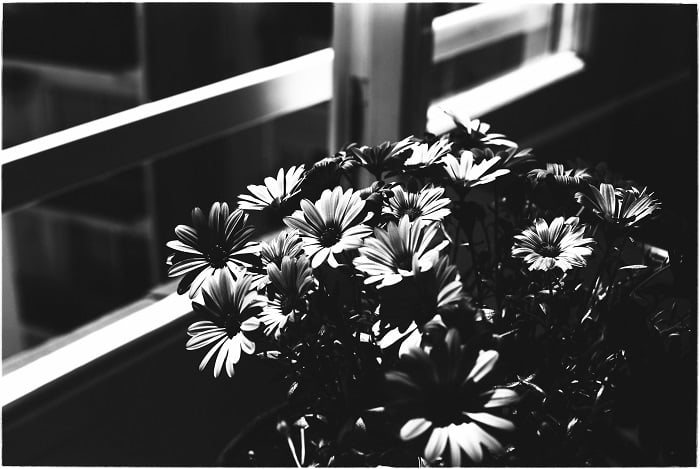
Black and White
Black and white still life photography is a beautiful way to capture the simplicity of inanimate objects. By removing color, you can focus on the textures, shapes, and lines of your subject.
Low key lighting with natural light from a window or a soft sidelight works well for emphasizing these elements.
Even the most mundane objects can become works of art in black and white. Look around your home or garden for subjects that tell a personal story, such as antique objects, jewelry from an elderly relative, or your favorite food.
Use simple compositions that don’t distract from the shapes, lines, and textures.
Fine-tuning your images in post-production is an important final step. Adjust the HSL color sliders in Lightroom or Camera Raw to lighten or darken parts of the photo and change the mood of the image.
With black and white still life photography, you can push the boundaries and get creative.
If you’d like to learn more about black and white still life photography, this blog post is a must-read resource.
Smoke
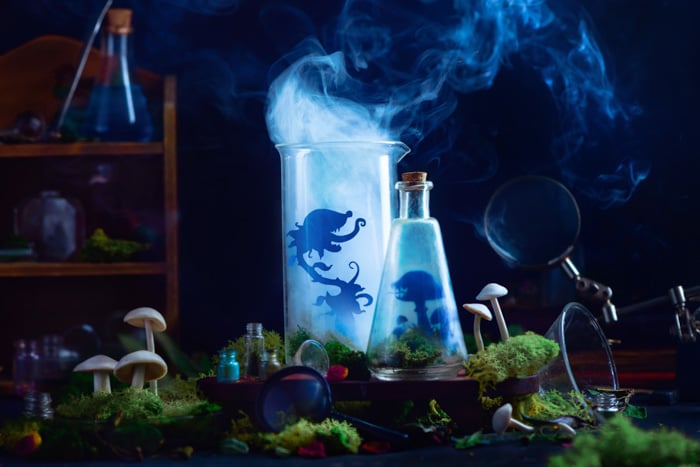
Creating smoke for photography is a fun way to add drama and atmosphere to your images.
You’ll need a few props like a glass jar, incense sticks, paper silhouettes, and a dark background. Arrange your scene with the largest objects first, then add smaller details to create a mystical feel.
Lighting is key for capturing smoke. Place your main light source behind the scene to make the smoke glow and outline the silhouettes. You can use a second light or reflector to fill in shadows.
Light the incense, let the smoke fill the jar, and snap away. Experiment with different amounts of smoke and camera settings to get the look you want. In post-processing, make simple adjustments like boosting contrast and fixing any overexposed areas.
To learn more about make smoke for photography, check out this in-depth article.
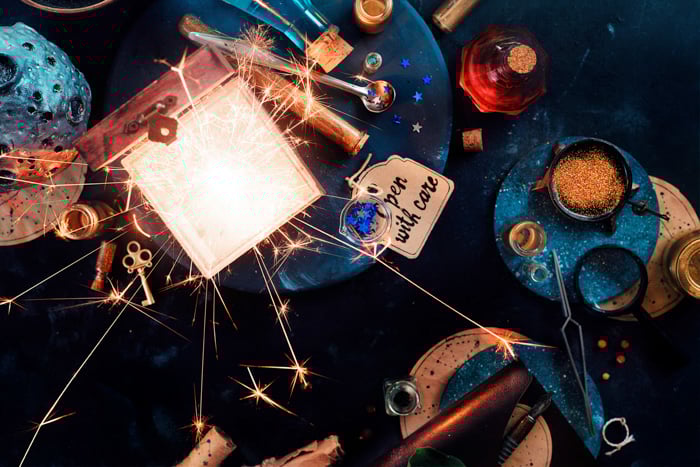
Sparklers
Sparkler photography is a fun and creative way to add magic to your still life images.
To get started, gather your props, sparklers, and camera gear. Create a story with your still life setup, building it one object at a time.
Use two light sources to illuminate your scene, but be careful not to overexpose as the sparklers will also provide light. Keep the sparkler steady to prevent motion blur, and adjust your camera settings for well-exposed photos.
Experiment with shutter speeds between 1/100 to 1/10 second and use burst mode to capture the perfect moment.
Try photographing sparklers inside jars or making glowing figures with tracing paper. Post-processing is minimal, focusing on choosing the best shot and adjusting tone and contrast.
With these sparkler photography techniques, you can create stunning and magical still life images.
Christmas Ideas
Christmas is a magical time for still life photography. Capture the cozy feeling of steaming hot drinks with backlight to make the steam shine. Arrange star-shaped cookies in a flat lay with tea cups, cinnamon, and fairy lights.
Build a classic gingerbread house and use it as a prop to tell Christmas fairytales. Light up your composition with sparklers using a shutter speed of 1/60 s or 1/20 s and burst mode.
Create still life photography Christmas cards with festive letters made from gingerbread, sprinkles, or candy canes.
Tell stories of presents and surprises using smoke, silhouettes, and colorful Holi powder. Add snow to your scene with flour or powdered sugar.
Capture miniature scenes with tiny Christmas trees or LEGO people. Experiment with Christmas drink photography by making marshmallows or berries fly in a spiral.
Christmas still life is a great way to have fun and tell magical stories through your photos.

Gear for Still Life Photography
A professional still life photographer may need a suitable setup and expensive equipment. But you can still take amazing photos with basic equipment in the corner of your living room.
Keep costs low by getting creative and crafting DIY accessories and solutions to get your desired shot. Below is a list of the materials and equipment you need to begin tabletop and still life photography.
Required Equipment
- Camera: A digital camera is cheaper to run, and you can have immediate feedback. But nothing is stopping you from using your film camera.
- Lenses: A telephoto lens or a fast standard lens like a 50mm f/1.8. Old, manual lenses are good and usually cheap.
- Reflectors: Small silver and white light reflectors bounce light back into the scene. These can be easily built using tinfoil and cardboard.
- Scene Materials: Different materials to create the floor and background of your scene.
- Props: Look around your house or visit a flea market for interesting props that enhance the scene. You can read our posts about food and product photography props for still life prop ideas.
Lenses for Still Life Photography
A macro lens is a valuable tool for still life photography. It allows you to capture stunning close-up details and create beautiful background blur.
The most common focal lengths for macro lenses are 60mm, 90mm, 100mm, and 105mm. A 60mm macro lens is a great choice for cropped sensor cameras, while a 90mm or 105mm lens works well on full frame cameras.
When using a macro lens for still life photography, don’t just use it like a traditional macro lens. Step back and capture more of the scene to tell a story.
Shoot a range of apertures to get the right amount of detail and blur. Play with distance and angles to find unique perspectives.
If you’d like to learn more about lenses for still life photography, you have to see our full article.
Recommended Equipment
- Macro Lens or Close-Up Lens: You can get away with a set of close-up lenses. Since I do not own a macro lens, I usually work with a +2 and +3 close-up lens. They reduce the minimum focus distance of my lenses.
- Flashgun: Ideally, the flashgun can be used in manual mode and has adjustable power. We recommend the Godox V860III for Canon, Nikon, Sony, Fujifilm, Olympus, and Panasonic.
- Softbox: This is for your flashgun. I use the Neewer Translucent, a wonderful, affordable, compact softbox.
- Tripod: You should have at least one. A second one might be necessary if you want to mount your flashgun instead of using it handheld.
- Wireless Trigger or E-TTL Cord: This is to enable flash off-camera. The cord should be fairly long, like with the Pholsy E-TTL.
I usually use an old manual, Olympus 50mm f/1.4, and the Sigma Art 30mm f/1.4, which are super sharp and cheap lenses. I use those lenses on a Micro Four Thirds camera with a 2x crop factor.
This means these lenses are equivalent to 100mm, 60mm, and 120mm on full-frame cameras. Generally, you are better off staying between the 50 and 120mm focal range for still life and product photography.
Still Life Photographers
Here are 10 contemporary still life photographers to follow in 2026. Each has their own unique style that can inspire your own still life photography.
Jonathan Knowles is an award-winning advertising photographer known for his unique lighting techniques. Jenny Van Sommers creates quirky and innovative images for clients like Apple and Nike.
Mat Collishaw’s often confronting work has been featured in famous art institutions worldwide. Henry Hargreaves is known for his funny and edgy still life food photography.
Evelyn Bencicova uses symbolic elements to create images with hidden depths. Still life photographers like these can provide plenty of ideas and inspiration to improve your own photography.
© Gareth Paul
Conclusion: Still Life Photography
You do not need to invest much money to wet your feet in still life photography. You can create your own little home studio with just a few simple pieces of equipment.
And you can find many everyday items around the house to begin shooting. Tabletop and still life photography are both very accessible types of photography. We hope we have inspired you to give it a try!


