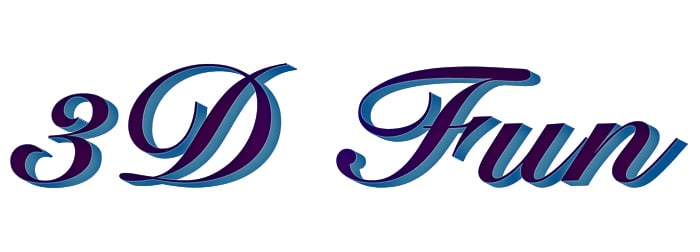
It is easy to add text to your photos in Photoshop. Simply click on the Type tool and start writing. But what if I told you that you could create cool 3D text in Photoshop with a few more steps.
Adobe is removing 3D effects from Photoshop. If you use these controls, you get a warning that 3D effects are unstable. But this does not mean you cannot create 3D text with some easy Photoshop techniques.
In this step-by-step tutorial, I’ll show you how to make 3D text in Photoshop without using tools in the 3D workspace. Making pop-out 3D text in Photoshop is easy once you see the underlying process. We will even show you a few shortcuts to make the process a breeze. You have a lot of flexibility in how the 3D effects look, so feel free to be creative!
Step 1: Make 3D Text in Photoshop by Creating a New Document
Start by opening Photoshop and creating a new document. Go to the File drop-down menu. Select File > New (Ctrl+N or Command+N). In the New Document dialog box, enter a size for the new document.
Let's create a document that is a good size for social media. Enter 1350 pixels for the width and 1080 pixels for the height. We will add a background later. But for now, make the “Background Contents” transparent.
Click Create.
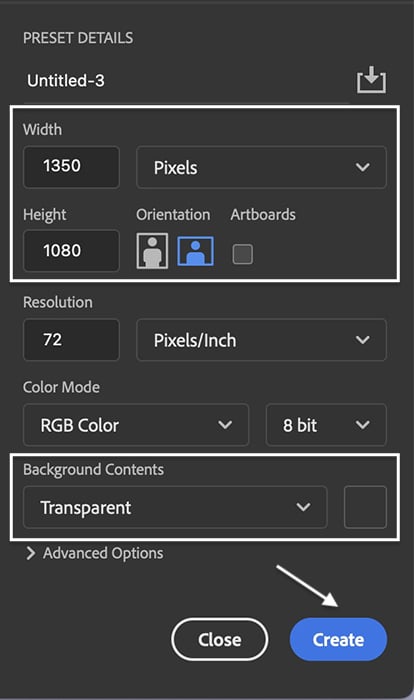
Changing document size and making a transparent background.
Step 2: Rename Layer in the Layers Panel
It is important to keep track of which layer is the top layer. Select “Layer 1” and rename it "Top Layer."
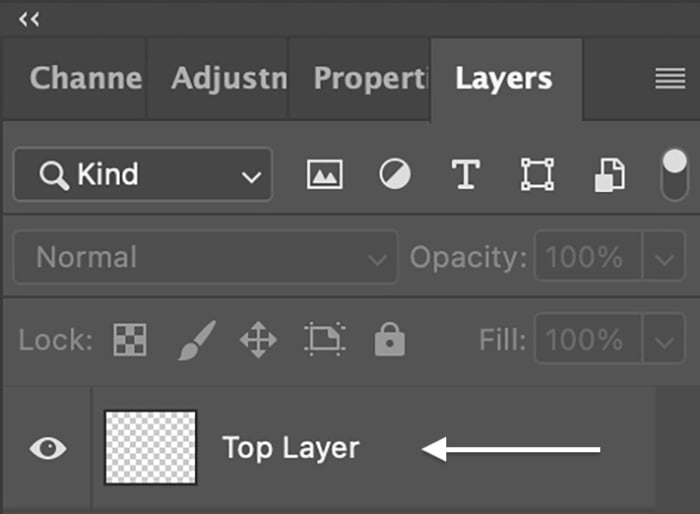
Renaming layer.
Step 3: Create a Text Layer
Select the Type tool and add text to the “Top Layer.” You can type anything you want. Have a little 3D fun!
Then select a font. You can choose any font you want. But the best has a thick stroke.
In the Options bar, select the bold option if the font has this. Select a color and size your text to fit the canvas. I selected Snell Roundhand bold and a dark purple color for this tutorial.
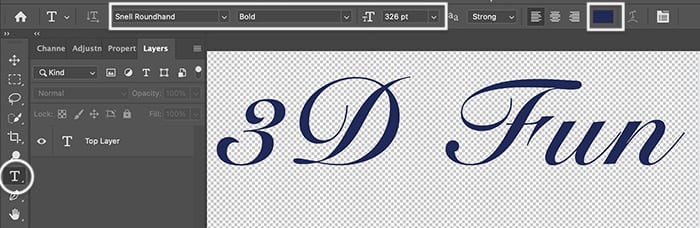
Selecting Type tool, font. style, and size.
Step 4: Convert the Layer to a Smart Object
When you are happy with your font, convert the layer to a “smart object.” Making this a smart object lets you revisit the changes you make. Go to the Layer drop-down menu. Select Layer > Smart Objects > Convert to Smart Object.

Converting layer to a smart object.
Notice that the thumbnail has changed. An icon appears in the bottom right corner showing that this is now a smart object.
Also, this is no longer a text layer. If you want to change the text or the font, make sure to do it before making it a smart object. Otherwise, start with a new layer.
Step 5: Duplicate the Top Layer
Duplicate the top layer by going to the Layer drop-down menu. Select Layer > Duplicate Layer (Ctrl+J or Command+J). Rename the duplicate "3D Effect." In the layers panel, drag the 3D Effect layer to the bottom.
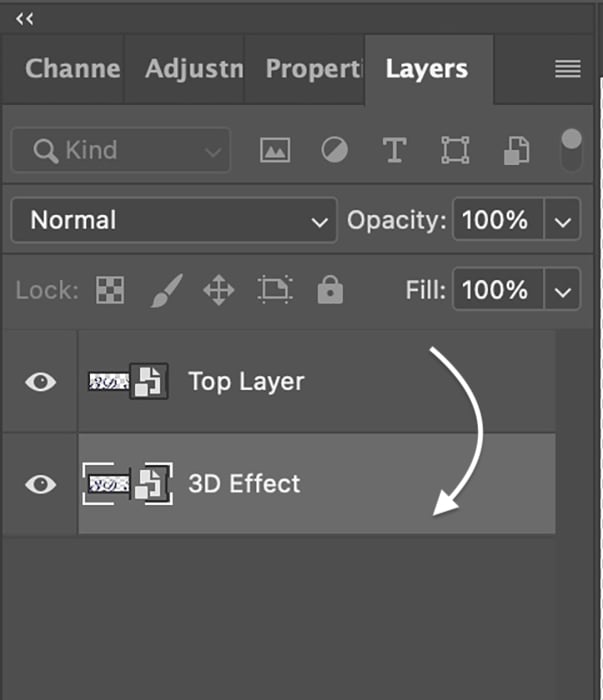
Duplicating and renaming layer.
Step 6: Resize the 3D Effect Layer
We will resize the 3D text and move it slightly off-center to add realistic depth. You can do this with the Free Transform tool. Go to the Edit drop-down menu. Select Edit > Free Transform (Ctrl+T or Command+T). Change both the width (W) and the height (H) in the Options bar to 99.9%. Click the checkmark to accept the change.
Choose the Move tool and drag or use the arrow keys to move the text slightly to the right. Move it just a little. You have gone too far if you start to see white space between the letters (see example circled in red). The text should look just a little thicker.
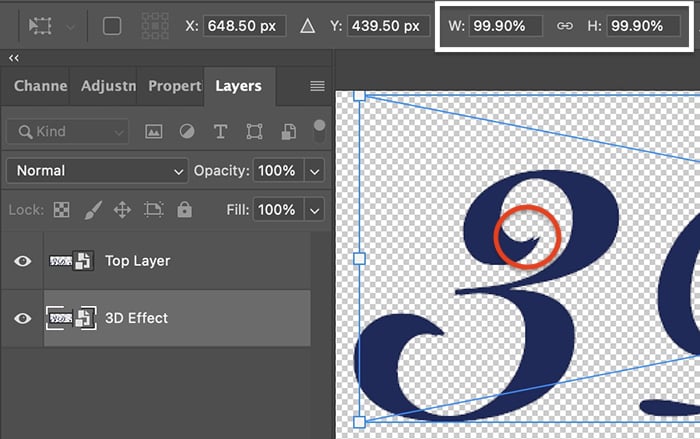
Changing text width and height—and white space you don’t want to see.
Step 7: Make an Action to Repeat Steps 5 and 6
You need to repeat Steps 5 and 6 many times. To make the process easier, create an “action.” Do not worry if you have not worked with actions before. They are simple!
Open the actions window by going to the Window drop-down menu. Select Window > Actions. There may be some default actions listed. But we need to create a new one. Click the Add Action button at the bottom of the window. It looks like a plus sign.
Name the action “3D Effect” and click “Record.” The Record button will activate. Do Steps 5 and 6 again. (Duplicate the top layer. Pull it to the bottom of the Layers panel. Select Free Transform and resize it to 99.9%. Move the text slightly off-center.)
When you finish, click the “Stop recording” button at the bottom of the Actions window. It looks like a square. You should now have a 3D Effect action on the list.
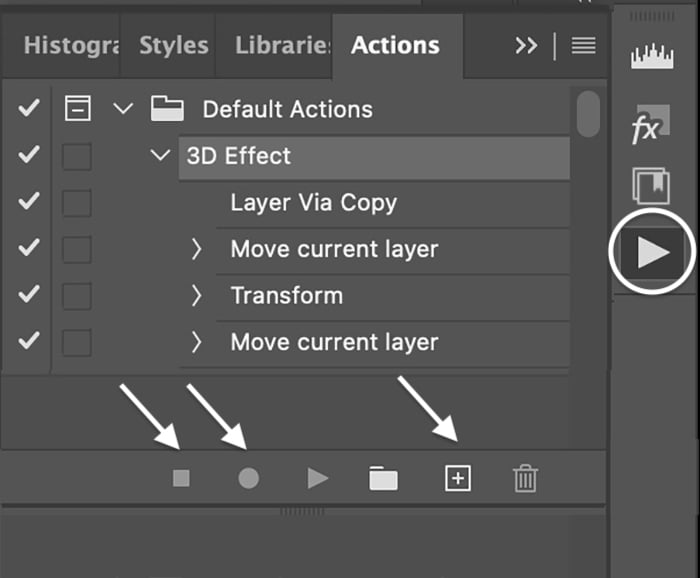
Stop, record, “Create new action,” and play buttons.
Step 8: Use 3D Effect Action to Create Duplicate Layers
Select the first 3D Effect layer. Click the Play action button at the bottom of the Action window. It looks like a triangle. Click it as many times as you want to thicken the 3D text. You will probably want somewhere between 10 and 20 copies. Later, if you decide that the 3D text is too thick, simply hide the bottom layers by clicking on the eye icon.
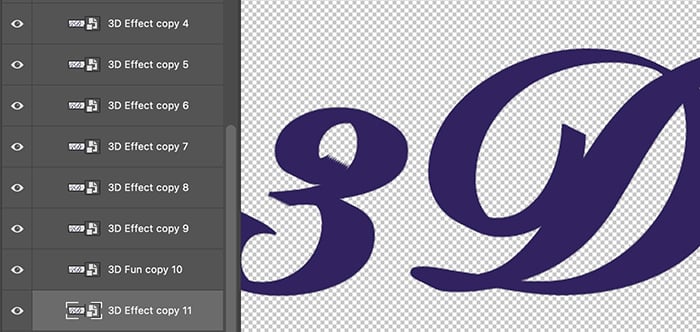
Thickening 3D text.
Step 9: Group 3D Effect Layers
Select all the 3D Effect copies. Go to the Layer drop-down menu. Select Layer > Group Layers (Ctrl+G or Command+G). Rename the group "3D Effect."
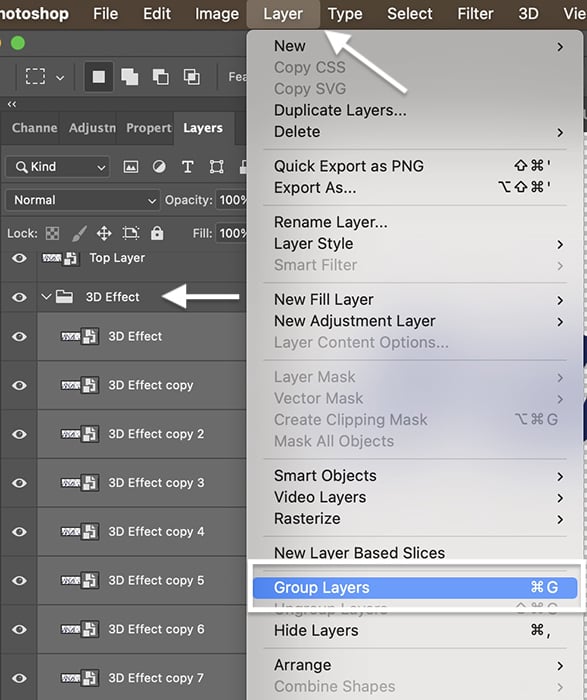
Grouping layers.
Step 10: Add Layer Style Effects to the 3D Effect Group
Right now, the 3D effect is the same color as the top layer. It looks like you have simply thickened the font. Adding style effects to the 3D text will add depth to the effect. We can do this for each individual layer. But it is easier to add the styles to the whole group. I will show you the settings that I use. But be creative and let your eye guide your choices.
Double click the 3D Effect group to open the Layer Style dialog box. Because you are working with a smart object, you can go back and change any of the layer styles if you want a different color or a different look. Let's start by adding color to the 3D text.
Step 10A: Add a Color Overlay
At the bottom of the left-hand column, click the “fx” button. Choose “Color Overlay” from the menu. And set the blend mode to “Normal” with 50% opacity.
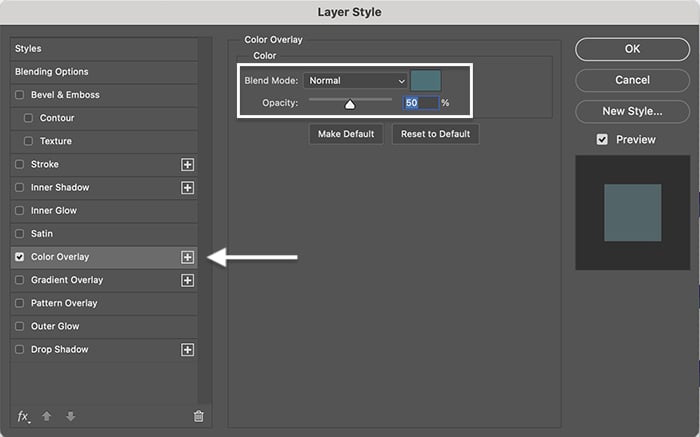
Adding color overlay and changing blending mode and opacity.
Select the colored box to open the color picker. One option is to make the 3D effect layers slightly darker or lighter than your chosen color. Use the eyedropper tool to select the original text color. Then move the hue up or down along the spectrum. You will see the colors change in your image.
Initially, I chose a hue slightly lighter than my original color. But then I decided to use a contrasting color. You can even add texture. Choose any color that looks good to you.
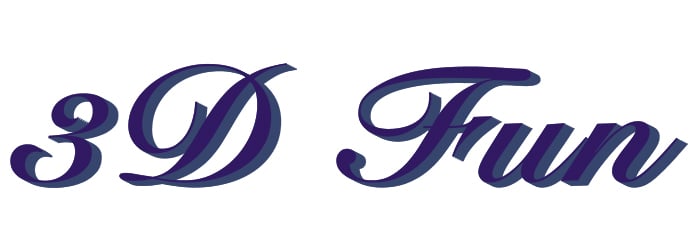
Color overlay result.
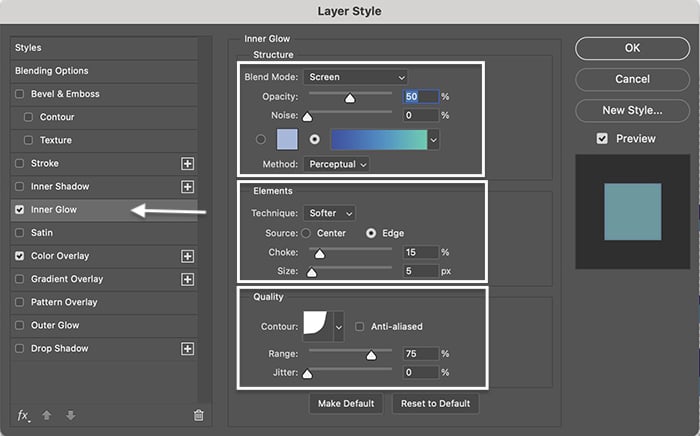
Step 10B: Add an Inner Glow
Before you click OK, let's add a bit more depth. Select the Inner Glow option in the left-hand column. Set the blend mode to “Screen” with 50% opacity. You can keep the solid color or add a gradient. Under “Elements.” set the following:
- “Technique” to “Softer”
- “Source” to “Edge”
- “Choke” to 15%
- “Size” to 5 pixels
Adding inner glow settings.
Under “Quality,” I like the Cove-Deep contour (fourth choice on the top row). But other contours work. Set the range to 75%.
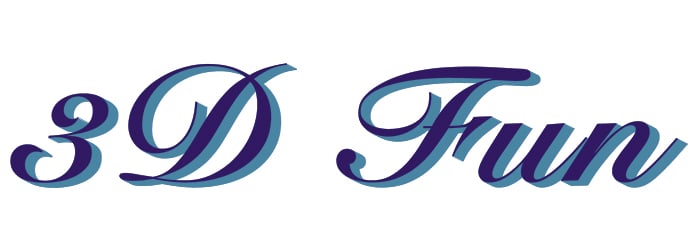
Inner glow result.
Step 10C: Add an Inner Shadow
Finally, let's add a shadow to the 3D text. Choose “Inner Shadow” in the left-hand column. Set the blend mode to “Vivid Light” with 35% opacity. Set the angle to 90°, and check the Use Global Light box. Distance is 5, choke is 15, and size is 35 pixels.

Adding inner shadow settings.
The linear, default quality contour is fine. But feel free to experiment with other contour options.
Click OK to apply all style effects. You will see each listed below the 3D Effect group. Toggle the eye icon next to each to see the effects in isolation.
The final result of adding the Layer Style effects to the 3D Effect group.
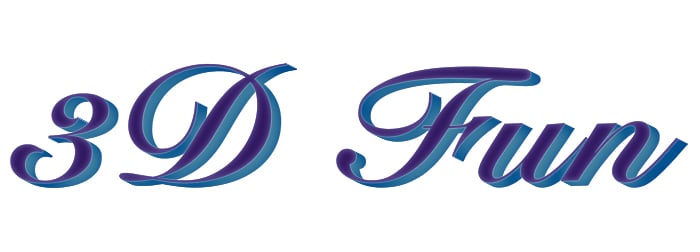
Step 11: Add Style Effects to the Top Layer
Now, let's make the original text really pop out from the 3D effect. Double click the “Top Layer” to open the Layer Style dialog box.
Step 11A: Add a Light Stroke
Start by adding a light stroke to the edge of the letters to define the top layer. At the bottom of the left-hand column, click the “fx” button. Choose “Stroke” from the menu. Set the size to 1 pixel, position to “Outside,” and blend mode to “Lighten.”
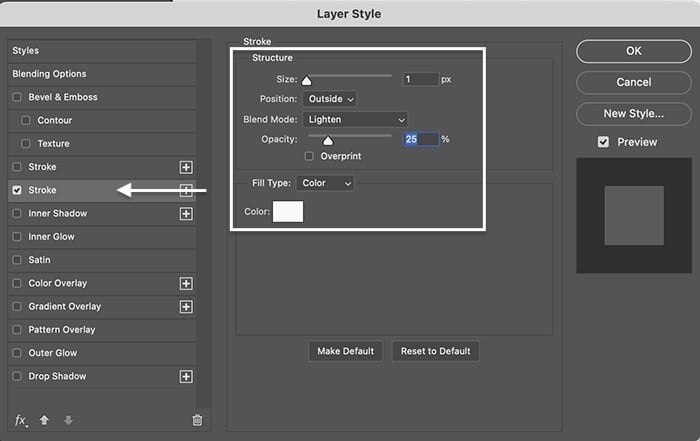
Adding stroke settings.
Select “Color” for the “Fill Type” and click the Color box to select a color. Choose a white or a lighter version of the hue you chose for the text.

Light stoke result.
Step 11B: Add an Inner Glow
Select the Inner Glow option in the left-hand column. Set Blend Mode to Screen with a 35% opacity. Under elements, set the technique to “Softer,” source to “Edge,” choke to 0%, and size to 15 pixels. Under “Quality,” use the default linear contour. Set the range to 50%.
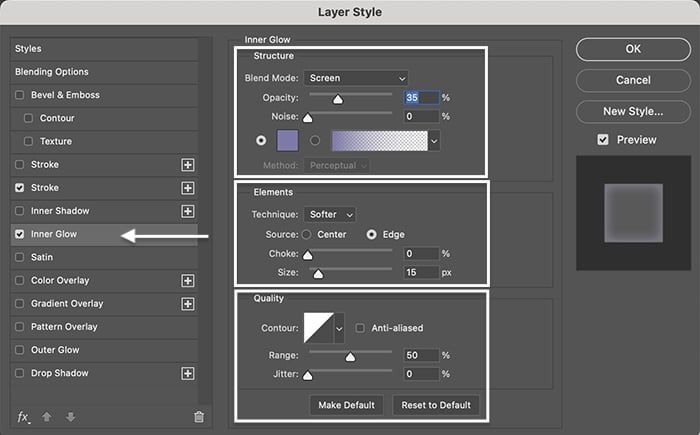
Adding inner glow settings.
Second inner glow result.
Step 11C: Add a Gradient Overlay Layer Style
For even more dimension and color variation, select the Gradient Overlay style. Set the blend mode to “Overlay” with an opacity of around 20%. Select a gradient from the default options included with Photoshop or create your own. Set the style to “Radial” and use an angle of around 30°.
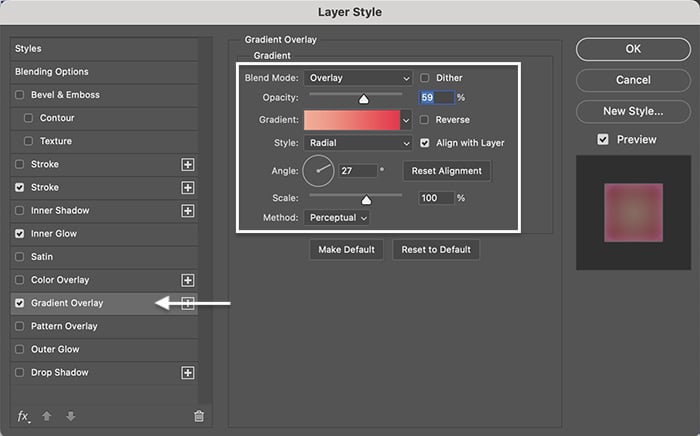
Adding gradient overlay.
Click OK to apply the style effects to the top layer. Remember that you can change the style effects later. So, be adventurous and explore!

The final result of adding the Layer Style effects to the top layer.
Step 12: Warp or Change Text Shape and Perspective
From here, you can warp the 3D text or change the perspective. Merge layers by selecting the “Top Layer” and the 3D Effect group. Hold the Shift key and press Option (Alt), Command (Ctrl), and the E key. Hide the “Top Layer” and the 3D Effect group by toggling off the eye icon next to the layers.
Go to the Edit drop-down menu. Select Edit > Transform > Perspective. Handles appear around your shape. Grab a handle and drag. Pulling up on the corners in the Perspective Warp tool creates the effect that the letters are coming closer.
Select Warp instead of Perspective, and you can change the shape of the text. When you are happy with the shape, click the checkmark in the Options bar to accept the changes.
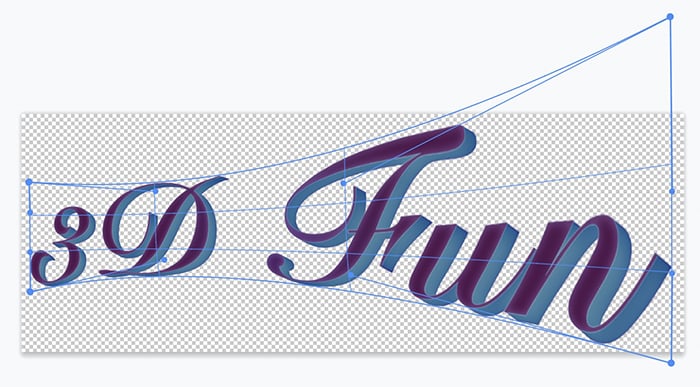
Perspective and warp results.
You have not changed the original layers. To create a different shape, make a new merged layer.
Step 13: Add a Background Layer
Finally, add a background to your text. Go to the Layer drop-down menu. Select Layer > New Fill Layer and choose either “Solid Color” or “Gradient.” Name the fill layer "Background." Drag the fill layer to the bottom of the layer panel.
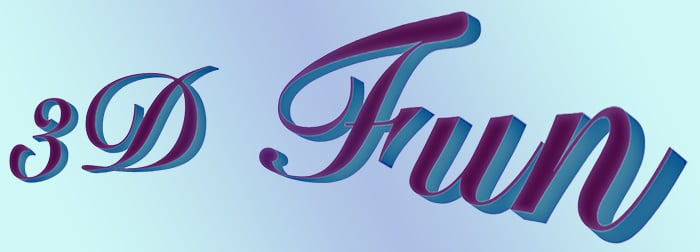
Gradient background result.
Conclusion
You do not need 3D tools to create a cool 3D text in Photoshop. You can easily create multiple text layers to add depth. Use the Layer Style tools to add dimension and separate the top layer from the 3D effect layers. Built into the easy steps of how to make text 3D in Photoshop is room for a lot of personal creativity!
Try out our Effortless Editing with Lightroom course for step-by-step edits for magazine-quality photos!


