A monitor that is not calibrated correctly can cause all sorts of problems when you are editing photos. Colors may be off, the image may be too bright or too dark, and you may not be able to see all the details in your photos. In order to get the best results from your photo editing software, it is important to calibrate your monitor on a regular basis. Here are some tips on how to calibrate a monitor for photo editing.
How to Calibrate a Monitor for Photo Editing: What is Monitor Calibration and Why Do It?
In plain terms, to calibrate your monitor means ensuring that the colors, brightness, contrast, and vibrancy are true to life.
Monitor color calibration compares your monitor to an accepted standard so that there can be consistency in how images are seen.
If all monitors were calibrated, then a photo would look the same regardless of what screen it’s shown on.
While it’s a good idea to calibrate your monitor when you first purchase it, the output also changes over time. Lights weaken, which can alter how the colors look.
For this reason, it’s a good idea to calibrate your monitor regularly to make sure its output is consistent.
Calibrating your monitor is a good idea no matter what your profession. As a photographer, though, it’s especially important!
Monitor color calibration ensures that the edits you apply to a photo are accurate. It also helps ensure that the picture looks good on social media and other calibrated monitors.
Finally, monitor screen calibration gives you peace of mind that any prints will come out looking exactly how you want them to.
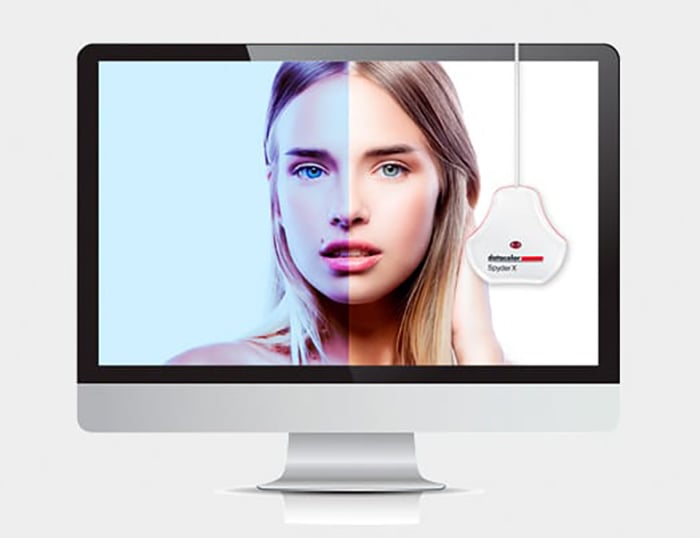
Without calibration, your color temperature can be very off and can throw off prints or shared photos. (Photo courtesy of Datacolor)
How Do You Calibrate a Monitor?
There are various options for how to calibrate a monitor. Built-in and online options are free to use, or you can step things up a notch by purchasing a kit.
You can use:
- Built-in calibration methods
- Online calibration tools
- Calibration kits
Built-In Calibration Methods
Windows and Mac computers have built-in calibration tools. These tools help counterbalance any factory inconsistencies.
The tools available and depth of calibration will vary from model to model. If you’re not ready to invest in a calibration kit, this is an excellent first step at no charge!
For Windows
In Windows 10, right-click on the desktop and select Display Settings from the drop-down menu. Once the pop-up window appears, scroll down to Color Calibration under the Related Settings menu.
Once the calibration tool opens, it will guide you through each step.
First, it will have you adjust the gamma, then the brightness, followed by the contrast and color.
Windows walks you through each one and gives you samples of what to look for. This guidance means that you don’t have to know what each setting is, as long as you can match what they show you.
After walking through each step of the calibration tool, you’ll want to select the current calibration and then click "Finish". This will save the calibration that you did as ICC (International Color Consortium) profile.
If you’re not happy with the calibration, you can click “Cancel” in this window, and it will undo the calibration.
Windows has a simple built-in calibration tool to get you started. (Photo by Ben Andrews)
For Mac
To find the calibration tool in a Mac, go to System Preferences > Display > Color > Calibration. This will open up a tool that walks you through each step of calibrating your monitor.
This tool guides you to adjust the white point first. You can check the box for Use Native White Point, or you can manually adjust it.
The type of display monitor that you have will dictate whether you have more settings to adjust in the calibration tool. If you do have more settings, it will be for things such as gamma and contrast.
Once you’ve made the possible adjustments, Apple creates a new color profile based on your new settings. In the final section of the calibration tool, you assign a name to the new profile before saving.
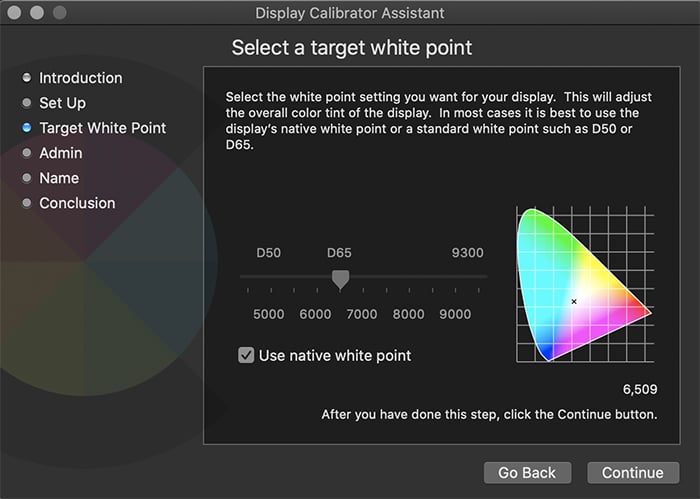
Macs have a simple calibration tool built in. Depending on your display type, adjustment options can vary.
Online calibration tools
Calibrize
This is a free online tool that you download. It lets you adjust the brightness and contrast, the gamma, and the white point.
When you finish customising, it saves the new color profile for you to then apply for your monitor.
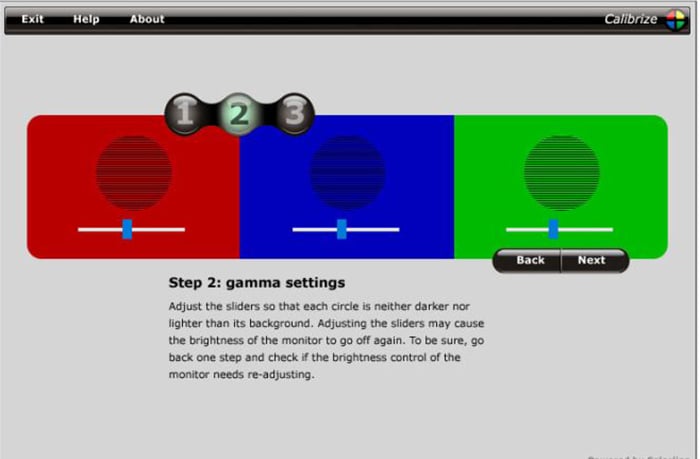
Calibrize has a simple interface that walks you through several adjustments. (Photo courtesy of Calibrize)
Photo Friday
If you’re looking for a super quick visual check for your monitor, Photo Friday is it.
It’s free and consists of a straightforward landing page with shapes and tones. The instructions are simple, and you can quickly check your monitor’s calibration.
The downside is that it’s such a simple tool that it doesn’t walk you through adjusting each separate setting of your monitor.
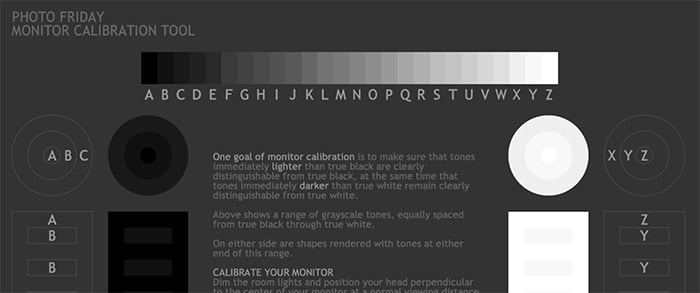
Photo Friday is easily the quickest and simplest tool to use for to calibrate monitor. However, it’s also the most basic.
Lagom LCD Monitor Test Pages
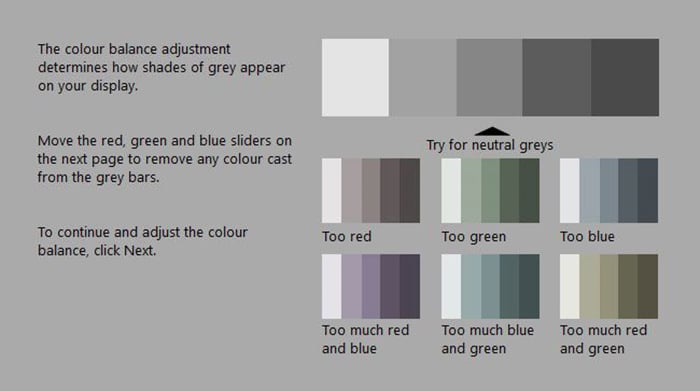
Lagom LCD Monitor Test Pages is the most in-depth free online monitor calibration tool. It has a series of pages with images that allow you to test different things such as black level, gradient, inversion, and contrast level. It’s got clear, simple instructions for each screen, which makes this a top choice for free online calibration tools.

Lagom LCD Monitor Test Pages offers a wide variety of checks for your monitor.
Calibration kits
The free tools are a fantastic start to calibrating your monitor, but they rely on you to make adjustments.
This means that any calibrations you make are based on how you interpret colors and contrast, which leaves room for error!
Using a calibration kit is the best way to ensure that the monitor will be well adjusted.
While these products do take a bit of financial investment, they’re well worth the cost for professional photographers.
The two leading brands that stand out in the world of monitor calibration are X-Rite and Datacolor. X-Rite has the i1Display Pro ($285) ($285) which is an entry-level monitor calibration product that delivers high accuracy.
Datacolor’s entry-level monitor calibration kit is the SpyderX system ($170). It offers its high-accuracy calibration in under two minutes. This option is excellent for professional photographers investing in monitor calibrators.

The SpyderX system from Datacolor is a great first investment in monitor calibration gear. (Photo courtesy of Datacolor)
Conclusion
Monitor calibration can make a massive difference in the quality of work produced, yet it often gets overlooked!
There are free tools available within your computer and online to get you started.
Once you’re ready to invest, a calibration kit is well worth the cost. It will save you time and ensure accurate and consistent output.
We have great articles on understanding color management or color temperature check out next!


