Astrophotography post processing isn’t easy. There are so many things you can do to your photos to improve them, it’s hard to know where to start. In this article, I’ll walk you through the basics of astrophotography post-processing and show you how to get great results with just a few simple steps.
Astrophotography Post Processing Technique: Image Stacking
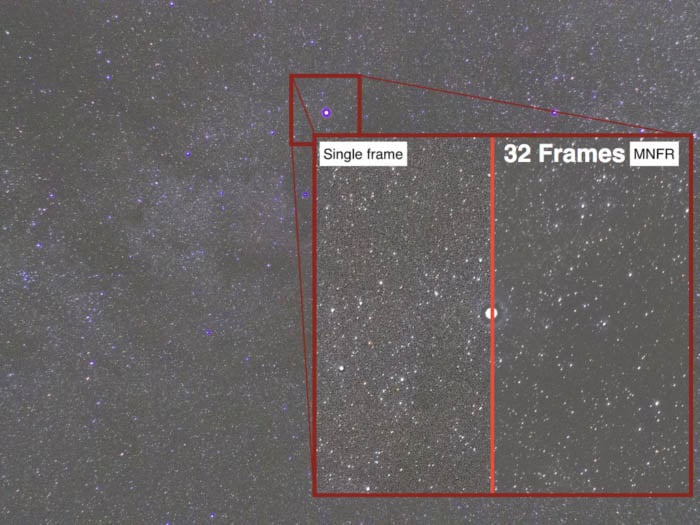
Image stacking is the process to combine all your light and calibration frames into a single image. This is the only step that is central to editing any kind of astrophotography.
Stacking increases the signal-to-noise ratio, giving a cleaner and more detailed image.
In The Field
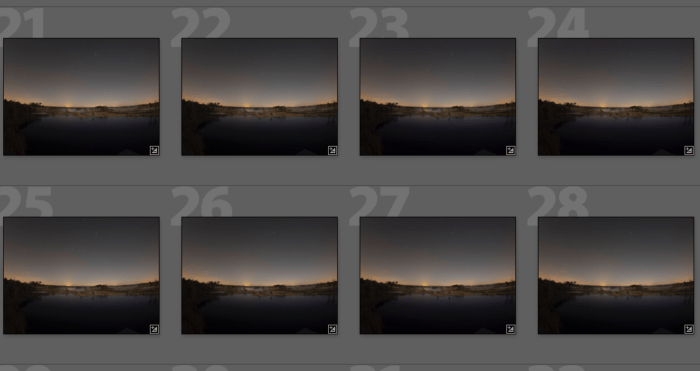
The work for image stacking begins in the field. Whether you are after a starry landscape or a faint nebula, take as many images (light frames) you can of your target.
While you are packing your stuff, take some dark frames. These will come in handy later on. Don’t forget to take them at the same temperature as your light frames.
At Home
Image stacking consists of three steps: image calibration (optional), alignment and stacking. Luckily, software is available to help you with the process.
Editing Strategies In Astrophotography
Since there is not a single workflow that will fit all cases, I will break down the subject in four case studies. For each case, I will focus on the key steps of the editing workflow.
Software
Dedicated software such Pixinsight is great, but such software usually has a steep price and learning curve.
The software I will suggest to you in this guide is mostly freeware and easy to use. The rest of the editing will be carried out in Adobe Photoshop and Lightroom.
Case Study I: Starry Landscapes

Starry landscapes are probably the first kind of astrophotography you will attempt.
Useful Software
The main difficulty in editing is to deal with a dynamic sky and a fixed foreground. Stars move between the different images, but the landscape does not.
Some useful software for stacking is:
- Starry Landscape Stacker (free trial available, Mac OS X). This wonderful piece of software will make stacking an absolute painless process. The drawback is that RAW files are not supported. You need to convert them in TIFF with Adobe Camera RAW or similar software;
- Sequator (free, Windows): as Starry Landscape Stacker, this software makes image stacking easy. It supports RAW files.
Finally, you can use Adobe Photoshop/Lightroom to edit your stacked image. Don’t bother trying to stack in Photoshop. It will probably fail to align your sky.
Editing Workflow
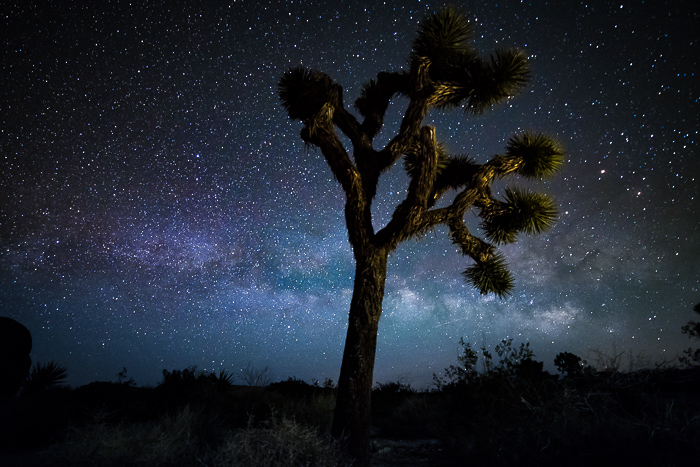
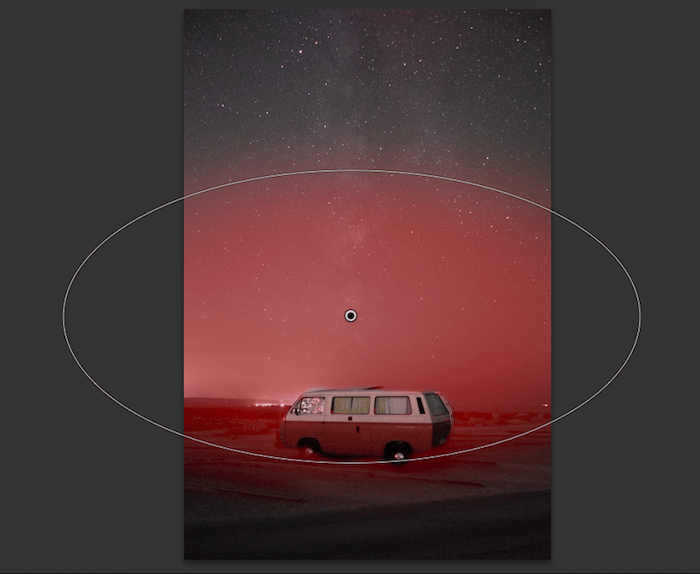
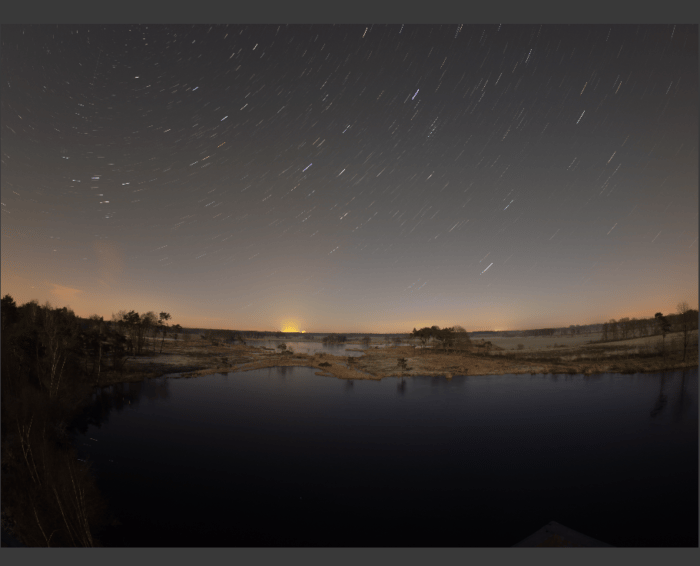
Let’s work with this starry landscape I took in Cap-Blanc-Nez (Calais, France). The sky was moderately polluted, scoring a 5 in the Bortle scale.
Sony RX100 Mk ii on a tripod and set to ISO 6400, 15″, 28mm EFL (equivalent focal length), f/1.8. Single RAW.
Step 1: White Balance, Vignette and Gradients
One of the main problems when shooting starry landscapes is light pollution, particularly low on the horizon. This will cause all sorts of problems with white balance and luminosity gradients.
I like to import my raw files into Lightroom to fix these issues first.
To fix the white balance I start with a general balance for the foreground using the eyedrop tool. Next, I push the saturation and vibrance sliders to +100 to see the different colors in the sky.
With local adjustment tools, I tweak the white balance in the sky to have a more homogenous mixture of purple/green/yellow in the sky.
White balance for the sky.
When I am happy, I set the saturation and vibrance slides back to zero.
To fix vignetting, I boost the contrast to +100and use the vignette slider in the manual lens correction panel.
Finally, I use local adjustment tools to reduce most of the luminosity gradients so the image is as flat as possible.
Reducing luminosity gradient above the horizon with a radial filter.
Finally, I synchronise all my images in Lightroom and export them as TIFF.
Step 2: Image Stacking
The next step is stacking. To do that I use Starry Landscape Stacker.
After loading all the .tiffs, you will see some red dots are placed in the sky. Those dots will mostly be over the stars, but some will be at the horizon or in the foreground.
The dots are the alignment points the program will use to align all the images. Delete those that are not in the sky.
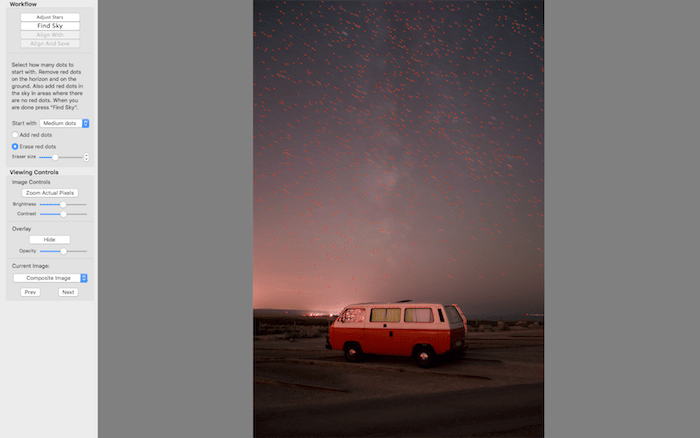
Then, press the “Find Sky” button. All the areas of the image that are considered ‘sky’ will appear in blue. This info will create a sky mask. You can refine the mask by painting in more sky or painting out selected background.
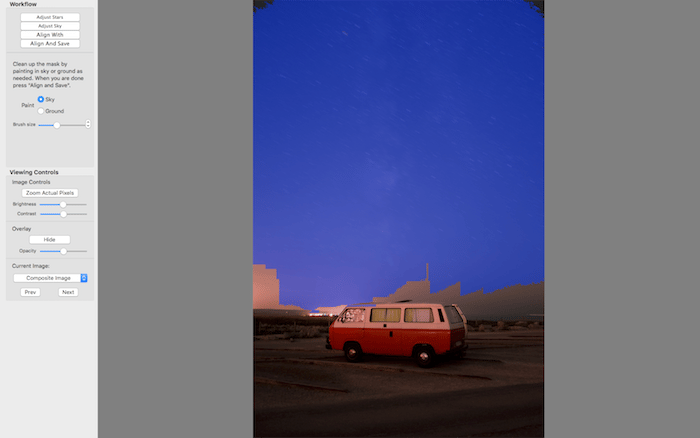
The mask for the sky needs some improvement using the brush tool.
Once done, align the images. This will separate the foreground from the sky, align all the stars to a reference frame and stack the resulting images together.
You can now save the stacked image and the stacked sky as TIFF. Saving the stacked sky can be useful if you have different series of images for the sky and the foreground.
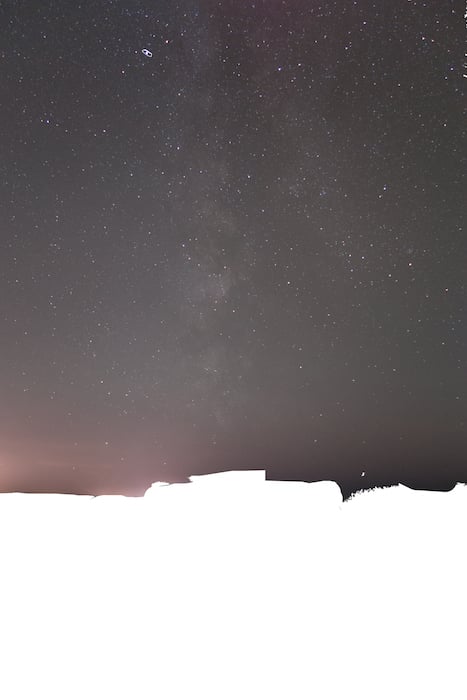
Sky mask.
Step 3: Finishing Touches
I then import the stacked image into Lightroom and/or Photoshop for final tuning. It’s important not to push sharpening, clarity and contrast too far. Try to keep a natural look.

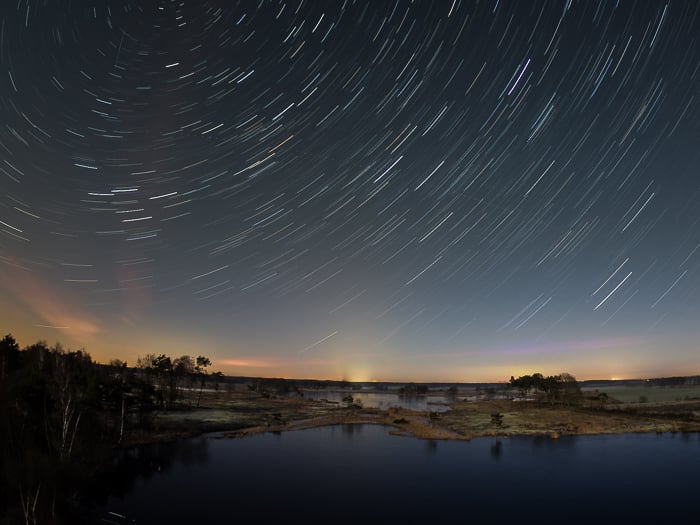
The final image has better colors and more details and less noise than the original RAW file.
Case Study II: Star Trails
Star trail photography is not much different than nocturnal landscapes. The main difference is that you will not try to freeze the stars in the sky, but rather enhance their movement.
In this article I discussed in detail how to photograph star trails.
Useful Software
While you can do everything in Photoshop &Co., StarStax (free, Win/Linux/Mac OS X) will make the whole process a breeze.
Editing Workflow
Step 1: White Balance, Vignette and Gradients
I start my editing by correcting white balance and removing vignette and gradients again.
Step 2: Image Stacking
I import all my TIFF images into StarStax, together with TIFF dark frames, if I have them. These will help remove thermal noise from the single long exposures.

For star trails you can choose blending mode Lighten or Gap Filling. As my intervalometer pauses for 1″ before taking the next image, I always use Gap Filling blending mode.
Remember to check the tick box to subtract dark frames if you have them.
The software will update the image during stacking, so you can see the trails form in real time.
If you are happy with the image, save it in TIFF. Otherwise, you can try changing the parameters for the gap filling (tool icon) or use a different blending mode.
Step 3: Finishing Touches
I then once again import the stacked image into Lightroom and/or Photoshop. This kind of editing is basically the one you would do in classic landscape photography.
Case Study III: The Moon
Who does not love the Moon? As part of a landscape, it can add interest and set the mood of the image, but the real treats are lunar closeups.
I detailed Moon (and Solar) photography in this article.
Useful Software
With lunar close ups we enter in the realm of “real” astrophotography. The main subject of your photo is a celestial body.
PIPP (free, Windows) is a great image pre processing software used in planetary astrophotography.
Registax (free, Windows) and Autostakkert! (free, Windows) are great to stack images of the Moon, the Sun and other planets. On Mac OS you can use Lynkeos (free, Mac OS).
Editing Workflow
Step 1: Preprocessing
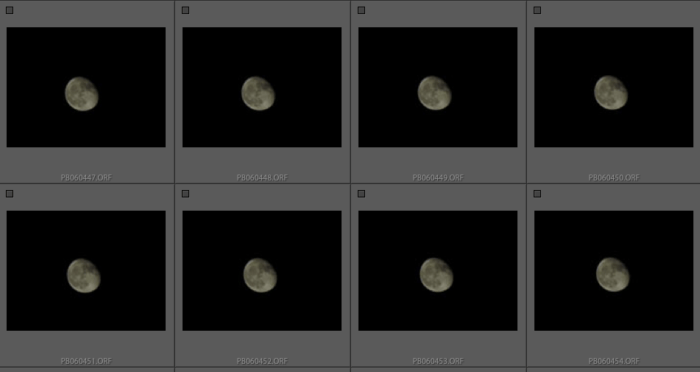
I use PIPP to center the Moon in each frame and to crop the images to the desired size, usually 2000×2000 pixels. I then save the images as AVI video or TIFF.
First load your image (RAW, TIFF, AVI…) into PIPP, then move to the Processing Option tab. Here check enable Object Detection and Center Object in Each Frame. Be sure to select the proper position for the Moon Shadow, so to match the Moon Phase to help the software to detect the Moon.
Finally, check the Enable Cropping option and specify the size for the cropped image.

Then move to Output Option tab and set the output format for the processed images. Click on Start Processing in the Do Processing tab to create the new images.
Step 2: Image Stacking
Registax is older than Autostakkert!, but I use it because after stacking I can sharpen the image using wavelets.
Stacking images with Registax is very simple.
Load your video or TIFF images by clicking on Select in the Menu bar and click on Set Alignpoints in the the Align tab. This will cause the program to set some points (visible in red on the Moon) in the image that will be used to align the different frames.
Set the program to use about 200 align points (the strongest one) and stack the best 80% of your images.
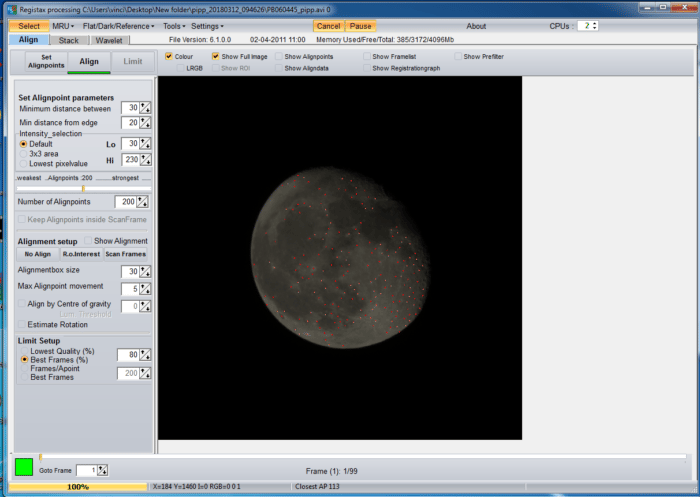
Click Align to align the frames. Next go to the Stack tab and click on Stack to combine the aligned frames into a single image. Because of the quality criteria was to use the best 80% of the images, from my set of 99 frames only 79 will be used.
When the stack is complete, move to use wavelets to sharp the image.
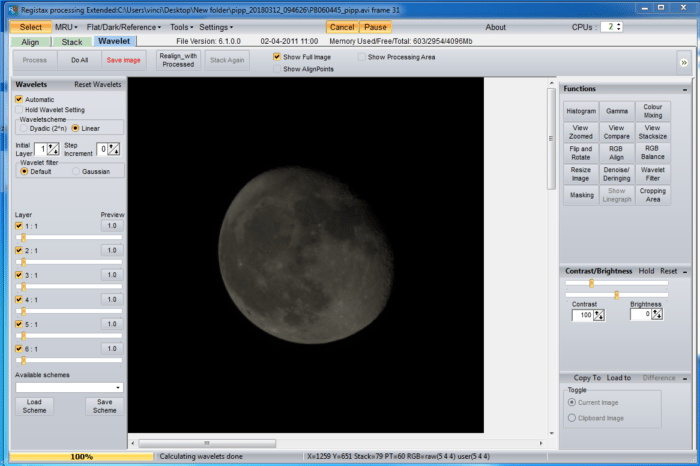
Be careful not to oversharpen the image or you will have bad artifacts. This page of the Registax manual tells you more about how you use wavelets.
The Do all button allows you to test your option on your image. Below you can see the effect of the wavelets on the top half of the Moon, while the bottom half has not yet been sharpened. The difference is quite dramatic.
When happy, click on Save image.
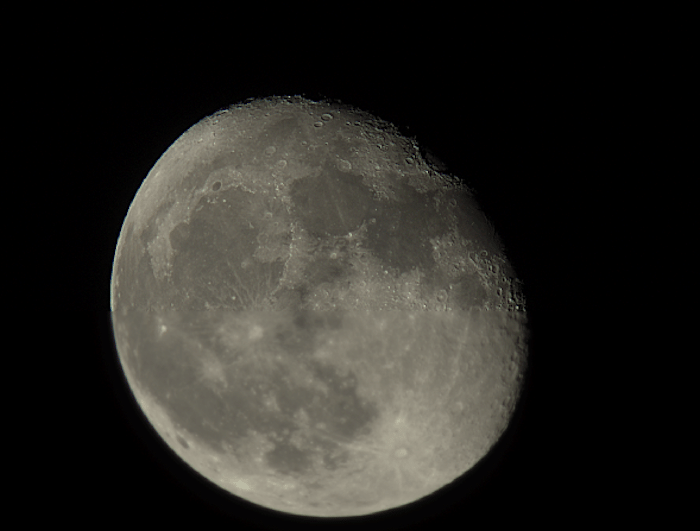
Step 3: Finishing Touches
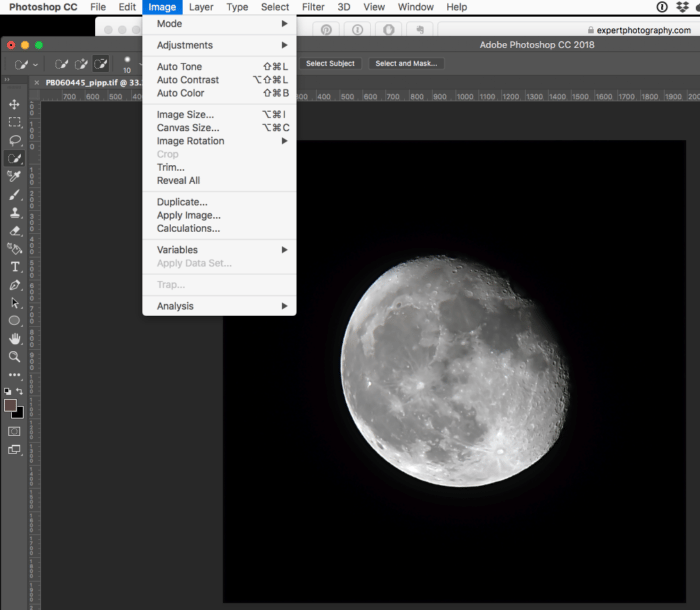
I like my Moon shots to show colors. To do so, I import the stacked image into Photoshop.
First thing I do is use the camera raw filter (Shift+cmd+A on Mac) to reduce any chromatic aberration I may have on the Moon edge.
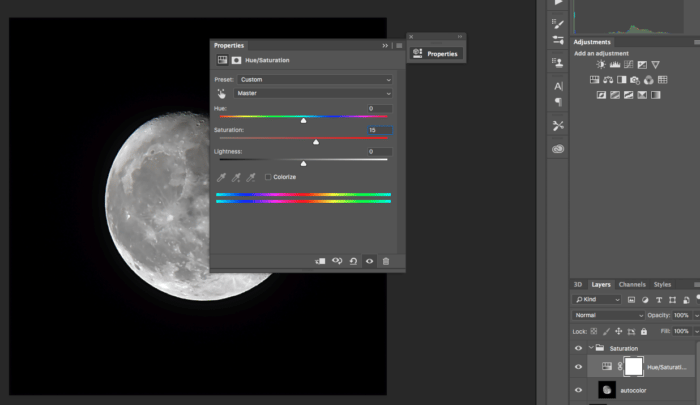
Next, I duplicate the level and apply a noise reduction filter, to smooth the Moon surface a little. I also go to Image->autocolor to let Photoshop improve the colors.
Put this layer in a new group and use the saturation adjustment layer and increase its saturation to 15.
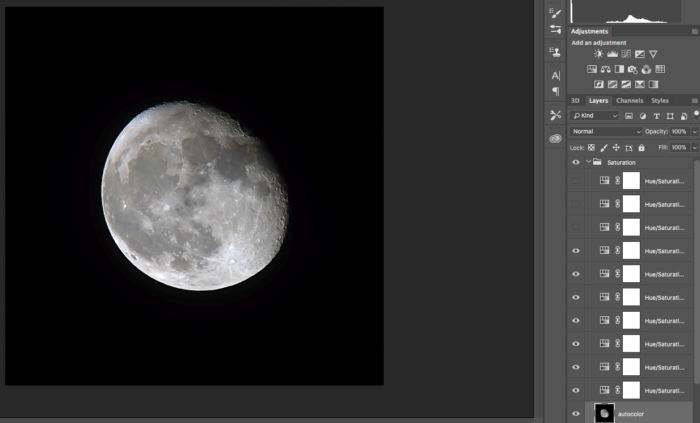
Start duplicating the saturation layer over and over to slowly build up colors in the lunar surface.
Keep an eye on the image. If your colors go wild, remove as many adjustment layers as you need to get natural results.
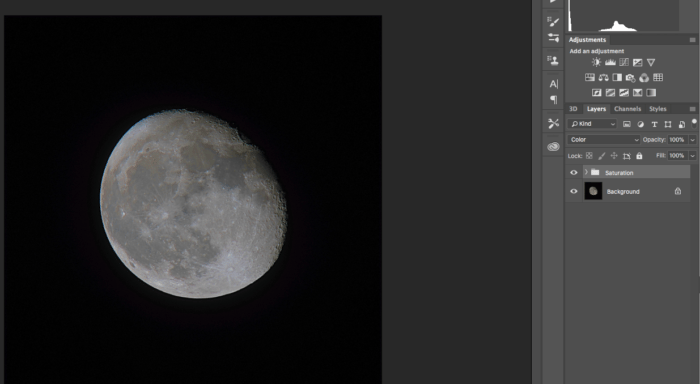
When you’re happy, change the blending mode of the group to color.
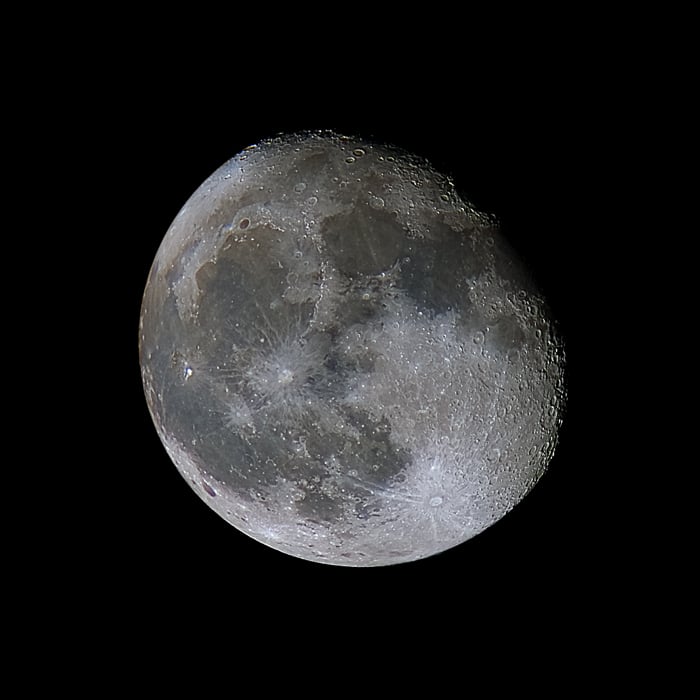
Finally, move to Lightroom to make the final adjustments. I usually work to render the sky pure black right at the edge of the Moon, boost contrasts and details, fix highlights, etc.
If you don’t want colors in your Moon, you can skip the Photoshop part.
Case Study IV: Deep Sky Objects
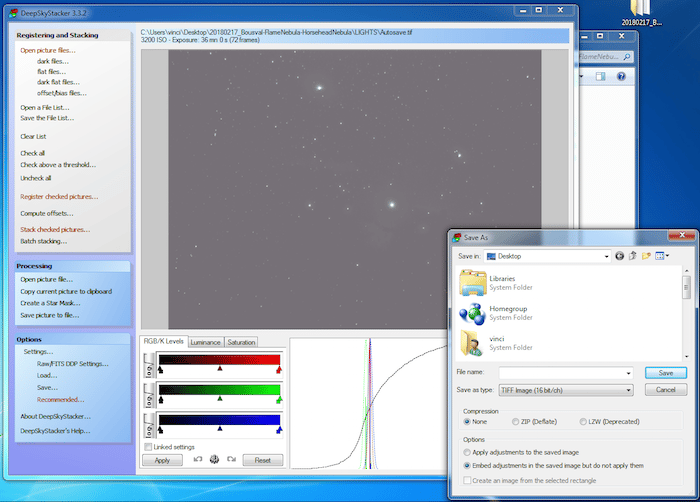
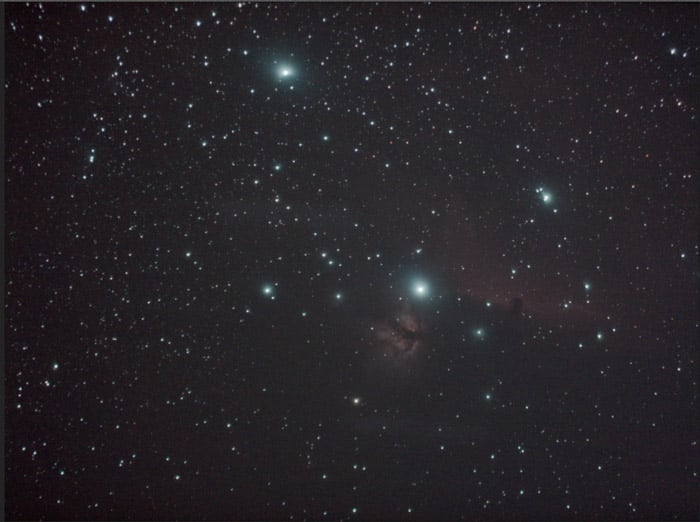
In this last case study, you will learn how to edit deep sky objects, such as galaxies and nebulae. Let’s consider the area around Alnitak, the leftmost star in the Orion belt, which contains the Flame and Horsehead nebulae.
If you haven’t done that already, have a look at our recent guide on deep sky astrophotography.
Useful Software
DSS, Deep Sky Stacker (free, Windows) is one of the easiest stackers for deep sky photography and it is free. If you don’t have it yet, you should try it. We have a great Deep Sky Stacker tutorial you can check out!
Astronomy Tools Action Set (paid, Windows, Mac OS X) is a very nice set of actions for Photoshop that are dedicated to astrophotography.
GradientXterminator (free trial available, Windows, Mac OS X) is a nice and quite powerful Photoshop plugin to deal with gradients.
Editing Workflow
Step 1: Image Calibration And Image Stacking With DSS.
First of all, don’t worry if the image is very dark. We will deal with this later.
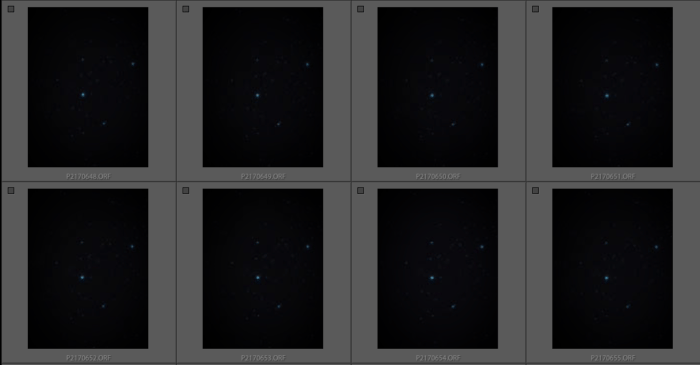
In DSS select Open Picture Files… to load all your light frames in the program. If you have dark frames (or a master dark) load them by clicking on Dark Files.
Bias frames (or a master bias) are loaded by clicking on Offset/bias Files.
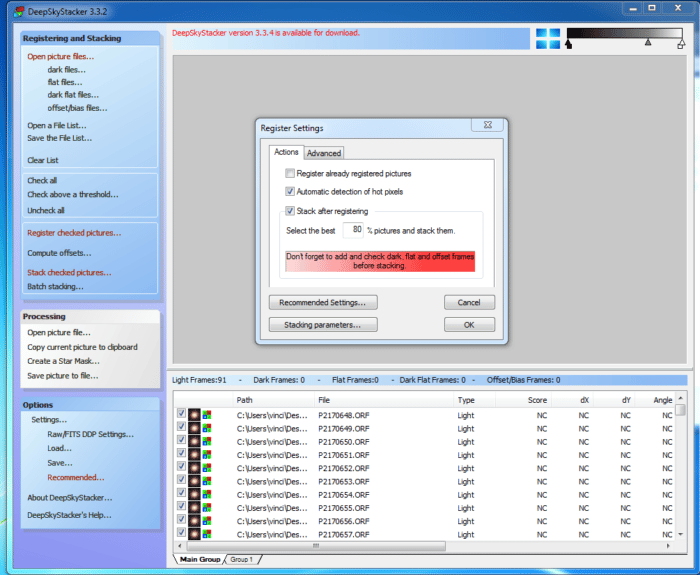
You can change how many frames you will stack by changing the percentage of best images to consider.
Click on Check all and then Register checked pictures. This will open a window where you can set some options to be used for registering the images:
- In the advance tab, ask to compute the number of detected stars: you want to be able to detect something like 200/400 stars at most. Move the threshold sliders to increase or decrease the number of detected stars;
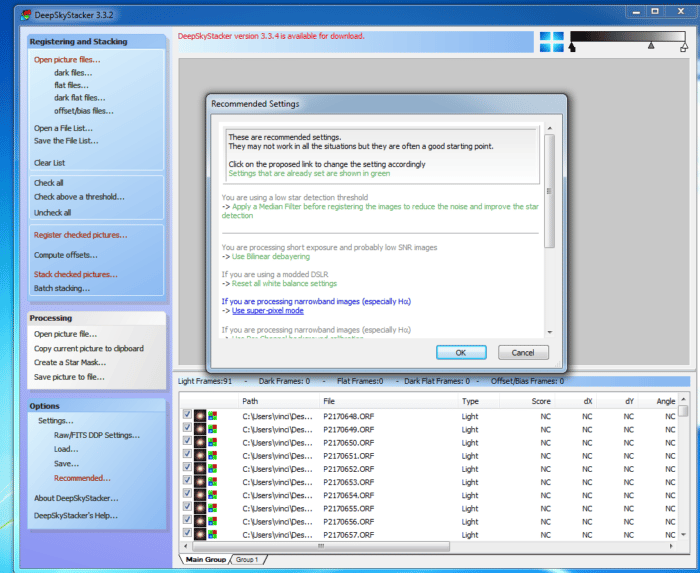
- Default parameters usually work well. Go to option and be sure to use the suggested options. Alternatively use the Stacking parameters… button to manually change the parameters, but you should know what you are doing.
Click OK to start the registering process.
Once the registering is finished, an image is saved as Autosave.tiff (32bit). You can now tweak the image in DSS, but I suggest to leave everything as it is, click on Save picture to file.. and save the image as 16-bit TIFF file, with embedded adjustments saved but not applied, and move to Photoshop.
If you used darks and bias frames, go to your Darks and Bias directories: you can delete all the raw files and keep only the master file. This will save space and time if you need to stack your images again in the future.
Step 2: Histogram Stretching
This is a crucial step, and there are many ways to do it. Some are fairly basic and simple, some more complex.
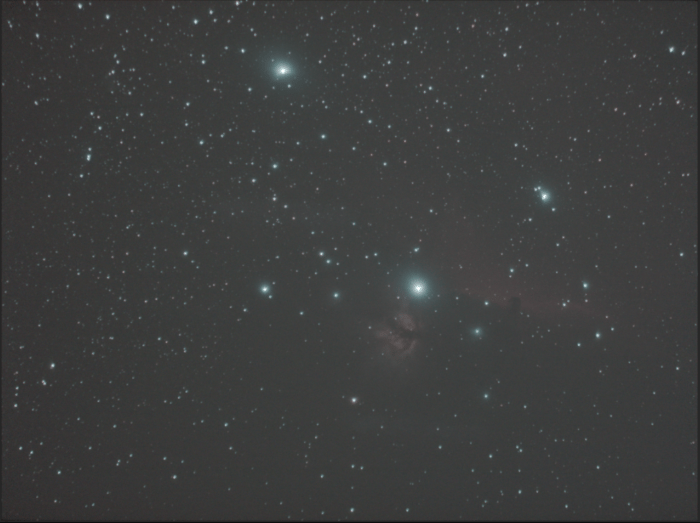
As you can note, your image is very dark and only the brightest stars are visible, sparse in a seemingly solid black background.

Histogram stretching is the procedure to extract the details hidden in the darkness by gradually widen the histogram.
This will brighten the image and revealed the hidden details. It requires some practice and patience so… go grab a cup of coffee and sit comfortably.
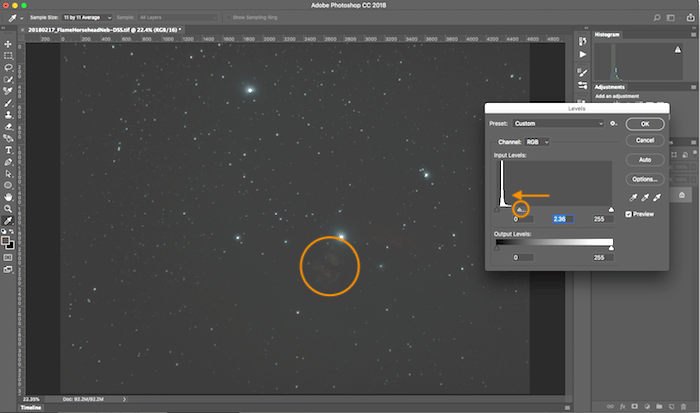
With CMD+L (Altt+L in Windows) open the Levels panel for the image. The histogram is all crammed to the left.
Gently move the middle slide towards the histogram, without touching it. As a result, the image brightens and the Flame Nebula (circled in orange) is now begin to show. Click OK.
Now, open the Levels panel again. The histogram is a bit wider now and has cleared the left edge of the graph.
Bring the black slider (the leftmost one) close to the left edge of the histogram, without touching it. Then bring the middle slider close to the right edge of the histogram.
As a result, the Flame Nebula is more visible and the fainter Horsehead Nebula (circled in red) begin to show.
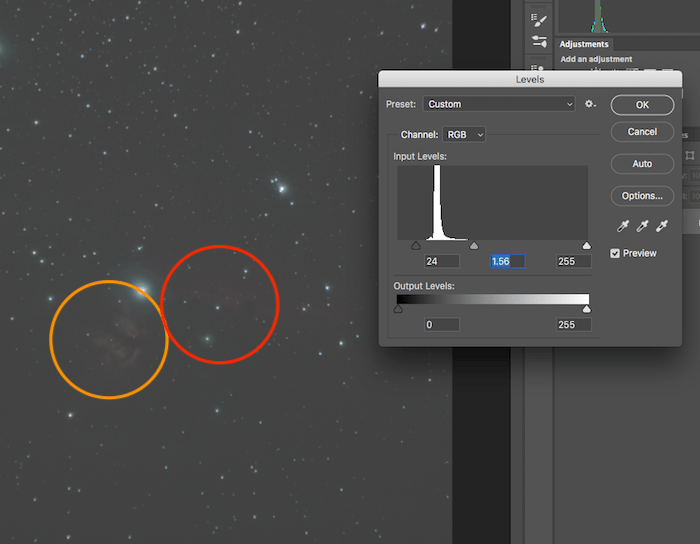
Click OK. After some iterations the two nebulae are readily visible. Don’t overdo it or you will start having problem with the dark sky and your stars will bloat too much.
Finally, set the black point for the image. Open up the Levels panel once again and double click on the black eyedrop on the right of the panel.
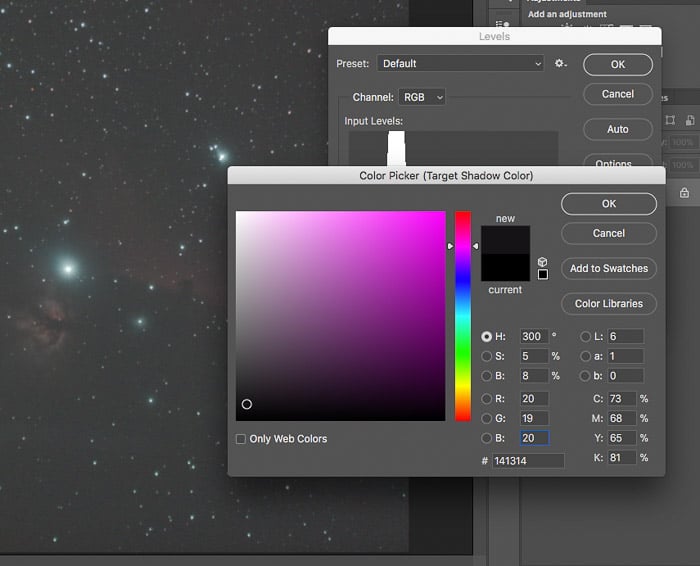
Set the RGB values to 20, 19 and 20 respectively. This is the sky is never pure black. Click OK, and with the pipette select a dark patch of sky where there are no stars nor nebulae.
The image will darken, so you may want to move the middle slider a bit toward the left edge of the histogram one last time. Click OK.
Step 3: Finishing Touches
From now on is pretty much a classic editing: fine tune black/shadows/highlight, boost contrasts, reduce chromatic aberration, sharpen, noise reduction etc. I like to do this in Adobe Lightroom.

Conclusion
As you have seen, every kind of astrophotography needs its own editing workflow. Also, many steps can be performed in different ways.
In this article, I have barely scratched the surface of a good editing workflow. But it is enough for you to be able to edit your first images and be happy with the results.
In time and with practice, you will be able to improve your skills. My suggestion is to concentrate more on getting good data in the field every time you can and carefully storing them.
You will find yourself editing those images over and over again, with better results every time.