Refraction photography is an amazing art form that can turn simple objects into beautiful works of art. But it takes a little bit of know-how to get started. In this article, we will teach you the basics of how to create refraction photography using everyday items like pencils and water glasses. So let’s get started!
Exploring Refraction Photography: What is Refracted Light Photography?
Refracted light photography comes in several different forms. The effect is caused when light passes through an object of denser mass. This makes the light bend.
There are several different ways you can use this in your photography:
- Crystal ball – The classic refraction photo is with the crystal ball. You invert your world with this amazing photography trick.
- Wine glass – You can use a wine glass in a similar way to a crystal ball, if you fill it with water.
- Water droplets – Water droplets will also refract light. They’re spherical so this will work in a similar way to a glass ball.
- Prism – Prisms don’t just bend the light, they split it! Use this to create your own rainbow, or redirect the light for interesting effects.
One of the best items you can use for refraction photography is the crystal ball.
Refracted Light Through a Glass Ball
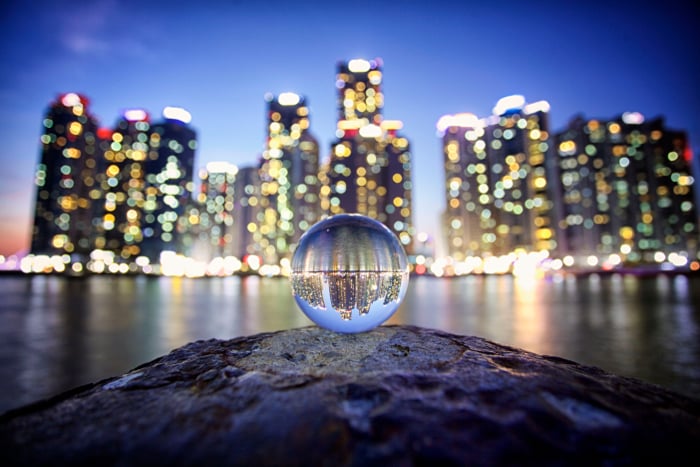
One of the best forms of refraction photography you can try involves using a glass ball. When refraction occurs inside a spherical glass ball you’ll be able to see the inverted image of the background behind the glass ball.
This effect can be great for landscape images, where the image inside the ball displays fish-eye like characteristics. But you’re photographing with a regular camera lens.
There are two main types of glass balls you can use, marble and the crystal ball.
We cover crystal ball photography in this in-depth article.
Refraction Photography With Marbles
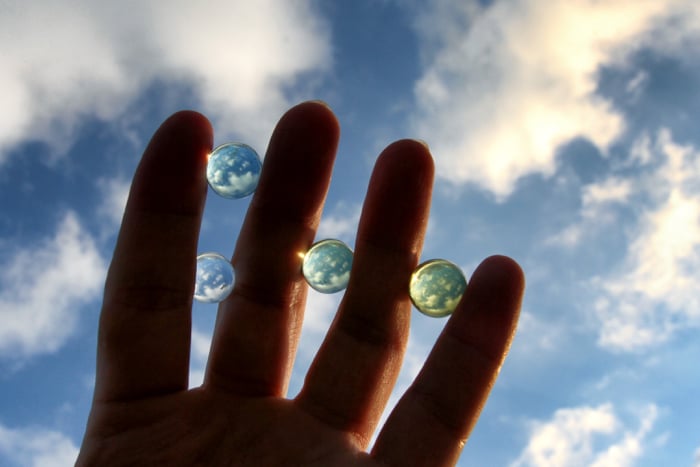
An even cheaper and readily available form of glass ball is the marble! These even come in larger sizes that approach those of a small crystal ball.
There are several good reasons for using marbles in your refraction photography, but there are a few drawbacks.
The Pros
- Weight – Marbles are much lighter than crystal balls. This gives you the chance to carry around several marbles for more creativity.
- Placement – The smaller size makes marbles a lot easier to place. They’ll fit into gaps a larger glass ball won’t. And they’ll stay still on smaller size divots.
- Size – The smaller size makes them much easier to carry around when you’re not using them. Depending on the photo you want to take, the smaller size can also be an advantage.
The Cons
- Sharpness – One of the big disadvantages is the sharpness of the image within a marble. This is because the glass used is not as high in quality. The size will also mean the sweet-spot of sharpest focus inside the ball is comparatively smaller as well. But using a smaller aperture can go someway to fixing this issue.
- Lens requirement – There are options for using different lens types with larger crystal balls. But when it comes to marbles, the smaller sizes means you will have to use a macro lens.
Using a Wine Glass for Refraction Photography
A great alternative to a glass ball is a wine glass. The more spherical the wine glass, the better. An empty wine glass won’t produce a refracted image, so first you’ll need to fill it with water.
The water in the glass now provides an area of denser mass. When light passes through it, refraction happens.
Just as with the glass ball, your image inside the wine glass will be inverted. What makes a wine glass a good viable alternative to a glass ball then?
- Cheap – A wine glass is great as it doesn’t cost much money. And you likely have one already in your cupboard.
- Steady base – Wine glasses won’t roll all over the place on a flat surface. In some cases, this can give them the edge.
- Prop – It’s a natural prop for someone to hold for a refracted light photo.

A wine glass can be a lot of fun to experiment with for refraction based imagery.
There are downsides to the wine glass though.
It’s a lot more fragile to carry around than a solid piece of glass. And you’ll need a ready supply of water with you to make it refract.
The stem and base of the glass also means that rotating the image in post processing is not an option. Those elements will be very obviously upside down in the flipped image.
Using Water Droplets for Refraction Images
When water forms a spherical drop you’ll be able to see an inverted image inside it. In fact refraction occurs in any container of water. This is because it’s denser in mass than air.
In terms of an interesting effect for photography though, concentrating on water droplets works best.
How can you make use of these then? Here’s a list of potential scenarios.
You’ll need a macro lens for droplet photography. This is because of how small the water drops are.
1. Water Droplets on Glass
Adding rain X to a clear sheet of glass will make the water form droplets. Alternatively you can use glycerine, a clear liquid that will also form droplets which you can then photograph.
Make a nice pattern of droplets on your glass. Now make two piles of books, with a gap between then. Bridge the glass across this gap.
You can now place an image underneath the glass, which will then be refracted into the water droplets.
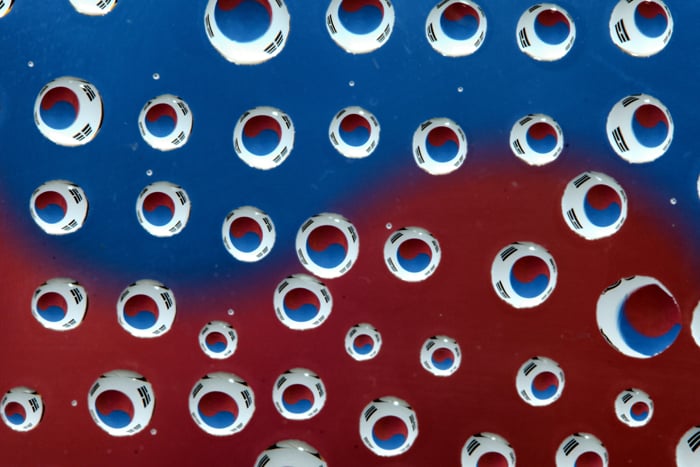
I used the South Korean flag here, due to its circular central symbol.
2. Water Droplet Photography
Producing water droplets is a fun experiment you can try at home. But capturing those water droplets is a little trickier. You’ll need to use off-camera flash to achieve these photos.
You can either try to catch a droplet mid-air as it falls from a tap. Or you can capture a droplet as it splashes into a tub of water.
3. Water Drops on a CD
A fun experiment to try at home is water droplets on CDs. No need for rain X with a CD, the water will naturally form a droplet on a CD surface.
You can use refracted light to create some interesting rainbow effects in a dark room, in combination with a torch and long exposure photography.
4. Mix Water and Oil
A similar experiment is mixing water with oil. In this case, you’ll need to mix oil and water together in a shallow glass container, and once again bridge two piles of books with your container. Now you’ll need to put some interesting backgrounds underneath it.
Finally, set up your camera on a tripod overlooking the container, and use a macro lens to photograph interesting patterns.
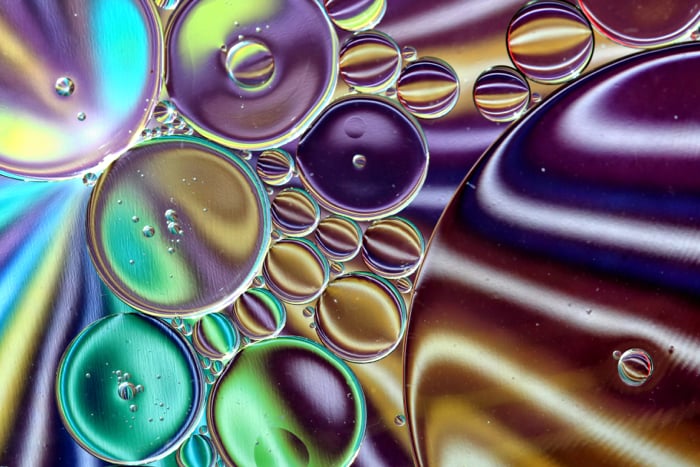
Mixing oil and water can create some very interesting patterns, and you can use refracted light for a more artistic effect.
5. Find Water Drops in Nature
Of course, it’s possible to find water droplets in nature after it’s rained. Think of water drops on a spider web, or perhaps on the edge of a leaf. Photographing a flower behind these naturally forming droplets can be a very popular type of photograph.
Not patient enough to wait for the rain? You can always simulate the rain by using a spray can, and spraying water onto a spiders web or onto a plant.

Water drop photography is a lot of fun to try, especially when you use it to produce refraction as seen right to left in this image.
Splitting Refracted Light Using a Prism
Yet another piece of glass you can use for refraction is the prism. This works differently to the spherical ball, as it splits and redirects the light.
This can be used creatively in your photography to produce photos that will have your friends wondering how you did it!
Redirecting Refracted Light
When you take photos using the prism in this way it will look like a double exposure, or a Photoshop manipulation.
Neither of those are true though. You can take this type of image in a single photo.
This is a tricky type of photo to produce though. You’re taking two, possibly three images in one photo. So how do you go about doing this?
- Use a lens of appropriate focal length. If the background scene looks interesting use a focal length of around 40mm. If you want to compress the scene use a macro lens, with a focal length of 100mm.
- Look for a background for your image that’s either not too busy, or one that will compliment the image you’re going to display inside the prism.
- Now hold the prism in front of you. Rotate the prism with your hand, and note the images you can see in the prism. These will be images perhaps at a 45 degree angle away from you. Depending on how you twist the prism you may be able to see 2 images through it, if the surfaces line up correctly.
- Now you have the prism lined up you can use it to capture something else. Perhaps a person within the prism against a nice background?
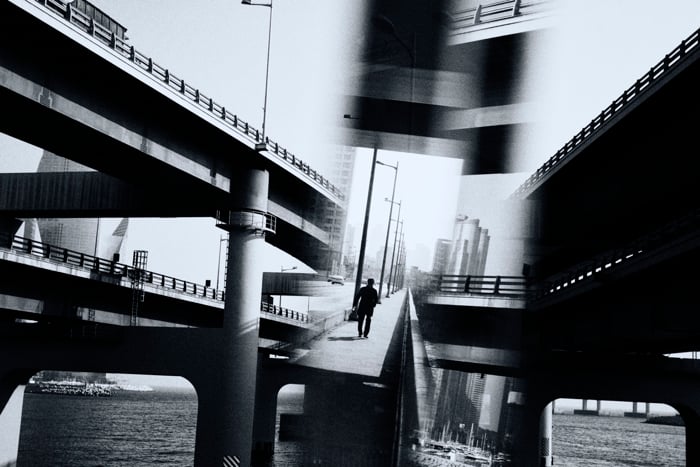
You can use a prism in some really creative ways. Here is a street photo taken with a prism.
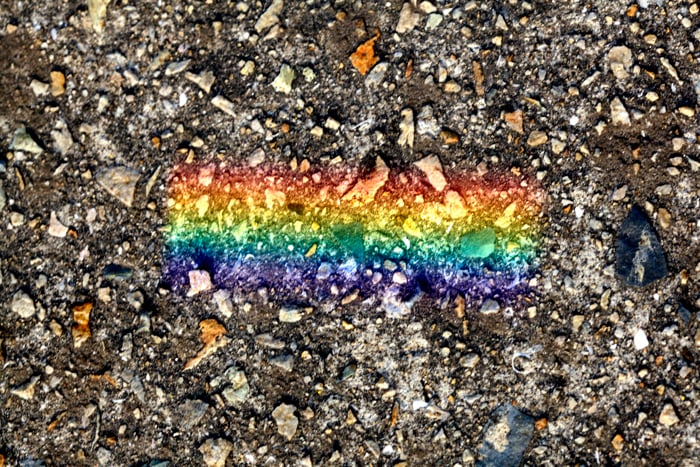
How to Create a Rainbow With a Prism
Most people associate a prism with rainbows. To find where the rainbow is being projected by the prism, rotate it until you can see it.
You can now direct the rainbow onto something that will make for an interesting photo.
This can be a textured background, or perhaps you can use this in your portrait photography. You’ll obviously need a sunny day for this, but also think about the angle of the light and the time of day you photograph at.
Remember that the smaller the prism is, the smaller the rainbow will be. It gets larger the further away the object you’re projecting onto is.
Get Even More Creative With Refractography
I will end this article with yet another way you can use refractive light creatively.
This is a technique called refractography. In this method you’ll use a glass object as a lens!
Read on to find out how you can do it as well.
What You Will Need
To create one of these photos you’ll need the following photographic, or household items.
- A camera body – This needs to be one that allows you to take the lens off, and expose the sensor to the refracted light source. Most dSLRs will work for this.
- A torch – As bright as possible is ideal, and one that allows you to focus the light is better. DO NOT use a laser for this, it will damage your camera sensor.
- Three tripods – You’ll need one for your camera body, one for your torch, and one for your refraction object. You might be able to get away with less tripods, but you do need to find a way of securing both the torch and refraction object in place. The camera must be on a tripod, this is long exposure.
- A piece of card – The less light this lets through, the better.
- Some tape – Gaffer tape works best for this. It will block the light coming from the side of the torch better.
- A pin – You will use this to put a small hole in your card.
- Scissors – Needed for cutting the card, and the tape to the correct size.
- Refractive object – This can be anything transparent, that causes refraction. A wine glass is a great object to start off with.
- Color gels – A selection of color gels will help you change the color of the light, to create more interesting refractographs.
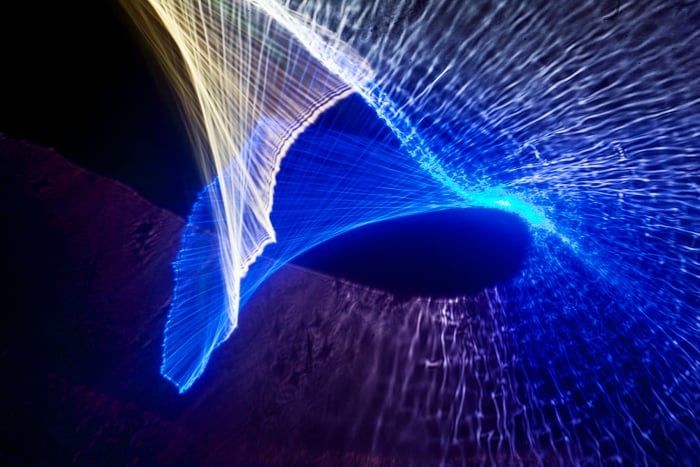
Refractographs can be a lot of fun to create, and look very abstract. In this image light was passed through the stem of a wine glass.
Preparing to Take the Photo
- Take your piece of card, and cut it into a square shape that will fit over the top of the front of your torch. It needs to be large enough to block the light.
- Cut a piece of tape, and place your card onto the tape. Now use the pin to make a hole in the card, pull the pin through the hole and ensure the hole in the card and tape can be seen through.
- Place the card over the torch, ensure the hole sits in the center of the light source. Finally use more tape to block any side light that the torch might emit.
- Test the torch in a dark room to make sure you can see the beam of light it emits.
- Now attach the torch to a tripod. Use tape to secure the torch so it doesn’t move.
- Put your camera on a tripod. While you’re setting up make sure the camera body has its cap on.
- Attach the refractive object to the third tripod. It’s best to use a clamp to hold the refractive object in position.

Using the same setup, but repositioning the wine glass can create different light patterns.
Taking the Refractograph
- Take all your equipment into a dark room. This room should be totally dark, with no ambient light coming in from outside.
- Now position the light source about two metres from the refractive object. Aim the light at the glass.
- Position your camera at right angles to the refractive object, in relation to where the light is aimed.
- Turn off the lights in your room. You should see your refractive object lit up by the torch beam.
- Put your camera into live view, and look at the back screen.
- Next adjust the position of the refractive object until you can see a light pattern on your LCD screen on your camera.
- Now expose your photo. Exposure time depends on how bright the light is. Use the color gels to color the light pattern to your liking.
Conclusion
There are many ways you can take stunning creative photos using refractive light. Have you ever tried one of the techniques mentioned in this article?
We’d love to see your work, so go ahead and show us or tell us in the comments section below.
Which of these techniques do you find most inspiring? Once again use the comments section to talk about which of these techniques you’ll try, and post your results once you’re done!
So now it’s over to you, to get out and use refractive light as creatively as you can!
Looking for more creative photography inspiration? Check out our new post about rainbow photography next!