Time-lapse videos are becoming more popular all the time. Following this trend, most newer cameras have the ability to make a time-lapse video directly in-camera. But you can also create a time-lapse in Photoshop.
In-camera time-lapse is very convenient. All you need to do is to set up the interval and exposure settings, then let the camera do the rest. But it’s also easy to make amazing time-lapse videos in Photoshop CC too.
Creating a Time-Lapse In Photoshop
Photoshop has been with us for many years now. It’s become the industry leader in image manipulation. We’ve seen the addition of layers, layer styles, vector graphics, and smart objects. There’s also a host of new tools and refinements, including some 3D capability.
Adobe Photoshop is the Swiss Army knife of editing software. It can do pretty much anything. But for specific processes, sometimes it doesn’t reach the mark of more specialised programs.
When it comes to time-lapse videos, Photoshop is more than capable. There is an alternative in Time-Lapse Assembler, which is free for both Mac and Windows. But in this article, we’ll show you how to make a time-lapse video in Photoshop.
If you want to know the best settings for time-lapse photography, take a look at our post on the subject here. In this article, we’ll start from the beginning of the post-production process.

© Simon Abrams
1. Prepare Your Images in Lightroom
It’s generally a good idea to make a new folder for each time-lapse sequence you shoot. It will help you keep things organised.
Click on the folder in the Library view to see your image sequence. Check all your images and discard any duff photos.
Apply some basic tonal adjustments and crop to a representative image that can be copied to all the other images in the sequence.
You can do this very easily using Lightroom.

Once you’ve adjusted one image and it’s still selected (as shown above), press CTRL+A or CMD+A to select all the other photos. Then click the Sync button.
Click ‘check all’ to tell Lightroom to copy all the possible adjustments. Then click Synchronize to copy these developed settings to the other images in your sequence.

2. Organize Your Image Files
Organizing your images is a crucial part of creating time-lapse videos. It’s not just about keeping things tidy, it’s an important step in the creative process.
Export your still images as JPEG files into one folder. Each image should have the same file name. But, they also have to be numbered in order of sequence.
The filename must have leading zeros, like this—flower-0001.jpg, flower-0002.jpg, flower-0003.jpg.
This numbering is important. Photoshop adds the images into the video sequence based only on the ASCII value of their filenames and not on any EXIF data.
Select all the images and hit Export to bring up the export dialogue.
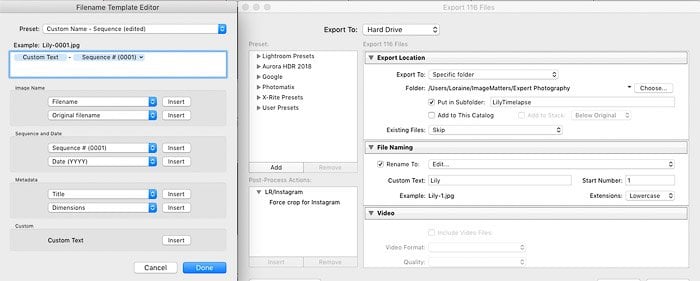
Under File Naming, tick Rename To and select the ‘edit’ option from the drop-down list. It will bring up the Filename Template Editor (shown above).
Click the Sequence drop-down list and select a format with leading zeros.
A preview of the filename format will be shown at the top of the Filename Template Editor (in this example, it’s Lily-0001.jpg). When you hit ‘done’, this format will appear in the File Naming section of the Export dialogue.
Check that you’re exporting as JPEG images. And make sure the size is set up according to the resolution of the display device.
Set the long edge to 3840 pixels for 4K Ultra HD, 1920 pixels for Full HD, or 1280 for standard HD. In this example, I’ve chosen a width of 1280 for a standard HD video.
When the export is complete, you will have a numerically sorted list in your chosen folder. It’s now time to open Photoshop.
3. Import Your Images into Photoshop
Photoshop has a special workspace for dealing with motion graphics. You can activate it by clicking on the Window menu option. Then Workspace>Motion.
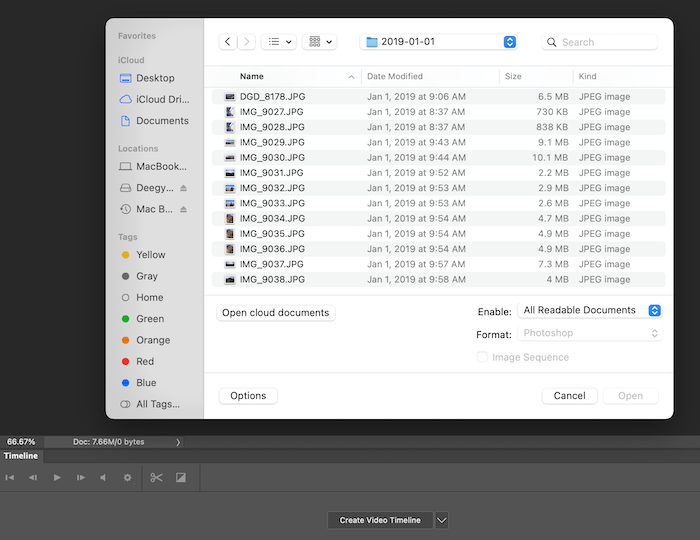
When you do this, you’ll notice a Timeline area appears at the bottom of your screen. Select File>Open and navigate to your image sequence folder to load your prepared photo sequence onto the timeline.
Select any image in the sequence, then click the Options button in the lower-left corner of the File navigator window. It will reveal some extra options, then tick the Image Sequence box.
Only select one image from the file. If you select more than one, the Image Sequence box will not be available.
Click ‘open’, and Photoshop will ask you to select a frame rate. The drop-down box contains many of the common frame rates such as 24, 25, and 30fps.
You can click ‘custom’ to set your own rate to speed up or slow down the final video. Here, I’ve selected 25fps.
When you hit OK, Photoshop will add all the images in the folder to the timeline. If you’re unsure what frame rate to use, you can pick one and modify it later.

Photoshop doesn’t import the images, but it does reference them. Don’t change any component file names or locations until after you’ve rendered your work as a video file.
The timeline will now contain your image sequence (‘Video Group 1’), ready for you to edit. The layer palette will also show a new group called Video Group 1.
If you’re familiar with using Photoshop for photos, you’ll find working with video fairly intuitive. You can apply masks, blending modes, and layer styles to a video in the same way you’d apply them to a photo.
You can also load multiple video clips and trim them to length. Or you can change their order and add keyframes and music.
4. Construct Your Timeline in Photoshop
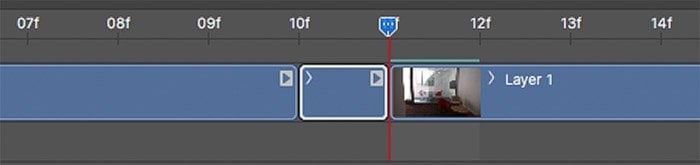
The image sequence is shown as a blue bar. Above this, the play head indicates the currently displayed frame against a scale of seconds and frames. Click and drag the play head to jump around your sequence.
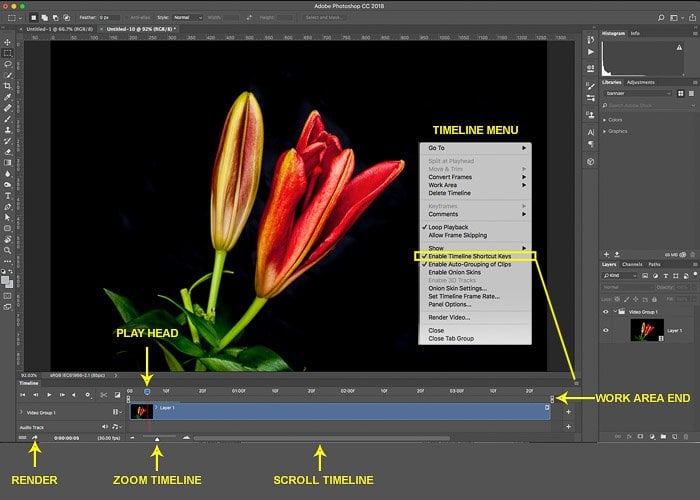
Clicking and dragging either end of the sequence will enable you to trim the length. Since the frames are just referencing the JPEG images, trimming is non-destructive. You can always restore the clip length later.
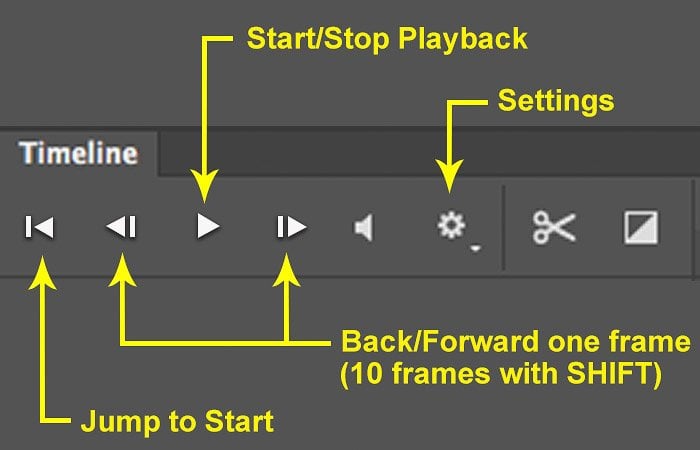
To play your entire sequence or position the play head on a specific frame, use the controls to the left of the timeline bar, seen below.
Under settings, set the resolution to 50%. If playback is not smooth and your computer is not able to display every frame, work at 25%. This only affects previews and will ease the load on your computer’s processor. It won’t reduce the quality of the final video.
Above each end of the bar, there are two work area markers. When you hit the Play key, Photoshop will play just the section between these two markers.
Drag the markers to define an area of interest to edit. Or you can use them to define a selected portion of your image sequence you want to be rendered into a video.
5. Create Convenient Shortcut Keys
Since video editing involves a great deal of play head shuffling, it makes sense to use shortcut keys to speed up the workflow.
While you’re in video mode, you have the option to reassign some of your existing shortcut keys. They will revert to their normal function again when you switch back to editing photos.
To enable this, select the timeline menu button as shown above and tick the Enable Timeline Shortcut Keys option.
You can now use:
- the spacebar to start and stop playback;
- left arrow key to move back one frame;
- right arrow key to move forward one frame;
- up arrow key to move to the start of a clip; and
- down arrow key to move to the end of a clip.
6. Remove Unwanted Frames
Checking all the images in Lightroom before exporting them sequence means you can weed out any duff images. For example, the flash of a car’s headlights during a night shoot. Or that person wearing a hi-viz jacket in one photo.
But if you did miss one, you can remove it without generating the whole sequence again.
Use the play head controls to position it at the frame where you want to cut the content. Make sure the video group is selected in the timeline. Then click the Scissors button to split the sequence at the play head.
Move the play head to the end of the section you want to remove and click the Scissors button again. Now make sure that only the unwanted section is selected. Hit the delete or backspace key to remove it.
7. Export and Render Your Time-lapse
At this stage, we have a Photoshop file that references external media. The video we’ve been watching is just a preview containing our edits and effects.
The time has come to turn all this into a real video file. The exporting process is called ‘rendering’. Depending on the length and complexity of your video, it can take a while. It might even take a few hours.
Click the timeline video menu icon and select Render Video. Or, you can click on the little arrow icon at the bottom left of the screen to bring up the Render Video dialogue box.
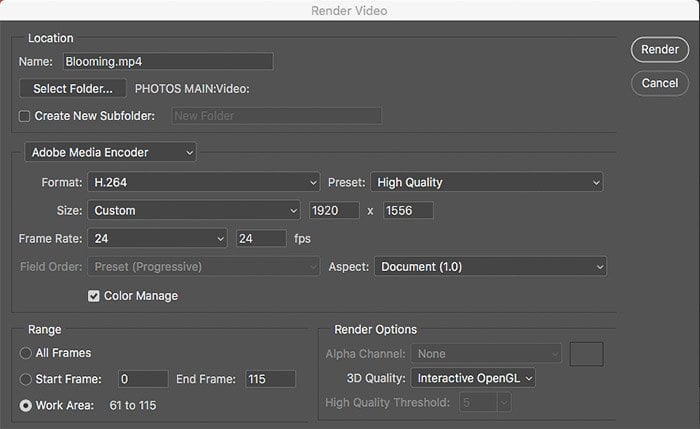
Select a name and destination for your video file with an optional sub-folder. Make sure Adobe Media Encoder is selected in the Render Video dialogue box.
Under format, select H.264 to make an MP4 file (the most common format on the internet) or Quicktime if you want to make a .mov file.
I would recommend selecting H.264 as it’s so widely used. This also makes a huge range of presets available when you select the Preset drop-down box.
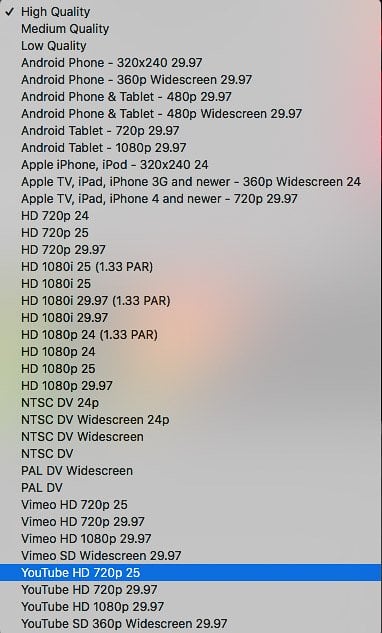
Selecting one of these presets will fill in the remaining details (such as resolution and frame rate) for you. If you don’t want to use any existing preset, just set the size to custom. Enter the pixel dimensions and frame rate you want.
Leave the Aspect set to ‘Document(1.0)’. This will produce square pixels. You don’t need to use rectangular pixels because you set the required video aspect ratio back in Lightroom.
Under the ‘range’ setting, you can opt to render ‘all frames’. Or, you can render the area specified by the Work Area markers on the timeline.
When you’re satisfied with the settings, hit the Render button to finish your video.
Once it’s created, you can safely delete the component JPEG images and associated Photoshop files. Keep them only if you want to make further video files from the same source images.
Now you have a fantastic time-lapse video made from still images in Photoshop.

© Brooke Cagle
Conclusion
Making a time-lapse in Photoshop is easy and painless. As long as you have the photo sequence ready, the process is simple.
For more interesting time-lapse videos, try using more than one camera or viewpoint for the same scene.
You can then assemble the images from each viewpoint into separate video files. And then import them into Photoshop as a sequence of clips to make a single epic video with an accompanying soundtrack.
We hope this article helps you create time-lapse videos of your own. And once you know how, you’ll be able to make lots of amazing time-lapse videos with Photoshop.
Use our Effortless Editing in Lightroom course to perfect your images before you turn them into a time-lapse video.


