A storyboard provides the visual roadmap for a photo or video shoot. It ensures that everyone involved in the project understands the desired end result.
Even if you’re shooting on your own, a storyboard can be a valuable tool to help you define your vision.
Here are some tips on how to create a storyboard for photography.
Creating a Storyboard for Photography
A storyboard contains information about the scene, location, and description of any action taking place. It also has information about camera equipment or techniques that will be required.
It's made up of a number of squares with illustrations or pictures representing each shot. There are also notes about what's going on in the shots.
It’s like a comic book version of your photo shoot.
In photography, storyboarding is a tool. Use it when you want to shoot a series of images that need to fit together cohesively and tell a story visually.
An example of this could be a fashion shoot with a vintage theme. Or a layout of a lifestyle shoot featuring a picnic for the summer edition of a lifestyle magazine.

Develop Your Idea
The first step in storyboarding is to have an idea of what story you want to tell. And then you develop that idea.
Ideas can come from everywhere. From pictures in a magazine to colorful fruits and vegetables at the farmer’s market. Or you can find inspiration on Pinterest.
Creating a mood board can be a great way to prompt brainstorming and get you started.
When gathering images, consider everything from mood, colors, theme, story, style, tone and props. They need to be literal.
Think about which props will be suitable. What kind of light complement your vision? What type of background do you need? Will you need models? Special clothing?
An image can convey so much information at a glance. Gathering together photographs that contain elements that align with your vision is a great first step.
Keep in mind that these elements don’t have to appear in your final story. They can give you some direction or help you tie things together.
Another helpful exercise is to use word associations to help you develop your idea.
This is an exercise where you choose a word that is relevant to your project. Then you come up with words that are synonymous. This can prompt ideas you might not have considered.
Coming up with words associated with your concept will also help you find images in stock photo banks that can fit your project.
This can also give you more ideas by showing you how others have approached your concept.
You can also try looking at illustrations in sites such as Envato or Graphic River. Illustrations often can capture abstract ideas more easily than photographs can.
Storyboarding Tools
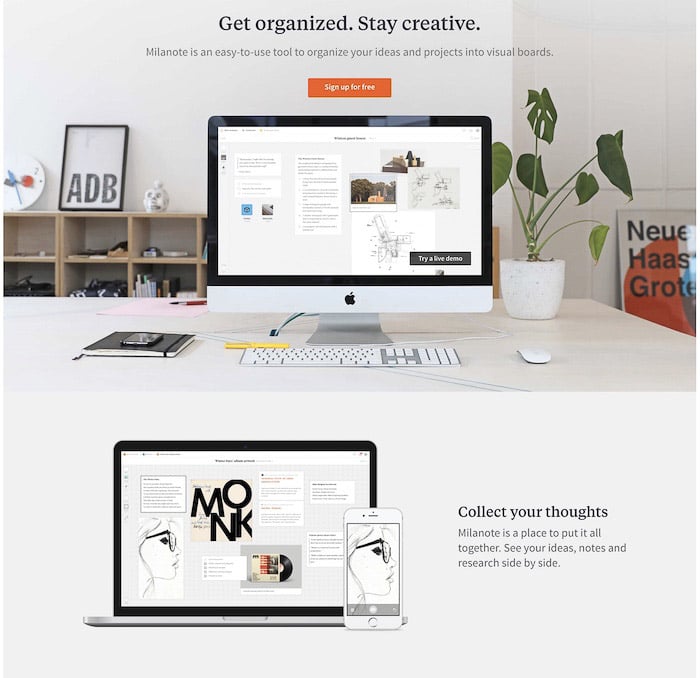 A great tool for storyboarding is Milanote.
When you’re working on a team, members’ contributions can get scattered across many notes and emails. This creates the potential for some of the best ideas to be lost.
This app is not just for teams. You can use it as an individual as well. It’ll keep all your creative collateral in one place.
Milanote offers a public template browser. This gives you immediate access to high-quality pre-formatted boards from expert contributors. Use these to help you and your team get started faster.
You can also create your own private templates. You can share these with colleagues and speed up common tasks and processes.
It’s easy to share and collaborate in Milanote. Once you’ve completed your own storyboard, you can share a link to the board directly with your team.
You can export your boards to linear or layout PDFs. Or you can invite others to collaborate on the boards directly.
Another tool you can look at is Storyboarder. This is a free app that you can use if you’re on a budget.
Storyboarder works collaboratively with Photoshop. You can edit your board more precisely in Photoshop. It will then automatically update in Storyboarder.
You can export to Premiere, Final Cut, Avid, PDF, or Animated GIF.

Define the Details
Gathering ideas and creating a mood board are an instrumental part of the process. Before you can create your storyboard, you’ll need to cull and define the details.
This is where you carefully consider all the information that you’ve gathered. And make some style decisions.
These can vary from the choice of image format to the lighting you require. Or to the mood you want to evoke. This can be a bright and airy atmosphere or a dark and moody one.
When you are working at defining the details, think about the message you want to send to the viewer. Use your creative voice to answer those questions.
Keep in mind that colors like red or blue evoke certain emotions. And lighting goes a long way in creating the mood of any given scene.
A successful shoot can depend on having these types of details clarified.
Edit It Down
Before you can start physically creating the storyboard, you need to decide which details are crucial. After that, you need to edit your ideas down.
Consider each element that you have gathered. Does it complement your vision for your project? Keep only those that are crucial.
Be ruthless when editing the details of what you want to keep and what should be discarded.
We can love a certain idea and feel attached to it. But if it doesn’t serve our final vision, it has to go.
Don’t be surprised if this process of culling your ideas takes even longer than the steps that have brought you to this point.
The physical storyboard will be the document that you and possibly a whole team will be working from. 
Create Your Layout
The key to an effective layout is to consider the various elements of composition and how they will appear in the final result your images.
When making a detailed scene, consider the visual weight of the various elements in your scene. This is determined by the size, color, and detail of your scene elements.
Also, be aware of the style and tone of your storyboard. It is important to remain consistent in the format and look of each frame. This means using similar colors, art style, etc.
Keep compositional elements like positive and negative space in mind, as well as the flow from image to image.
Conclusion
At the end of the day, a storyboard is just a tool.
It is important to plan every aspect of a shoot to get great results. But it’s also important to not be too rigid and take a paint-by-numbers approach.
Ultimately you want room for spontaneity and for your creativity to flow.
We have great posts on using gestalt theory in photography or making a DIY studio to check out next!


