Fruits and vegetables are some of the most interesting subjects to shoot in food photography.
They are naturally attractive, colorful, and full of texture. Playing up their best features only takes a bit of planning before you pick up your camera.
Here are 11 tips to help you create mouthwatering vegetable and fruit photography.
11. Fruit Photography: Using the Best Quality Produce
When it comes to shooting fruits and veggies, choose the cream of the crop.
Spend extra time picking your produce. Make sure it’s perfect. This might mean going to the farmer’s market instead of the grocery store. Or hitting up some of the better quality organic shops.
Food stylists even drive around to several stores in search of the best items they can find.
Check for bruises and blemishes, or any wilting in your greens. Look for the general freshness of the items. Fruits or vegetables that are even a bit tired will look terrible to the camera.
If you have a choice, photograph only vegetables and fruits that are in season. By natural, they will be at their peak and look their best.
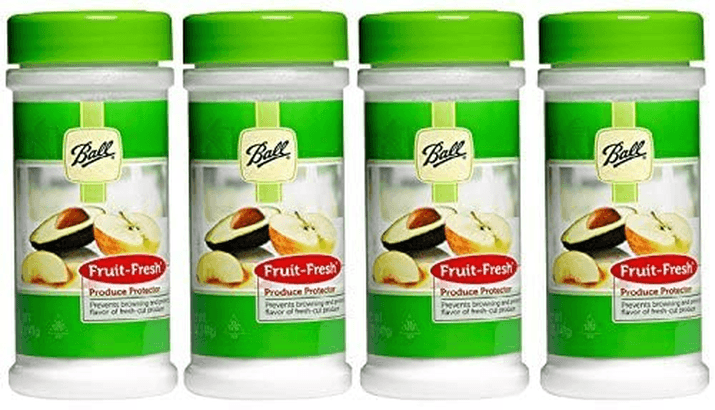
Some fruits and vegetables will stay fresh looking while you shoot them. Others, like artichokes or cut apples, might brown quickly.
A food styling trick is to soak the fruit or vegetable in a mixture of water and ascorbic acid. This is a component of vitamin C and will help keep them fresh.
You can also use a produce protector to stop the fruit from browning. The most popular name brand is Fruit Fresh.
If you photograph your fruits and veggies raw, wash them with ice-cold water before shooting. This will make the colors pop.
If you have to slice up the fruits and vegetables, use a sharp knife. This will ensure that the cut looks appealing in the photo.
10. Light up Your Fruits and Veggies
Whether you’re shooting in natural or artificial light, the lighting will be the biggest factor in the quality of your photos.
If you’re not confident using flash, use a constant light. That way, you can see how the light is falling on your subject. Or you can stick to natural light. Fresh fruit and vegetable look great in natural conditions.
Plan to shoot at a time of day when light is abundant and diffuse it for a softer look.
If you want to bring out the texture in your subject, use backlighting. Make sure your light source is coming from behind. Bounce some of it back onto your scene from the front with a reflector.
Backlighting can blow out the back of an image without casting enough light on objects in the front of the frame. Make sure that the light is balanced by playing with the distance of it to your set.
Side lighting or side backlighting are also great options. Side lighting enhances the shape of fruits and vegetables.
Don’t light from the front. This can create unwanted shadows and cause the image to fall flat.
To get the most out of your lighting, always use reflectors to block or bounce the light. Use diffusers to soften it.
9. Use a Spritz of Water and Glycerin to Add Freshness
The aim of food photography is to highlight the best features of the food. It should make your viewer want to eat it. And how can you achieve that? With a few food styling techniques, of course.
This might mean placing some peaches or plums in a bowl. And spritzing them with a bit of water to give the viewer the impression that they are looking at fresh fruit.
If you’re taking this approach, I recommend getting a small spray bottle with a fine mist. Use a 50/50 mix of water and glycerin to get your produce camera ready.
Glycerin is an inexpensive item you can find in the beauty section of the drug store. Combining it with water will make sure that your water droplets don’t evaporate immediately after you spray the fruits and veggies. In fact, it will last until you wash it off.
Just make sure you don’t take a bite out of those plums. Glycerin is not food safe.
Food photography looks better if you use your imagination. Get creative with your food styling.
Try cutting the fruit into pieces to show their insides and add different shapes to your scene. Use drips of juice or water to add the idea of freshness and juiciness.
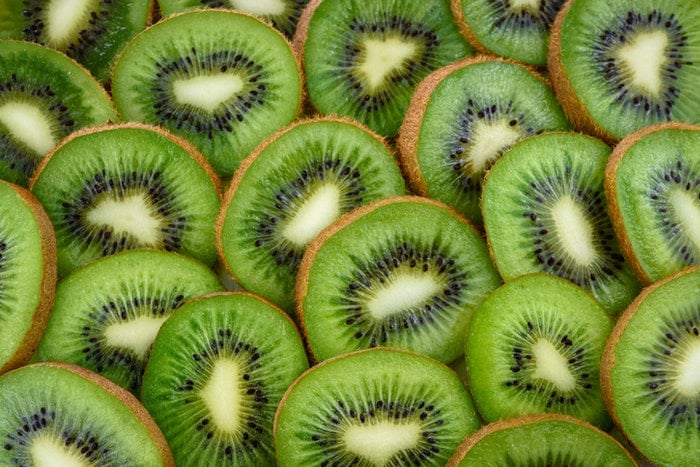
8. Take Macro Photos to Highlight Textures
Fruits and vegetables are the perfect subjects for those macro shots.
It doesn’t always make sense to take a super close-up shot of a lasagna. The viewer might not understand what they are seeing. But the same treatment given to a kiwi is immediately translatable.
When you’re working with macro food photography, you have a very shallow depth-of-field. A lot of your subject might be out of focus.
If this is not suitable for your fruits and vegetables, you might want to take three images with different focus points. Combine them using focus stacking in Photoshop for one image that is sharp throughout.
When you take macro shots, choose fruits and vegetables that have exciting textures. Photos of kiwis, pomegranates, figs and passion fruits look very pleasing.
Use your food styling skills as well. Chop up the fruit or the vegetable for the photos. Arrange them in a nice pattern. If you feel like you want to bite into them, you did a good job.
7. Use Few Props to Highlight the Main Subject
Simple food styling technique is best when photographing fruits and vegetables.
They are already beautiful subjects that can stand on their own.
A dish like pasta usually needs a bowl of parmesan, some cutlery or linen, or other food styling touches to create a good composition. With fruits and vegetables, they are perfect on their own and don’t need much except great lighting.
If you’re using props, one or two will add a bit of context but not detract from your subject. Make sure you don’t use too many props.
Otherwise, you will take away the viewer’s attention from the produce.
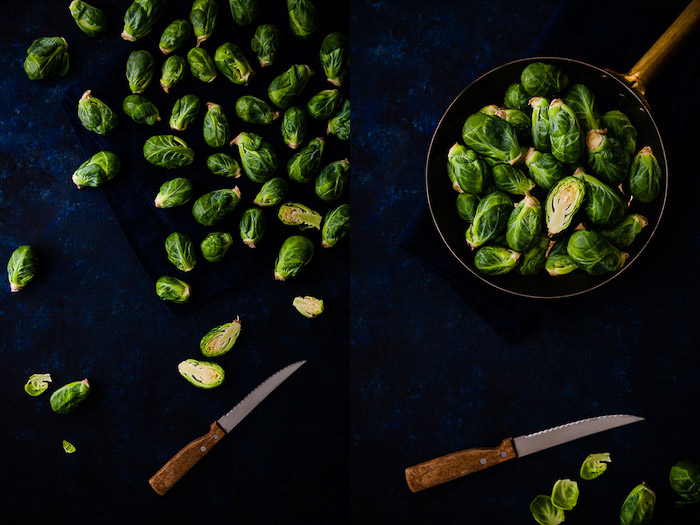
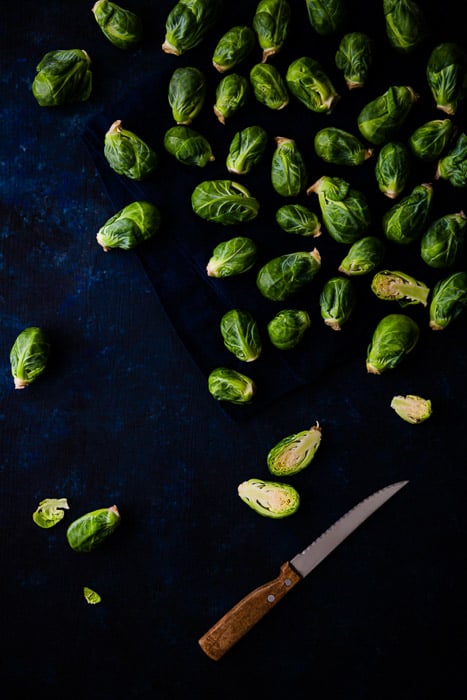
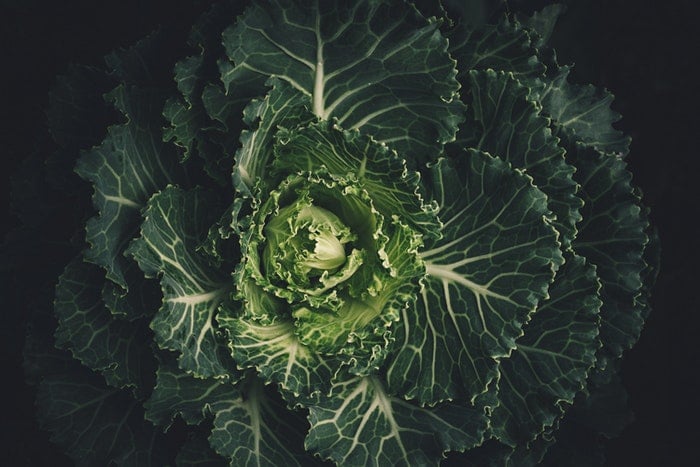
6. Add Interest With Pattern and Repetition
When you’re working in a minimalist style, you need to pay attention to the principles of composition. How you lay out your fruits and vegetables within your frame will have a big impact on your final result.
You can add interest to your photos by using pattern and repetition. This is a very common food styling technique in fresh fruit and vegetable photography.
In the picture of the brussels sprouts below, I used both of these principles to add a sense of flow and movement to my photo.
I cut open one of the brussels sprouts and placed it in a focal point area to create the greatest point of interest.
When using these principles, make sure that you leave some negative space. Photos that are too busy with no area for the eye to rest will feel a little claustrophobic.
Be sure that you also break up the pattern in some way, or it will become monotonous.
There are various ways to create a break in the pattern. You can use a break in color, shape, size, or texture. Where you place this break is crucial.
You want to place it in one of the focal points or along the intersecting lines on the rule-of-thirds grid or phi grid.
5. Choose the Right Backdrop Colors
Food styling doesn’t end at using props. The backdrops you choose in food photography also matter a lot. Choose backdrops from the color wheel to get a better composition.
A color wheel will tell you what colors work best together. It’ll help you make important choices in your props and backdrops.
Backgrounds and surface colors that are too bright can detract from your food photography subject. They should be chosen with respect to the mood you’re attempting to create. They should also be inin harmony with your chosen fruit and vegetable.
Cool and dark colors such as navy blue and black recede. Light or warm colors like yellow bring objects forward in your photo.
It’s best to stick with neutral or cool tones in your backdrops. Try blue, grey, brown, black, and white. But there are times when colors can really enhance a story.
Keep in mind that anything with an orange tone will be magnified by the camera. It can look really unappealing next to food. Put away that warm wood cutting board. Stick to something more neutral, like a deep espresso tone.
Color combinations can be monochromatic when they are tonal variations within a single hue.
This approach has its place. But using complementary colors is a wonderful technique to apply to food photography. Fresh fruit and vegetable look even better with their complementary colors.
These are colors that appear directly opposite each other on the color wheel, such as red and green, or blue and orange.
The fruit or vegetable that you are shooting will dictate the color scheme you can choose.
4. Use a Single Prop to Add Context
We talked about using a few props to highlight the fruit or vegetable in your photos. When you use too many props in food photography, you detract the eye from the main subject.
But what if I tell you a single prop can enhance your images even more?
Using a single prop can add context to your photos. It can make a powerful difference without overwhelming the viewer.
This can be a knife, a bowl, or another object that might be used when preparing fruits and vegetables for cooking, like a colander.
Choose a prop that complements your food and backdrop and makes sense in the scene. A spoon next to a cut open grapefruit makes sense. The same spoon paired with stalks of asparagus doesn’t.
When shopping for props, look for items that are unique, such as vintage or antique pieces. You can find these at thrift stores for a fraction of the cost of new ones.
Vintage pieces tend to have a patina to them. This is an extra bonus. The reduced glare will make them easier to shoot than shiny new pieces.
When choosing knives, make sure that they look sharp enough to actually cut vegetables!
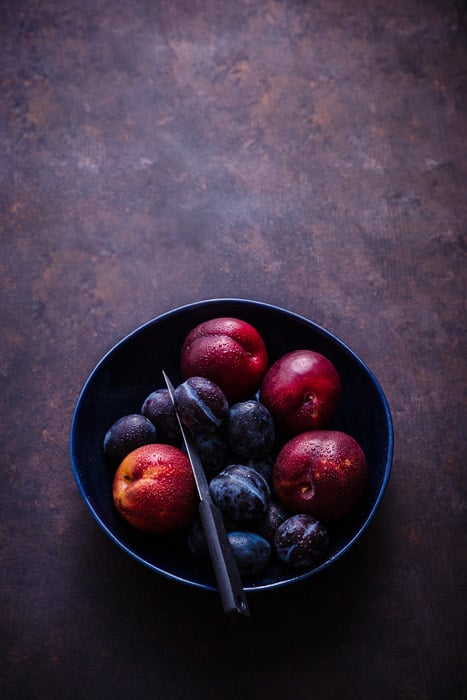
3. Try Shooting Dark and Moody Photos
If you’re used to shooting light and airy food photography (or maybe your style is bright and bold) try something a little different. How about shooting dark and moody fruit and vegetable photography?
Darker images with a lot of shadows are dramatic and mysterious. They provide a different sense of atmosphere.
These kinds of shots make great kitchen prints because they tend to have more of a fine art appeal.
To achieve this striking look, have one light source. Use black foam core to block the light and kick in shadows where you want them.
In this style of fruit and vegetable photography, you don't need as much light hitting your set.
If you’re working with artificial light, then I recommend diffusing it. If you're using natural light, you may not need to. It depends on its intensity.
Keep in mind that a dark style isn't appropriate for every subject. Think about the purpose of your images and what you are trying to convey.
If you haven’t shot much in this style before, challenge yourself and see what you can come up with.

2. Try the Shoot in a Box Technique for Dark and Moody Shots
This is a little trick that is fun and easy to do. It gives fantastic results if you want that dark and moody style but you struggle to achieve it.
All you need is an old wooden box and a three pieces of black cards for negative fill.
Place the cards around the box and leave one side open for your light source to hit your subject. Shoot your subject from above. Preferably with your camera on a tripod with an extension arm.
You’ll have to play around with the height of the fill cards to get the shadows that you want.
This technique creates a lot of heavy shadows in the photos. It’s ideal for a single subject, like a bunch of grapes or a cabbage head.
1. Tell a Story to Capture the Viewer’s Attention
Another option to macro or minimalistic photos is to shoot the opposite.
Photos with various produce or several props can have a storytelling aspect. It will be intriguing to the viewer.
A narrative quality in phots evokes the viewer’s emotions and pulls them into the scene.
In the image below, the bowls and linen on a cutting board, the placement of the knife and sliced strawberry gives the idea that someone is in the middle of baking a pie.
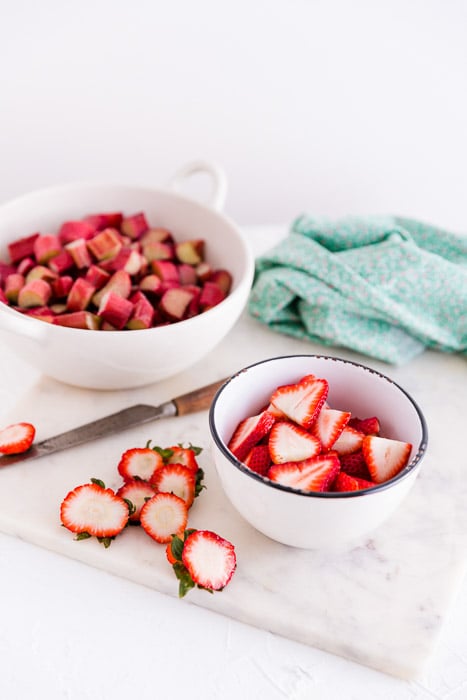
If you’re using this approach, try putting an item or two on the edge of your scene. Like one of the bowls and the knife here.
Cropping them out a bit gives tension to the composition. It gives the idea that there is a larger scene going. But the viewer only gets to see apart of it. These kinds of photos make people think and trigger their fantasies.
You can also try to photograph a variety of fruits and vegetables together at ninety degrees. Then you will get falt lay photos which are very popular in food photography.
The more elements you have, the harder it is to compose the shot. Take the time to assess and adjust the placement of each subject on set.
This might even mean having to replace some wilting items by the time you are ready to shoot.
Conclusion
Fruit and vegetable photography is sought after. It can make an important addition to your online or stock portfolios.
Shooting produce can be a great way to practice your composition and lighting skills. Fruit and vegetable photography is great because you don’t spend the extra time with cooking and food styling.
For more great food styling ideas, why not check out our tips on photographing steam or taking great burger photos!
To learn all the best food photography tips, read our eBook – Edible Images!