Macro focus stacking is a photography technique that allows you to take multiple photos of the same subject, each with a different focal point. When you stack these photos together, the end result is a photo with much greater clarity and sharpness than you could get from any one individual photo.
What Is Depth of Field and How Does Macro Focus Stacking Relate to Image Stacking?
Modern DSLRs don’t shut down the lens aperture until the moment you take the photo. But you don’t see the effect a lower aperture has on depth of field while composing a shot.
To preview the effect, use your camera’s depth-of-field preview button if it has one. More of the scene is in focus at smaller apertures. Particularly if you switch your camera to live view without exposure simulation.
If your camera lacks a depth of field preview button, take a test shot.
The same adjustments will change the depth of field in macro photography as well. But it won’t be by the amount you might expect.
You might have enough depth of field for a normal subject such as a person several meters away. But this will go down as you move the camera closer to the subject.
This presents a particular difficulty in macro photography. Obtaining a large image of a small object on your sensor means getting the camera very close to the subject.
You can use a small aperture to maximize the depth of field. But closing it down to the min. will introduce diffraction. And it’ll soften the resulting image.
It’s quite common for the resulting macro depth of field to be only a few millimeters. Even when using a small aperture.
For the sharpest results, set your lens aperture to around the middle of its range. This is the sweet spot.
You’ll avoid diffraction softness. And a very shallow depth of field when shooting at the max aperture.
Even with the optimal aperture, the depth of field can still be small. Canon’s MP-E 65mm macro lens is capable of x1 to x5 magnifications. But it has a depth of field at full magnification of 40 microns.
There’s only so far you can go with camera and lens adjustments. Instead, you need a more sophisticated approach – and that is what image stacking provides.
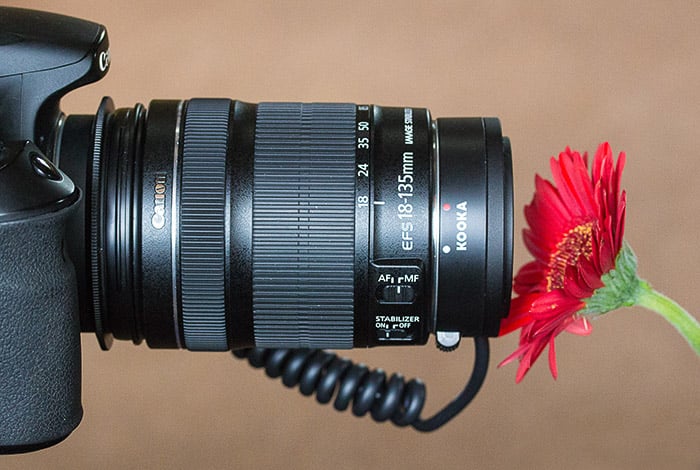
An auto reversing ring allows you to get very close to your subject. At this angle and small distance, you will have trouble getting the whole subject in sharp focus. Even if using a small aperture.
How to Use Image Stacking to Get Around the DoF Limitations
To bypass the DoF limitations, take several photos of the same subject. Alter the focus of each exposure to capture a succession of sharply focused ‘slices’.
These will range from the nearest to the farthest point on your chosen subject.
Once you have a series of images, you can combine the focused areas from each photo. This ‘stack’ will produce a single sharp image where the whole subject is in sharp focus from front to back.
That’s the theory. In practice, there’s more involved than blending a series of images.
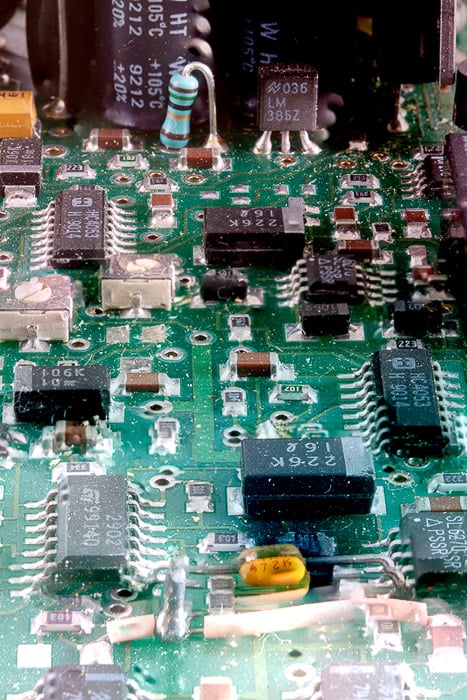
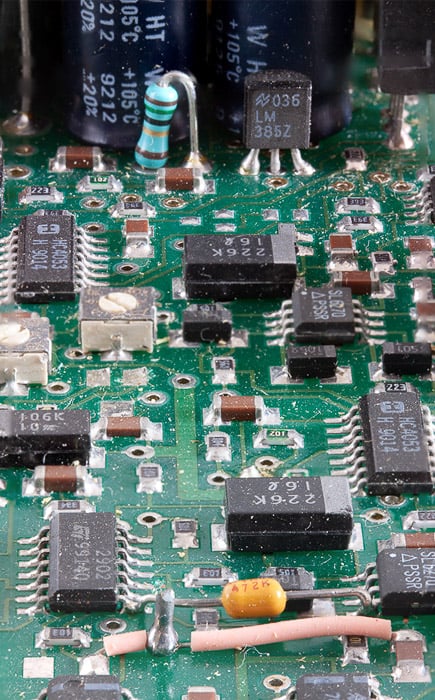
Take, for example, this macro photo of a printed circuit board. It may have been easier to take this photo square onto the board.
This would mean most of the components would be a similar distance from the camera and in focus at the same time. But you can get a more interesting result by shooting at a low angle close to one edge of the board.
The problem is that even at f/16, the depth of field is too shallow.

Even at f/16, there is insufficient depth of field. In this case, it’s around 10mm.
The foreground is sharp. But the more distant components at the top of the frame are out-of-focus.
We need a series of images that sweep the focus into the image.
The procedure is simple:
- Set the camera to manual focus and manual exposure. Use a small aperture – try your lens’ sweet spot.
- Focus on the foreground as shown above and take the first exposure. Then examine the result on the back of the camera. Note where the furthest sharp area is. Re-focus the lens to this point to overlap the old depth-of-field with the previous one.
- Take the next exposure and repeat until you’ve reached the furthest extent. The number of photos you need will depend on the depth-of-field. In this example, I’ve covered the area with four images.

A four image sequence showing how the image magnification varies as the focus is adjusted.
Take a look at these four images. You’ll notice it’s not only the focus that changes from one image to the next.
The camera and subject remained fixed in position. But there is a change in the size and position of each component from one photo to the next.
This is particularly obvious in the background and foreground.
When you change the focus, you’re also affecting the size of the image on the sensor by a small amount.
This is not something you’d notice with the naked eye. In the world of macro photography, it can be a significant problem when trying to blend the images.
Blending the Image Sequence
In this example, blending is a two-stage process. We first have to deal with the variation in image size and position. After that we can select the areas of max sharpness from each image.
You can either blend the images in Photoshop or using dedicated software.
Let’s look at how to do this in Photoshop and then examine a dedicated focus stacking application.
Focus Stacking Using Photoshop and Lightroom
If you’re working in Lightroom, select all the images you want to stack from the library view. Right-click one and then select ‘Edit In’ | ‘Open as Layers in Photoshop’.
Don’t confuse the photography term ‘stacking’ in Lightroom with what we’re trying to do here.
Lightroom’s term refers only to the way it groups photos in the library view and has nothing to do with layers.
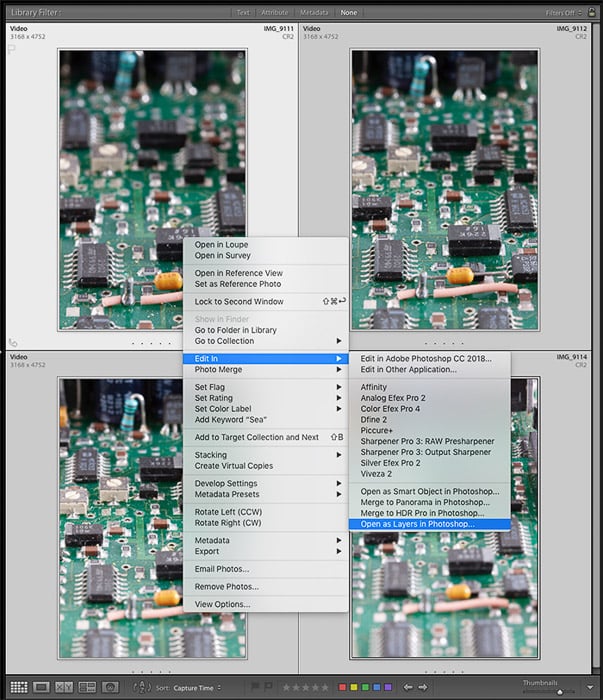
Sending an image sequence from Lightroom to Photoshop for stacking.
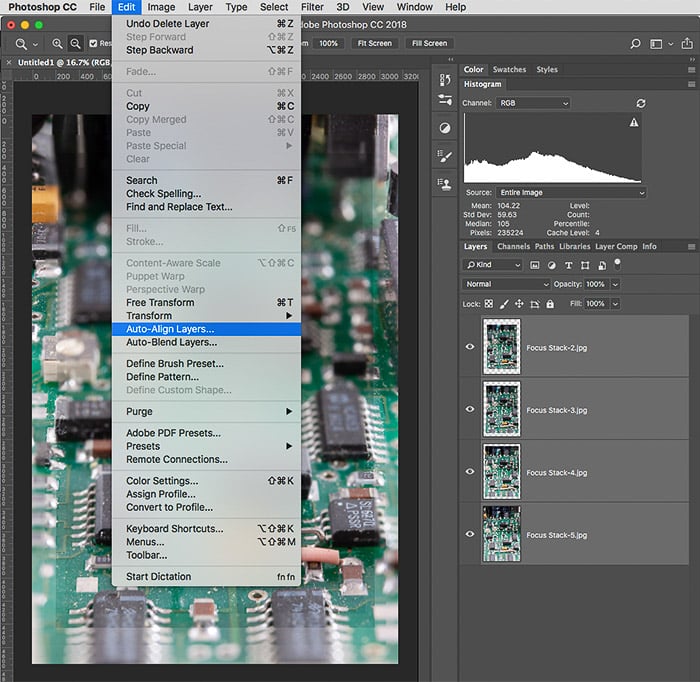
If you’re working in Photoshop, go to Files | Scripts | Load Files into Stack.
If you’ve saved your sequence of images to a folder, you can select the folder. Or you can browse for the individual photos.
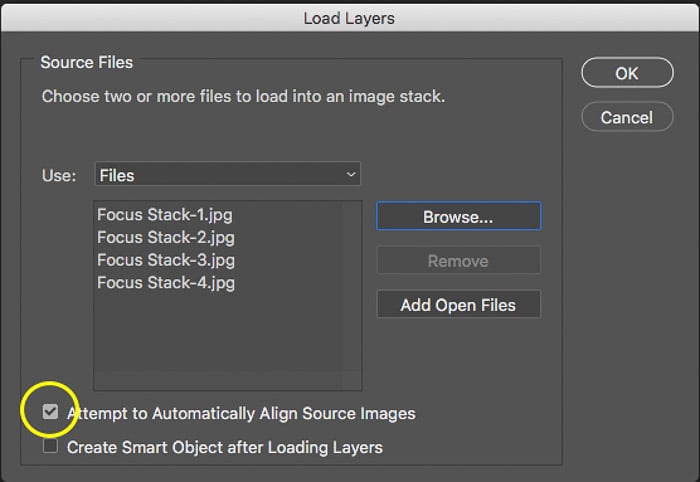
Loading a sequence of images into a stack in Photoshop with auto alignment.
Make sure you tick the box ‘Attempt to Automatically Align Source Images’. This will adjust for the variations in the effective size of each photo.
You’ll lose some of the image around the edges. But if you don’t do this, Photoshop will attempt to blend the various layers as they are.
This will produce a terrible image like this.
The result of forgetting to align images before blending.
Image Alignment
You should see your photos arranged in the layers palette ready for processing. You might have already opted to align the layers during import.
You’ll see that Photoshop has reduced the sizes of some of the layers. These now have transparent borders. This size change facilitates alignment.
What if you’ve imported your images from Lightroom? You’ll need to instruct Photoshop to align them now.
To do this, click the bottom layer and then shift-click the top layer to select them all.
Then from the top menu, select Edit | Auto-Align Layers… Select the ‘Auto’ option and hit ‘OK’.
After Auto-Align, some images will be reduced in size slightly and have transparent borders as shown here in the layers palette.
Image Blending
Photoshop now needs to analyze the high spatial frequencies in each of the images. And it needs to mask out the low-frequency spatial frequencies.
This is a lot simpler than it sounds. Select all the layers, and from the main menu, select Edit | Auto-Blend Layers…
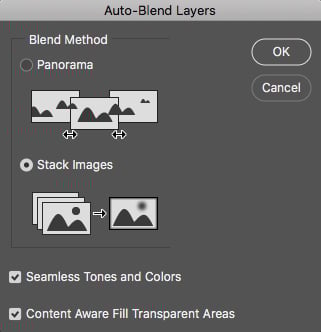
Auto-Blend can stitch images into a panorama but in this case, we want it to blend a focus stack so select ‘Stack Images’.
Select ‘Stack Images’ and tick both the other boxes and hit ‘OK’. After a few seconds, Photoshop will generate layer masks. These will reveal the sharp areas of each layer.
Photoshop will then combine these layers into a new merged layer. This will appear at the top of your layers palette.
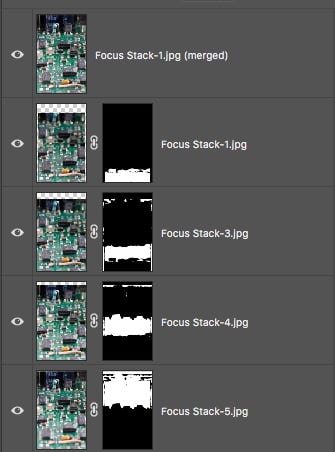
Photoshop makes a layer mask for each image that shows the sharp areas while hiding the out-of-focus portions.
You will then need to trim the resulting image to remove some blurred edges.
You should end up with something that’s sharp across the full depth of the subject.
Focus Stacking Using Helicon Focus
If you don’t have Photoshop, there are other options. These not only align and blend focus stacked images but will also automate much of the process.
The best known of these is Helicon Focus. It’s actually two software apps – Helicon Focus and Helicon Remote.
Helicon Remote controls the camera via a cable. This is to step focus the lens, take the photo and transfer each focused slice to the computer.
Helicon Focus stacks a series of images. It makes all the adjustments needed to produce the composite result.
Here’s a quick outline of the process. Set your camera to manual mode (so the software can control it) and connect it to your computer.
Helicon Remote should recognize it and switch the camera to Live View. This way you can see the subject on the computer screen.
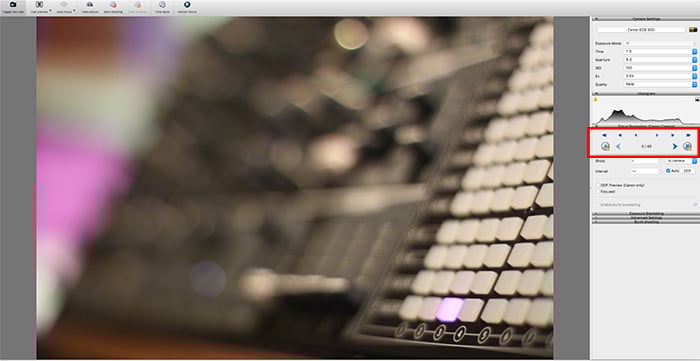
Screenshot of Helicon Remote showing live view from the sensor together with focusing and exposure controls.
Next, use the controls in the focus section (outlined in red above) to focus the lens at the nearest point. Save the setting by clicking the ‘A’ button.
Then use the focus controls to move the focus to the farthest point you want to be in focus and click the ‘B’ button.
Helicon Remote can calculate how many photos you need and at what focus settings. It does this based on the exposure settings you set in the section above.
At this stage, you can experiment with different angles and lighting. You’re only setting up the range of focus adjustments.
I chose to include the keyboard on my synthesizer for a more demanding test. I also used a standard 50mm lens for this shot rather than a macro lens. This was to show that focus stacking is not limited to macro photography.
Once you’re satisfied with the composition, you can hand the work over to Helicon Remote.
Click the ‘Start Shooting’ button at the top of the screen. Helicon Remote will then set the focus. And it will fire the shutter for as many photos as needed.
It will transfer each photo to the computer as it takes them so you don’t even need a memory card. Once it’s taken the whole sequence, it will give you the option to open these images in Helicon Focus.
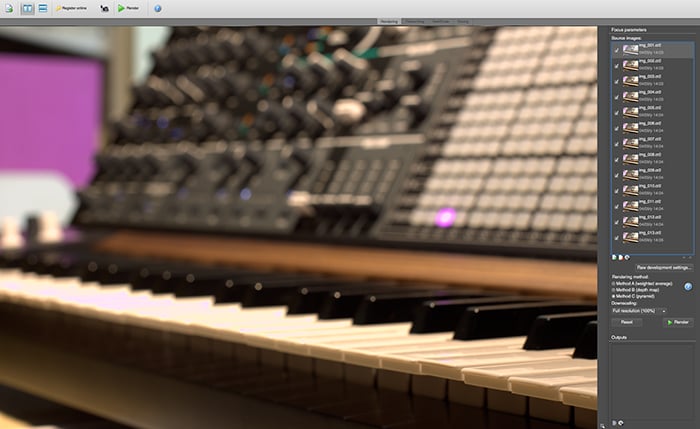
Helicon Focus will open with the freshly shot sequence of images already loaded and ready to be blended.
You are then presented with a list of component thumbnail images. There are also some options that control how blending will happen.
Clicking the Render button will start the chosen blend algorithm. This will take a minute or so to complete. You can watch it selecting the sharp areas of each component image in turn.
Here’s the result:
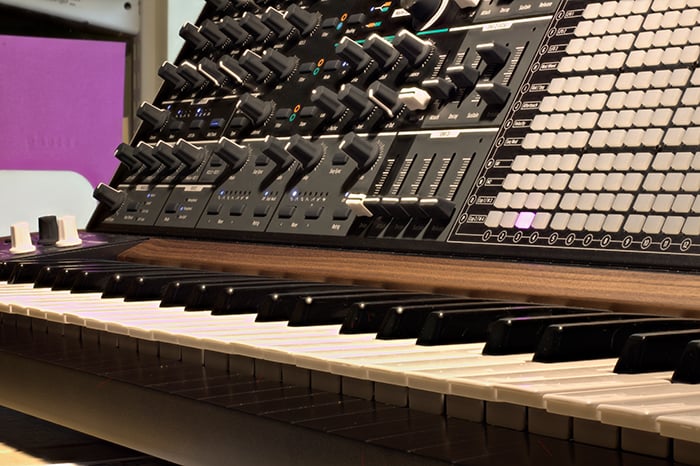
The result of blending 13 images in Helicon Focus using an APS-C camera and standard 50mm lens.
Conclusion
Focus stacking is particularly useful in macro photography. But it’s also a great tool for achieving sharp images with any lens.
Don’t limit yourself to macro lenses – try it with both wide-angle and telephoto lenses.
Try using the technique in landscapes, or product photography. Any situation where you can sweep the focus in a series of images is good to practise.