A 4×6-inch photo measures 101.6 × 152.4 mm, or 10.16 × 15.24 cm. Those are the exact conversions of 4 × 6 inches. At 300 pixels per inch (PPI), the image area needs 1200 × 1800 pixels.
The same print can be portrait or landscape: turn it sideways and the width and height swap. Here are the dimensions, followed by the crop, border and resolution checks to make before printing.
How Big Is a 4×6 Photo in Inches, CM and MM?
| Measurement | Short side × long side |
|---|---|
| Inches | 4 × 6 in |
| Centimeters | 10.16 × 15.24 cm |
| Millimeters | 101.6 × 152.4 mm |
| Landscape aspect ratio | 3:2 |
| Portrait aspect ratio | 2:3 |
One inch is exactly 25.4 mm, as NIST explains. So 4 × 25.4 = 101.6 mm and 6 × 25.4 = 152.4 mm. A nominal 4×6 print is not universally 4 × 5⅞ inches.
You may see approximate metric labels on print products. For example, Epson lists 4×6 paper as 102 × 152 mm. A literal 10 × 15 cm rectangle is 100 × 150 mm, which is slightly smaller than the exact inch conversion. If the print must fit a frame or album pocket precisely, check the lab’s finished dimensions rather than relying on the size label.
The PiliApp website has an on-screen size guide. Check its displayed rectangle with a ruler before using it as a physical reference; screen size and zoom affect what you see.
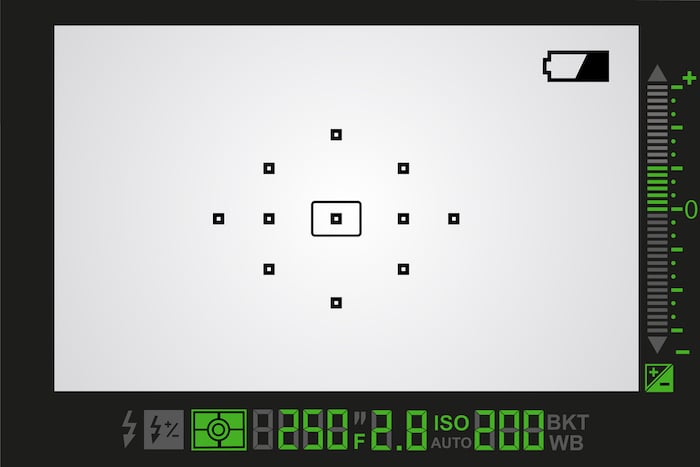
Digital viewfinder in 4×6 (3:2) ratio
What Aspect Ratio Is a 4×6 Photo?
The aspect ratio describes the shape, not the print size. Six divided by four is 1.5, so a landscape 6×4 photo has a 3:2 ratio. A portrait 4×6 uses 2:3. Both are the same photo format, rotated.
This shape matches the 36 × 24 mm frame associated with 35mm film cameras. Canon describes that format as full frame. A digital camera can use that shape too, but digital camera sensors and capture settings vary. Check your actual file rather than assuming every camera or phone produces 3:2 images.
The camera viewfinder illustration above shows the matching 3:2 shape. A file in that ratio can fill a 4×6 image area without an aspect-ratio crop, although borderless printing may still remove a little at the edges.
What Is a 4×6 Photo Size in Pixels?
A 4×6 print has no single pixel size. Multiply each dimension in inches by the chosen print resolution:
Pixels = inches × PPI
| Image resolution | Portrait 4×6 | Landscape 6×4 |
|---|---|---|
| 150 PPI | 600 × 900 pixels | 900 × 600 pixels |
| 250 PPI | 1000 × 1500 pixels | 1500 × 1000 pixels |
| 300 PPI | 1200 × 1800 pixels | 1800 × 1200 pixels |
PPI means pixels per inch in the image. DPI means dots per inch produced by a printer. They describe different things; a printer’s advertised DPI is not the pixel requirement for your file. See our DPI and PPI guide and Adobe’s printer-resolution explanation.
For a 300 PPI workflow, use at least 1200 × 1800 pixels after cropping. Follow the lab’s own instructions: Mpix says its printers output at 250 PPI, for example. No pixel count guarantees a sharp print if the source is blurred or heavily compressed.
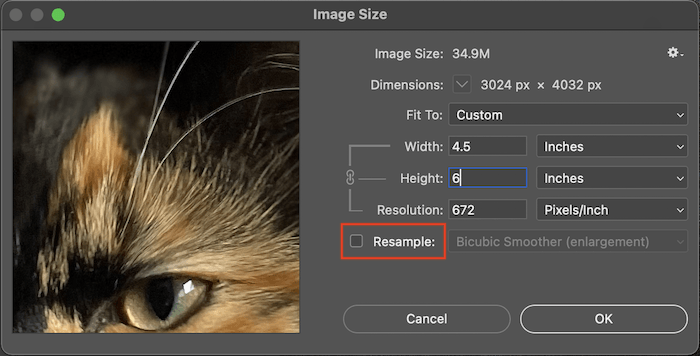
To check your file, open Image > Image Size in Adobe Photoshop and read its pixel dimensions. Our Photoshop resizing guide explains the controls. Changing a resolution label from 72 to 300 PPI with Resample disabled does not add pixels or detail. Adobe explains how physical size, pixels and resolution work together.
Common Issues With 4×6 Photos
Cropping or Adding Borders
If your file has a different shape, it cannot fill a 4×6 rectangle without a crop or distortion. You have two useful choices:
- Fill the print: crop the image to 3:2 for landscape or 2:3 for portrait. Check that the crop keeps faces and other important details.
- Keep the whole image: fit it inside the 4×6 area and add borders in the unused space. The paper is still 4×6, but the photograph within it is smaller.
For example, a landscape 4:3 image fitted to six inches wide is 4.5 inches high. To fill a 6×4 print, remove half an inch from the height in total. To keep the entire image, fit it to four inches high: it becomes about 5.33 inches wide, leaving borders at the sides. These are geometric examples; the lab’s preview shows the actual placement.
Check the crop preview when using printing services. Mpix, for instance, describes a center crop when the file and ordered print have different aspect ratios. A matching ratio also makes enlargements from 35mm film easier to compose.
Borderless Printing and Edge Loss
Borderless printing can enlarge an image beyond the paper edges to avoid a white rim. Epson documents this cropping behavior. Lab trimming and printer settings vary, so there is no universal three-millimeter crop on every side.
Keep important details away from the edges and follow your printer or lab’s safe-area instructions. The illustration below uses a three-millimeter border to demonstrate possible edge loss; it is not a measurement of what every 4×6 printer removes.

Three-millimeter red border to show what a trimmed print photo looks like
Resolution After Cropping
Cropping removes pixels as well as part of the composition. Check the remaining image resolution against the intended print size. For example, a 900 × 600 landscape file provides 150 PPI at 6 × 4 inches; a 1800 × 1200 file provides 300 PPI.
Use the original file where possible and check the lab’s low-resolution warning. Enlarging a small file can create more pixels, but it does not recover missing detail.
How to Prepare a 4×6 Image in Photoshop
Work on a copy so you retain the original. The existing screenshots below show the Image Size and Canvas Size method for a portrait image. Menu styling can differ from your version. This method can trim the picture or add borders, depending on its starting shape.
First, open your image in Photoshop.
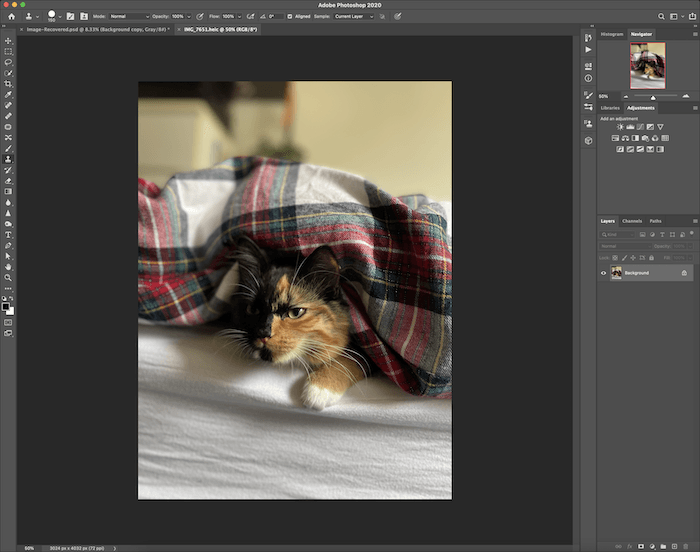
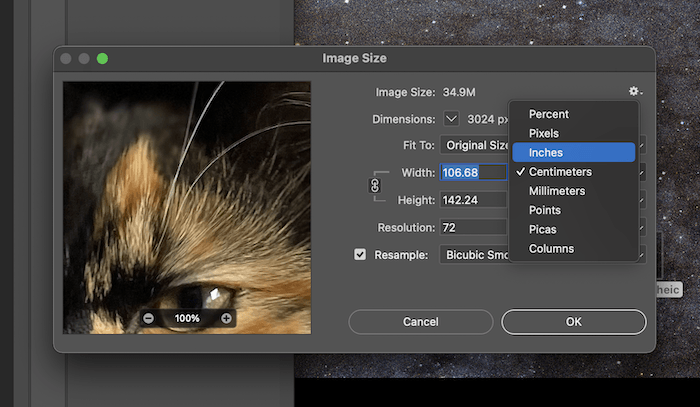
Choose Image > Image Size and set the width and height units to inches. Keep the width and height linked so you do not stretch the photograph. Adobe’s resizing instructions show these controls.
For the illustrated portrait workflow, disable Resample, then set Height to 6 inches. The pixel count stays fixed while Photoshop calculates the width and PPI. If the width is greater than four inches, the next step trims the sides. If it is less than four inches, the next step adds space at the sides. For a landscape version, use Width 6 and a final canvas of 6 × 4 inches.
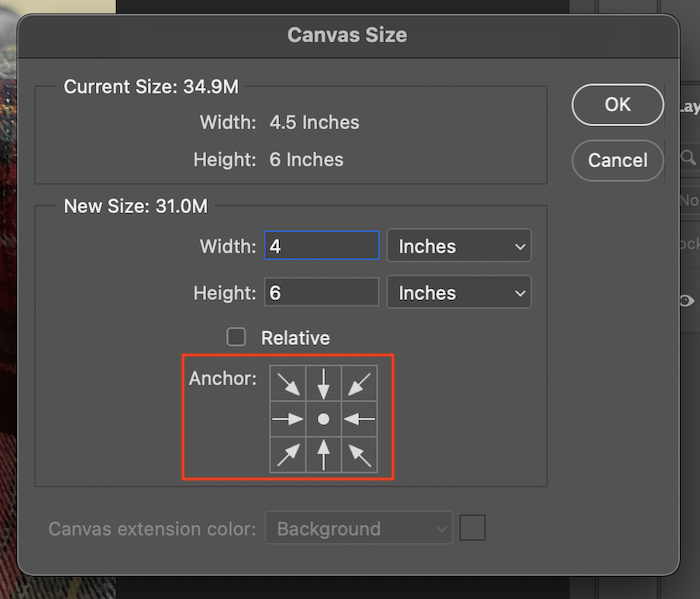
Choose Image > Canvas Size, select inches, and set the portrait canvas to Width 4 and Height 6. Leave Relative unchecked to set the final dimensions directly. Reducing the canvas removes the image area outside it; increasing it adds space. If adding a border, use a suitable canvas extension color or fill any transparent added area before exporting.
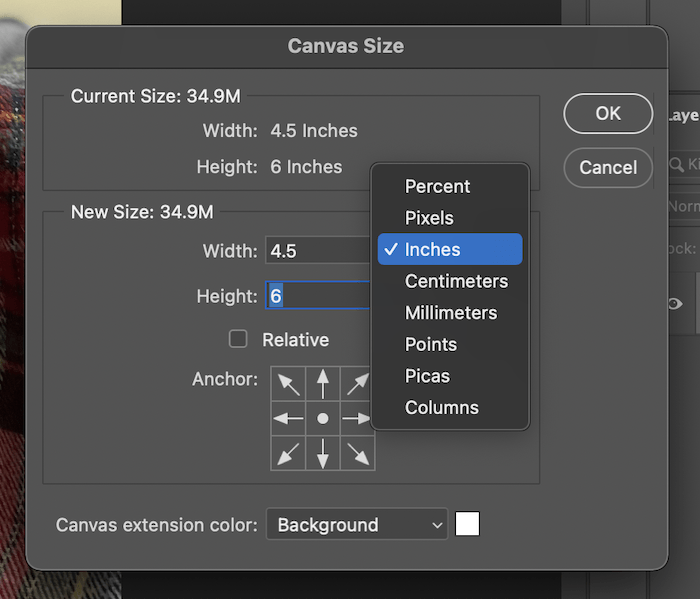
The Anchor grid sets where the image stays fixed as the canvas changes. For a centered crop, use the center square. Choose another square if needed to keep the subject. Adobe’s Canvas Size guide explains the anchor and extension-color controls.
Inspect the result before saving. The canvas now has 4×6 proportions, but a crop removes pixels; it does not preserve every pixel of the original. Recheck the final pixel dimensions and effective PPI in Image Size, then review the print service’s crop preview before ordering.

Conclusion: 4×6 Photo Actual Size
A 4×6-inch print converts exactly to 10.16 × 15.24 cm or 101.6 × 152.4 mm. Its shape is 3:2 in landscape and 2:3 in portrait, and its pixel requirements depend on PPI. At 300 PPI, use 1800 × 1200 pixels for landscape or 1200 × 1800 for portrait.
Choose a crop or borders, check the pixels left after editing, and confirm the paper size and borderless settings on your photo printers. Our guide to getting photos printed covers the next steps.