When it comes to printing photos, there are a lot of things to consider. One of the most important factors is resolution. What is the best photo resolution for printing? How do you determine it? And what happens if you don't print at the optimum resolution?
In this article, we will answer all those questions and more. We will also provide some tips on how to get the best results when printing your photos. So let's get started!
A digital camera captures images through what we know as pixels. Pixels are the smallest components of a digital camera sensor. This means they are the smallest parts of a sensor (or a camera display).
Digital images are made from thousands of tiny tiles capturing light and color. A megapixel (MP) is one million of these pixels. (1,048,576, to be precise.) So a 30 MP camera has around 30 million pixels on its sensor.
![]()
The number of pixels on an image determines the image resolution. The more pixels, the more detailed the image is and the higher its resolution. Image resolution is measured in pixels and megapixels.
To calculate the image’s resolution, multiply its width and height. For example, an image that’s 2,048 pixels wide and 1,152 pixels tall has a resolution of 2.36 MP (megapixels).
Image resolution is often given in PPI (pixels per inch). It means how many pixels are displayed per inch in the image. This refers to the photograph or image’s detail when viewed at 100% on a computer monitor.
But image resolution also relates to the image’s print size. This is given in DPI (dots per inch).
Photo resolution is a factor that determines image quality. But the camera sensor, processor, and even the quality of the lens you are using also play a part.
You might think more pixels mean better images. But then smartphones could outrank some semi-pro DSLRs. Yes, they might have a higher MP number written on them, but it’s not what determines image quality.
Higher-resolution photography can mean higher image quality. But only if you have the right lens. Sharpness, definition, and detail go up alongside the image resolution. And a good-quality image results from many other factors. This includes good lighting, correct exposure, and proper composition.
But yes, more megapixels can mean better quality. And you also need a higher resolution for printing and editing. A clear, well-focused image at the best resolution is key.
You could have a 40 MP camera and still won’t be able to take advantage of it without the right lens. Usually, your lens is not able to resolve as much information as your camera is capable of providing. The quality of the lens determines how much detail it can manage.
And what if your lens produces errors? A high-resolution sensor will draw them more sharply. For example, lines of chromatic aberration will be more visible in your images.

Diffraction is also something that limits the resolution of a lens. This means that image quality changes above a certain aperture value. Usually, at f/16, you encounter a loss in image quality and a decrease in sharpness. That’s because of the optical interference of light. But it’s a general phenomenon in optical physics. So every lens has this disadvantage.
What is the best way to compare optics and see your lens capabilities? Double-check its ranking on this chart by DxOMark. This is one of the most reliable databases online.
Sometimes it’s better to buy an expensive lens for a not-so-expensive body. That way, you can maximize image resolution.
A composition can look much better after cropping an image. This is a technique you can use in analog photography too. Having a higher photo resolution gives you a little more playroom. It helps avoid a serious drop in image quality.
Also, your image might need perspective correction. Or maybe you need to adjust it to standard aspect ratios (i.e., for printing purposes). Both can result in losing some details.
An image with more pixels holds more information. So it’s less of a problem if you lose some.
![]()
You may want to find out the pixel size of your camera or the resolution of your images. You can look at the information from one of your images. For example, a camera may produce its largest image at 6016 x 4016 pixels. This means the max resolution of the camera is 24.2 megapixels.
This information is easily accessible on a computer. Right-click on your image and then click Properties in Windows or Get Info on a Mac to see the EXIF data of your shot. Sometimes it’s also written in your camera’s manual.
For photo editing, you need images with as high a resolution as possible. You should set your camera to the maximum resolution (image size) it can achieve. Most of the time, it’s best to shoot in RAW file format.
RAW files are better for editing than JPEGs. They contain a lot of information. And you can bring more details out of them during post-processing. And as mentioned, they are also better for cropping.
When exporting, you may find that your 20 MP (or higher) image becomes redundant. If your image is for a website, or sharing platform such as Flickr, don’t use the highest image resolution. You’re shooting yourself in the foot.

Sure, it makes your image look great. But if it takes too long to load due to the file size, viewers will scroll past.
Facebook and Instagram automatically resize any images over a certain resolution. They compress them to a lower resolution to be able to store millions of photos added each week. This has the potential to turn a great image into one with poor resolution.
You can resize your images before uploading them to Facebook. Setting the longer edge of an image to 2048 pixels while exporting is just enough. It will also take less time to upload them.
There is also a difference between screen resolution and photo resolution for printing. Your image may look great on the computer screen. But it’s a whole different ballgame when it comes to printing or print quality.
We talked about PPI, which means the number of pixels per inch on a screen or a sensor. Now we should talk about DPI, which means dots per inch.
This refers to the number of ink dots on a print. The higher the number, the higher the quality. You can set the DPI value on your computer. But it really matters when it comes to printing.
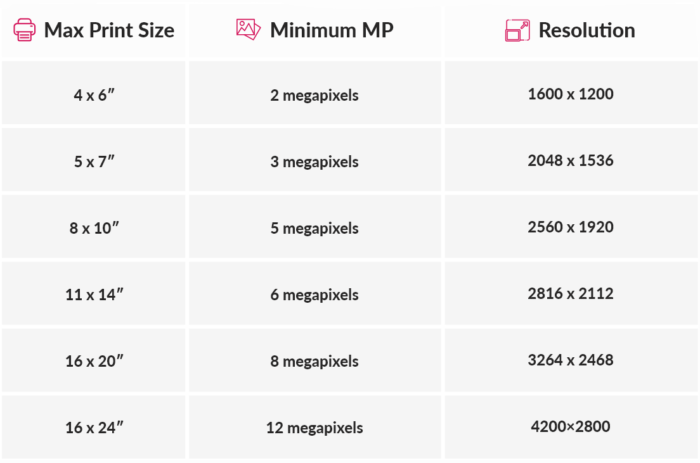
The standard is 300 DPI. You might want a higher resolution, but usually, it’s enough. Under this, your images quickly lose their quality.
Do you have limited knowledge about printing? Then it may be best to leave this to the professionals until you get up to speed. Printing your image at a high resolution on the wrong paper will cause inks to bleed. This results in a blurry effect.

Ensure the ink and materials you use are for digital photo printing. You can find great print labs and online print services to print your images. You’ll also be able to learn information about the materials and techniques they use.
Optimize your image for a canvas that fits the desired scale of your print. You should also pay attention to the RGB and CMYK color spaces.
Remember, you should never print your images at the same resolution as your screen. These are typically 72 DPI (dots per inch). So you want to aim for anything between 300 and 1,800 DPI when printing.
Also, we should mention file formats. It’s preferable to use TIFF file format or TIFF compression (LZW) for printing. Printing an image as a JPEG can cause a huge loss in image quality. It decreases pixel density. This is done by compressing and merging pixels to optimize the file size.
For images at 300 DPI, follow this table to print your photographs at the ideal size.

It’s a myth that you need more megapixels for your images to look great… But it’s a great way to sell cameras. Remember that there’s more to photography than image resolution.
Some photographers need more megapixels for advertising, fashion, or editorial purposes. They may need to print their high-quality images up to the size of small buildings! But everyday photographers aren’t taking images for multi-million dollar campaigns.
So what’s the best resolution for printing photos? New cameras these days are never below 10 MP. And that is enough for 99% of your photographic work!