Photographers use small apertures to gain a wide depth of field. But a smaller aperture causes some problems, such as lens diffraction.
Lens diffraction causes a photograph to lose sharpness at small apertures. So what can we do about lens diffraction? Read on to find out and get the maximum sharpness in your images!
What Is Lens Diffraction?
Diffraction is a physical phenomenon affecting all types of waves. You can observe it in liquids, soundwaves and light. You encounter it all the time, even if it doesn’t catch your attention.
When waves meet a barrier on their way, their behaviour changes. The barrier can be a slit, or it can be a single object.
Here, we’re observing the slit example. (You will apply it later to the aperture opening in your camera.)
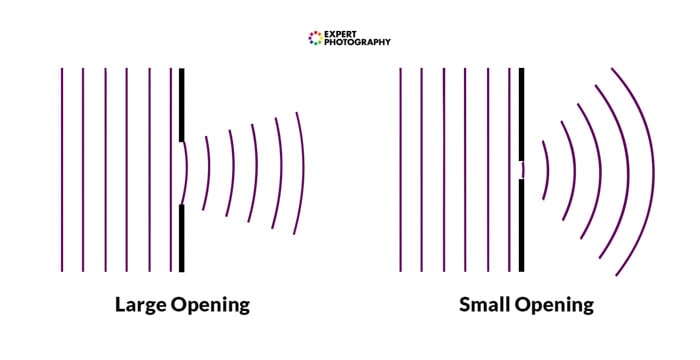
The start to waves bend. Depending on the size of the slit compared to the wavelength, this bending can vary in size. If the slit is wide, there’s not much.
If the opening is comparable to the wave length, diffraction will occur at a much larger relative scale.
We model this change in behaviour as if new waves were created in the line of the slit. All along this line, the new waves begin to spread out in different directions. The degree of this varies, depending on the size of the slit.
The idea of circularly spreading waves and their physical explanation is called the Huygens principle.
The waves then interfere, which results in differences in the strength of waves. They cancel each other at some places while adding up at others.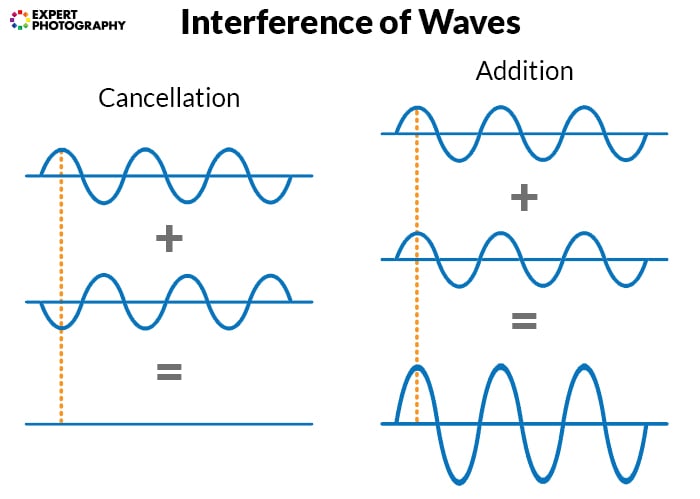
If we observe these additions and cancellations along a line parallel to the slit, we get a pattern. In the middle, there’s a very strong add-up of waves.
Then, there are repeated additions and cancellations, decreasing in amplitude outwards. This continues until the pattern becomes indistinguishable.
The most spectacular example is diffraction in water.
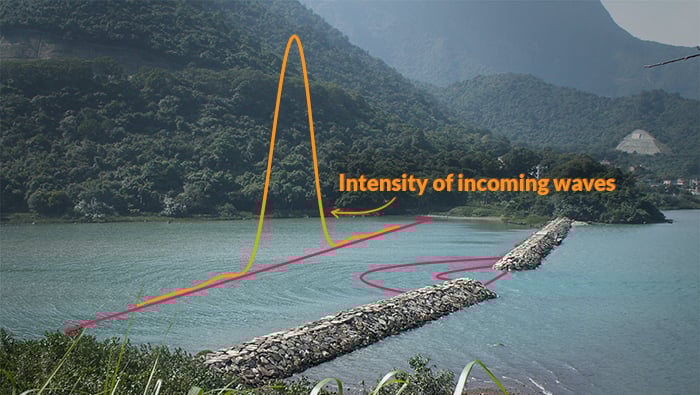
Take a look at the image below.
You can see a slit, comparable in size to the water’s wavelength. Diffraction is very noticeable. We observe the strength of waves at the long purple line.
They are most intensive in the middle, in front of the slit itself. A dip of wave cancellation follows. Then, gradually towards the edges of the river, the level of interference decreases.
This pattern, shown in orange, is called the Airy pattern.
The Airy pattern of intensity. Original image from Wikipedia
Diffraction of Light
The example of water is two-dimensional. But diffraction occurs in three-dimensional situations, too. For us, photographers, it’s the diffraction of light that matters.
When the light goes through a slit, it diffracts. In photography, the size of the aperture slit is much larger than the wavelength of light. This even applies at narrow settings, such as f/32.
So, light doesn’t bend excessively- but it can still cause issues.
Pixels on modern cameras are tiny. So tiny in fact, that their size is often only one magnitude larger than the wavelength of visible light.
This implies that even though light doesn’t diffract much, the effects are noticeable.
We’ll come back to the exact numbers, but first, let’s see what happens when light passes through a slit.
In this example, a red laser was projected onto a sensor through a 90-micrometre aperture.
Keep in mind that 90 micrometres is much smaller than what you’d find in any lens. This size helps to visualize the effect better. On a 50mm lens, it would make for an f/550 aperture.
You can see the Airy pattern, but it’s two-dimensional in this case. The strongest part is in the middle – waves add up there. The pairs of cancellations and summations are orders – there are 27 of them below.
This two-dimensional Airy pattern is called an Airy disk.

“A real Airy disk created by passing a red laser beam through a 90-micrometer pinhole aperture with 27 orders of diffraction.”
How Does Lens Diffraction Affect Your Photography?
Diffraction impacts everyday photography.
Depending on the pixel pitch of the camera sensor, lens diffraction can limit the image resolution.
It often causes problems at high f-stops. In some devices, for instance, high-megapixel compact cameras, you might start seeing it at f-stops as low as f/3.5.
As you stop your lens down, the effects of lens diffraction become more and more apparent.
Diffraction limits resolution. No matter how good your lens is, it's always true. The extent of this is given in this (simplified) formula:
p = (1.22 λ A) / 2
Here, p is the smallest pixel pitch that can receive pixel-level information from the lens. λ is the wavelength of incoming light, and A is the f/stop.
Let's calculate with the iPhone XR's camera. It has a 12MP sensor, with a pixel pitch of 1.3 micrometres. It has a fixed f/1.8 aperture.
The wavelength of visible light is about 0.5µm.
p = (1.22 * 0.5µm * 1.8) / 2
The resulting p is 1.1µm.
If two objects are closer to each other on the sensor than p, they will blend together. They can’t be resolved, no matter how tight the pixels are packed.
What this means is that the iPhone XR (with its 1.3µm pixel pitch) is very close to being diffraction-limited.
So, even if the lens is optically perfect, free of all aberrations, it's at its peak. It can't accommodate smaller pixels.
Take another example.
At f/16, the resulting p is 7.3µm. This means that cameras with a pixel pitch around this value are only affected by diffraction above f/16.
So, the original 5D with its 8µm pixel pitch only gets diffraction-limited after f/16.
This coincides with my experiences. When I use the original Canon 5D, I tend to get away even with f/16 without a decrease in sharpness. On the 5D MkIII and MkIV cameras, it's more like f/11 and f/9.
Take a look at this illustration I shot with the Canon 5D MkIV, and the Canon 100mm f/2.8L IS macro lens. Both shots are in perfect focus; the softening is due to lens diffraction.

The effect of lens diffraction on resolution
Finding the Sharpest Aperture
You’ve probably learnt that the more you stop your lens down, the sharper the image you’ll get. And you might be stunned that this principle is partially erroneous.
The truth is somewhere in the middle – in all aspects.
If you use them wide open, lenses suffer from spherical aberration and potential design issues. Their apparent sharpness is lower because of the shallower depth of field.
If you stop them down too much, they are affected by diffraction.
On DSLR and mirrorless lenses, you’ll find that the sharpest apertures are usually 2-3 stops higher than the maximum aperture.
On the Canon 50mm f/1.8 II (often called the nifty fifty) lens, it’s around f/4. My Canon 24mm f/1.4 lens doesn’t get any sharper beyond f/2.8.
Test your lens to know its behaviour at different apertures.
Depth of Field and Lens Diffraction
Keep in mind that you might still want to use narrow apertures in certain situations.
If you need to keep most of the scene in focus, stopping down is generally the easiest method. Landscape photographers often have to shoot at and beyond f/16.
That way, the depth of field will be larger, resulting in a seemingly sharper image. The parts in perfect focus won’t be as sharp as they would at f/8, but more of the scene will be almost as sharp.
A technique to achieve a large depth of field and the highest possible sharpness simultaneously is called focus stacking.
It’s a pretty meticulous process with limitations, but can yield great results. To do it perfectly, you need to shoot a series of images of a completely steady subject, using a tripod.
You incrementally change the focus between the shots, covering everything from the closest to the furthest subjects. Later, you combine them in an editor, for example, Photoshop.

Photo by Samer Daboul from Pexels
Conclusion
Lens diffraction is a confusing topic, yet you can see the effects it has on your image. It is worth knowing about this when you’re shooting your scenes.
Lens diffraction will always be present. Unless you are careful, your images will lose out in sharpness.
Once you see lens diffraction and understand how it works, it will become second nature to handle it in your photography.
For more great tips, check out our posts on camera sensor size , reducing blur or shooting with larger apertures next!