You’ve probably heard of shallow vs deep depth of field. But do you know when to use one over the other?
Our article gives you six great tips for using depth of field for creative effects, including bokeh. This is the beautiful blurry effect prime lenses are known for.

- Learn to effortlessly set up your camera for any situation.
- Master the art of selecting the perfect exposure every time.
- Discover 10 composition rules that elevate your photos instantly.
Shallow vs Deep Depth of Field
1. A Bigger Sensor Means a More Shallow Depth of Field
Shallow depth of field is easiest using a full-frame sensor or larger-format camera. A larger dimensioned camera sensor means better bokeh.
I’ve often spoken with frustrated new photographers who have bought an entry-level DSLR or beginner camera with a kit lens. They tell me they struggle to create nice bokeh in their photos. Two things work against this camera type and lens choice.
Combining a smaller sensor and a lens with the widest aperture of around f/4 makes it more challenging to create photos with a shallow depth of field. With this camera and lens combo, you must concentrate on zooming in.
Also, ensure plenty of distance between your subject and the background. Or, you can zoom wider and get as close as possible to your subject.
Sensor size has nothing to do with the number of megapixels your sensor has. A 40-megapixel (MP) phone camera won’t produce shallow DoF like a 12-MP full-frame DSLR. It’s the physical size of the sensor that makes the difference.
Using a smaller-sensor camera or smartphone helps create a deep depth of field in your photos.

© Kevin Landwer-Johan
2. Longer Lenses Are Better for Shallow Depth of Field
Whatever camera and sensor size you use, the longer the lens you put on it, the less the background appears in focus. This is not because there’s less field depth with longer lenses but because they compress distance more.
Wide lenses take in much more background and give the appearance of what’s in the frame being spread out. Using the same aperture setting on a 20mm lens as on a 200mm lens gives you essentially the same focus depth.
It appears different because of the compression and the amount of background you can see. Using a wide or long focal length, the DoF at any aperture might measure the same but look different. This look is what concerns most photographers.
Attaching a longer lens or zooming in to your maximum limit produces photos with softer-looking backgrounds. I used a 300mm lens with the aperture set to f/5.6 for this photo of the red flowers below. The camera I used had a full-frame sensor.

© Kevin Landwer-Johan
Only some of the red petals are sharp. The unopened flowers at the end of the stem are not sharp. The garden in the background is not detailed because it is much further away.
Retaining a large depth of field with a long lens can be challenging. Set your aperture as narrow as you can and focus on the distance.
The further away your point of focus, the more focus there is in your photo. This is true for any lens but is more pertinent with longer lenses when you want more focus.
3. A Wide Aperture Means Shallow Focus
Kit lenses sold with cameras typically don’t have a very wide maximum aperture. To most easily achieve a shallow DoF, It’s best to use a lens with the widest aperture of at least f/2.8. Wider is better.
Prime lenses that do not zoom often have wider maximum aperture settings. A 50mm f/1.4 or f/1.8 are both popular and relatively cheap.
Using a lens like this with a wide-open aperture results in a very shallow depth of field in your photos. When you focus on something far from the camera, the narrow field of focus won’t be so noticeable.
Longer or wider prime lenses with wide maximum apertures are more expensive. Using the widest aperture on longer lenses can be challenging. With a very shallow depth of field and a lot of compression, it’s vital to focus precisely where you need to.
Let’s take an example of photographing a close portrait using an 85mm f/1.4 lens. If you focus on the person’s nose or ears, their eyes will be out of focus. It’s most helpful if your subject remains very still. If they move slightly, your focus point will be wrong.

© Kevin Landwer-Johan
Often, I take multiple photos in succession when using a longer lens with a wide aperture. First, I focus carefully on the point I choose. This is usually a person’s eyes when I am making a portrait.
I move very slightly forward and back, so my focus points vary. At least one frame I take is in focus at the best point.
Wide-angle lenses with wide maximum apertures allow for shallow focus. Without the compression effect of a long lens, the bokeh is often not so soft. Using a 35mm or 24mm at f/1.4 is not as difficult as with longer focal lengths.
Using the widest aperture setting requires more care to focus precisely with any lens. When you do, the effect of the very sharp, shallow depth of field attracts the viewer’s eye. You can use this technique to guide their gaze exactly where you want them to look.

© Kevin Landwer-Johan
4. Subject to Background Relationship Affects Depth Of Field
Placing your subject further away from the background will mean the background is more out of focus. The farther away from your camera, the softer the bokeh will appear.
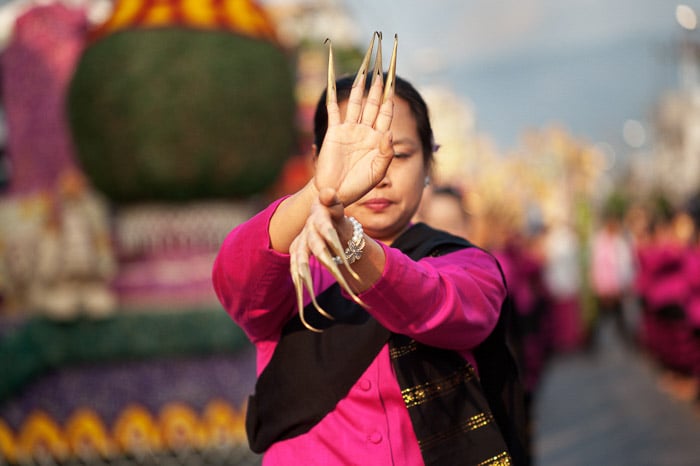
This photo of a Thai woman dancing in a street parade demonstrates this well. Her right hand is in focus, but her face is not sharp. Looking into the distance behind her, you can see the blur increase.
I took this photo below with a 105 mm lens and the aperture set to f/2.5 on a full-frame camera. I wanted to have her right hand in focus and show the color in the background.
© Kevin Landwer-Johan
While she was dancing, I carefully positioned myself and took the photo when the person behind her was hidden from view. Had this next person been visible, they would not have been blurred because they were closer to my subject. They would have been distracting.
Subject to background distance affects the amount of blur no matter what aperture setting you use.
If you only have a kit lens with the widest aperture around f/4 and want a blurred background, separate your subject from the background. The background is blurred if you have enough space between them and use your widest aperture setting.
5. Get Close to Your Subject for a Shallower Depth of Field
Getting in as close as your lens lets you focus helps you get a shallow DoF. Combining this technique with the previous tip can make it possible to take photos with a soft background, even with a kit lens.
Position your subject far away from anything in the background. Get in close and frame your subject carefully.
Coming in close means whatever is in the background blurs. Naturally, the wider your aperture is set, the greater the degree of blur in the background.
When you want more detail to be visible in the background, back away from your subject. Being further from your focus point gives you a larger depth of field. This is common in landscape photography when you want to find the hyperfocal distance.
I often position myself farther away from someone when making an environmental portrait. Being too close can mean insufficient detail in the background to put the person in a clear context.

© Kevin Landwer-Johan
6. Use Depth of Field to Tell Your Subject’s Story
The techniques outlined above will help you create lovely soft backgrounds. This is often desirable to enhance your photographs’ storytelling potential.
Lens choice, careful manipulation of your aperture, and distance ratios let you control the degree of background blur. By slightly blurring a background, your photos are more striking rather than having it completely soft.
Find the sweet spot—when the background is blurred enough not to be distracting yet contains enough detail. This creates a more narrative image.
I focused on the taxi driver sitting in his tricycle in the photo below. The driver and vehicle passing in the background are not sharp, but it’s still clear enough to see what it is.
Had I blurred the background more, any helpful detail would have been lost, adding nothing to the photo’s story. Having more of the background in focus would have meant distraction from my main subject.

© Kevin Landwer-Johan
Quick Guide for a Shallow Depth of Field
Creating photos with a shallow DoF and soft bokeh is made easier by doing the following:
- Use a camera with a large sensor dimension (disregard the megapixel count)
- Buy a lens with a wide maximum aperture, usually f/2.8 or wider
- Use a long lens rather than a wide one (100mm or longer, depending on the maximum aperture)
- Have enough distance between your subject and the background
- Get as close as possible to your subject
© Kevin Landwer-Johan
Conclusion: Using a Shallow vs Deep Depth of Field
Mastering the use of a shallow vs deep depth of field requires knowledge of the principles involved. It’s not merely about using a lens with a wide aperture.
Plenty of practice is also necessary. Work through tips two through five with whatever sensor size you have. Get a feel for how each one affects the blur you see in the background of your photos.
Once you understand these photography principles, you can better control the blur level. You’ll soon be able to tell how much or how little blur works best in the photos you are taking.
- Learn to effortlessly set up your camera for any situation.
- Master the art of selecting the perfect exposure every time.
- Discover 10 composition rules that elevate your photos instantly.


