So you’ve bought your first DSLR camera. Are you eager to start taking DSLR photography but don’t know what to do with your camera? Or are you unsure what all those buttons and settings are for?
Don’t worry—we’ve got your DSLR basics covered. Our article tells you all you need to know to understand your first DSLR camera. Grab your camera and its manual, and let’s get started.
- Master manual mode to capture moments you’re proud of.
- Overcome the frustration of missed shots with quick exposure settings.
- Benefit from visuals with hundreds of images and illustrations.
DSLR Basics: How to Use Your First Camera
I’ll be using my two Nikon DSLR cameras to illustrate this article. Don’t worry if you’re using a Canon DSLR or a different brand. The terminology might vary, but the concepts remain the same. Just check your manual to see what camera settings are in your camera.
1. Begin With Autofocus for Best Focus
All DSLRs give you a choice between manual and auto modes. Focusing manually by moving the lens rings is quite hard and requires practice and time. Not to mention that even professional photographers still use autofocus modes.
Set your camera and lens on autofocus (AF) and let your device do the job—at least at first. It will save you a lot of time, and you’ll still get that sharp focus and great image quality you’re after!
You can switch between manual focus and autofocus through the menu. But it’s easier and faster to do so with the switch on the camera and lens itself.
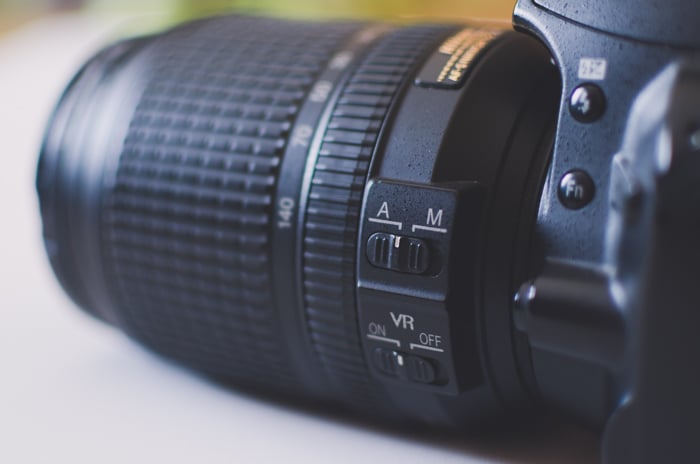
Lens switch to change from autofocus (A) to manual focus (M)
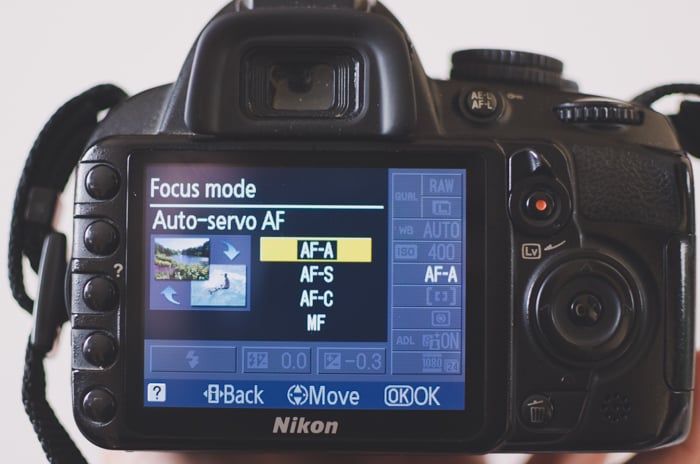
2. Choose an AF Mode Based on What You Need
Digital cameras have different autofocus modes. This means different settings depending on your subject. You can select them through your screen camera menu or using a button.
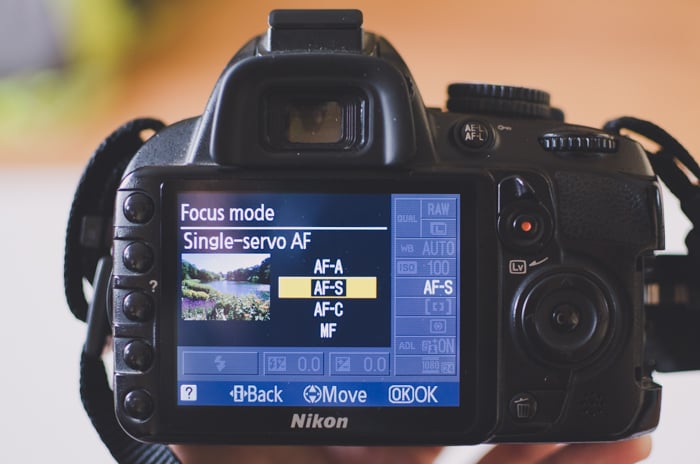
The autofocus I use in 95% of my shots is the AF-S (single-area or one-shot autofocus). It works great for stationary or slow-moving subjects (landscapes, flowers, food, models that don’t move fast, etc.).
It lets you lock the focus when you press the shutter button halfway. You then take the photo by pressing it down.
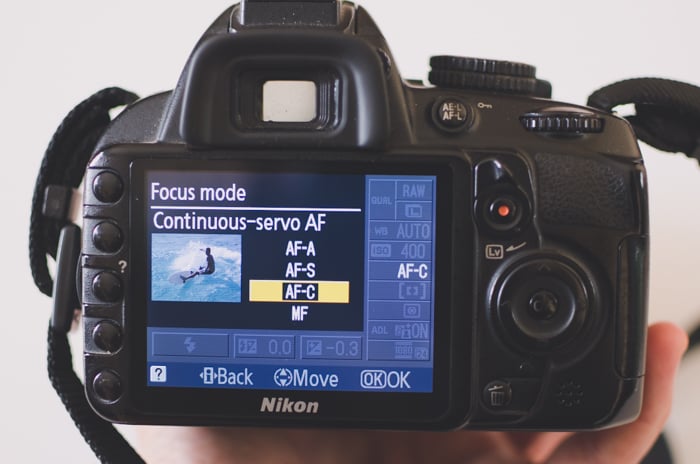
If you’re taking photos of moving subjects (sports, pets, wildlife, etc.), use the AF-C (continuous-focus or AI servo autofocus). Your camera adjusts focus continuously while the shutter button is pressed halfway.
Finally, you have the AF-A (auto autofocus). The camera has full control and decides with each shot if it is AF-S or AF-C. This can get confusing if you’re shooting both moving and stationary subjects, so I don’t recommend it.
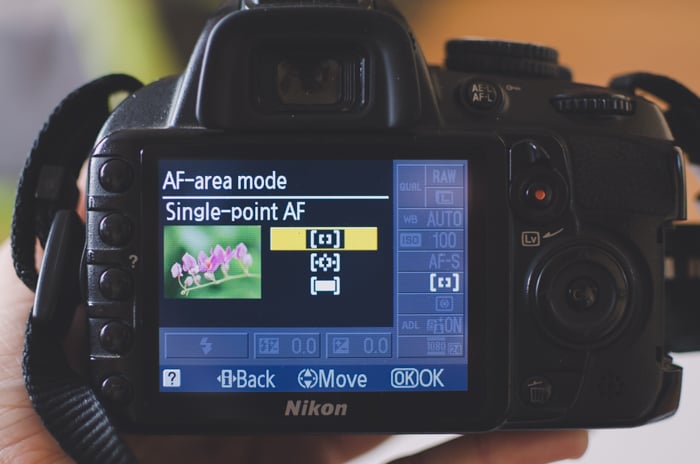
3. Choose Focus Points
Your camera can focus on certain points of the frame (focus points). You can see these points through the viewfinder or on the screen (focus point display). Depending on your DSLR camera, you might have nine or more points. And you can select the one you want to focus on.
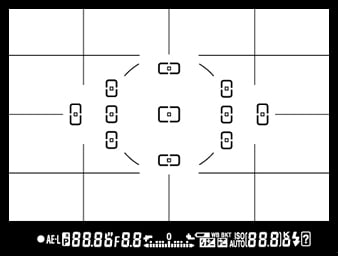
Focus points. Photo from Nikon.
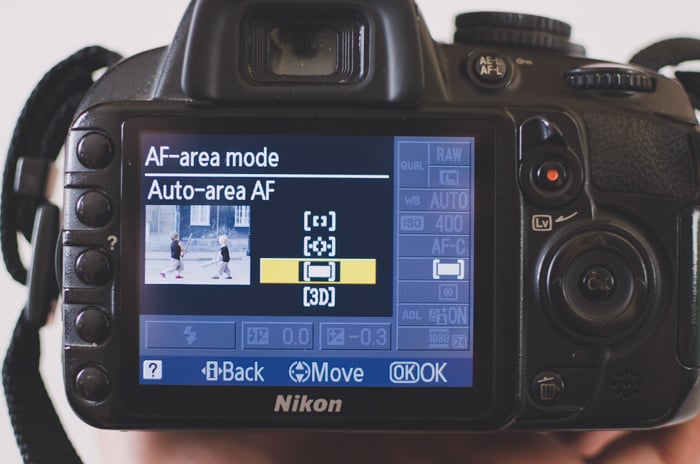
First, you must pick the autofocus area (AF-area) using the menu on your camera screen. Select single-point AF. Your camera focuses only on your selected focus point (great for steady subjects).
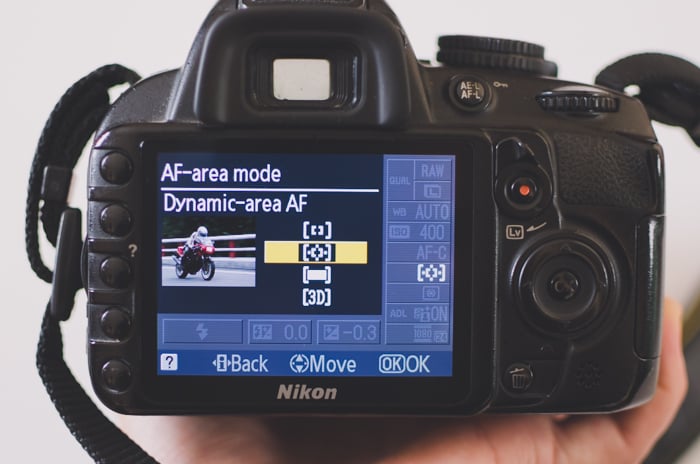
If you choose dynamic-area AF, you need to select a focus point. The camera refocuses using surrounding points if the subject moves even a bit. This is a good option for unpredictable moving subjects.
In 3D-tracking mode, you select one focus point. By keeping the shutter release halfway pressed, you can change the composition. The camera selects a new focus point to keep the subject in focus.
Finally, you can let the camera decide where to focus (Auto-area AF). Again, I recommend not using this option because your camera is just a machine. It doesn’t know what the most important subject in the frame is for you.
4. Choose a Metering Mode for Best Exposure
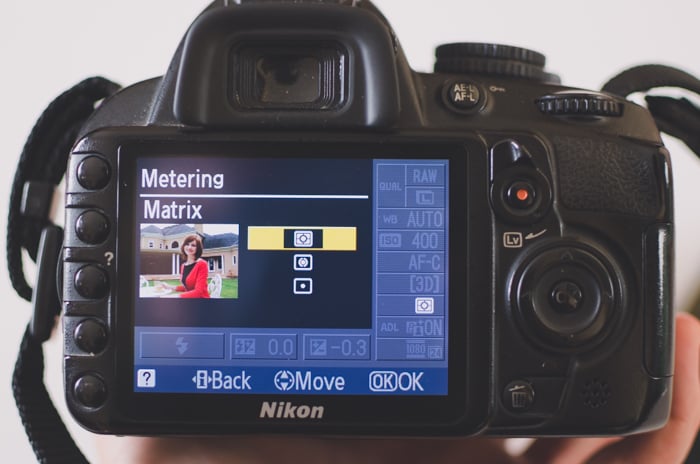
Metering modes tell your camera how to measure available light. You can choose them through the menu on your camera screen or by pressing the metering mode button.
The default mode is usually a matrix or evaluative mode. Your camera measures the light across the whole frame. After some complicated calculations, it tries to achieve a balanced exposure. This is useful for uniform scenes.
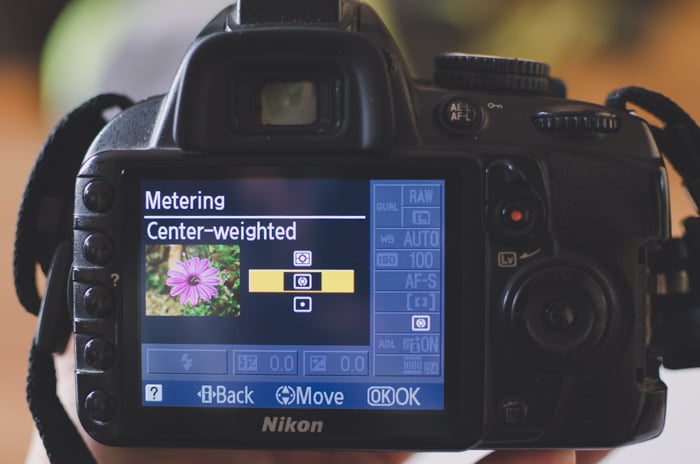
Next, we have a center-weighted mode. The camera measures the light in the center of the frame and its surroundings. It depends on your camera model but is usually between 60 and 80% of the frame.
It’s useful when your subject takes up most of the frame and you don’t care much about the exposure of the corners.
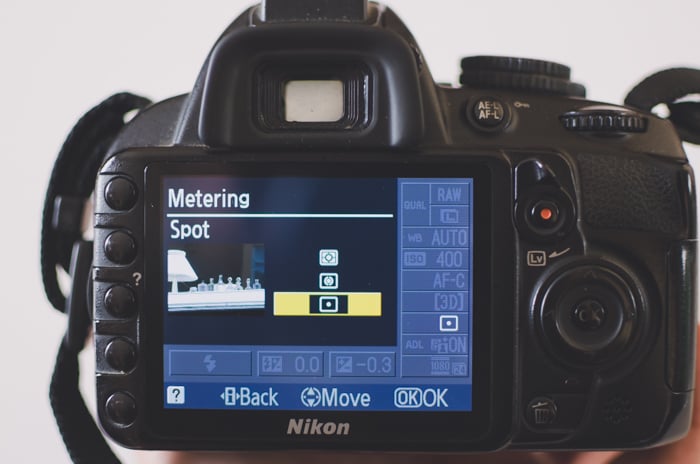
Finally, you can select spot metering mode. Your camera measures the light for the focus point—only 1 to 5 % of the scene! This mode is useful when the subject you photograph doesn’t take up a lot of space in the frame.
5. Use the Light Meter to Check Your Exposure
You can check the light meter to determine if your camera is getting the right amount of available light. Usually, you can see it when you press the shutter release while looking through your viewfinder or Live View.
It might appear slightly different depending on the camera model. But the concept is always the same. It is a meter with a zero (0) point in the middle and two sides that indicate less and more light.
When the meter is at zero (0), the camera sensor receives the right amount of light (according to the camera). Towards the plus sign (+), the photo is overexposed (too bright). Towards the minus sign (-), the photo is underexposed (too dark).

Overexposure (left), good exposure (middle), underexposure (right)
6. Set the Aperture and Shutter Speed
To adjust the amount of light, you can start by playing with two settings—aperture and shutter speed. The idea is to balance these two settings until you get the perfect light.
Aperture means adjusting the hole size that lets light into the camera. The bigger the hole, the more light goes in. Shutter speed is the time your camera’s sensor is exposed to light. The longer it is, the more light you have.
Are you getting too much light? You can either close the aperture or open the shutter for a shorter duration. Too dark? You can open the aperture or leave the shutter open for longer.
This might seem complicated, but luckily, our DSLRs greatly help us with their semi-automatic shooting modes. There is an aperture priority mode and a shutter priority mode. You can select them using the dial.
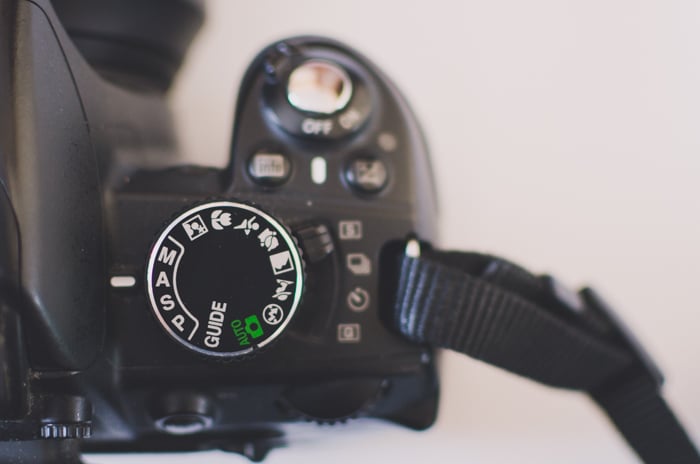
The mode dial for manual (M), aperture priority (A), shutter priority (S), and program (P)
Use Aperture Priority to Control Depth of Field
When you select the aperture priority mode (A or AV), you only have to adjust the aperture setting. Your camera automatically picks the shutter speed to get the right light exposure.
The aperture units are f-stops. Small f-numbers correspond to wide apertures (big holes, more light going into your camera). Big f-numbers correspond to narrow apertures (small holes, less light).
Another detail you control through the aperture is the depth of field. This affects how sharp or blurry the background is in your frame. Use this to get a deep or shallow field depth.
Choose high f-stop values if you want the entirety of your image to be sharp. I kept the background of this image of a cruise ship in Australia sharp using f/22.
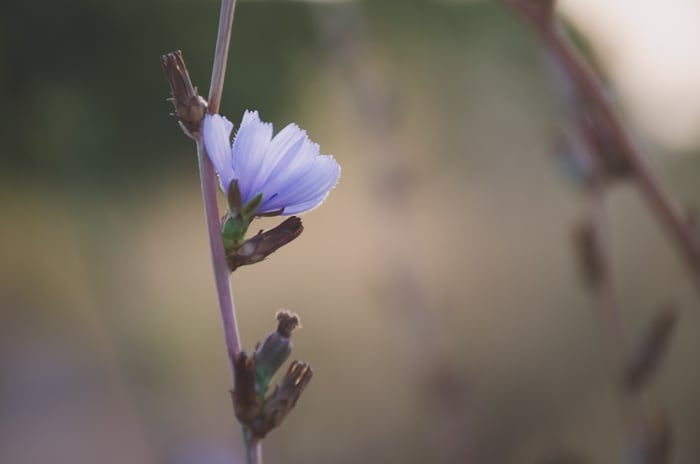
If you want the background to be blurry, choose small f-numbers. Watch out for potential camera shake introduced by your hands. If that’s the case, use a tripod. I used f/2.8 to blur the background of the flower below.
Use Shutter Speed Priority to Manipulate Movement
When selecting shutter priority mode, you choose the shutter speed, and your camera picks the aperture to get the right exposure.
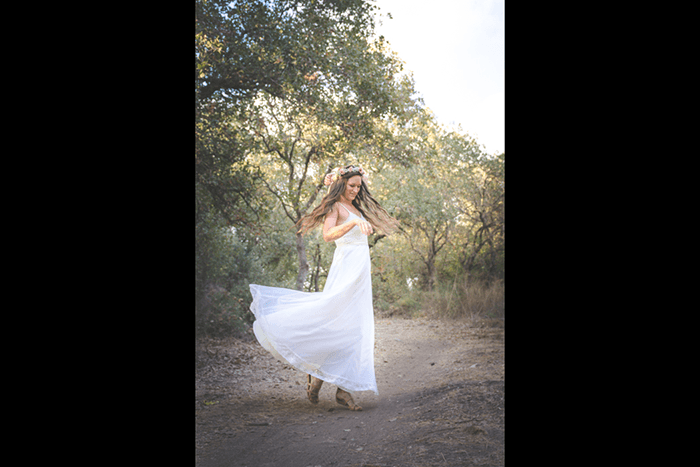
Controlling the shutter speed is crucial when your photo has movement. Fast shutter speeds can freeze the movement in your image. In the first photo below, I used a shutter speed of 1/400 s (seconds) to freeze the movement of the bride’s wedding dress.
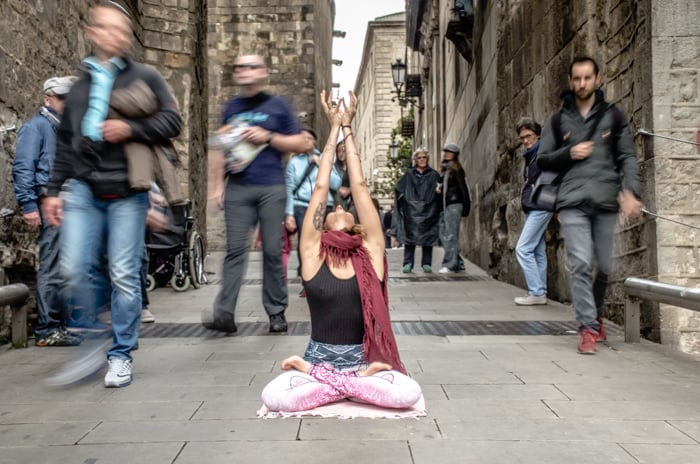
When you use longer shutter speeds, you can blur moving subjects. You can even achieve a smooth effect, like in waterfall photography. I used a shutter speed of 1/5 s to blur the movement of the pedestrians in the photo below.
Take care when your camera chooses small f-numbers. This can affect the depth of field, resulting in blurry backgrounds.
7. Use Exposure Compensation to Adjust Brightness
With priority modes, your camera always tries to compensate to get the exposure level to zero on the light meter. But sometimes, you might want a darker or lighter image.
You can do so by using the exposure compensation button. It’s the button with the plus-minus (+/-) sign. While pressing it, turn the front dial sideways. This makes your image progressively darker or brighter.
Other cameras have a dial that controls exposure compensation. Check the manual to see what your camera has because it is a very useful tool.
The exposure compensation (+/-) button
8. Experiment With Automatic and Manual Modes
You can select other shooting modes. One is automatic (Auto), which means your camera decides on everything. I don’t recommend using it too often.
The other is manual mode, where you adjust everything. This is a very useful mode because it gives you a lot of freedom and lets you get creative with your photography.
Once you understand how aperture and shutter speed work, I highly recommend you practice using them.
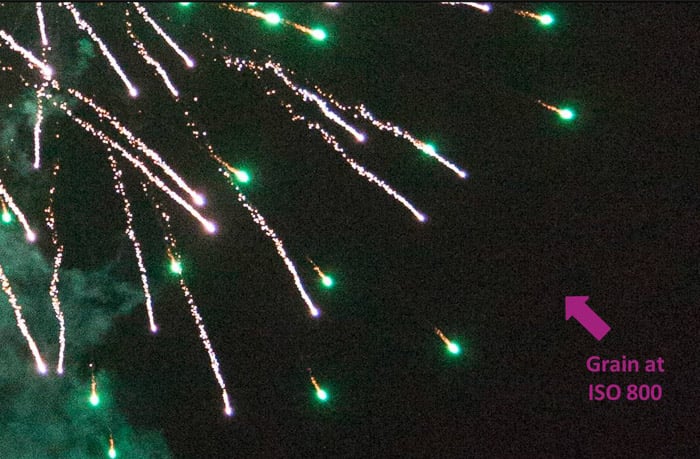
9. Use ISO to Change the Camera’s Light Sensitivity
ISO measures your sensor’s sensitivity to light. The lower the ISO number, the less sensitive the sensor. Higher values mean the camera is more sensitive to light. This lets you take photos in darker situations indoors or outdoors when the sunlight is weakening.
But there’s a trade-off. Your photos have a grainy effect (known as noise), so you must ensure it’s worth having some noise for more light. Noise-reduction software now helps remove noise in post-production.
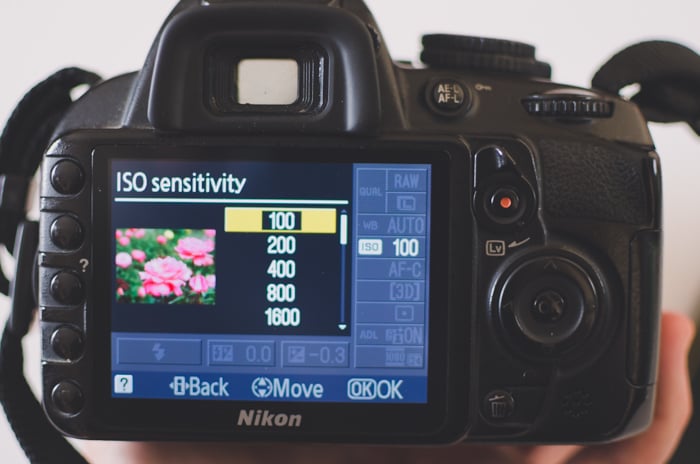
You can select an ISO value through the menu on your camera screen. Some cameras also have an ISO button. You can also select the auto ISO mode. Your camera chooses the ISO setting in each shot depending on the lighting situation.
Below is a photo of the fireworks I shot with an ISO of 800. When zoomed in, you can see the grain in the photo.
I can select ISO through Menu > Shooting menu > ISO sensitivity settings > Auto-ISO in my cameras. Check your manual to see how to access it in your case.

Conclusion: Learning DSRL Basics
Digital SLRs might seem overwhelming at first. But with some practice and following this tutorial, you will soon master DSLR basics and take awesome shots!
Before taking photos, stop for a moment and consider your settings, from autofocus to metering modes, shooting modes, and ISO. Change the settings to see how they affect your images, practice as much as possible, and be patient.
You must enjoy the learning process. Have fun and experiment with your camera! Soon, all these settings will be part of your photography flow, and you’ll adjust them naturally!
Check out our Photography Unlocked eBook to further your DSRL camera skills!
- Master manual mode to capture moments you’re proud of.
- Overcome the frustration of missed shots with quick exposure settings.
- Benefit from visuals with hundreds of images and illustrations.


