Few things can make or break a photograph like the sky. A beautiful, blue sky can add an element of serenity and peace to an image, while a stormy, dark sky can convey drama and tension.
Editing the sky is one of the easiest ways to dramatically change the look and feel of a photo. Here are four tips to help you edit sky photography.
Edit Sky Photography: Basic Setup for Capturing Beautiful Images
Understanding Light at Different Times in the Day
Although you may think that all light is equal, photographers know that this is not the case. A good photographer can read and understand different kinds of light and use it to their benefit.
The primary types of light are:
- Early morning soft light
- Harsh midday sun
- Cloudy overcast skies
- Golden hour
- Blue hour
Each type of light is excellent in its own way. My favourite type is the golden hour. This light appears with the sunset. The light grows softer on the subject, and colors become more enhanced.
Clouds take on different textures as light filters from between them. The environment also becomes more contrasted and dramatic.
But, harsh mid-day sun can also add drama to your images, so don’t discount photographing that way.
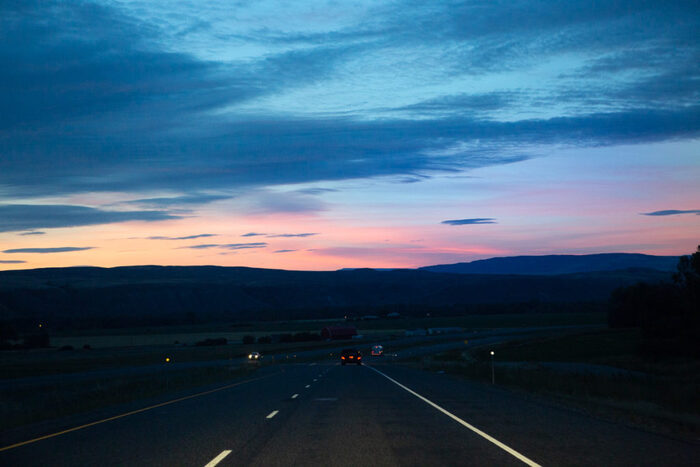
An unedited RAW image of an early morning drive where the sky exploded with color, but the clouds got in the way.
Photograph in Raw for Best Post-Processing Results
If your camera can record in RAW format, then you should use this to capture your images. The RAW format will give you more flexibility when it comes to post-processing. If your computer can handle storing and working on these huge files, then they are the best option.
Below is the RAW image of the cover photo for this article. The patches of cloud and sky make for an interesting backdrop.
You can edit this image in many ways to bring out the blue of the sky but keep the white of the clouds.
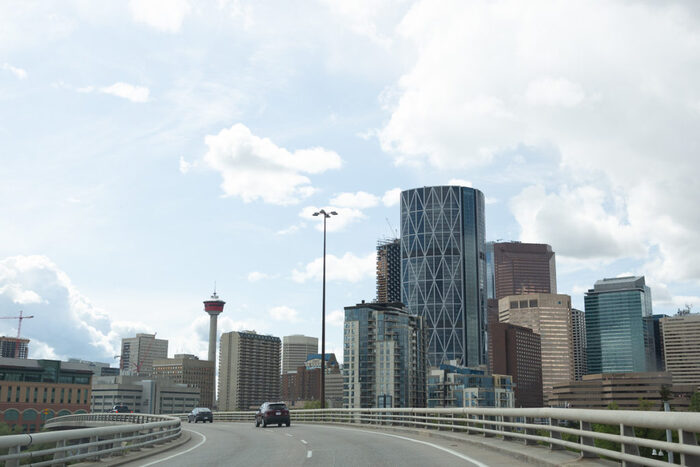
There are several ways you can edit skies in Lightroom. In this article, we will look at two different types of editing and the various tools that you can use for each of them.
Selected Adjustments
Selected adjustments are adjustments made only to specific areas of the image. In our case, we will only make adjustments to the sky in the picture.
There are a couple of tools that you can use to make adjustments.
Graduated Filter to Bring out Beautiful Sky Details
This panel gives you control over elements like exposure, contrast, saturation, temperature, and tint. You can make the sky darker and bluer, or brighter and saturated.
You can also increase the clarity by using the graduated tool. This tool can bring out details in a cloudy sky.
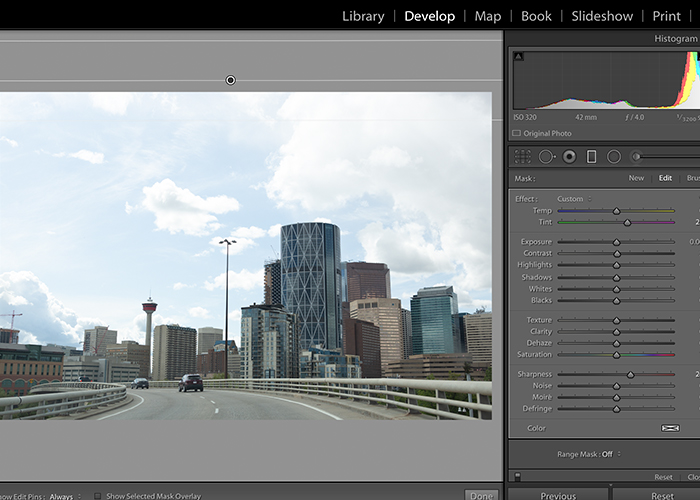
I have exaggerated the effects here for this article so you can see the increase in the blue tone.
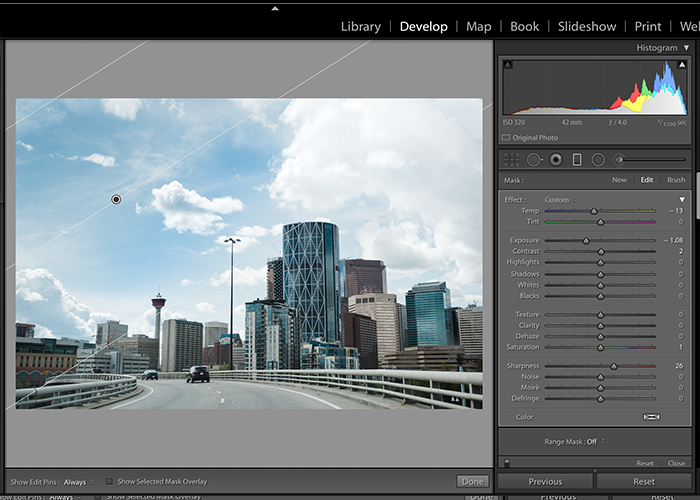
You should aim for a natural, almost umber effect with gradual progression from light to dark.
Adjustment Brush for Full Control
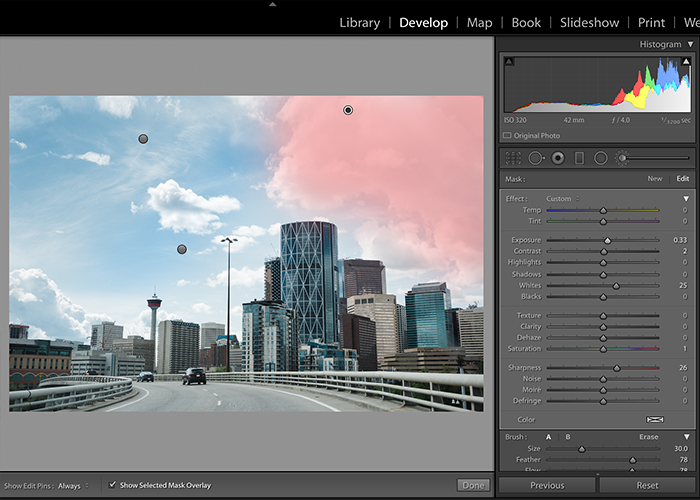
The Adjustment brush is used to make changes to selected areas in an image. This brush gives full control of the type of changes that you make. The Adjustment brush is in the same panel as the Graduated filter.
As the name suggests, the Adjustment brush adjusts a part or specific area of an image. So in effect, you can brush on a darker or bluer sky, or brighten clouds and other aspects in your image.
When you click on the Adjustment Brush icon, a panel opens up similar to the Basic one in the Develop module. You can adjust exposure, white balance, contrast, and other features for specific areas.
To go back to the adjustments you have made, you can select the black dot and select ‘Show Selected Mask Overlay’. Here you can see the edited area on the image and make further edits.
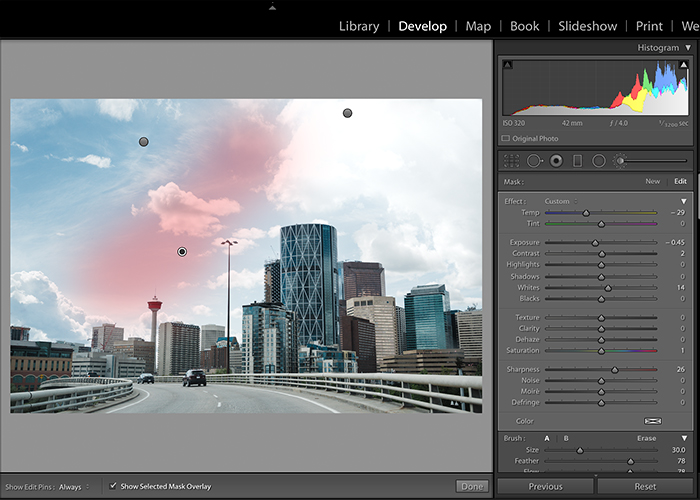
I used the Adjustment brush to increase the white of the clouds on the right-hand side of the frame.
Sometimes the sky needs a deeper blue and a whiter white to bring out the vibrance.
Selected Color Adjustment Tool for Editing Specific Colors
The Selected Color Adjustment tool helps isolate specific colors. This tool gives the ability to change specific colors in an image.
It is not as precise as the Adjustment brush or the Graduated Filter tool. But, for monotone or limited/distinct colors, this method works well.
You can find the Selected Color Adjustment in the HSL/Color panel, as seen here.
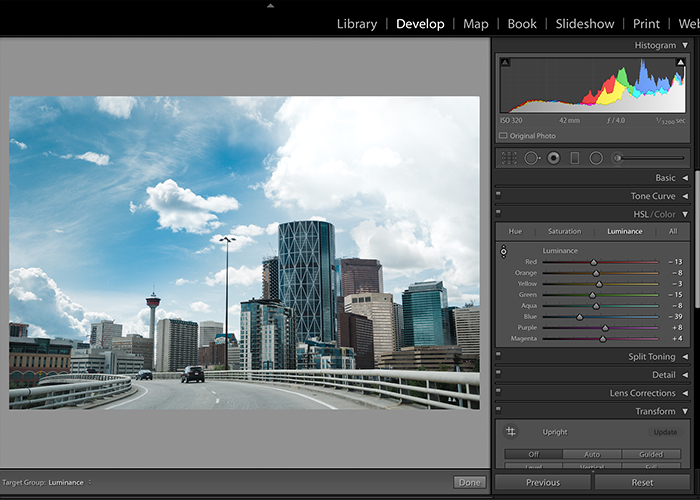
Remember, sometimes editing isn’t only about precision. It is also about efficiency. If you have many images, adjusting the blues might be quicker with the Selected Color Tool.
Use the eyedropper on the left top corner to select the exact shade/color of the area you want to adjust. Once you get the color slider, moving left reduces the intensity, moving right increases it.
There are three different color schemas to use in the HSL/Color panel. When making selected color adjustments, I always choose Luminance or All.
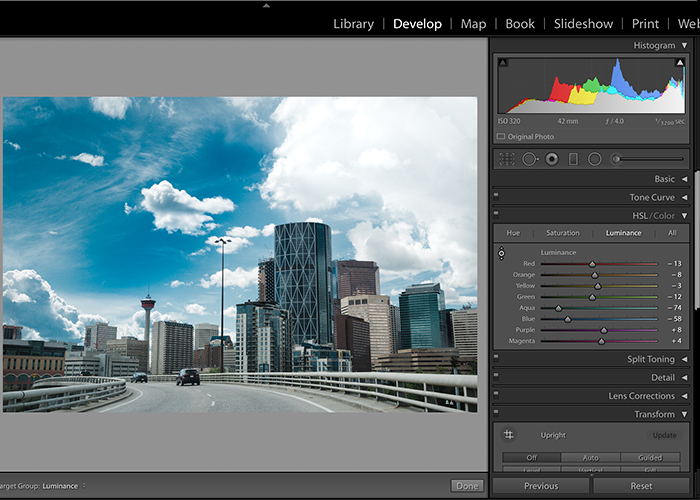
This effect is very pronounced. Without choosing the exact shade of blue, I adjusted Aqua and Blue. This adjustment changed the sky and the buildings to an unrealistic value.
General Adjustments
General adjustments are adjustments that you make to the entire image. These adjustments will affect all parts of the image in the same way. This method might be a better bet when the sky occupies the entire or almost the whole frame. All general adjustments are in the Basic panel.
You can adjust the highlights in an image to make the sky darker, or add a blue tint to increase the blue tones. You can even increase the whites to bring out the clouds.
When making general adjustments, the changes will affect all parts of the image.
If you have a light, bright, and airy photography style, you might have overexposed images. Overexposure helps in achieving that airy look. But more often than not, the sky becomes super bright. You lose detail due to the brightness of the sky.
Making selected adjustments to each area is better than making general adjustments.
Bringing down highlights in an image will affect all highlights. This change will affect elements like mountains or water close to the horizon.
In this image, the following general adjustments helped to edit the sky:
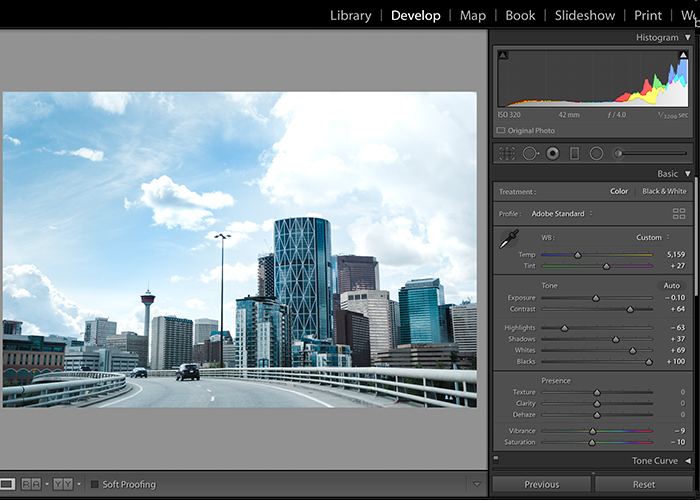
- The histogram shows overexposure. Almost all my pictures are because this works well for my style. Reducing the exposure of the image brings back some of the blues in the sky. But this also affects the foreground of the image, which will need adjusting.
- Adjusting the Temp/White Balance of the image to increase the blues gives back some of the sky blue color. It also affects the buildings, which may be undesired.
- Bringing down the highlights affects all the highlights. The left corner of the image where the road turns also changes.
- Bringing up the whites changes the color of the whites in the images, including the clouds in the sky.
- Increasing the shadows brings some light into the foreground. This light offsets some of the reduction in the exposure.
Conclusion
As you can see with Lightroom, you have many different options in getting the sky in your images to pop.
You can choose from selective adjustment methods or general ones. Selective adjustments will always tend to be more precise to the look you want to give to your images. General adjustments will have a broader impact on the colors and tones.
You can even use a combination of the two if you want to be perfect in editing the beautiful sky in your images.
For more great Lightroom tips, learn about soft proofing or creating a matte photo effect next!

