Texture can be especially eye-catching in black and white photos. In the absence of color, variations in surface details can add variety, drama, and even levels of storytelling to compositions.
Black and white texture photography can leave you with stunning results. But it can also be frustrating when the texture doesn't show as much as you had hoped for in the final result.
This article will help you learn how to capture sharp, compelling textures in your images.
Exploring Black and White Textures Through Photography
In black and white photography, textures add interest to your photos by providing tonal variance and detail densely concentrated in certain areas of the frame.
Having an emphasis on texture in your photos can help you make the overall photo stronger. Being able to see surface details enables the viewer to get a better feel for your subject and location.
It adds character and atmosphere to your composition. Texture evokes the viewer’s tactile sense.
If you do it right, people will almost want to touch your photos. Just to see if they can actually feel the texture that you’ve captured.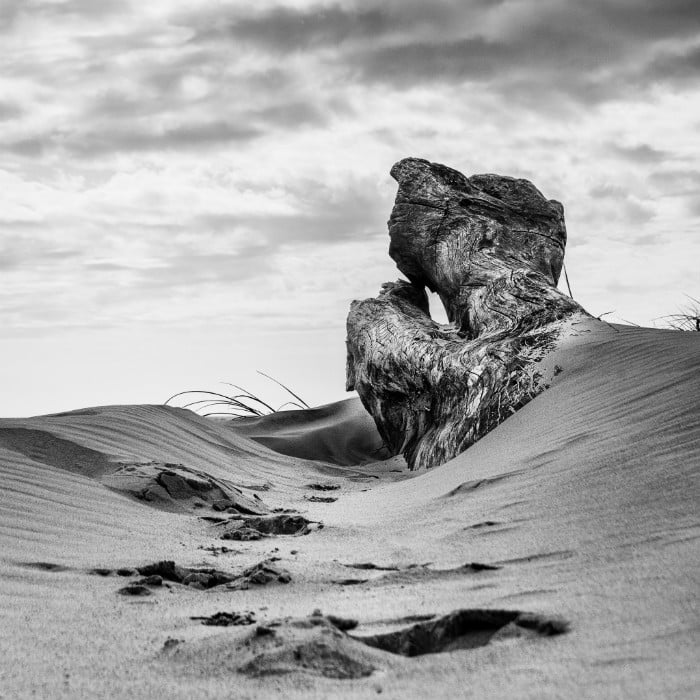
You can, of course, also opt to fill the entire frame with texture. Let the photo be all about its details. This turns your photo into a more abstract, artistic creation.
In a photo like this, the emphasis is on the patterns, structure, lines, and curves of the texture. Together, they form an artistically appealing whole.
Below you’ll find some tips to become better at capturing textures in black and white photography.
It doesn’t matter if you’re creating a black and white photo that is all about texture or just emphasizing texture as part of a larger composition.
With these key points in mind, you will get better results.
Equipment and Settings
Camera
You can capture black and white texture photos with any DSLR, mirrorless, or even compact camera. Some cameras will be able to capture detail better than others.
In general photographing textures depends more on lighting than the type of camera you use. You should be able to take good photos of textures with nearly any camera.
Read our article on the best camera settings for black and white photography for more information.
Flash
Flash can help bring out textures, as shadows help create definition and reveal surface details.
However, you should avoid using an on-camera flash when including texture in your photos. This will most likely light up the small shadows that would otherwise enhance the texture.
If you must use a flash make sure it is an external, off-camera flash. This way you can ensure that the light from the flash comes at an angle towards your subject.
Tripod
Most times you can get away with hand-holding your camera. As long as you can use a shutter speed fast enough to eliminate any camera shake.
If the light is limited or if you use a small aperture, use a tripod to avoid shaking with slower shutter speeds.
Another benefit of using a tripod is that you can switch to live view and zoom in, while setting focus manually, to be 100% sure you nailed the focus.
Too often I thought I’d gotten a sharp handheld shot, only to find out that I had moved a few inches, which threw the subject out of focus. When capturing texture, you want it to be sharp and crisp.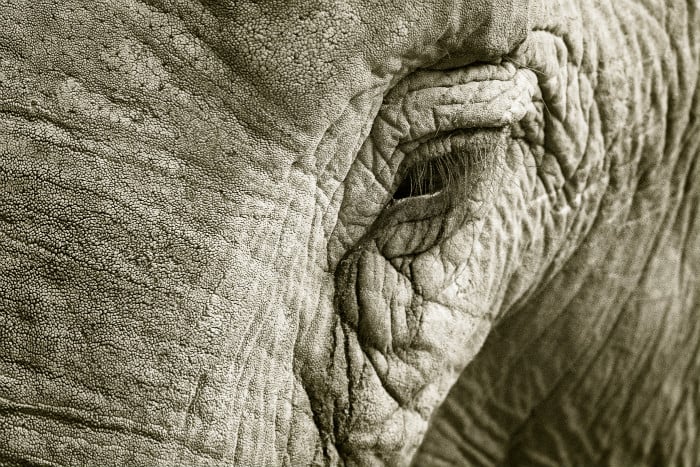
Lenses
Every lens, whether it’s a standard kit lens, a dedicated macro lens, a wide-angle lens, or a telephoto zoom lens can capture beautiful black and white texture photos.
Of course, you get a very different look when using a wide-angle and a telephoto lens.
Every type of lens has its pros and cons. A wide-angle lens introduces distortion. But it can be difficult to include enough of the texture with a telephoto lens if you cannot take a step back and position yourself in a good spot.
When beginning to shoot textures, I would suggest that you experiment with something like a 24-70 mm or a 70-200 mm lens.
Avoid going both wider or narrower than this spectrum. I often use a 24-70 mm when I use texture as only one of many elements. I can include more in the frame.
When I’m trying to make a black and white photo that only seeks to be visually stimulating and interesting, I will switch to a longer focal length, like a 70-200 mm lens.
Search For Texture
It may seem obvious, but one of the first steps to including more textures in your black and white photos is to actively seek them. Texture is often easy to overlook. Fine details are not always the most apparent thing in subjects.
Once you get into a habit of looking for it, though, you will find that there are many more opportunities to include texture in black and white photography (and ordinary color photography) than you had previously realized.
So what should you look for when searching for compelling textures?
Great textures often include repetition of some kind. Lines or curves that repeat into a pattern. Keep an eye out for dense bunches of forms such as wood grain, rock striations, bubbles, and foam, etc.
Organic materials often have some kind of natural texture.
The textures you find can be quite subtle. For example, surfaces showing the wear of time which makes them stand out distinctly and pleasingly.
Think of a spot of rust on the motor hood of a car or paint wearing off a wooden boat.
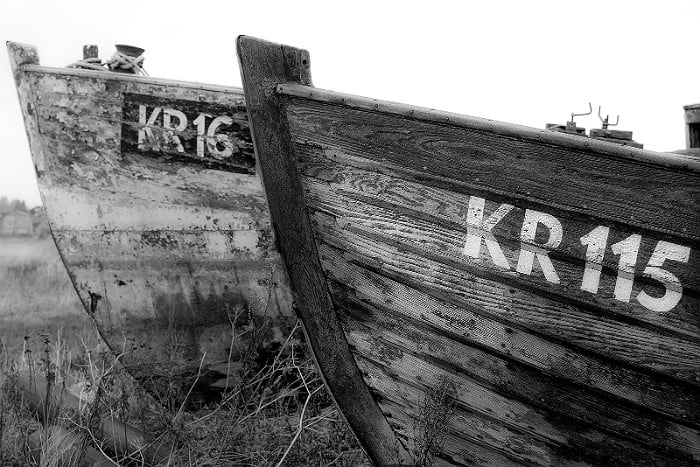
Using an aperture of f/4 with the wood on the boat closest to the camera as the focus point, its texture is emphasised. Whereas the old boat in the background almost blends with the ground both in tones and in sharpness.
The Best Time Of Day To Capture Black And White Textures
If you want to enhance texture, you will get the best results if you avoid direct light. Outdoors, you’ll want to avoid harsh midday sunlight. The light at this time of day illuminates everything strongly from above or in front of your subject.
This fills small cracks and irregularities surfaces, creating a flattening effect that prevents the texture from appearing as clearly.
For the best results with texture photography using natural light, you should take your photos when the sun is low in the sky, during the golden hour.
At this time you subject will be lit from the side which will make tiny shadows appear wherever there is a crack or crevice.
This will exaggerate the texture and the perception of details, with the bonus of adding beautiful evening light to your photo. Shadows are especially important in black and white texture photography for keeping a good tonal contrast in your photo.
This ensures that you have both bright and dark tones in your image.
Get Closer To The Texture
When including textures in your black and white photography, it is crucial to get close enough for the details to have a real impact. Don't be afraid to let the texture dominate an image.
Often you need to get very close to the subject to do this. If this means that you cannot include some of the elements that you intended, you will have to switch to a wide-angle lens.
If the photo you have in mind is all about the texture, you will get better results if you exclude anything else by framing your image so that nothing is happening in the frame or corners.
Also remember to get a few shots where you capture only part of the texture, selecting the most interesting parts of the texture.
Close-up textures often result in stronger images because getting that much closer means you can better control how the lines enter and exit the frame.
Of course, a macro lens will help you get right up to the surfaces of your subject so you can reveal even finer details and texture.
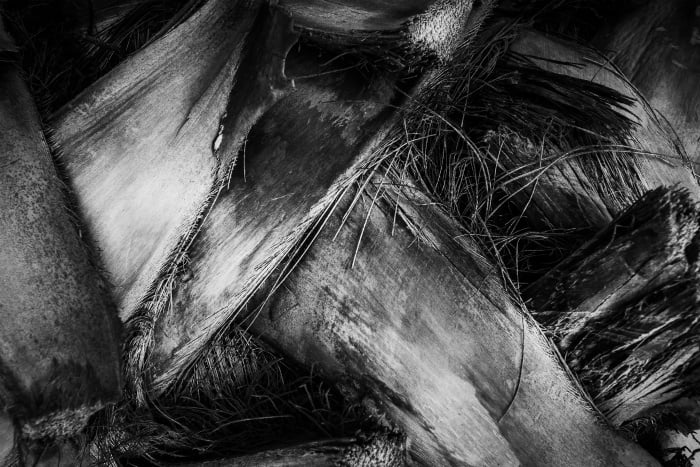
Close-up of a palm stem
Depth Of Field
So what depth of field should you use to capture texture in your black and white photos?
That depends on both the angle to your subject and whether you have other elements in your photo that you want to include along with the texture. Let us discuss the latter first.
If the texture is part of a complex composition, you have the choice of using a shallow depth of field with an aperture such as f/4-5.6 to keep only the texture in focus.
But this might render other important elements in your photo too soft.
In this case, it would be better to opt for a depth of field that gives you a wider range of compositional elements in focus. You’ll want to stop down to a smaller aperture (f/11, for example) to achieve a greater DOF.
After all, you’re including these elements in the frame to help you tell a story, right?
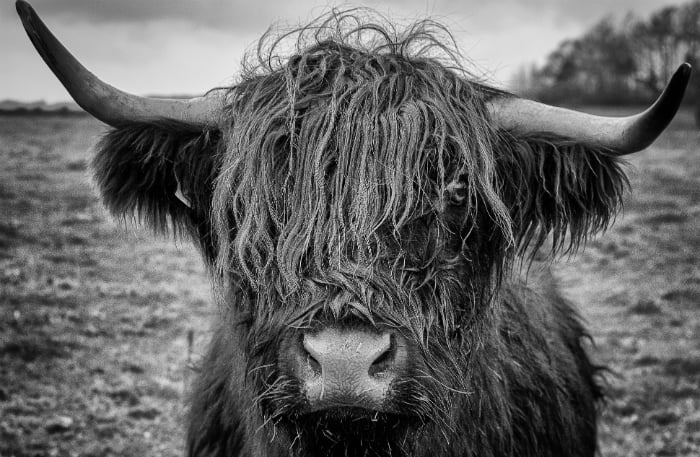
The emphasis is on the fur covering the eyes on this Scottish Highland Bull. Its texture gives the viewer a sense of being almost able to touch the animal.
In cases where you want to capture just a beautiful texture and nothing else, you only need the depth of field to cover the entire texture.
If you don't want to shoot the texture flat on, you will still need to stop down the f-number. This way you’ll include the entire texture without losing detail.
You should aim for an aperture at around f/8 so that every part of the photo stays sharp.
Make sure to check the sharpness on your LCD screen afterward. There is nothing worse than coming home only to discover that large areas of the texture you’ve shot have a soft focus.
Texture Colors Can Be Tricky
When doing black and white texture photography, you still see your subject in color. However, you should keep in mind that not all the color contrast and variation that you see will be visible in the black and white photos.
For example, yellow and green colors convert to nearly the same grayscale tone. If the texture you intend to capture is mostly yellow and green colors, the photo will most likely turn out very flat (in terms of tone).
Colors that are next to each other on the color wheel (and with similar luminosity) will convert to similar grey tone values. These offer very little contrast, which will make your photo look flat.
Conclusion
When you create black and white photos that emphasize texture, pay attention to textures in your environment and apply the approaches above.
The texture used as a supportive element will make your photo compositionally more complex. It will emphasize the atmosphere or 'feel' around the subject.
Texture photographed as the subject itself can produce some pleasing fine art images. These will explore the visual qualities of a surface.
There’s a whole world of textures out there. Experiment with the tips, techniques, and approaches discussed here. With a little practice, you’ll be able to use texture to create some striking effects in your black and white photos.
For some great tips on creating custom textures in Photoshop, take a look at this step-by-step guide. We also have a great article on editing black and white fine art photos.