Knowing how to whiten teeth in Lightroom (and eyes!) is a great skill to have. That’s because sometimes eyes and teeth might have an unflattering tint in your portraits. That’s when you’ll need to whiten eyes and teeth in Lightroom to make your portraits pop.
Here’s how to do it, all in a quick tutorial. Make sure you have a photo with basic adjustments done and correct white balance.
How to Whiten Teeth in Lightroom
Before we begin with teeth whitening, you need to be familiar with the Brush tools in Lightroom.
Locate and Select the Adjustment Brush Tool in Lightroom
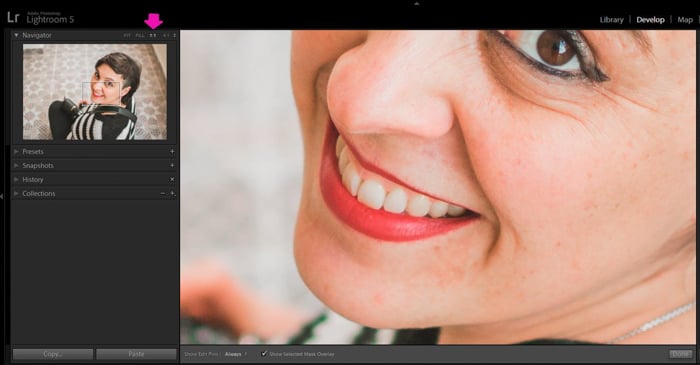
Once you've opened Lightroom and imported the image you want to correct, switch to the Develop module. Now choose the Adjustment Brush tool.
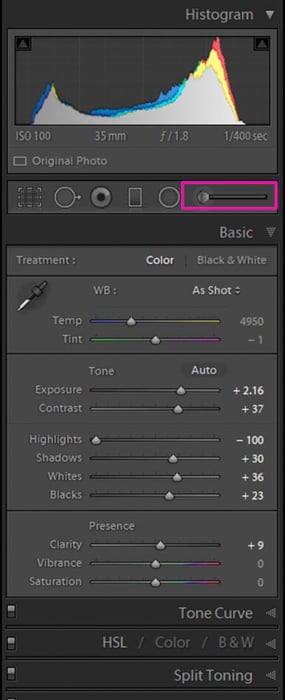
You can do it by clicking on the Adjustment Brush icon located below the right bottom corner of the histogram. Or you can use the”K” keyboard shortcut.
How to Select a Preset to Whiten Teeth in Lightroom
After selecting the Adjustment Brush tool, the panel with all the options of the tool will open. You will be able to start selecting adjustments and defining their values.
An easy way to get started is by choosing the “Teeth Whitening” brush preset that Lightroom offers. To select it, just click on the drop-down menu located to the right of the word "Effect."
Scroll down until you find the "Teeth Whitening" preset. This will give you a good starting point to work with.

Lightroom’s Teeth Whitening preset modifies the exposure and saturation
How to Change Brush Adjustment Settings to Whiten Teeth
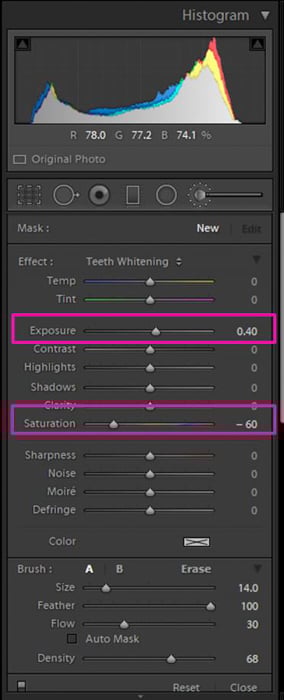
The most common issue with teeth is that they are grey or yellow. This can be due to lighting conditions, a color tint we applied earlier on, or even because our subject's teeth really are that color.
The "Teeth Whitening" preset is a basic one. You might want to modify it to get better results.
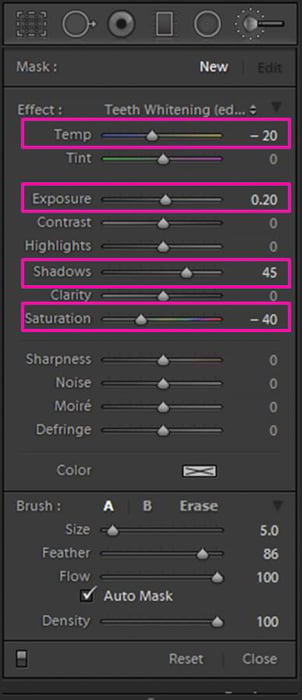
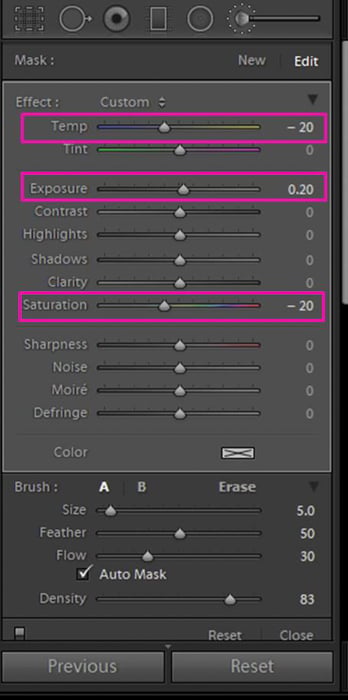
My usual brush settings are:
- Temp (Color temperature) -20
- Exposure +0.20, Shadows +45
- Saturation -40.
You can try these ones or you can experiment until you get your own brush whitening tool settings.
Size and Feather of the Brush to Get the Best Effect
Teeth are usually small in the photo. For that reason, although it means spending more time and work on each tooth, I recommend you use a small-sized brush.
Teeth also stand in strong contrast to their surroundings. You want to use low feathering to get a clear and well-defined effect.
To set the size and feathering of the brush, go to the bottom of the drop-down menu. Locate the slide bars titled "Size" and "Feather" one below the other.

Make your life easier by using the Auto Mask. This is an option that enables you to work near borders of well-defined areas without going out of line.
It is very useful as you can work faster without worrying about your accuracy. Keep in mind that it works when there is contrast between the part you want to adjust and the areas around it.
To choose it, head to the bottom of the brush panel and tick the box near the words "Auto Mask".

Zoom In on the Teeth for More Accurate Results
You can work on the image in the Loupe View. But you will be more accurate and will be less likely to go out of the borders of the teeth by zooming in.
To zoom in go to the top left corner of the Lightroom window. Right at the top of the Navigator panel, you will find the image zoom options. These are FIT, Fill, 1:1, and another with a ratio and a drop-down menu option.
Most of the time, I work with either the Fill or the 1:1 zoom. But if you need to zoom in even more, click on the drop-down menu button. This allows you to see the different zoom options, and choose the one that fits your needs.
To navigate quickly through the zoomed-in image, click on the spot you want to go to in the Navigator. And if you double-click on it, you can switch to a wide/full view of the image.
I usually use the 1:1 option, but you can click on the drop-down menu to the right of the purple arrow to select a different zoom level.
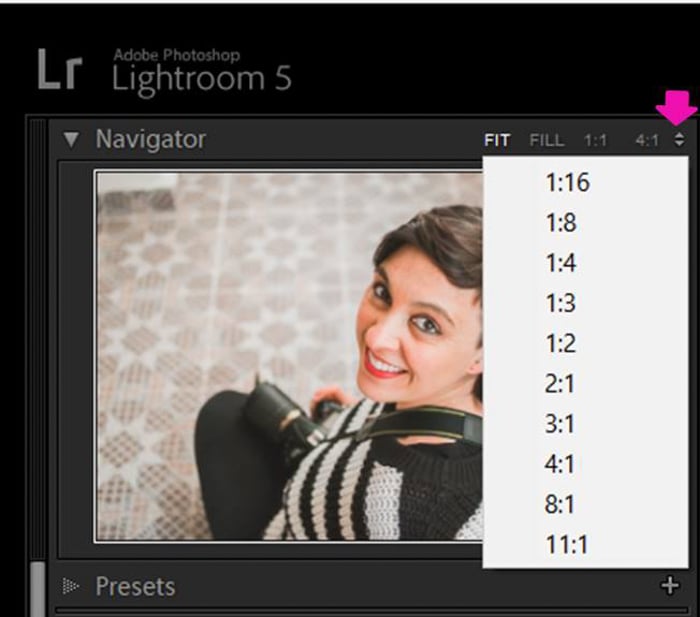
After clicking the icon you can select the zoom level that fits your needs, you can even zoom out.
Whitening Teeth Using the Brush Adjustment
After defining the brush settings, you just go over the teeth while the Brush tool is selected. You can use the mouse, moving the cursor over them while pressing the left mouse button.
Another option is to use a graphic tablet, these devices are extremely helpful as they imitate the way you would work with a brush or a pen. They make hand movement more natural. You will also be much more accurate.
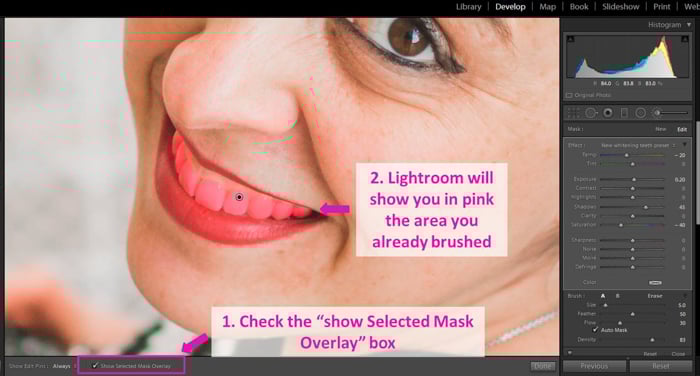
A good way to see where you've painted with the brush is by ticking the “Show Selected Mask Overlay” box. It will mark in red all the areas you went over with the brush.
This will help you make sure you haven't gone out of the borders. By unticking the box you will clear the red marks.
If you make some mistakes, don’t worry. You can always erase some of the brushed areas by selecting "Erase" in the Brush Panel and brushing where you want to remove the effect.
As with the brush, you can adjust the size of the eraser to make your workflow easier.
How to Save a Brush Preset After You've Created It
Defining and adjusting the brush to your liking takes time. And it might require some trial and error. It would be a shame to go through this process every time you have to whiten teeth.
Once you’ve defined and adjusted a brush, you can save it as a preset. This makes it available for you to use in the future.
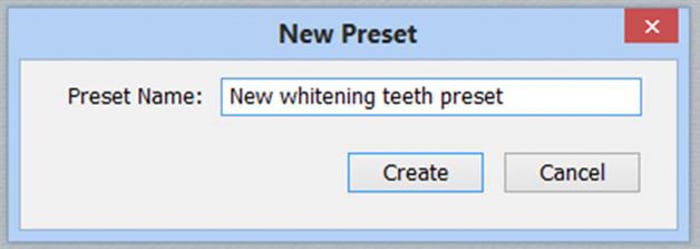
To save the new brush, you need to click on the area where you clicked to select the Brush Adjustment Effect. Then click on "Save Current Settings as New Preset." This is located second from the bottom of the list.
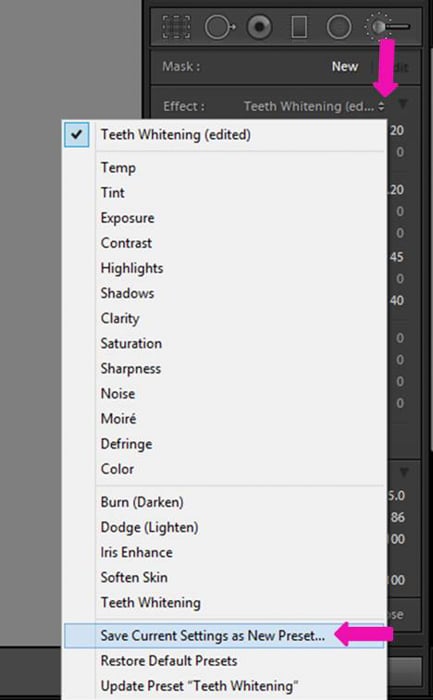
Once you click on this option, a pop-up window appears and you can name your new preset. Save it by clicking on "Create."
After doing so, the preset will appear in the same list of Effects.
Edit and Whiten Eyes in Lightroom
In order to whiten eyes, you need to follow the same procedure as for whitening teeth. But there are a few key differences.
Color correction for teeth would usually include adding some light to possible shadows. I avoid this setting for eyes because it makes the eyes unnaturally bright.
The settings I use are:
- Temp (Color temperature) -20
- Exposure +0.20
- Saturation -40
You can start with these settings and adjust them to your image.
Whitening teeth and whitening eyes share many similarities, it is important to pay attention to the differences.
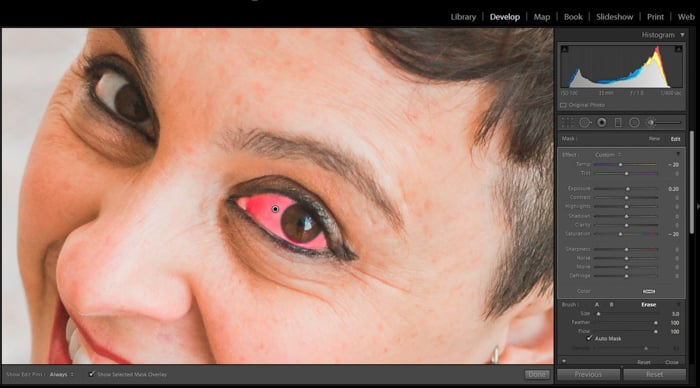
The “Show Selected Mask Overlay” option is extremely useful for eyes as well. Remember that its coloring effect will not be shown in your final image
Final Tips For Whitening Teeth and Eyes
Always adjust the brush and the effect according to the person and the image. Lighting, skin tone, and the effect you want to create all require you to change the level of whitening.
When editing several different people in a photo, it might be tempting to be quick and use the same adjustments on all of them. I recommend you take the time and edit each person individually. This will ensure the best results for your efforts.
Pay attention not to overdo it. Over-whitening looks very unnatural and stands out in the image. Make sure to take breaks from time to time and to look at the whole picture with fresh eyes.

And here is the final result
Conclusion
Whitening teeth in Lightroom is a quick and easy process. And so it whitening eyes. It can improve the appearance of the whole image.
Make your work even easier by using and adjusting the existing whitening presets that are available in Lightroom. Don't forget to save the presets you create as you work.
Keep a natural look to your image and the results will be great!
Check out our Effortless Editing with Lightroom course to master post-processing your images!