If you are looking to buy a new camera lens, you may read a lot about aberrations. Removing lens aberration is a big deal for lens designers.
But what does all the marketing lingo mean, and is it important when buying a lens?
In this article, we’ll explore the different types of lens aberrations, and how lens manufacturers try to correct them.
[highlight type=”short” price=”no” tag=”epshorthighlight-20″ toc=”no” title=”Sony FE 12-24mm f/4 G” badge=”Wide-Angle Correction” product=”26730″]Discover a lens that eliminates chromatic and monochromatic lens aberrations, providing stunning corner-to-corner resolution at all apertures. Ideal for landscapes and architecture, it’s compact, lightweight, and perfect for both movies and stills.[/highlight]
Camera lens aberration is an imperfection in the way a lens focuses light. Light comes in through the lens as waves. Ideally, all the waves converge at the same point. Aberrations occur when light waves converge at different points. This affects sharpness and color and may even change the shape of light in your image.
There may be very obvious visual distortions. Or your eye may adjust for these imperfections. You may have seen issues in your photos and wondered what you are doing wrong. You might see a colored halo that you don’t remember seeing when you took the picture. Or an object may look elongated. You can use lens distortions artistically. But if you are trying to represent a scene faithfully, distortions can be distracting.
The imperfections are caused by the physics of light and how light interacts with the lens. Lens designers have worked since the invention of photography to make lenses that control aberrations. This is why correcting distortions is such a central part of marketing information. It is a big deal for them!

Looking through the front element of a lens.
A lens is more than a bit of glass at the end of a barrel. Many of the elements inside a lens are designed to correct lens distortions. These extra parts and how the lens is constructed change how light is directed on its way to the sensor.
You may wonder why lens manufacturers do not just correct the imperfections once and for all and be done with it. It is not that simple. Correcting one distortion may lead to another problem. Even if they could make a lens that perfectly controls the light, it may make the lens big, heavy, and slow. Lens manufacturers try to balance optical clarity with practical considerations.
Lens companies may design similar lenses that have different levels of corrections. Lenses that have more corrections tend to be more expensive – maybe a lot more expensive. Let’s take a look at the variety of lens aberrations that can occur in your photography. But first, you need a little information about how light passes through your lens.
The glass elements in your lenses are convex or curved like the outside of a ball or sphere. Light enters your lens, flips over, and is projected on a flat sensor. All cameras invert the image. But you might not notice. Today’s cameras use software to flip the picture again so that you see it upright. Film photographers in the past composed their images upside-down.
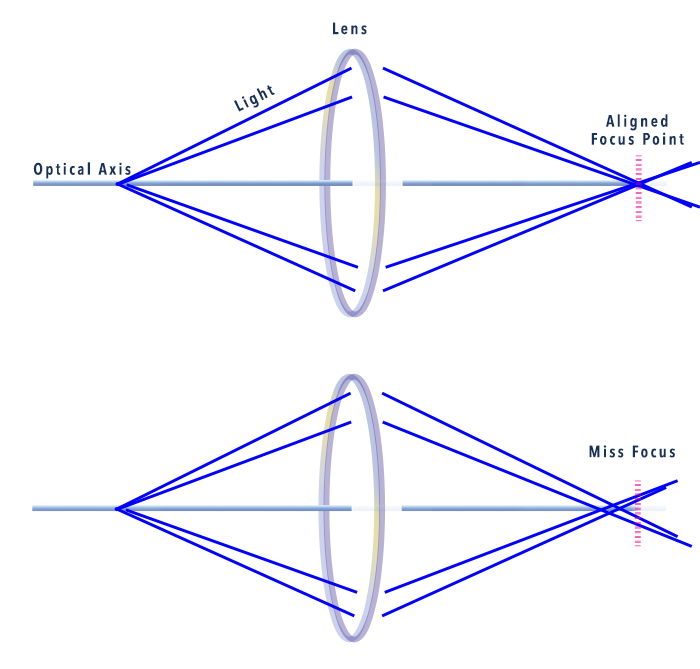
The optical axis is the imaginary straight line passing through the center of the lens to your sensor. Light enters the curved lens and converges at a focal point along the optical axis. At least, that is what we want to happen in the optical system. When light does not focus at one point on the optical axis, distortions occur.

The goal is to align light coming into a lens at one focus point (top). Monochromatic aberrations occur when the light from different parts of the lens is misaligned (bottom).
The two most general types of lens aberration are Chromatic and Monochromatic. Chromatic aberrations have to do with how a lens focuses light waves of different colors. Monochromatic aberrations are optical distortions. They include spherical, comatic (coma), curvature, field curvature aberrations, and lens flare.
Sony says of their 12-24mm f/4 lens:
“One Super ED (Extra-low Dispersion) glass element and three ED glass elements are strategically deployed to minimize chromatic aberration. Effective reduction of chromatic aberration contributes to improved sharpness and clarity throughout the image area.”
Chromatic aberration is how the lens collects different colored light waves. White light is made up of the colors of the rainbow. A prism separates the colors so you can see them. The light waves move at different speeds through the glass of the lens. If left alone, the light waves hit the optical axis at different points. This spreads the light and creates color fringing.

As light moves through a medium like glass or water, the colored waves can split because they move at different speeds.
Chromatic aberrations are often called color fringing because a purple or green colored haze appears along the edges. This is especially seen along edges of dark objects against a lighter background.
By changing the glass in the lens, the colored waves converge on one point. This focuses the light, improving sharpness and clarity.
You can often see chromatic aberrations on the edges of night sky photos. The fast, wide-angle lenses favoured by astrophotographers can be the most affected by this. But you may also see colored fringes along the edge of buildings or even faces when photographed against a light background.

Purple or green color fringing can be seen along dark edges against a light background.
There are two types of chromatic aberration, longitudinal and lateral. Longitudinal occurs across the entire image. Lateral happens at the edges of the frame.
Monochromatic aberrations are optical distortions. These are created by white light passing through the lens at different speeds and angles. There are different types of monochromatic aberrations. These are often referred to by the shape of the distortion created.
Sony says of their 12-24mm f/2.8 lens:
“Three XA (extreme aspherical) elements, and one standard aspherical element, are incorporated into the optical design, which features superior surface precision for effective control over astigmatism, field curvature, coma, distortion and other spherical aberrations for a high degree of sharpness and accurate rendering.”
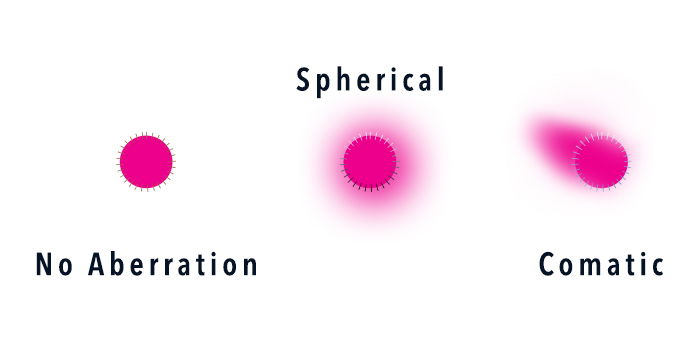
The glass elements of a lens are not flat but curved. The light entering at the edges of a lens refracts more than light entering in the middle. Light entering from the edges hits the optical axis at a different point than light entering in the center. This creates a soft-focus look called a spherical aberration.
Sony has added specially shaped elements to its lens to reduce spherical aberration. These aspherical elements help focus the light entering from the edges at a single point. This makes the image sharper. Aspherical elements can reduce the total number of internal parts required to correct for an aberration. This makes the lens lighter. But because aspherical elements are harder to manufacture, the lens tends to cost more.
Coma or comatic aberrations are like spherical aberrations. The difference lies in the shape of the distortion. Rather than round, the distortion is elongated, like the shape of a comet. This occurs when light entering at the edge of a lens comes in at an angle. Coma is more obvious at the edges of the frame. External coma is when the tails of the comet shape point away from the center of the image. When the tails point inward, this is internal coma.

The shape of the aberration changes depending on where the light hits in reference to the focus point.
Curvature distortions happen when light coming through a curved lens projects on a flat sensor. There are two main types of curvature distortions: barrel and pincushion. They are named for the shape of the distortion. With barrel distortion, the center of the image bulges in the center and looks smaller at the edges. It is as if the image is wrapped around a barrel.
A fisheye lens exaggerates barrel distortion for artistic effect. With pincushion distortion, the center puckers inward. The picture looks larger at the edges. Lenses can have both main types of curvature distortions. This results in a complex distortion in the shape of a wave called moustache distortion.

A fisheye lens creates barrel distortion for artistic effect. Image from Pixabay.
Curvature distortions bend lines that should be straight but do not affect sharpness or focus. Field curvature concerns the quality of focus across the frame. The image may be sharp in the middle and lose focus towards the edges. Some lens designers add field curvature for a swirly bokeh artistic effect.

Field curvature distortions can create artistic bokeh at the edges of the frame.
Sony says of their 12-24mm f/4 lens:
“Sony’s original Nano AR Coating suppresses spurious reflections that can cause flare and ghosting in backlit and other challenging lighting situations, for consistently high contrast and clarity. Freedom from flare over a wide range of incident light angles provides greater framing and composing flexibility.”
Lens flares are caused by light reflecting off the glass elements inside the lens. Lens manufacturers reduce reflection with thin coatings on the reflective surfaces. Reducing lens flares and other lighting effects is usually desirable. But some photographers artistically include lens flares in their images.

Lens flares are created when light reflects off lens elements. Image from Pixabay.
With vignetting, the edges of the frame are darker than the center. Vignetting is caused by the lens barrel itself and elements within the lens blocking some light coming from the edges.
Many photographers add vignetting for artistic effect. But it is best if you control the shape of the vignette and how dark you want the edges to be, not the lens.

Lens vignetting is the darkening of the edges of the frame caused by the lens elements blocking some of the light.
Many aberrations are seen on fast lenses at their widest apertures. In some cases, narrowing the aperture will reduce the aberration.
If using a zoom lens, try different focal lengths. When zooming, lens elements move and change their relationships. You may find distortions at one focal length and not others. For instance, you may see barrel distortion at the widest focal length. Or you may see pincushion distortion when the lens is at its greatest focal length.
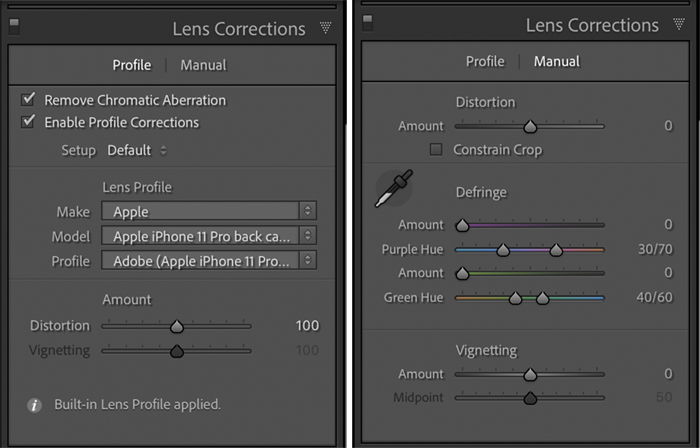
Advanced photo editing programs also correct for many distortions. Adobe Lightroom includes a Lens Correction panel in the Develop module. Adobe programs each lens’ unique profile into Lightroom. Known distortions are adjusted when possible in the software.

Lightroom screenshots showing lens correct applied in the Lens Correction panel. Lightroom will automatically detect your lens and apply a profile (left) or you can manually adjust the image (right).
Set up an import preset in Lightroom to automatically correct for lens distortions. By the time you look at images, corrections have already been made. The best way to reduce distortions is to buy a quality lens that has eliminated most aberrations.
Lens design and software technology has improved to reduce or remove many lens optical distortions. You may not notice a distortion unless you are shooting lines or points of light. Fast, wide-angle lenses are particularly prone to aberrations. Stopping down your lens, using a narrower f-stop, can reduce many distortions.
Lens designers promote the quality of their lenses. But lens reviewers perform tests to check on the marketing hype. If you are looking to buy a lens, look at an in-depth review to see how the lens performed.
You have choices in how you approach lens distortions. Buy expensive lenses that remove as much of the optical distortion as possible. Use photo editing software that removes many optical distortions. Or you can ignore or embrace the imperfections of your lens. Use the distortions to create artistic images that incorporate imperfections.
If you’re looking to learn more about the basics of photography, check out our Photography for Beginners eBook.