These 16 free photography cheat sheets collect visual reminders for camera settings, portraits, creative projects, and more. If you're learning the basics, start with the exposure triangle, shutter speed, and aperture charts. Use each setting as a starting point, then check the photo and adjust for your subject and light.
The sheets are individual images on this page. Save the ones you need to your phone for reference, or open an image and print it.
But if you want something more comprehensive…
Our 52 premium Quick Capture Cheat Sheets are designed for fast reference and easy learning.
And they’re the perfect visual tool to help you master photography…
Camera Settings at a Glance
Use this reference to decide what to change before consulting the charts. The right settings depend on your camera, lens, light, and subject.
| Control | What it changes | How to choose |
|---|---|---|
| Aperture | Light through the lens and depth of field | Use a wider opening for a shallower zone of sharpness; stop down when more of the subject needs to be sharp. |
| Shutter speed | Exposure time and recorded movement | Shorten the exposure to reduce motion blur; lengthen it when you want to show movement. |
| ISO | Image brightness at a given aperture and shutter speed | Raise it when the shutter speed and aperture you need leave the photo too dark. Check noise in the result. |
| Focus mode | Whether focus stays fixed or keeps adjusting | Use single autofocus for a stationary subject and continuous autofocus for a moving one. |
| Focus point | Where the camera focuses | Place it on the detail you need sharp, such as an eye. |
| Metering | Which parts of the scene guide the exposure reading | Start with the camera's whole-frame mode. Use spot metering when you intend to measure a small area. |
| White balance | How colors are rendered under the light | Start with Auto; choose a matching preset or a custom reading if the color cast is unwanted. |
Keep ISO low when the exposure allows it, but raise it if you need a faster shutter speed or more depth of field. Auto ISO can help when the light changes; check your camera's available limits and behavior.
For white balance, check a neutral object in the same light as your subject. A custom reading can give you a consistent starting point, but different light sources in one scene may still need separate attention.
Photography Cheat Sheet: Free Basics
These five sheets cover exposure, focus stacking, and a practice checklist. The camera-types notes explain how cameras differ. Start by learning to master your camera settings, then try one idea at a time.
The Exposure Triangle
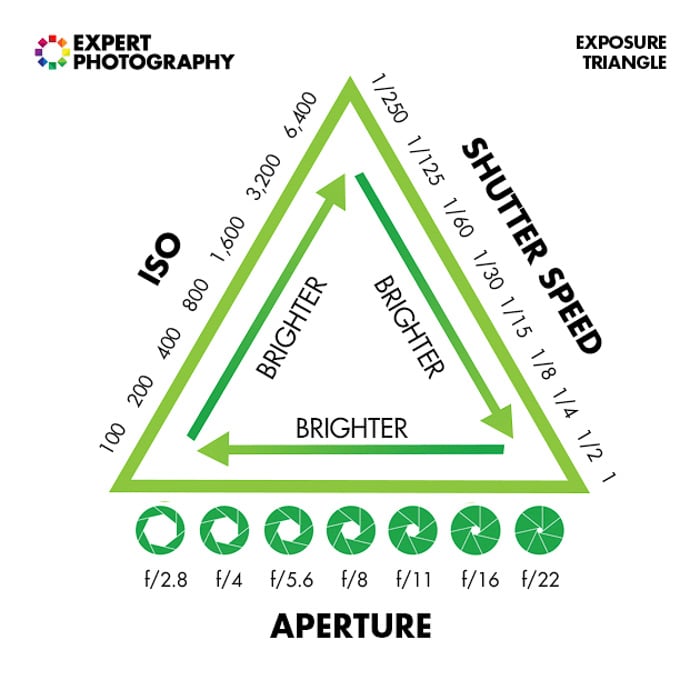
The exposure triangle connects three settings that affect how bright your photo looks. The three elements of this triangle are aperture, shutter speed, and ISO. All three need to be balanced in order for a photo to be well exposed.
Aperture controls the lens opening, and shutter speed controls how long the sensor receives light. At the same aperture and shutter speed, raising ISO makes the image brighter without letting more light through the lens.
Choose the setting that matters most to your photo first. For a moving subject, start with shutter speed; for a blurred background, start with aperture. Then adjust the other settings for the light available. In an automatic exposure mode, the camera may make those adjustments for you.
For example, changing from 1/125 to 1/250 second halves the exposure time. Doubling ISO from 100 to 200 keeps the resulting brightness similar if aperture and lighting stay the same. It changes the noise trade-off, though, so the two photos need not look identical.
When to Use Each Shutter Speed
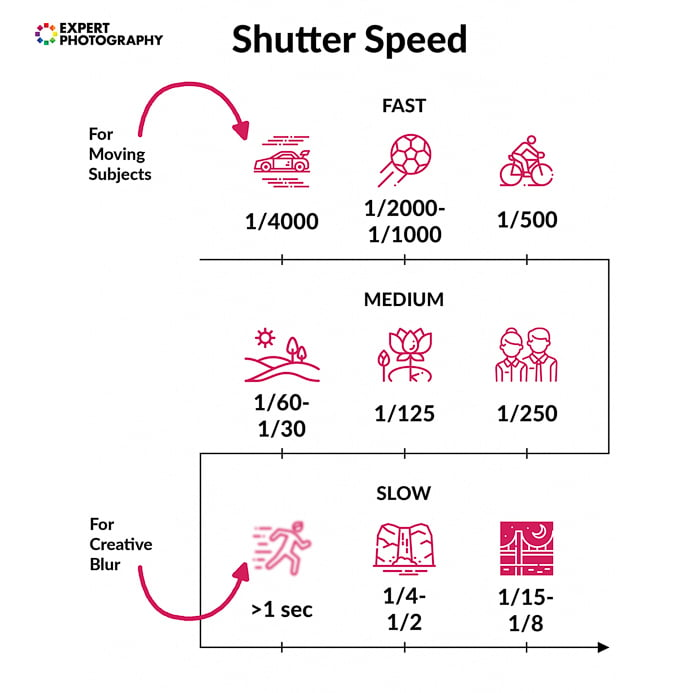
Shutter speed affects both brightness and how movement appears. A short exposure can freeze a moving subject; a longer exposure records more of its movement as motion blur.
Treat the chart's speeds as starting points. The speed needed depends on how fast your subject moves, its direction, how large it appears in the frame, and how steadily you hold the camera. Take a test photo, enlarge it, and use a faster shutter speed if the subject is blurred.
A tripod can keep a stationary scene sharp during a long exposure. It cannot stop a person or pet from moving. Image stabilization reduces camera shake, so it also needs to be considered separately from subject motion.
Aperture (And How It Affects Depth of Field)
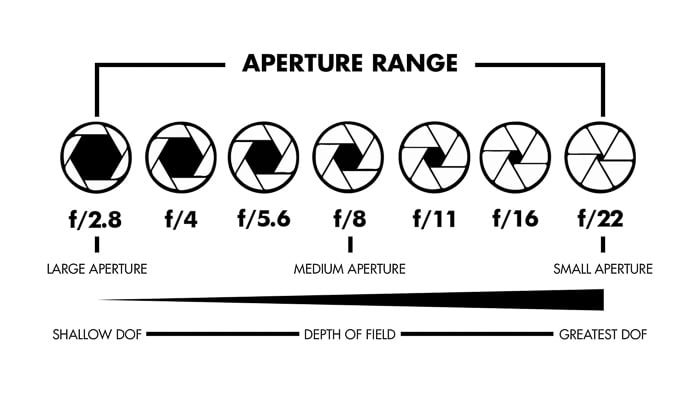
To shoot in manual mode, you need to understand aperture. A lower f-number means a wider opening: f/2.8 lets in more light than f/8.
The chart shows the relation between aperture size, exposure, and depth of field. With the same lens and focus distance, a wider aperture gives a shallower zone of acceptable sharpness; a narrower aperture increases that zone.
Distance matters too. Close-up subjects have less depth of field, so a setting that keeps a distant scene sharp may leave much of a nearby subject blurred. For groups, check every face rather than assuming one f-number will cover everyone.
Choose an aperture that gives you enough depth of field, rather than automatically choosing f/22. Very small apertures can soften fine detail through diffraction. Review the photo to balance depth of field with sharpness.
Types of Cameras
The main types of cameras differ in how you view the scene and whether you can change lenses.
A DSLR camera uses a mirror to direct light to an optical viewfinder. A mirrorless camera uses the image sensor's feed for the rear screen or electronic viewfinder. Both types can have automatic and manual exposure controls.
Point-and-shoot cameras have a fixed lens, so you cannot swap it for another. Their controls and sensor sizes vary by model. You can learn composition and exposure with the camera you already own.
10 Steps to Focus Stack Correctly
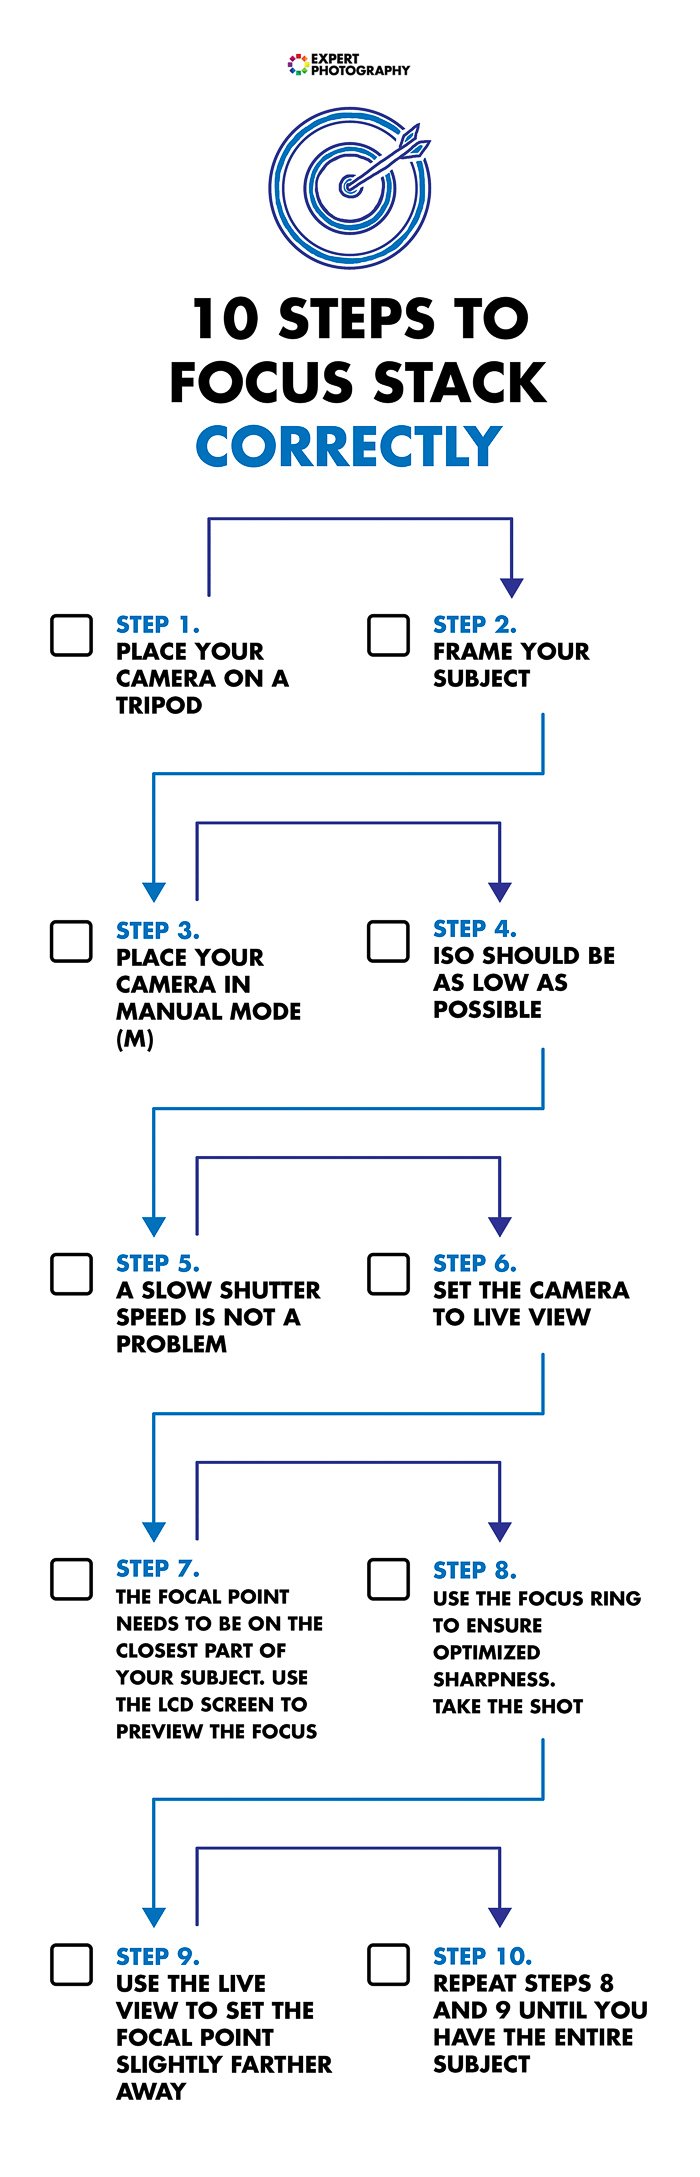
Focus stacking combines photos taken at different focus distances into one image with a wider zone of sharp detail.
It’s also an absolute lifesaver for macro and close-up shots where the depth of field can be very limited. However, it can take some time and patience to learn how to do it correctly. This photography cheat sheet will help you out!
Keep the camera and subject still. Use consistent exposure and white balance, then take overlapping slices of focus from the nearest detail to the farthest detail you need. A slow shutter speed is suitable only if the subject stays still during each exposure.
The chart covers capture. You still need to combine the frames afterward. In Photoshop, align the layers, then choose Edit > Auto-Blend Layers > Stack Images. Inspect the joins, especially around fine edges or anything that moved.
10 Steps to Taking Good Pictures
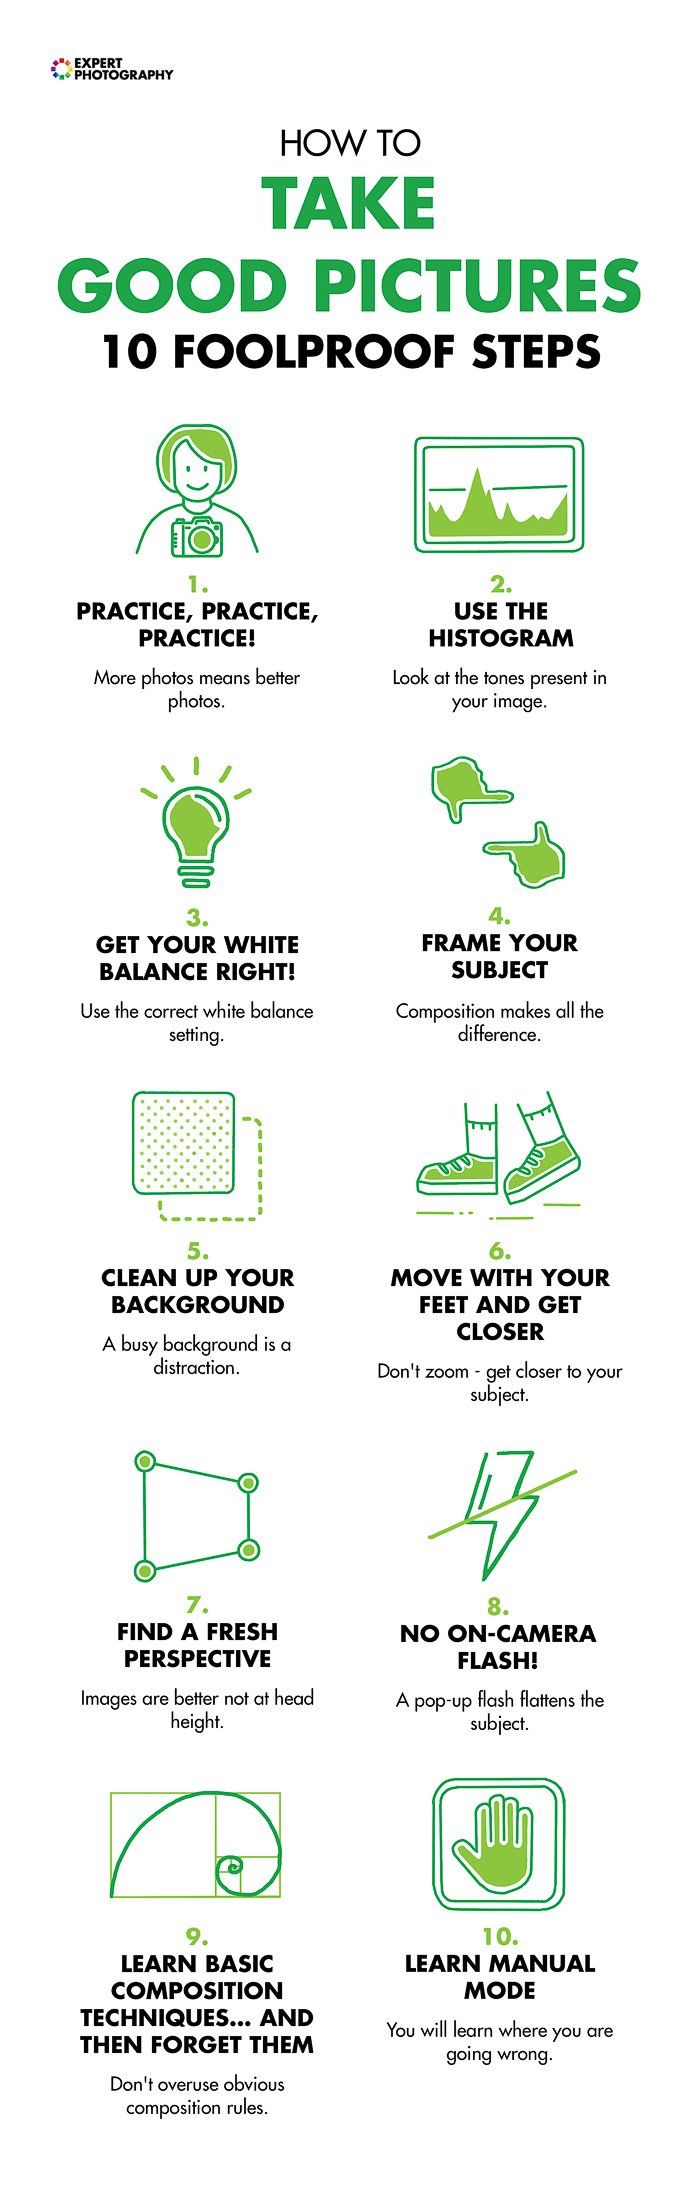
Start by deciding what the photo should show. The taking a good picture guide and the chart below give you a checklist for practice: light, composition, background, focus, and exposure.
Change one thing at a time and compare the results. Moving closer changes perspective; zooming from the same position changes framing. Choose either approach to suit the scene. Direct flash and unusual camera angles are creative choices, rather than rules you must always avoid or follow.
Photographing People
Use these sheets to plan poses and moments. Our family photos guide can help you prepare for a group session.
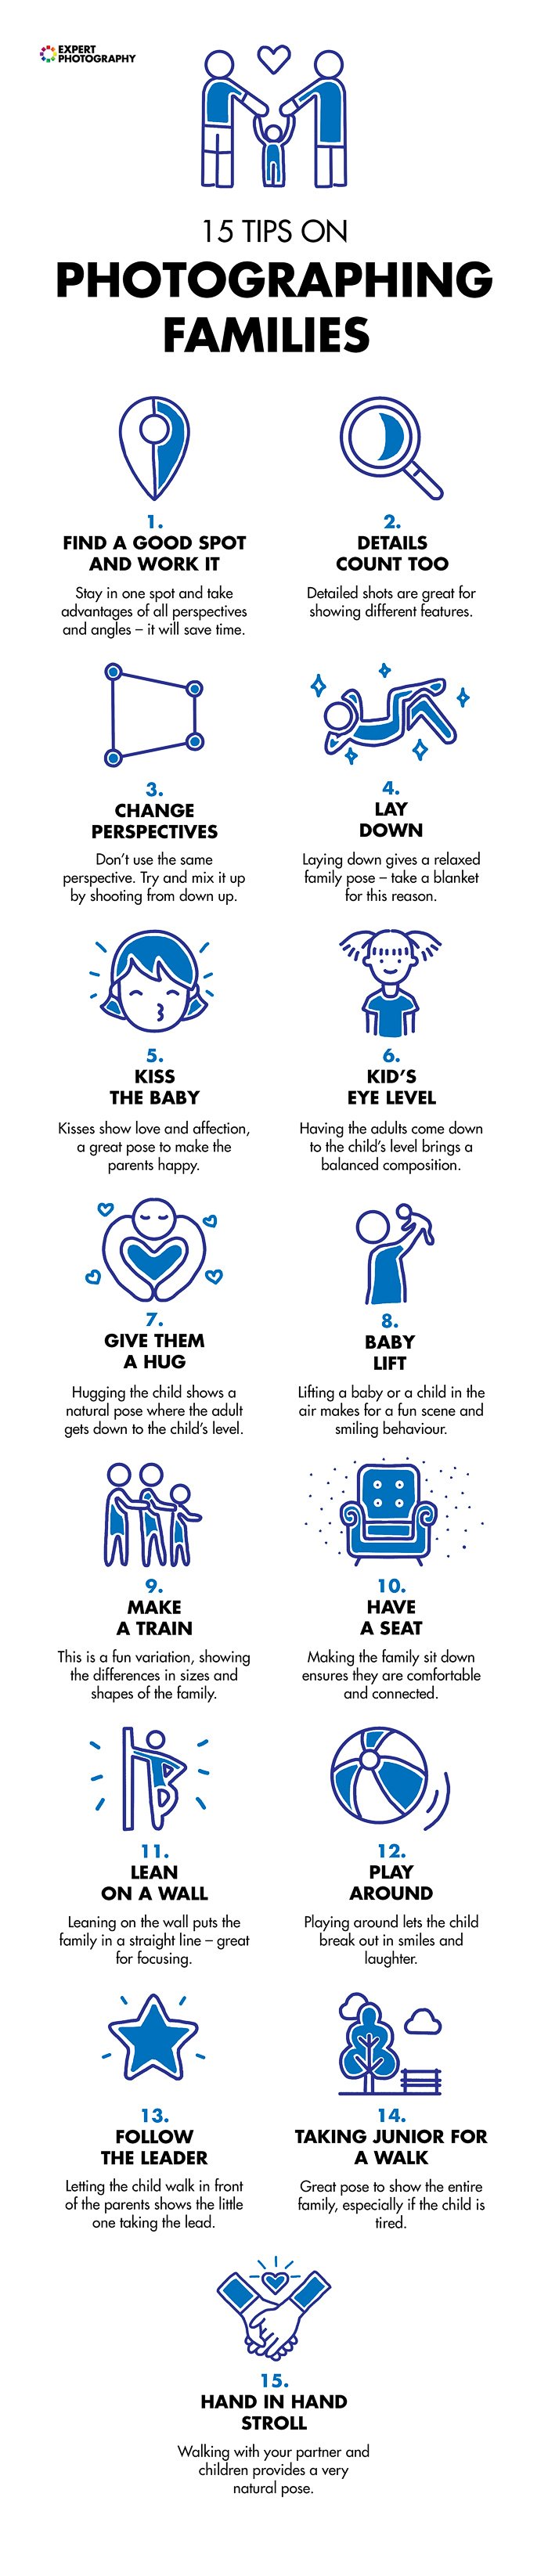
15 Tips for Photographing Families
Every family has its own story. Start with a comfortable pose, then watch for expressions and interaction.
For a group portrait, try keeping faces at similar distances from the camera and check that they all appear sharp. For walking or playing, use continuous autofocus and a shutter speed that keeps the movement as sharp as you want it.
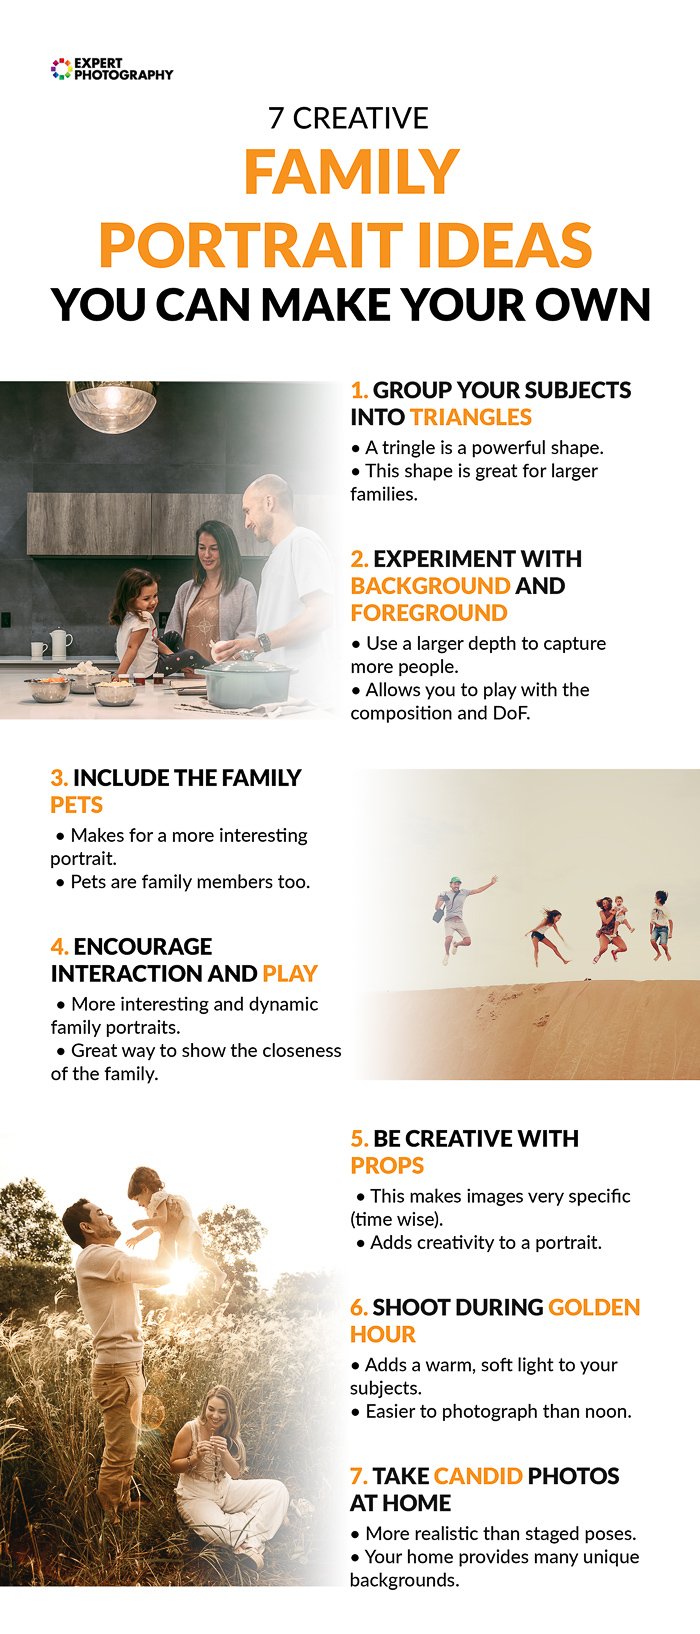
7 Creative Family Photography Ideas
If you want to vary your family photography, the seven ideas below give you different ways to arrange the scene.
Choose an idea that suits the family: a familiar room, a pet, a game, or a prop with meaning. Leave time for candid moments between posed photos.
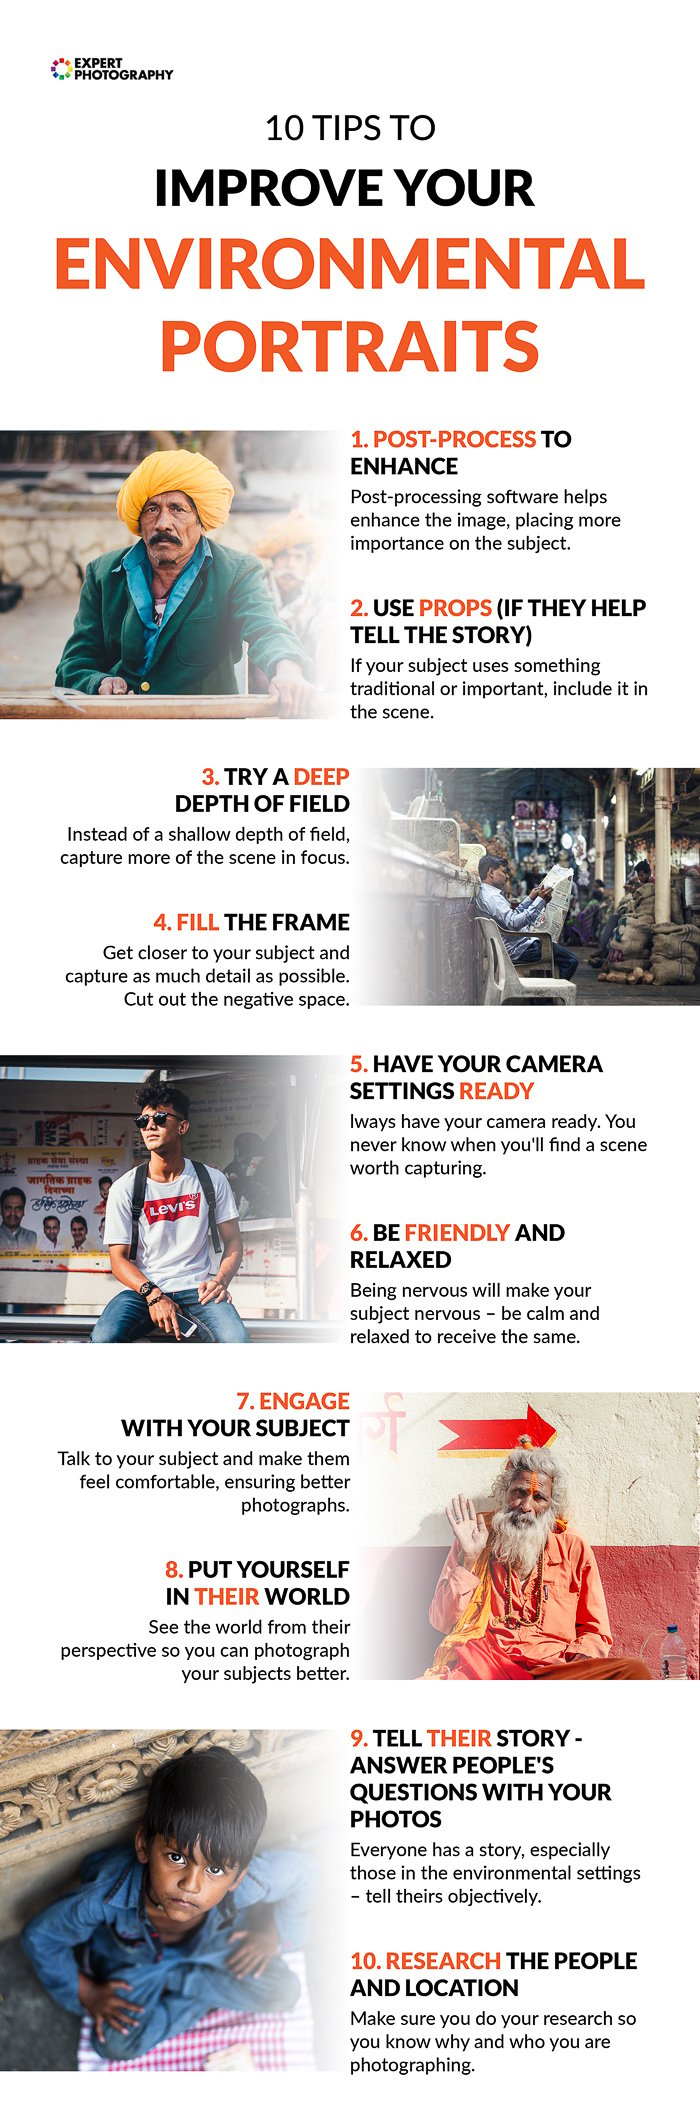
10 Tips to Improve Your Environmental Portraits
Good environmental portraits tell the story of their subject. Include surroundings that help the viewer understand the person's work, interests, or daily life.
Decide how much of the background needs to be recognizable. Use aperture and your distance from the subject to balance context with separation, and check the frame for distracting objects.
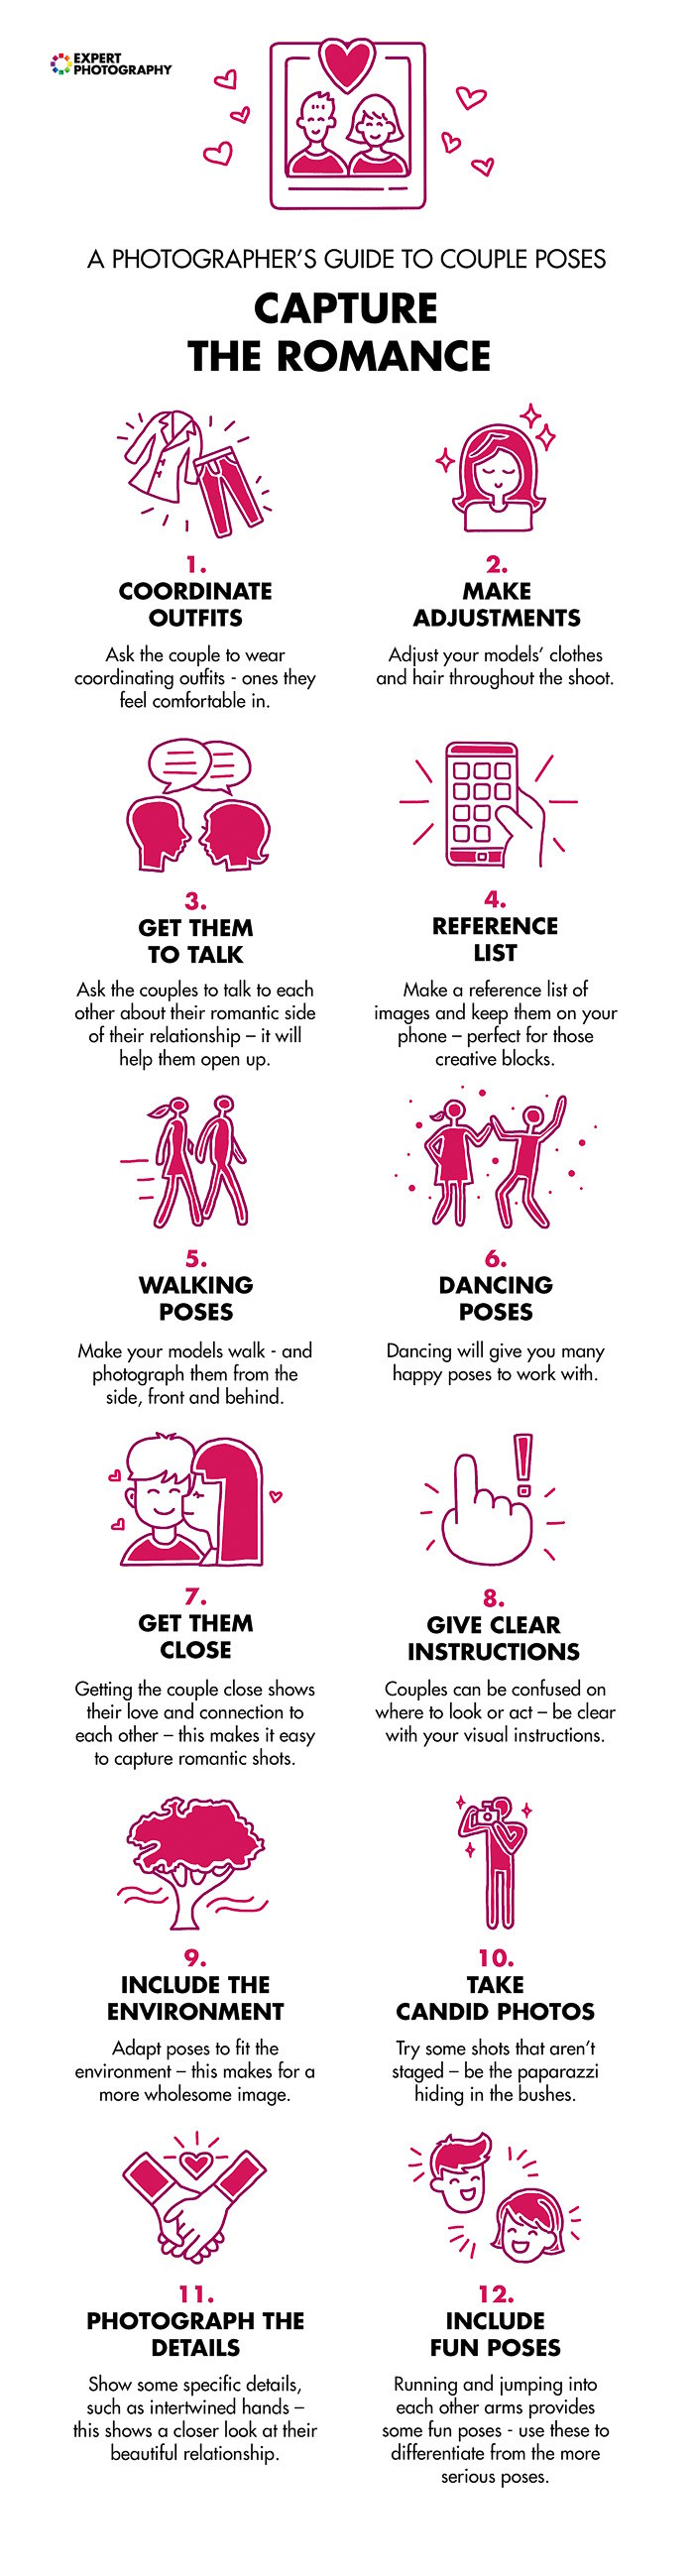
How to Capture Romantic Couples Photos
Couples may feel awkward in front of the camera. Start with a simple action, such as walking together or talking, and give instructions they can follow.
If you're getting disappointing photographs, check focus and shutter speed as well as the pose. The chart gives you options to try; choose poses that both people feel comfortable with.
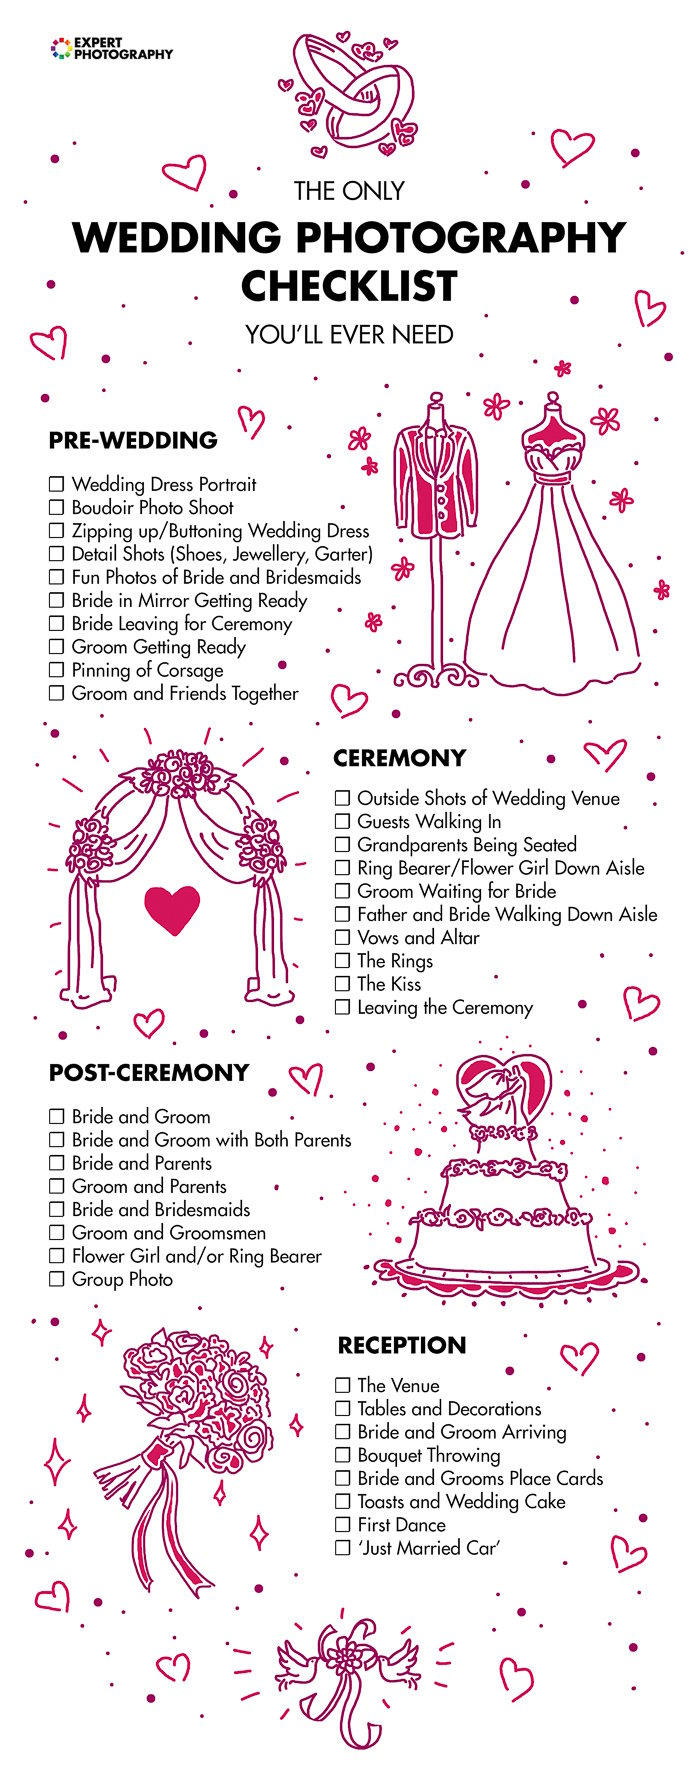
Wedding Photography Checklist
Use this checklist to plan the moments you need to photograph, then adapt it to the couple and their schedule.
Agree on priority photos and group combinations before the day. The order of events and the people involved will vary, so use the list as a prompt rather than a fixed schedule.
Creative Photography Cheat Sheets
Pick a project, prepare the setup, and experiment with one change at a time. These sheets cover night scenes, moving lights, and still life.
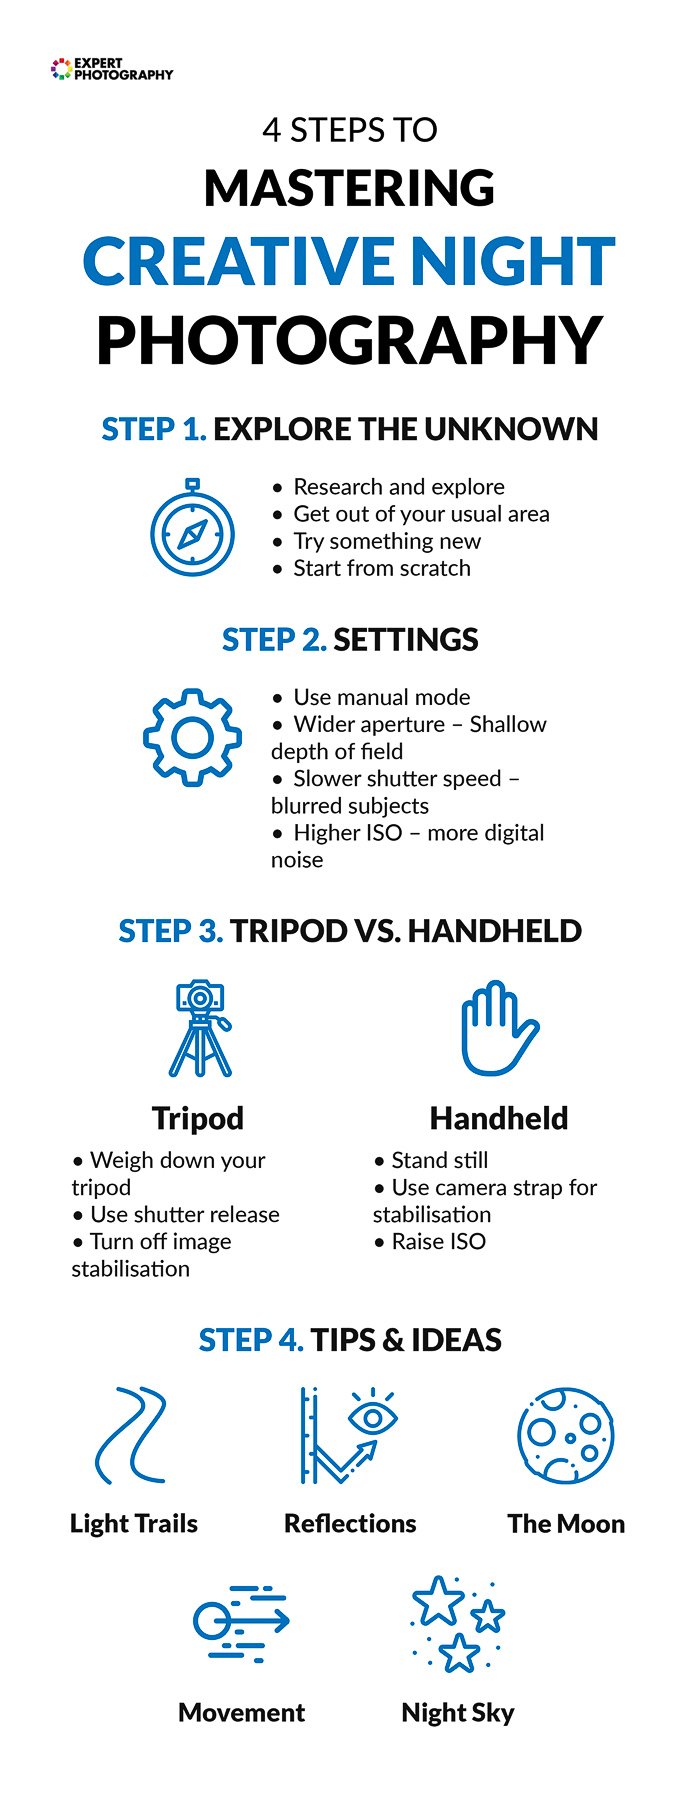
4 Steps to Mastering Creative Night Photography
Creative night photography is a new and exciting field for many photographers.
Choose the effect before you choose the settings. For light trails, a longer exposure records movement; for a person you want sharp, shorten the exposure and adjust aperture, ISO, or lighting to suit.
The chart helps you plan, and our guide can help you master the art of night photography through practice. A tripod supports long exposures of a still scene. Check your camera or lens manual for its stabilization advice when using a tripod.
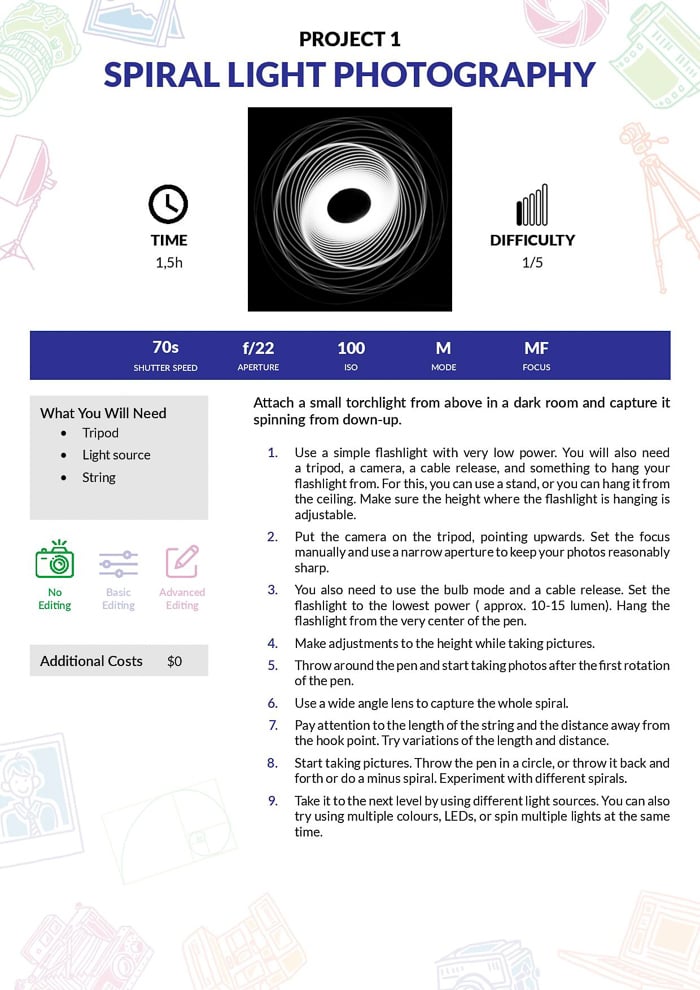
Spiral Light Photography Cheat Sheet
This is one of the simplest forms of creative photography.
All you need is a low-powered flashlight and a piece of string.
With a simple long exposure setup, you can capture some really cool photos.
Suspend the light above a camera pointing upward, then record its path as it swings. Treat the example exposure as a starting point: the light's brightness, its distance from the camera, and the exposure time all affect the result.
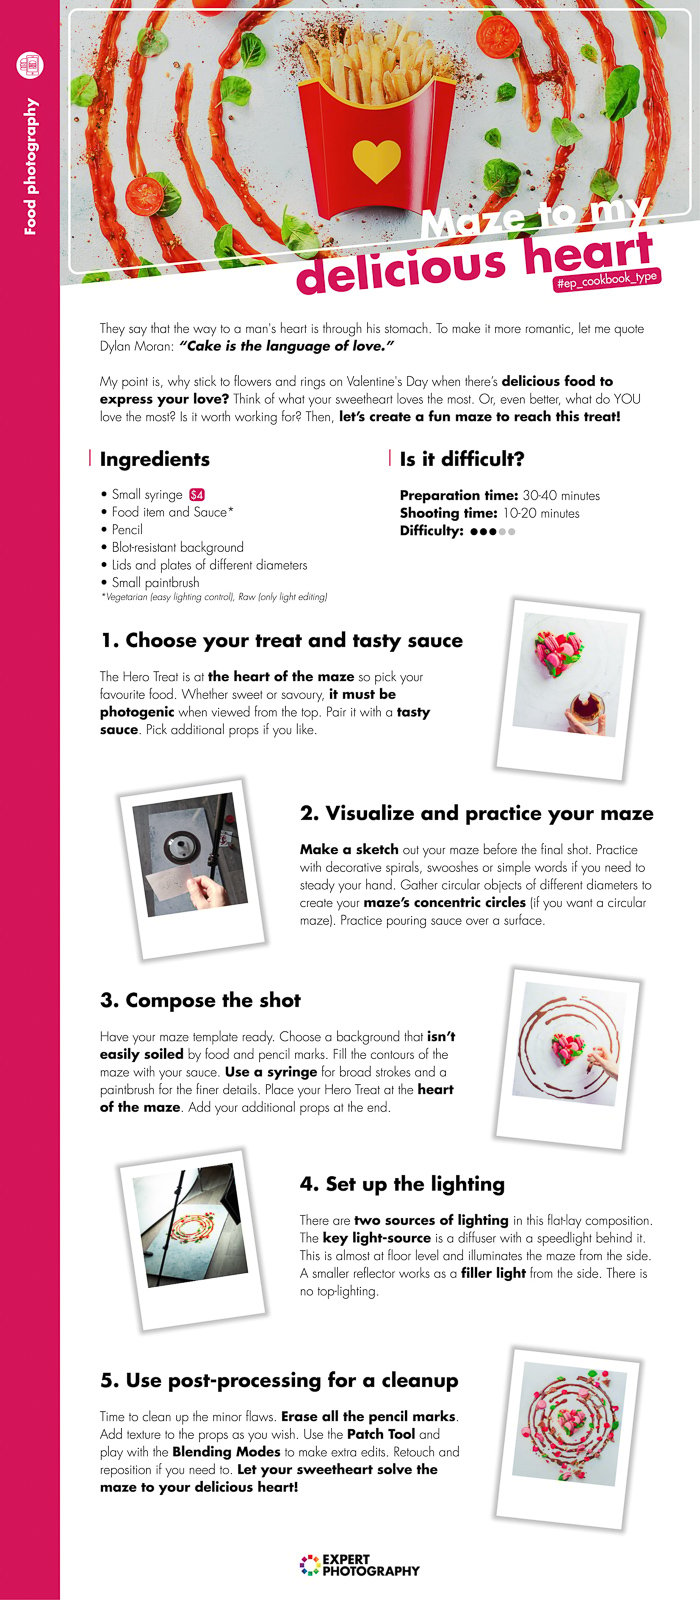
Creative Still-Life Photography Cheat Sheet
Photographers are always looking for new ways to challenge their creativity. Creative still-life photography is a great way to do this because it forces the photographer to think outside the box and create something unique.
This sheet shows a food-maze project. Plan the arrangement, set the lighting, and check the frame before adding the final food item. A still subject gives you time to change one part of the setup and compare photos.
Niches of Photography
Try a subject that interests you. The guides to pet photography and food photography explain those subjects beyond the checklists.
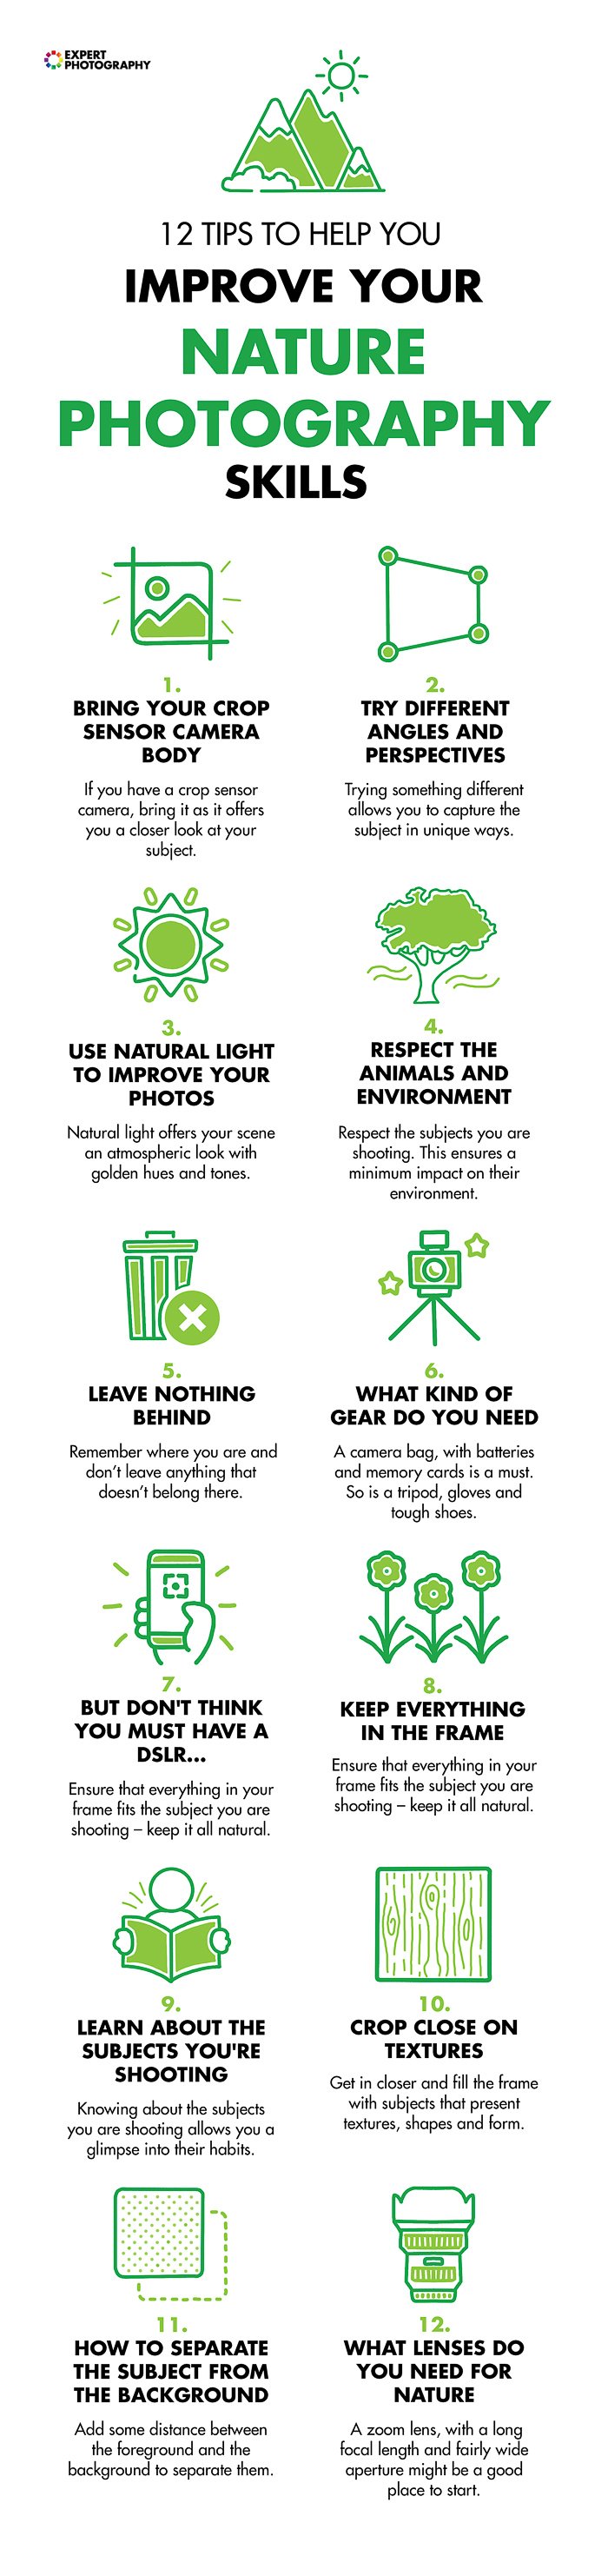
12 Tips to Improve Your Nature Photography
For nature photography, prepare for the subject as well as the setting. A flower close-up and an animal in motion need different focus and shutter choices.
The checklist covers equipment, perspective, light, and care for the surroundings. Choose what fits your subject, keep your distance from wildlife, and leave the location as you found it.
Pet Photography Tips
A pet is a member of the family, and capturing their personality on camera can be just as important as photographing your children. For more help, explore taking great photos of your pets.
Use single autofocus for a pet that holds still and continuous autofocus for one that moves toward or away from you. Check the eyes and adjust shutter speed if movement looks blurred.
Fur color alone does not determine an exposure adjustment. Check a test photo and the bright areas for lost detail. If the camera makes pale fur too dark, positive exposure compensation can help; if it makes dark fur too light, negative compensation can help. Adjust for the actual light and background rather than applying a fixed one- or two-stop correction.
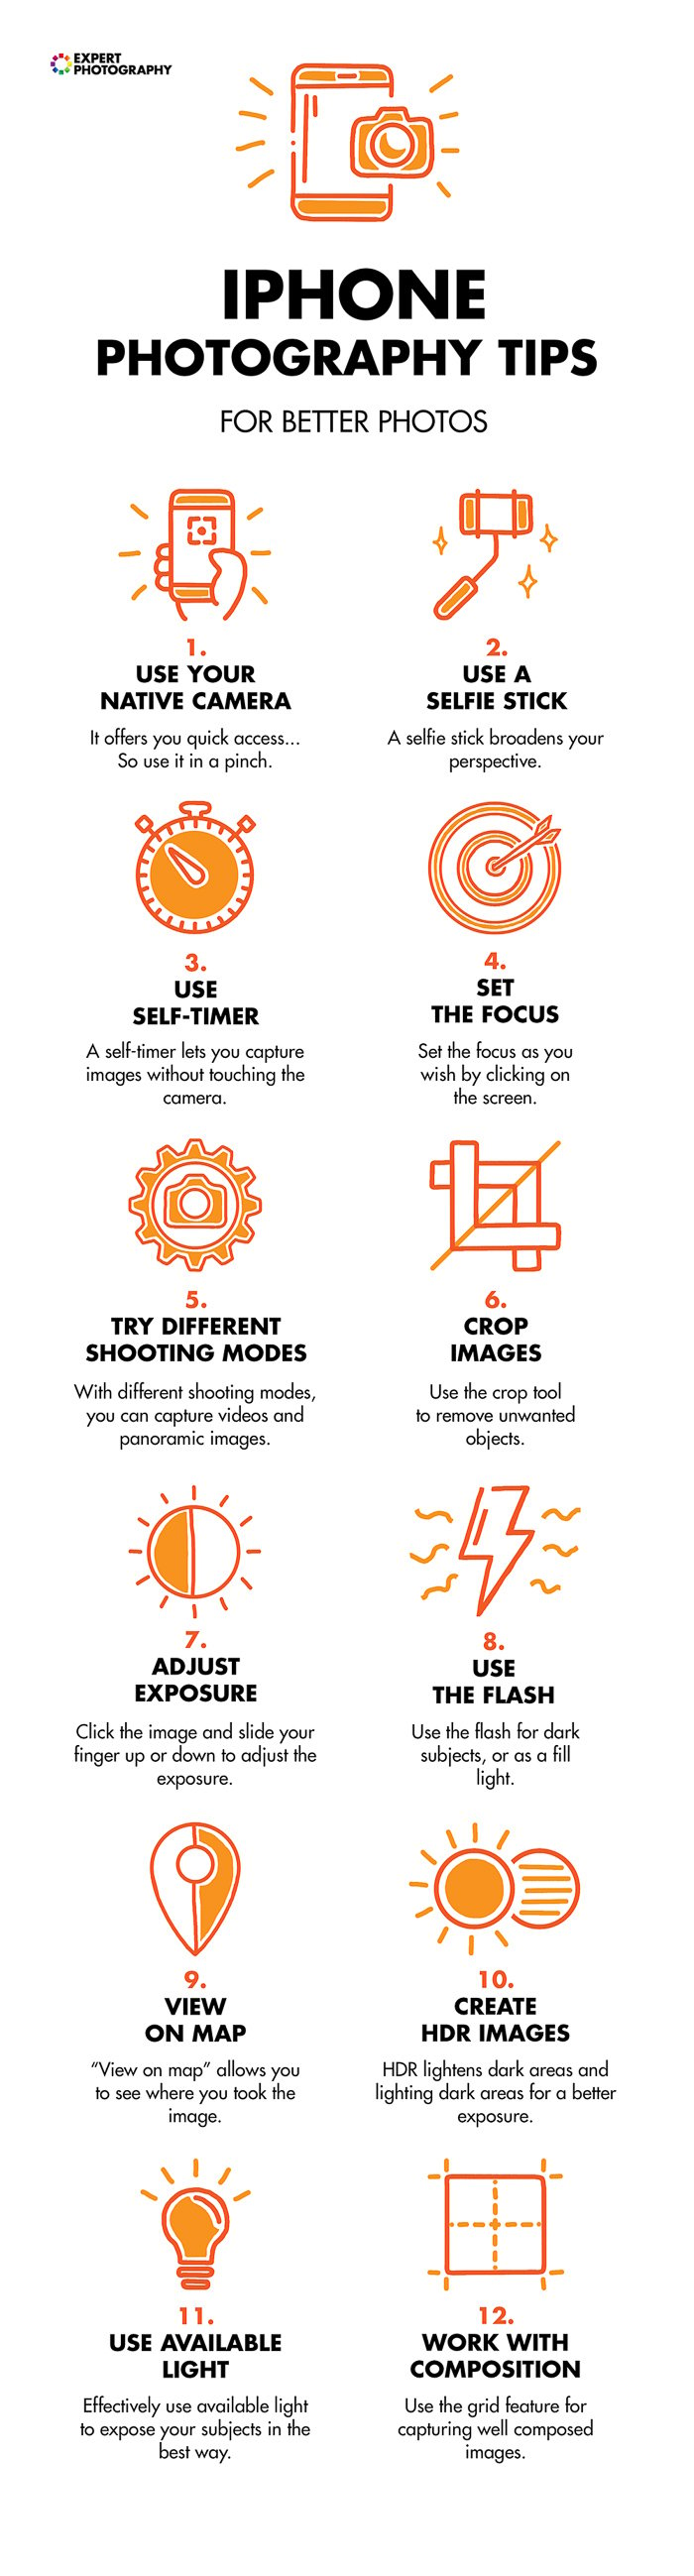
iPhone Photography Tips for Better Photos
Your phone gives you a camera you can practice with every day. Start with composition, the direction of the light, and a deliberate focus point.
The iPhone photography sheet collects 12 ideas. Camera features and controls vary by model and software version, so use the options available on your phone rather than assuming every older feature has the same control today.
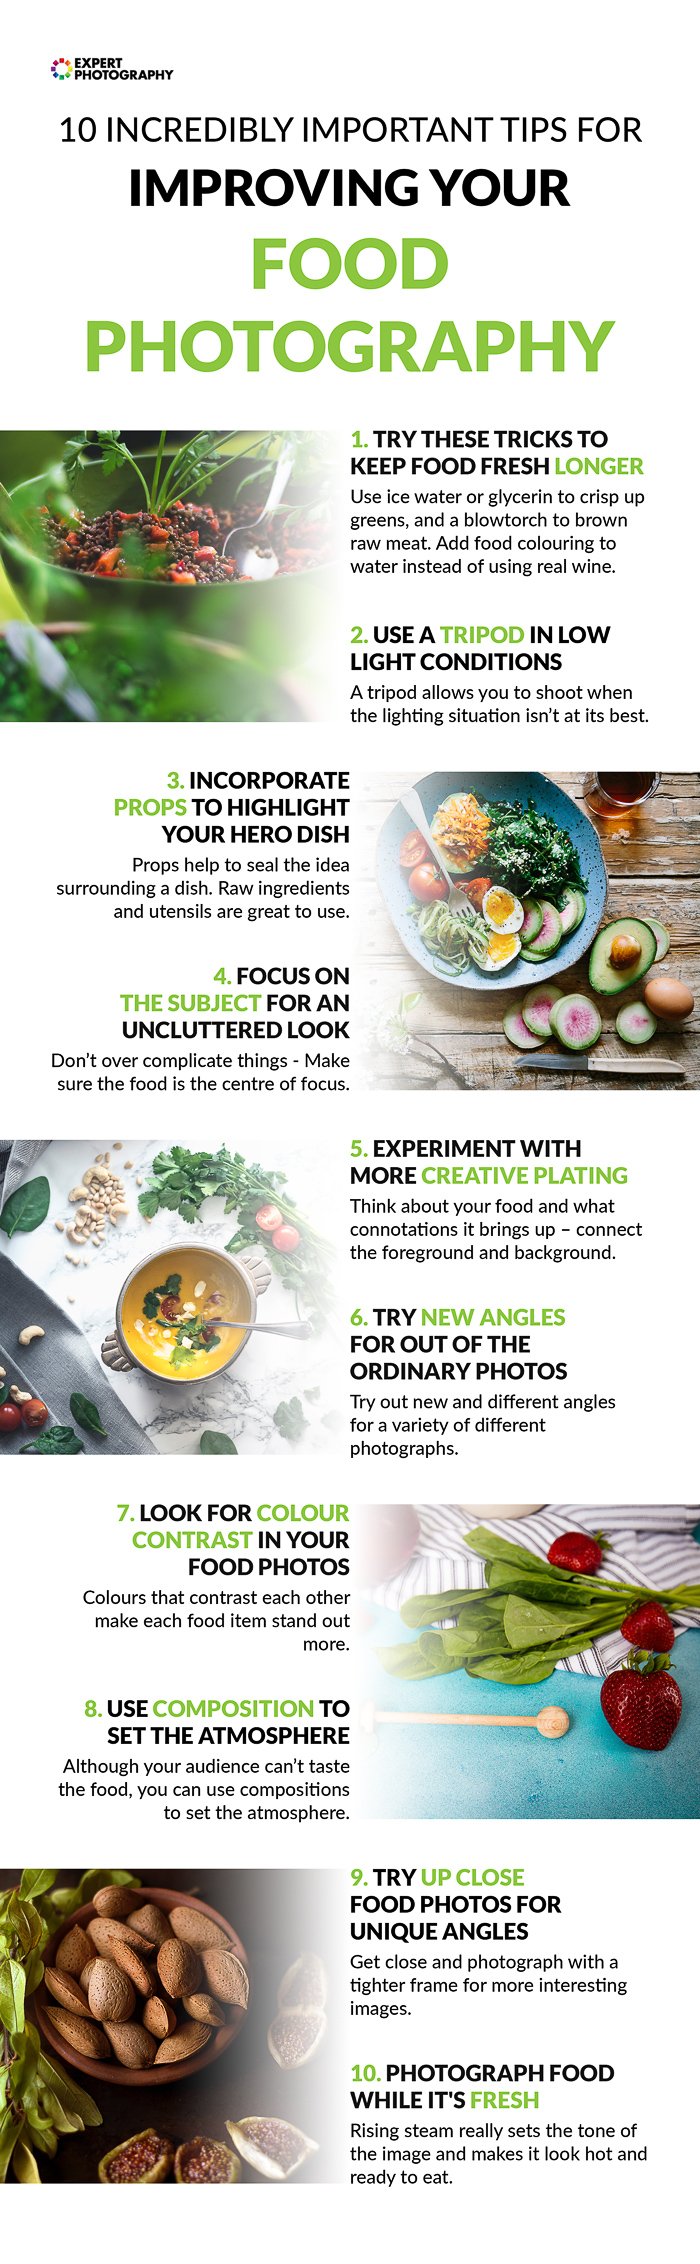
10 Tips for Improving Your Food Photography
Start with fresh food, a background that suits it, and light that shows its shape and texture. Compare an overhead view with a lower angle before deciding on the composition. Below are 10 tips to make food photography easy.
For a stationary dish, a tripod lets you frame and focus without rushing. Check the near and far edges of the dish to decide how much depth of field you need. Keep food prepared with non-food styling materials separate from anything intended to be eaten.
Professional Photography & Social Media
These notes cover planning client work, recording permissions, and presenting your photographs.
Planning Your Photography Contract
I know how difficult it can be to put together all of the necessary information for your photography contract.
This is why we’ve compiled 10 things your photography contract should include.
Collect the details of a job: who is involved, dates, deliverables, payment, cancellation, and agreed image use. A client contract and a model release serve different purposes. The wording needs to fit the assignment and the law that applies.
Photography Model Release Forms
A photography model release form records a person's permission for specified uses of their likeness.
Decide how the photos will be used before you choose the wording. ASMP recommends releases for commercial use, including self-promotion, and notes exceptions to general editorial-use guidance. Being in a public place does not by itself settle whether a release is needed. Keep the signed release linked to the relevant photos.
Sharing Photos on Instagram
Think about the photo and its caption together. Choose a photo that tells the story you want to share, and use the caption to add useful context. Give accurate location information only when it is suitable to share. Reply to relevant comments.
For more social media help, check out our Social Success Strategies eBook.