Switching to manual mode can be daunting for beginners, and other shooting modes that make things a little easier can be useful. Manual mode is valuable when you want direct control over the relationship between aperture, shutter speed, and ISO.
Manual mode becomes more intuitive with practice. The settings below give you a way to test one change at a time and understand how it affects the final frame.
Continue reading for everything you need to know about shooting in Manual mode.
How to Shoot in Manual Mode
There’s no problem with shooting in auto mode when you’re a beginner. It’s a great way to get used to the camera, and auto mode can produce decent results. But it’s important to push yourself to the next level by switching to manual mode.
Auto mode is like using training wheels on your bike. They make life much easier and give you an easy ride, but at some point you’ll have to take them off. It can be daunting, but it’s an important step if you want to improve.
Manual mode gives you complete control over your exposure settings. That means you have complete creative control, giving you more influence over how the final image looks.
The exposure triangle describes the relationship between ISO, aperture, and shutter speed. Manual mode gives you direct control of all three, subject to the limits of your camera and lens.
Balancing the three settings for a usable exposure is the main objective in manual mode. Control of them also lets you shape depth of field, motion blur, and image noise.
We’ll go into more detail on the three exposure settings, how they work, and how you can use them in the following sections. Keep reading to master shooting in manual mode.
Manual Mode Settings and the Exposure Triangle
Now we’ll look at each manual setting in more detail. We cover everything from how the settings affect your exposure to how to understand the values on your camera.
Aperture
The aperture is the hole in the lens that opens to let light fall on the sensor. Pretty much every lens has an adjustable aperture. Mirror lenses are an exception to this, but most lenses have a way of making the aperture smaller or larger.
The size of the aperture is expressed as a number, and known as the f-stop or f-number. A lens description always includes the largest aperture possible. For example, the Canon RF 50mm f/1.8 STM has a maximum aperture of f/1.8.
The minimum aperture is less important and will be f/22 for most lenses. Some will go smaller, but that’s unusual.
You need to be aware that larger apertures are denoted by smaller f-stop numbers. As you can see from the examples above, the narrower aperture has the f/22 f-stop and the wider aperture has an f/1.8 f-stop.
You can see the full f-stop scale in the graphic below.
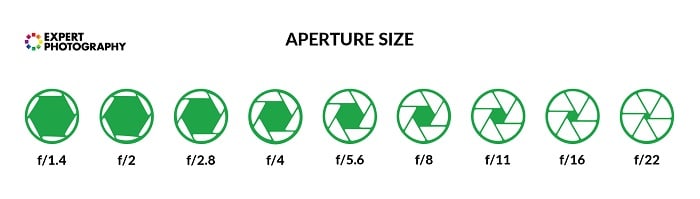
Changing the aperture has two main effects. The larger the aperture, the more light passes through the lens barrel and onto the sensor.
If your picture is too dark, or underexposed, you can use a smaller f-number/wider aperture or adjust ISO or shutter speed. If it is overexposed, stop down to a larger f-number/narrower aperture or make another exposure adjustment.
The aperture also controls the depth of field, which is how much of the scene is in focus. The wider the aperture, the shallower the depth of field. Use a wide aperture to show your in-focus subject against an out-of-focus background.
On the other hand, you would use a smaller aperture to get as much of the shot in focus as possible.
It’s worth noting that diffraction can reduce fine detail at very narrow apertures, although the point at which it becomes visible varies by lens, sensor, and output size.

At f/2.8, the shallow depth of field helps us concentrate on the shot’s main subject. A high ISO of 6400 allows a 1/640 s shutter speed to eliminate any motion blur. Canon EF 70-200mm f/2.8 L IS at 200mm
Shutter Speed
The shutter speed is how long the shutter stays open. This is usually measured in fractions of a second but can go a full second or longer for some shots.
The faster the shutter speed, the less light gets to the sensor. Using a slower shutter speed allows more light into the camera.
Modern digital cameras can offer very fast shutter speeds, although the available range depends on the model and electronic or mechanical shutter. Check your camera manual for the actual limits.
On most cameras, you’ll usually find a maximum shutter speed of 1/4000 s or even up to 1/8000 s on some high-end cameras. That’s fast enough for some impressive photographs.
Using a fast shutter speed is important for two things – preventing blurry photos caused by camera shake and preventing blurry images caused by a moving subject.
Choosing a slower speed allows deliberate blur, which can be an effective way of showing speed and movement within a photo.
With cameras and lenses that have no image stabilization, a rough starting point for avoiding camera shake is a shutter speed near the reciprocal of the focal length. A 50mm lens might suggest 1/50 s or faster, but technique, resolution, subject distance, and stabilization can change the result.
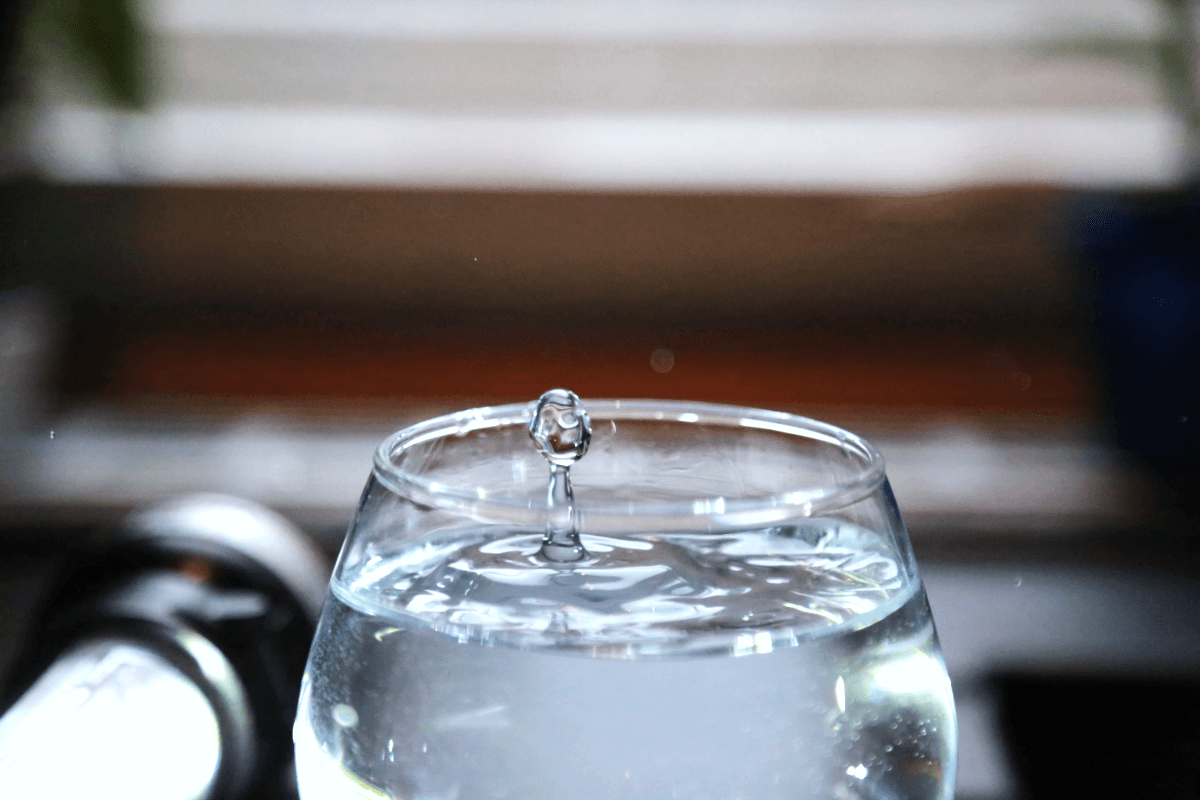
The 1/8000 s shutter speed freezes the movement of this water droplet © T P E Marshall
ISO
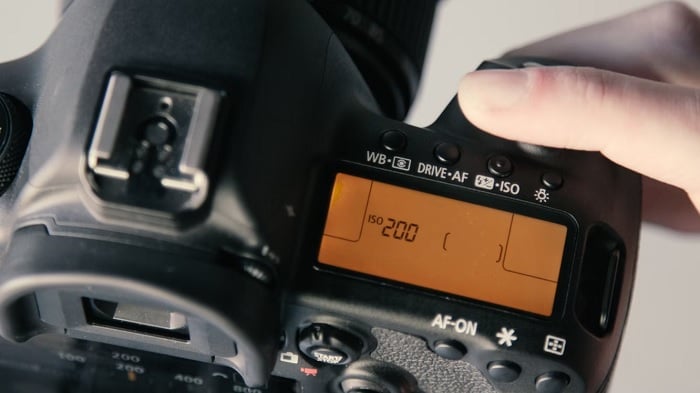
The ISO number tells you how sensitive the camera sensor is to light. On digital cameras this is an adjustable exposure setting.
In the days of film, the ASA/DIN of the film told you how “fast” it was. In other words, it tells you how sensitive it is to light. The ISO number has replaced the ASA/DIN numbers, although ISO numbers are identical in their value to ASA. And they still determine how sensitive the film is to light. Or more usually, how sensitive the digital sensor is to light.
If you came to modern digital cameras from the world of film, you’d be amazed at how “fast” sensors can be. A fast ISO film would be 400, maybe “pushed” to 800 or even 1600 for very dark settings. But you’d pay the price with lots of grain in your image.
Many current cameras offer ISO settings well beyond 12,800, but the useful range depends on the sensor, lighting, and the noise level you can accept.
However, high ISO can increase visible digital noise and reduce color or shadow detail. The effect varies by camera and exposure, so test the settings at the size you plan to publish or print.
Modern cameras and noise-reduction tools can handle high ISO better than older systems, but lower ISO generally preserves more signal when the scene is bright enough. Choose the lowest value that still supports the shutter speed and aperture you need.

My Canon EOS 5D Mark III does an incredible job even with the ISO set at 5,000 © T P E Marshall
Exposure Triangle
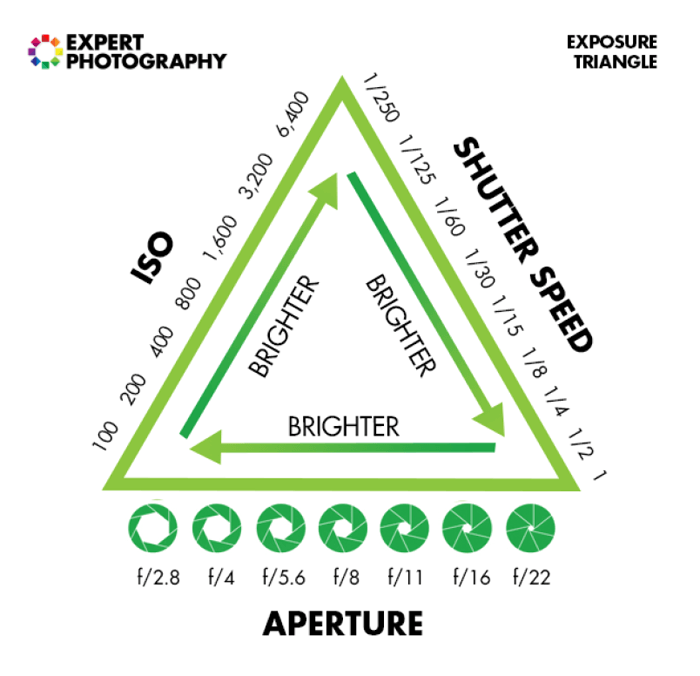
Aperture, shutter speed, and ISO are the three components of the exposure triangle. Capturing a usable exposure is about balancing the three points of the triangle.
Thinking about the manual mode settings in this way helps you understand their relationship to one another. You need to find a balance between all three to expose your image correctly. And adjusting one setting has a knock-on effect on the other two.
The stop system makes this easy to understand. All three of the settings are measured in incremental “stops”. This means you go up and down the scale in equal measurements, and one stop in one setting scale is equal to one stop in another setting scale.
For example, if you have a well exposed image but you decrease your ISO for better image quality, you have to use a slower shutter speed or wider aperture to compensate.
Let’s say you’ve found a good exposure with these settings: ISO 400, f/8, and 1/500 s. However, you want to reduce your ISO to 200 to improve image quality.
That means you’re reducing the ISO by one stop. Therefore, you need to change the aperture or shutter speed by one stop to compensate.
Opening the aperture from f/8 to f/5.6 is one option. But if you don’t want to reduce your depth of field, you can slow the shutter speed down one stop. That change would be 1/500 to 1/250.
Your new settings would be ISO 200, f/8, 1/250. Even though two of the three settings are different from the original combination, the nominal exposure balance is the same; the creative result may differ because motion blur and depth of field have changed.
Mastering Manual Settings
This section looks at how to choose a workable exposure in different conditions. The right settings depend on the subject, light, lens, and the amount of motion or depth of field you want.
How to Set Aperture
A narrow aperture, such as f/16, will keep almost everything in focus because it has a large depth of field.
It’s most useful for landscape photographers, who might use a narrow aperture to show as much detail as possible in the foreground and background. But there’s always a limit to sharpness.
At narrow apertures, diffraction effects can soften fine detail. When that happens, the finer details won’t be sharp anymore.
Shooting a photo with wider apertures, such as f/1.8, will have a shallow depth of field. This means only part of the scene is in focus. The foreground and background will be out of focus.
Portrait photographers tend to use a wide aperture to keep their subject in focus while the background is out of focus. This technique gives you a “bokeh” effect.
It’s also commonly used in food and product photography, and can be used in street and travel photography. 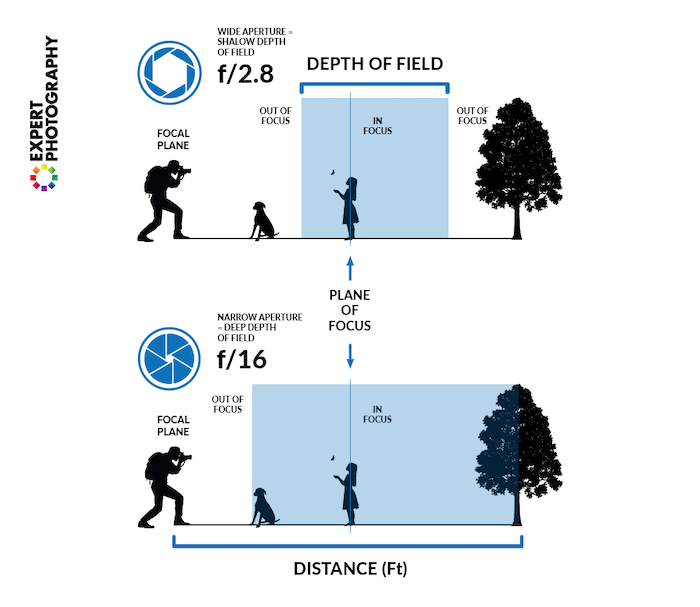
How to Set Shutter Speed
Using a fast shutter speed is one way to reduce motion blur or camera shake. Faster shutter speeds can freeze action, but they also reduce the light reaching the sensor and may require a wider aperture or higher ISO.
Sports and wildlife photographers use fast shutter speeds because their subjects move quickly. If they use a shutter speed that’s too low, the athletes or animals will appear blurred in the final image.
Using faster shutter speeds means you often have to compensate by increasing the ISO level.
You can also intentionally use slower shutter speeds to achieve the motion blur effect. This can create a sense of pace and energy in your images.
But you need to be careful not to set your shutter speed too slow when shooting from hand (without a tripod).
If you use a slow shutter speed handheld, camera shake becomes more likely, but there is no universal cutoff. Focal length, stabilization, technique, resolution, and the intended output all matter; use a test frame to find your limit.
Using a tripod gives you more freedom with your shutter speed setting. You can keep the shutter open as long as you need to, and there’s no risk of camera shake. Moving subjects will still be blurred with slow shutter speeds, but still objects will remain sharp.
Some cameras have built-in image stabilization systems that can reduce camera movement at slower shutter speeds. The benefit varies by camera, lens, focal length, and whether the subject is moving.
Lenses, too, sometimes have built-in image stabilization. Both these systems help you capture sharp shots with slower shutter speeds.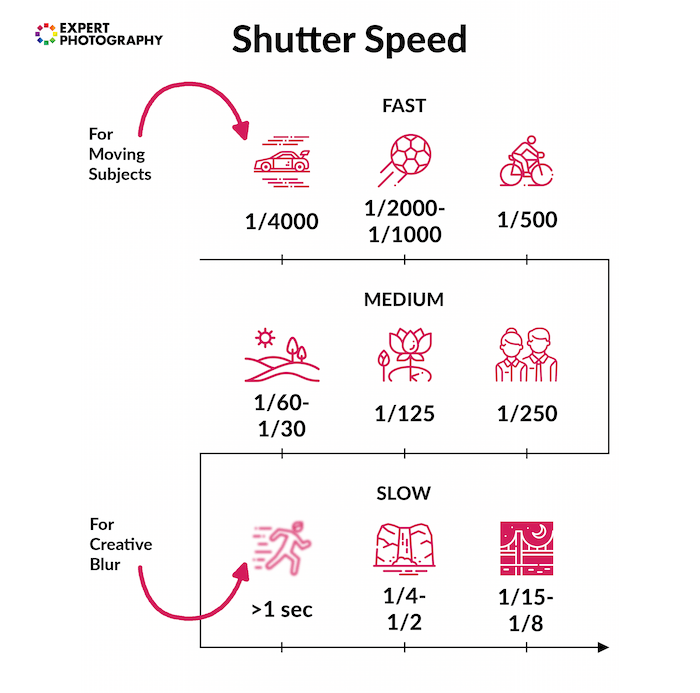
How to Set ISO
Lower ISO often preserves more dynamic range and reduces visible noise, but it is not automatically the right choice if it forces too-slow shutter speed or unwanted motion blur. In general, use the lowest value that suits the scene.
But there’s a trade-off. If you’re working in low light, you need the extra brightness from a higher ISO. You have to balance brightness with image quality.
Noise does not begin at one universal ISO value. Compare test frames from your camera, and balance ISO against aperture, shutter speed, subject movement, and the amount of shadow recovery you expect.
Most cameras will offer you the option of Auto ISO. This means that while you concentrate on getting the exact shutter speed and aperture you want, the camera adjusts the ISO so the exposure is right.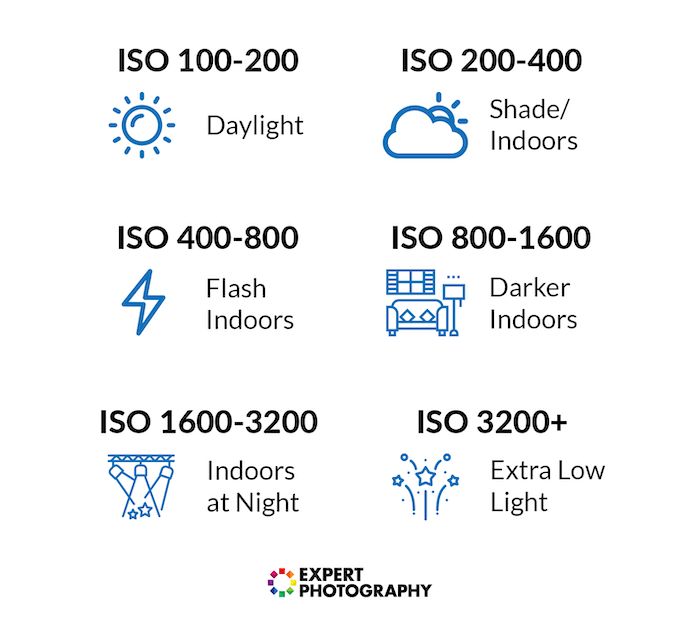
How to Shoot in Full Manual Mode
The best way to get full control over your exposure is to use manual mode. Assess the scene, and use your judgement to select the appropriate ISO.
Once you’ve done that, it’s simply a case of choosing the aperture and shutter speed you need for your photos.
And as we’ve seen, the type of photo you want will determine your choices. For example, if you’re shooting sports or fast-moving wildlife, you need a fast shutter speed.
But if you’re shooting a still-life with a tripod, you can use slower shutter speeds since motion blur isn’t an issue.
Choosing the right aperture depends on how much light there is and how much of the scene you want in focus.
In low-light conditions, a wider aperture can let in more light, but it also reduces depth of field.
If you want a deep depth of field, use a narrower aperture and adjust ISO and shutter speed to compensate for the correct exposure.
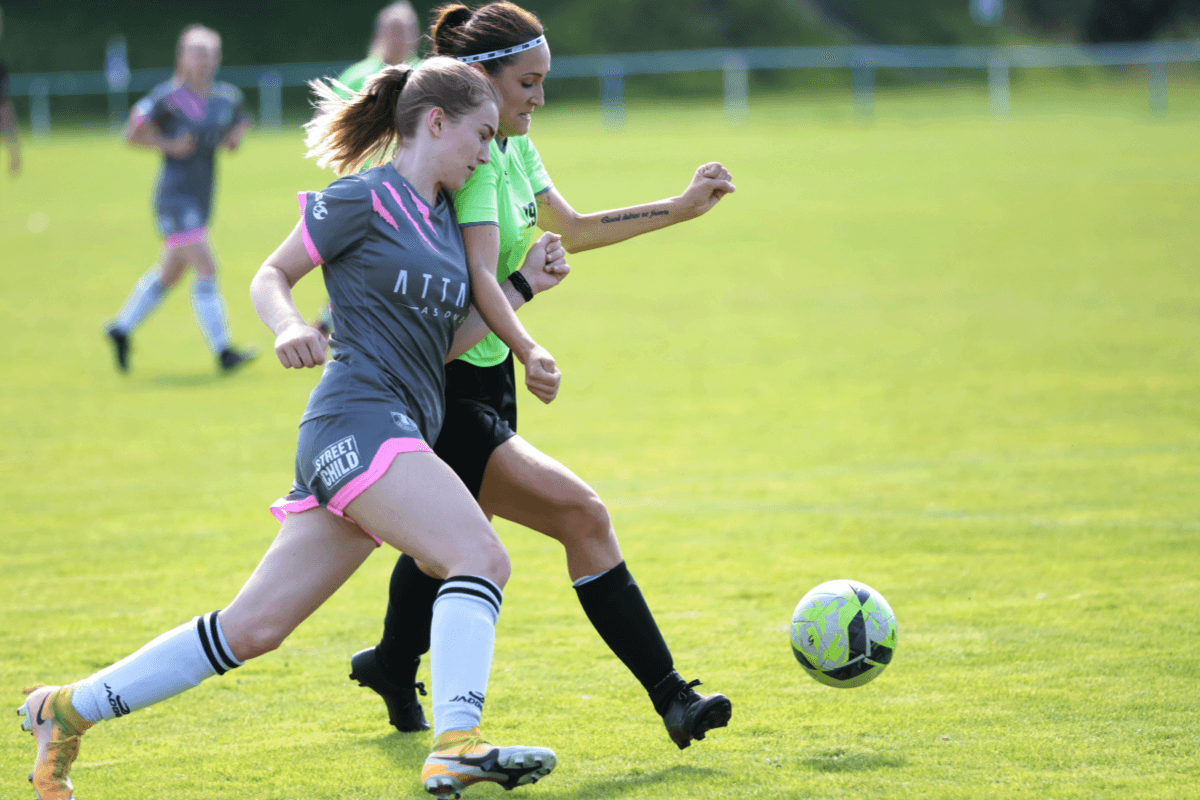
With the shutter speed set to 1/8000 s, the fast-paced action is frozen © T P E Marshall
Conclusion: How to Shoot in Manual Mode
Manual mode is one way to learn how aperture, shutter speed, and ISO interact, but Auto, Aperture Priority, and Shutter Priority can also be useful depending on the subject and workflow.
Manual mode takes practice. Start with a known exposure, change one setting at a time, and use the histogram or highlight warnings to judge the result rather than relying only on the rear-screen preview.
Experiment with different combinations and keep notes about what changed. The goal is not a particular dial position; it is understanding which settings protect detail and create the motion or depth-of-field effect you want.