In this article, we will show you how to use the Blur tool in Photoshop. We will start by painting blur into specific areas using the Blur tool in the toolbar. Then, we will explore Blur filters and the Blur Gallery effects. These latter tools let you control blur across your image.
There are many reasons you might want to blur parts of your image. Blurring backgrounds make the subject stand out. A blur creates a dreamy effect. And you can add to add a soft glow to a person's face. Or your reasons may be more practical… You may want to hide identifying details like a license plate or phone number!
Using the Blur Tool in Photoshop
The Blur tool in Photoshop works like the Paintbrush tool. Select it from the left toolbar and paint blur onto your image. You can use this tool to soften edges and precisely apply the blur.
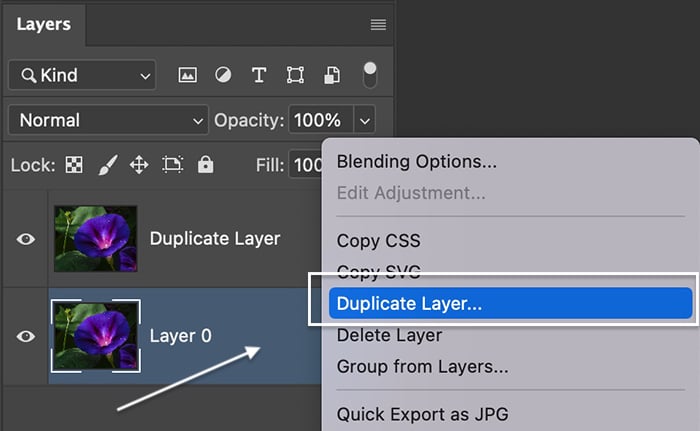
Step 1: Create a Duplicate Copy
Open your image in Photoshop. Click on the background layer and make a copy. You can do this by right-clicking on the layer and selecting Duplicate Layer (Ctrl or Command+J).
Working on a duplicate layer ensures that you always have the original file to go back to. Also, you can compare the before and after by toggling the eyeball on and off.
Step 2: Open the Blur Tool
In the toolbar, select the Blur tool. It looks like a teardrop. It is grouped with the Smudge and Sharpen tools.
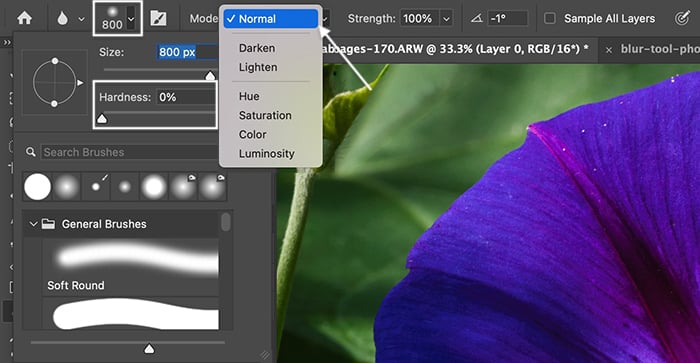
Step 3: Set Blur Tool Options
Set up the Blur tool in the options bar that appears at the top of the workspace. You have many of the same options as the paintbrush. Change the size and character of the brush.
Choose a soft brush from the Brush Preset picker with its strength set at 100%. If the effect is not strong enough, paint over an area a few times.
You can also change the angle of the brush tip and the mode. The Blending modes available are Normal, Darken, Lighten, Hue, Saturation, Color, and Luminosity. For simple blurs, use Normal blending mode. But feel free to play with the other modes.
Step 4: Paint Blur on Image
Drag the Blur tool over the area you want to change. Blurring some areas will make the sections in focus stand out. You can build up the blur by painting over an area several times.
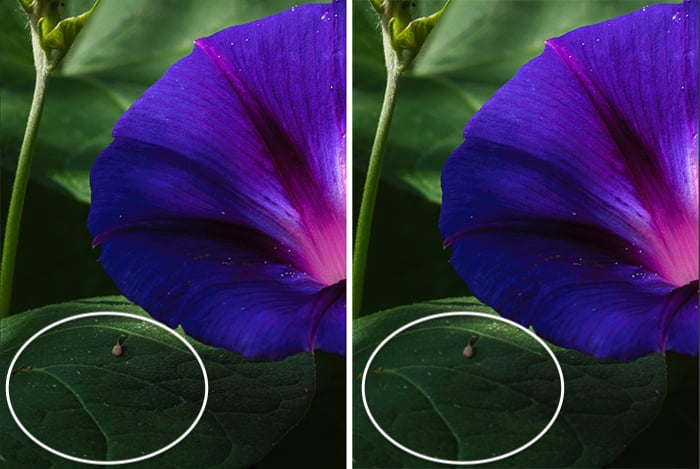
Comparing the original leaf (left) with one blurred using the Blur tool in Photoshop (right)
How to use a Blur Filter (Motion Blur)
The Blur tool works great to blur a small section of your image. If you want more blur, use one of Photoshop's many Blur filters. Each gives you a different look. As an example, we will apply a motion blur to water and clouds.
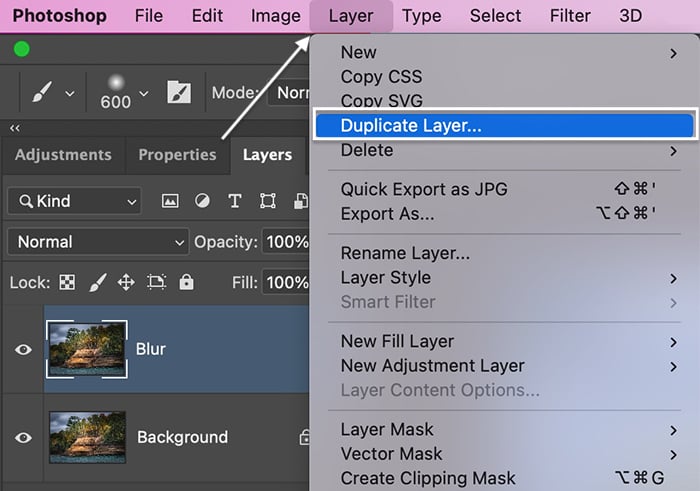
Step 1: Create a Duplicate Copy
Open your image in Photoshop. Select the background layer. Make a copy by going to the Layer drop-down menu and selecting Layer > Duplicate Layer (Ctrl or Command+J).
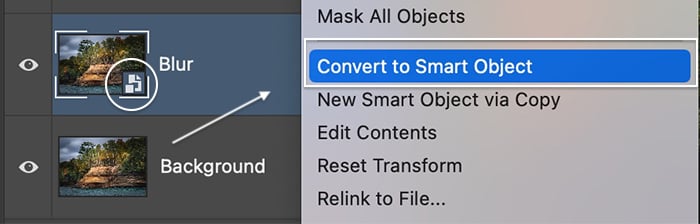
Step 2: Convert to Smart Object
Right-click on the duplicate layer and select Convert to Smart Object. A symbol appears in the lower right-hand corner of the thumbnail.
If the layer is a Smart Object, you can re-adjust the amount of blur at any time. If not, the blur is baked into the layer. You will not be able to adjust it later.
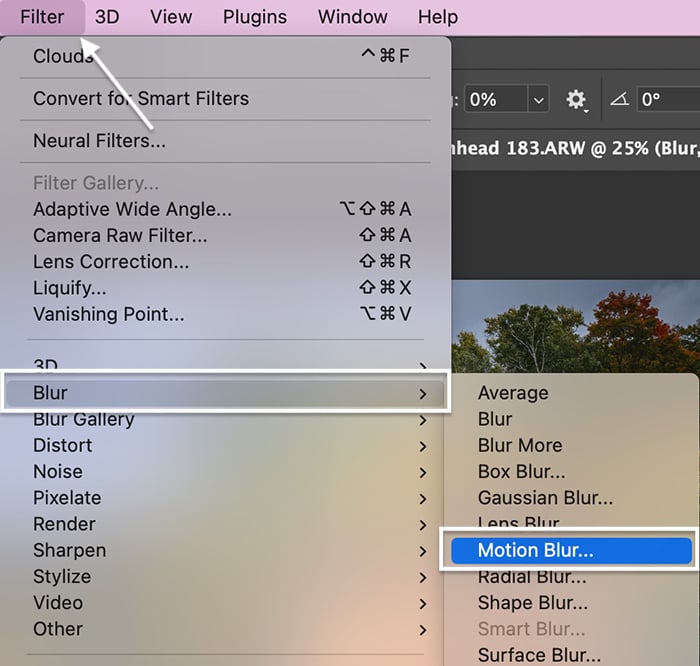
Step 3: Select a Blur Filter
Make sure the duplicate layer is highlighted. Select the Filter drop-down menu. You have two blur options.
Let's start by choosing Filter > Blur. (We will explore the Blur Gallery in the next section.) From this menu, you can choose the following options and more:
- Average
- Blur
- Blur More
- Box Blur
- Shape Blur
If your layer is a Smart Object, you can also select Smart Blur. Each creates a different type of blur. Here are descriptions of the rest of the more popular blur effects:
- Gaussian Blur is one of the most used blur effects because it creates a soft blur and reduces noise.
- Lens Blur simulates a shallow depth of field created by using a wide-open aperture on your camera.
- Motion Blur goes in one direction, making it look like your subject is moving.
- Radial Blur creates a spinning or zooming effect as if you were twisting your camera or zooming a lens.
- Surface Blur retains edge detail to create a special effect or reduce noise.
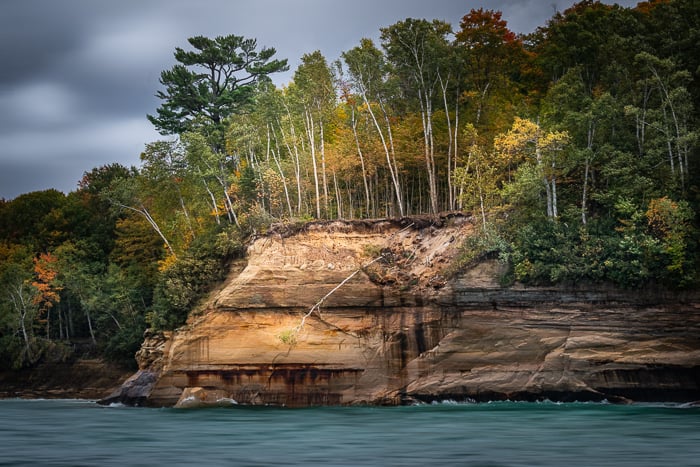
Select your blur option. Some apply the effect automatically. Others open a window where you can change the amount of blur and other characteristics of the effect. Let's apply one of the most popular blur effects, Motion Blur. This option lets you simulate smooth water and clouds you can create with your camera using a long shutter speed.
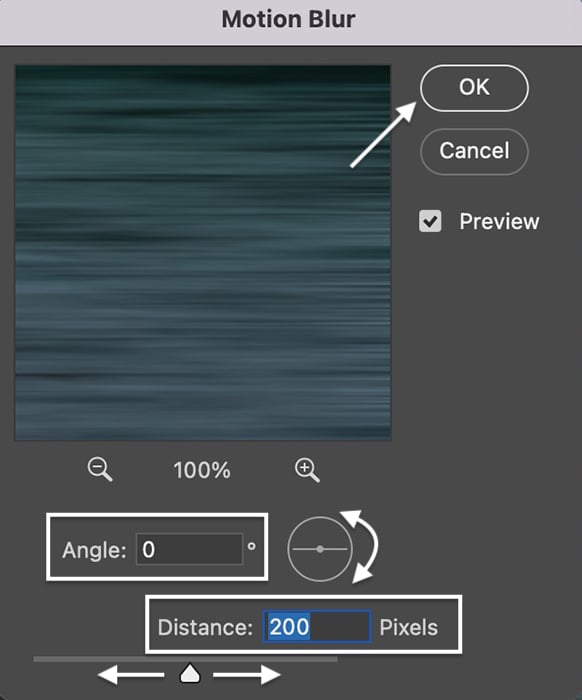
Step 4: Enter Blur Settings
Enter the amount of blur you want in the Distance box or use the slider. Select a blur in the range from 1 to 2000. You can see the effect in the Preview window.
Select the angle of motion. Enter a number or spin the compass. For horizontal motion, enter 0. You can change the angle in the range between -90 and +90.
Click OK.
You can lower the opacity of the layer or add a layer mask to remove blur from parts of your image. If the layer is a Smart Object, open the caret symbol next to the layer and double-click on Motion blur to adjust.
Here you can see the water before blur (left) and after applying motion blur (right).

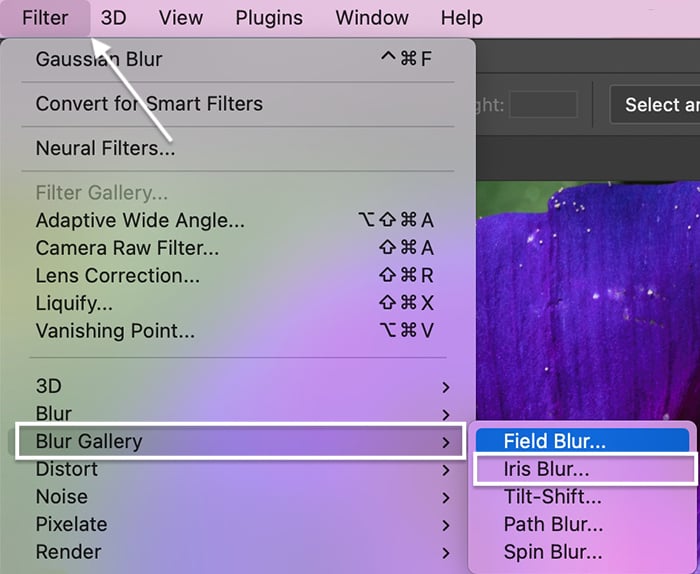
Blur Background Using Blur Gallery Effects
In addition to the blur tools, Photoshop has five Blur Galleries. The Blur Gallery gives you more control over the final product.
- Field Blur adds blur around pins that you place in the image
- Iris Blur creates a shallow depth of field around a focus point or points that you select
- Tilt-Shift simulates the focus pattern created by using a tilt-shift lens. This is a graduated focus effect. Your selected focus point gradually blurs towards the top and bottom of the image.
- Path Blur lets you determine the shape and speed of the blur effect. With this tool, you can simulate the look of a rear sync flash. This is a flash triggered at the end of a long exposure, freezing the motion at that point.
- Spin Blur creates a rotating blur around points that you select.
In addition, you can control bokeh and noise. Path and Spin blur also let you control motion effects.
Open one gallery to open the workspace. You can control all five tools in the same workspace and combine the effects. Let's use the Iris Blur tool to simulate shallow depth of field.
Step 1: Create Blur Layer as Smart Object
Duplicate the background layer (Ctrl or Command+J). Right-click on the blur layer and convert it to a Smart Object.
Step 2: Open Blur Gallery
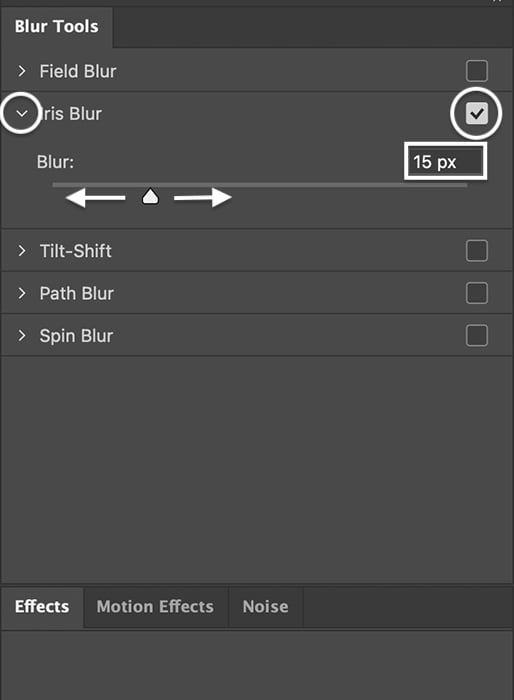
With the Blur layer highlighted, go to the Filter drop-down menu. Select Filter > Blur Gallery > Iris Blur. The blur tools will open in the right-hand column of the workspace.
The caret symbol next to Iris Blur is open to reveal a slider. The checkmark indicates that this blur option is active. If you open other blur tools, they will become active. To deactivate a tool, uncheck the box.
Use the slider or enter the amount of blur. You can choose from a range between 0 and 500 pixels.
Step 3: Set a Focus Point
A circle with four dots and a square appears on your image. The blur effect will start in the center and gradually increase. The outside circle shows where the blur is at the maximum.
You can increase or decrease the size of the circle to adjust the gradation. Click and drag the square symbol to change the shape.
Click on the center to reveal the focus point. Grab and move the center to the sharpest point of your image.
This tool also works as a circular slider. To change the focus of the center point itself, use Focus in the options bar.
The four pins orbiting the center show where the blur effect begins. Click and drag one of the circles to start the blur effect closer or further from the center point.
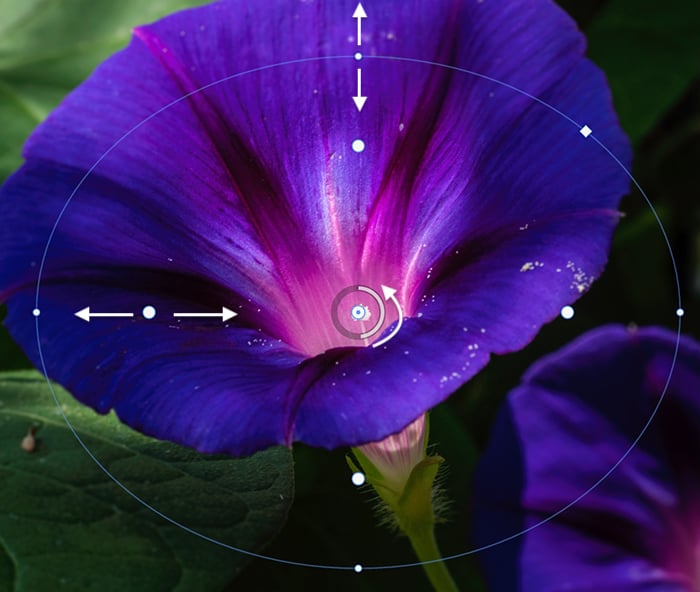
You can add another focus point by clicking on your image. This allows you to bring focus to an element on a different focal plane. It's something you cannot do with your camera.
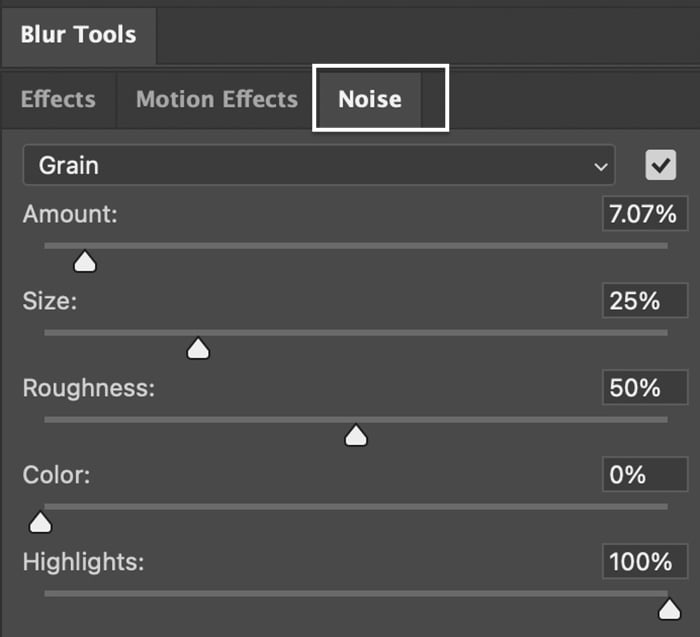
Step 4: Set Effects and Noise (Optional)
In the Blur Tools menu, click on the Effects or Noise tabs to control bokeh and the type of blur you wish to add:
- Gaussian
- Uniform
- Noise
Double click on the Blur Tools tab to return to the Blur Gallery. When you are happy with the blur, click OK in the options bar.
Conclusion
We hope you've learned how to blur pictures… Photoshop has several blur tools to create the effects you want:
- The Blur tool in the toolbar adds a small amount of blur to a specific area of your image.
- Blur filters in the Filter menu affect your entire picture—Gaussian Blur being one of the most popular options.
- The Blur Gallery gives you more control over the blur effect. You can blur backgrounds, simulate a tilt-shift lens, and create complex motion effects.
All these blur tools in Photoshop will help you simulate a shallow depth of field or add an overall glow to your images. So happy blurring!
Try out our Fantastic Photo Adventures video course with 30 projects you can try out today!


