Whether you're new to digital photography or not, Lightroom is a powerful tool to take your interior photography from good to great. Knowing how to work with Lightroom to edit interior photography, though, can take lots of practice!
While each photographer works slightly differently and eventually develops their own workflow, there are basic techniques to edit interior photography sessions. Let's walk through a sample Lightroom workflow for you to edit interior photography.
How to Edit Interior Photography: You Might Need Photoshop First
If you shot bracketed to capture the view through the windows, then you'll want to edit your layers in Photoshop before applying Lightroom edits. We'll walk through those steps below.
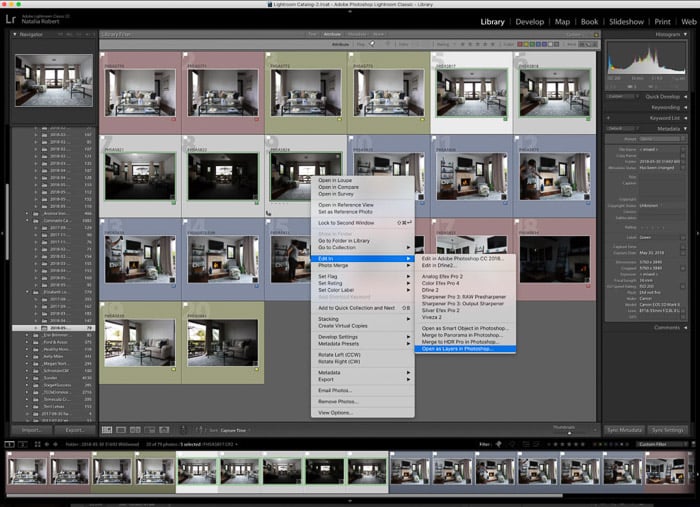
- While in Library mode, select the photos you want to layer. Then right + click (Ctrl + click on a Mac) to open the menu
- Select "Edit in" and then select "Open as layers in Photoshop…"
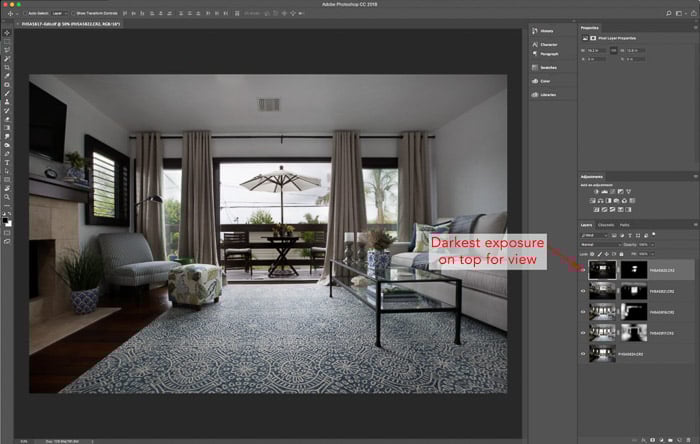
- Once in Photoshop, arrange layers in preferred order. You'll want the layer with the outside view at the top so that it can go over the lighter exposure.
- Leaving the bottom layer as is, create masking layers to selectively add areas you want to overlay. You can do this easily with the Brush tool. Keep in mind that white is to hide areas of that layer and black is to expose them.
- Using the layer mask is ideal because it doesn't actually delete or damage the layer, but rather hides or exposes it.
- When masking the layer with the view, you'll want to use the pencil or lasso tool to select the area to mask so that you get clean edges. If you just use the brush, you'll most likely end up with dark shadows on the edge of the window, as shown in the example below.
- When you're done masking, save the file. Photoshop will automatically create a TIFF file with the name of the base layer RAW file (you can also have it save the new file as a PSD file – this change can be made in Lightroom Preferences).
This file will appear in the same folder as the base files, and once you return to Lightroom, your new photo will appear in the Library module next to the base files.
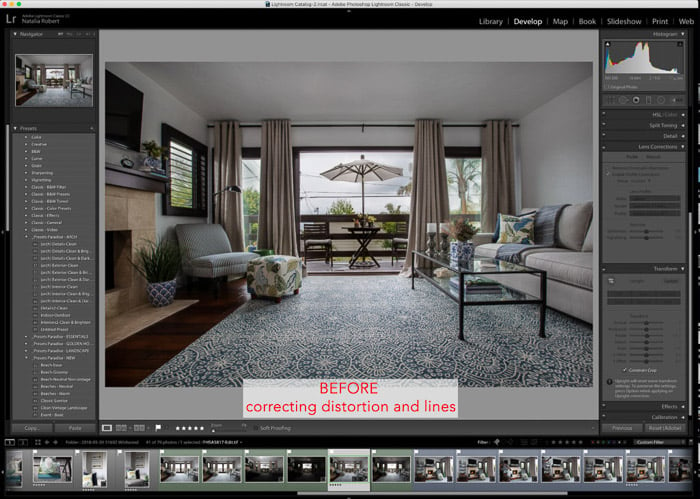
Straighten Your Lines and Fix Distortion
Once you're back in Lightroom, the next thing you want to check is that your distortion and lines are corrected. This means your verticals are actually vertical and, if it's a straight-on shot, that your horizontals are also horizontal.
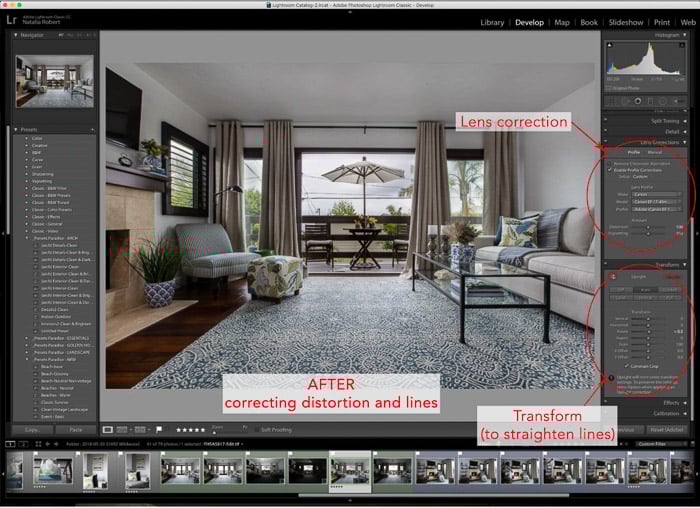
In the Develop module, you'll first want to apply lens correction. Check the box that says "Enable Profile Correction", and then make sure that the lens shown beneath that is the one that you used for this shot.
Next, go to the Transform section below that and check the box that says "Constrain Crop". Then you'll either press the box that says "Auto" or you can also manually adjust the lines with the sliders.
Now that you've corrected the lines, you're ready to look at colours!
Color Correct
When looking at color correction, you'll want to look at the overall color and then look for any spots that need fixing. For overall color correction, you can use the white balance sliders at the top of the right column in the Develop module until the colors look just right.
Otherwise, you can also use the eye dropper in that same section to select a middle grey that Lightroom will use to auto-adjust the color. Often, it's time saving to use the eye dropper to select a middle grey and then tweak the color on the sliders a bit from there.
When you shoot with interior lights on, you also get warm spots from the different light temperature of the bulbs compared to the cool sunlight. For this, you'll want to manually correct those areas. Since the light from a fixture fades into cool light, you'll want to use light brushes with soft edges. This way, the correction will be subtle.
The best tools to use for this are the local adjustment brush and the radial brush. Personally, I prefer the control and flexibility of the local adjustment brush over the radial brush. That being said, though, do experiment with both to find what feels best for your editing style!
If the light that you're adjusting is just out of frame, you'll most likely have to use a gradient filter to gradually adjust color correction from one side of the frame.
When using the gradient filter, be sure to stretch it out so that the effects are applied gradually and remain subtle.

Apply Your Edits
Now it's time to apply any creative edits you feel the photo needs. Ideally, the less editing you do, the better! Still, there are often small changes we can make that just give a photo more life and add depth.
Think about things like the vibrancy of the colors, whether the over-exposure feels spot on or needs adjustment, and whether the highlights or shadows look how you want them to look.
If you like to use presets, this is the time to apply them! Do be careful with presets for interiors, though. Interior photography is not a niche where you'll want to push the creative edits too far. Rather, interior photography calls for realistic, yet polished, photos of a space. Our job is to enhance, but not overdo the look.
Presets can also be great to use as a base for your editing! Apply a preset that you think best suits the space and is closest to what you want your final image to look like, then tweak the sliders as needed to make sure that the photo is just right.
Don't be afraid to play with the sliders and see what the different effects look like on the space.
One of my top recommendations is to use the local adjustment brush to add pops of clarity to help draw the eye to certain features. This brush is also great for brightening up shadows a bit.
In an interior photo, this is great for decor on a table or pillows on a sofa – items that you want the eye to go to and that will add interest for the viewer.
Add Finishing Touches
Now that you've layered, straightened, and edited, it's time to give the photo one last look for final adjustments. Be sure to zoom out so that you see the entire photo at once.
Think about any spots that might need adjustment, or if the entire image needs any extra sharpness or clarity. Once you're satisfied, you're ready to export, organize and deliver to your client!
Conclusion
While there are loads of detailed edits and different methods you can use for interior photos, the above workflow will serve you well at the beginning. As you get more comfortable with this workflow, you'll find what does and doesn't work for you.
Additionally, over time you'll learn more intricate methods of photo editing that may suit your photo style or that simply expand your expertise. Above all, though, you'll want to continuously learn the features at your disposal in Lightroom and other photo editing tools.
For more great tips, check out our new article on using HDR for real estate and interior photography or great real estate photography tips!