If you’re looking for photo software to sort and organize your RAW files, you may come across Exposure X7. It features many sorting and editing tools at an affordable price… especially compared to the prices you get from a software giant like Adobe.
Today we take you through an Exposure X7 review. We look at all the key features that show how you can customize this effective editing software. We look at its new features and its old ones. So let’s dive in and discover what this software is about.
Exposure X7 is editing software created by Exposure Software. It helps organize, edit, and prepare your photo files. It used to be called Alien Skin Software. But it recently changed its name to Exposure X7.
The program aims to give you a simplified, all-in-one experience for editing images. It takes you from having a large number of RAW files to a perfect set of shots in the file format that works for you.
If you’re familiar with photo editing software, this may sound like Adobe Lightroom, Adobe Camera RAW, or Adobe Photoshop. And you wouldn’t be wrong!
But Exposure X7 is a cheaper alternative to Adobe and features different editing tools. Exposure X7 is also another choice for those who don’t enjoy Adobe software interfaces. This program gives you a stripped-back view so that your photos are front and center.
Exposure X7 is a fully-fledged editing suite with many broad functions and abilities. Some photographers use it to organize photos. Then they export images in RAW or TIFF format to edit in Photoshop.
Others save editing presets and manage their photography styles through this image editor. You may even use the program strictly to crop. It is much easier to do in Exposure 7 than in Photoshop.
Exposure X7 also comes as a plugin for both Lightroom and Photoshop. So if you only want to use some of their features but don’t want to leave your Adobe workspace, you don’t have to!
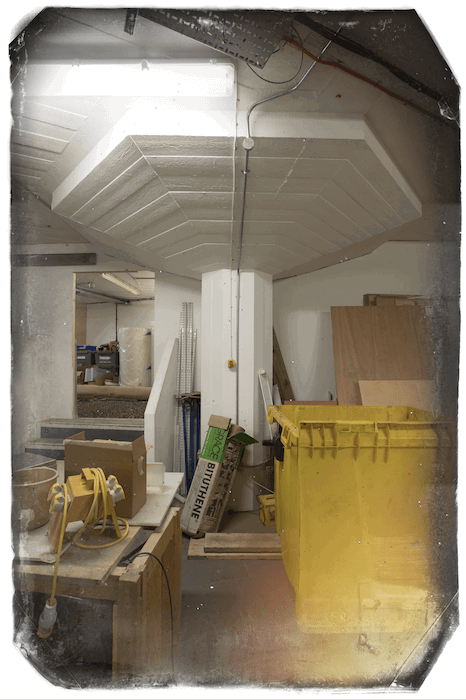
Here’s a simple edit I did with Exposure X7.
Exposure X7 is for a wide range of digital photographers, from beginners to paid professionals. It provides a wide number of functions, and you can pick and choose what works for you.
Beginners can import and edit images in a pretty straightforward process. But Exposure X7 can also handle huge sets of files spanning many catalogs for professionals.
With a customizable workspace, photographers who know what they want can best use Exposure X7. The interface may take a little time to set up. But it can help save hours over the months and years of navigating a workspace.
There are so many features in Exposure X7. So stripping back the workspace can make the program less overwhelming for beginners. But you still have the option to perform those hidden tasks if you need to.
Professional photographers know what editing functions or fine-tuning they perform often. So it will take them no time at all to set up a custom workspace. Exposure X7 gives professionals a tailored organizing and editing program.
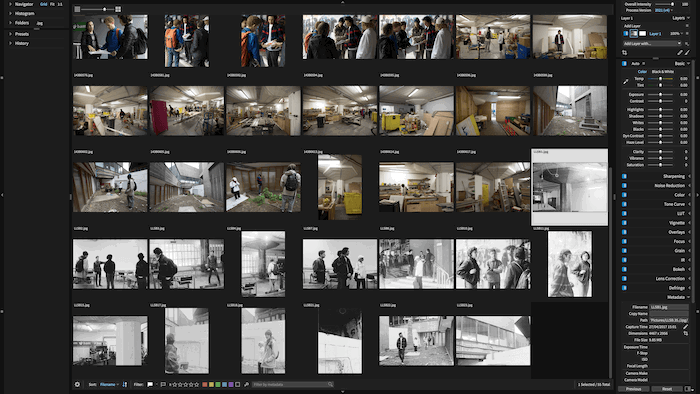
You will be at home in the workspace if you’re familiar with Adobe Lightroom. First, all panels around the images are collapsible. This allows you to take full advantage of your screen and have nothing to distract you from your images.
Secondly, all the edits use sliders. This is an easy-to-grasp method to adjust different intensities. You also have the option to put in number values for perfect precision.
The editing software also includes all the crucial file sorting and metadata options like a rating system and flags. Exposure Software has ensured they haven’t overlooked these important, accessible features.
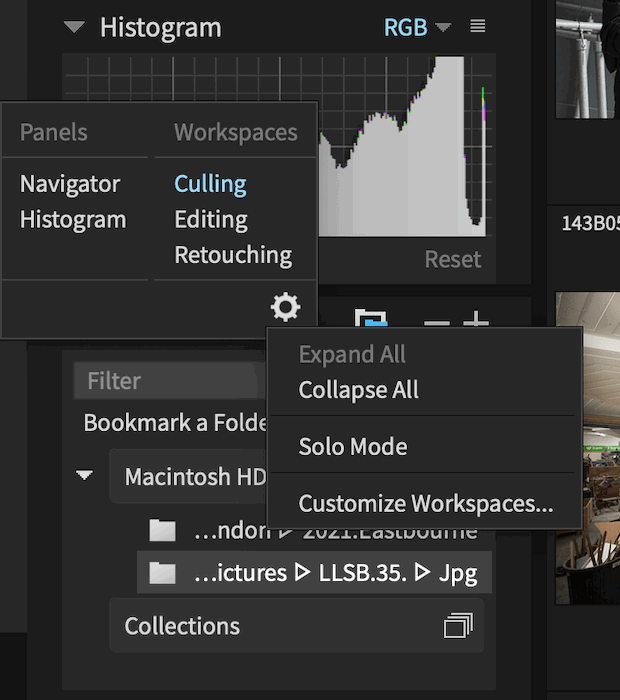
As mentioned, the interface features a customizable setup. I like that there are different levels to their workspaces. There are three preset editing workspaces:
Switching between these three options gives you a good idea of how much you can use the space.
My favorite detail that differentiates Exposure’s interface from Lightroom’s? You don’t have to toggle between Library and Develop or other modules.
This means you can seamlessly switch from organizing to editing without clicking out of the photograph. It also allows you to click and edit more than one photo. So you can batch-edit several photos and see the effects of your edits across them all.
You can click the cog for the settings in the panel editor section and then “Customize Workspaces.” You get a slightly confusing, text-heavy information box. It is designed to mimic the workspace with its different sections.
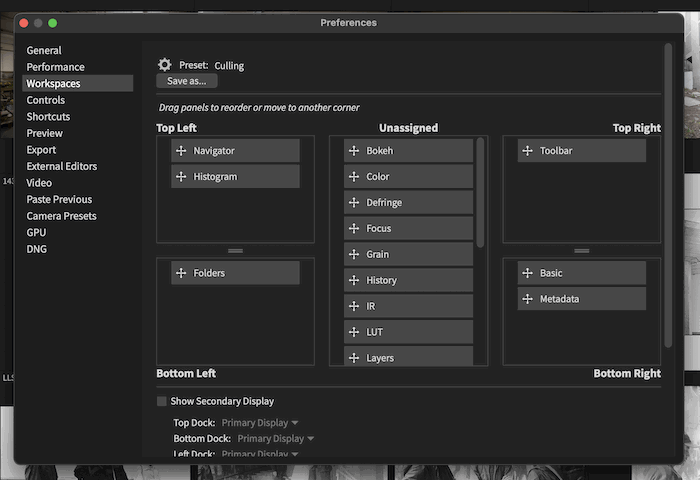
Here, you can add whichever functions you like to each space. Again, this is best for professionals who know exactly what they need and where they want it. If you’re used to other editing software, you can probably set them up the same.
Overall, the interface is simple. And you can make it even simpler. But even without customization, it is stripped back and easy to navigate. It works very well for photo editing.
Exposure X7 has put both the Crop and Transform functions in the same panel. It is a simple change from their previous program that makes a lot of sense. Switching between the two in the previous program was a pain. It was most noticeable when you tried to perform an intricate crop. Now, you can perform all the same functions in a unified box.
I’m also a big fan of the new composition guide selector. This tool lets you choose a compositional grid or other forms of composition to help you get the best crop possible. These compositional techniques include the golden ratio and the rule of thirds.
You also get the golden spiral, golden triangle, diagonal grids, and others. I especially like the golden spiral addition. It is the first time I’ve been able to lay the golden spiral over my photos without Photoshop.
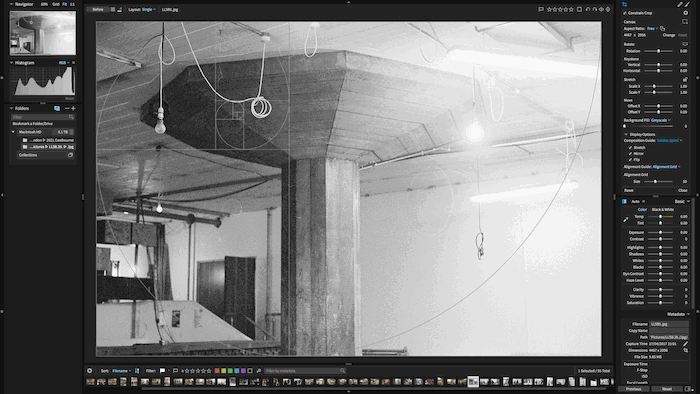
All the Transform tool sliders are equally handy. In Photoshop, it’s hard to carry out these transformations with constant accuracy. By adding the numerical values, you can apply the same transformation to a selection of images with the same issues.
I also like that it allows you to extend your crop outside your image to create blank space or borders. And Exposure X7 has a Background Fill slider so you can choose the space’s color. It is a time saver.
A big addition to Exposure X7’s tools is their new Polygonal Selection tool. It produces great results and makes the process much faster.
This masking tool has many customizable traits when masking sections of your photos. The traits you can customize range from the width of your line to the selective color constraints you want to put on the mask.
I like how Exposure X7 allows you to change the relative width between individual points. It’s handy for those points where the background and subject easily fade into each other. This allows you to make more precise selections at these points and quickly click on the easily identifiable sections.
Further, you can hold down the Alt key to freehand draw around your subject instead of point-to-point clicking. But it is best to use the freehand feature with a Wacom tablet or other touchscreen device.
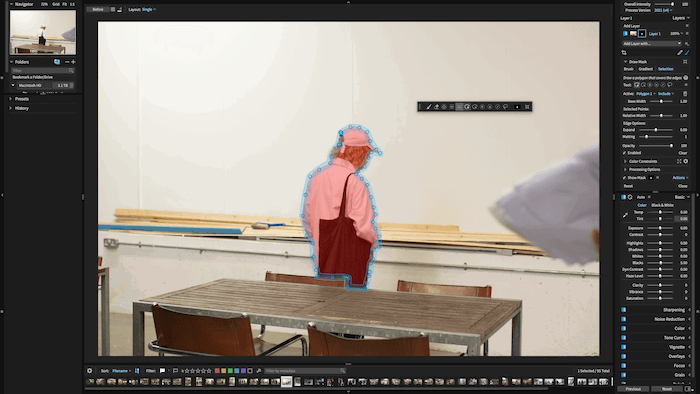
I put this new masking tool to the test with an image where the subject was a similar color to the background. For a quick-click mask, the program did exceptionally well. It identified the loose line I outlined.
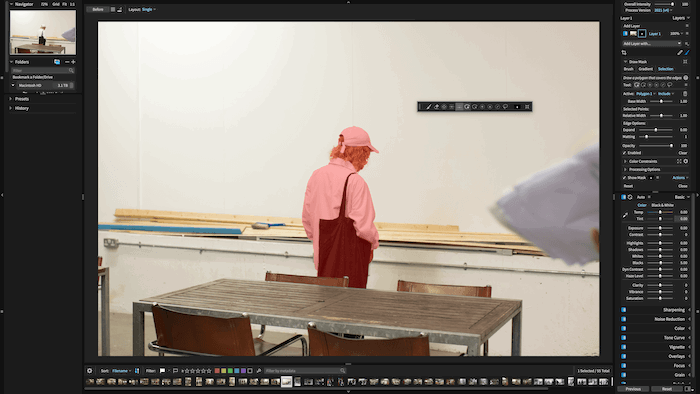
Upon further inspection, I saw some areas the Masking tool couldn’t handle. Hair is harder to detect with this quick mask. But this isn’t surprising for a computer program.
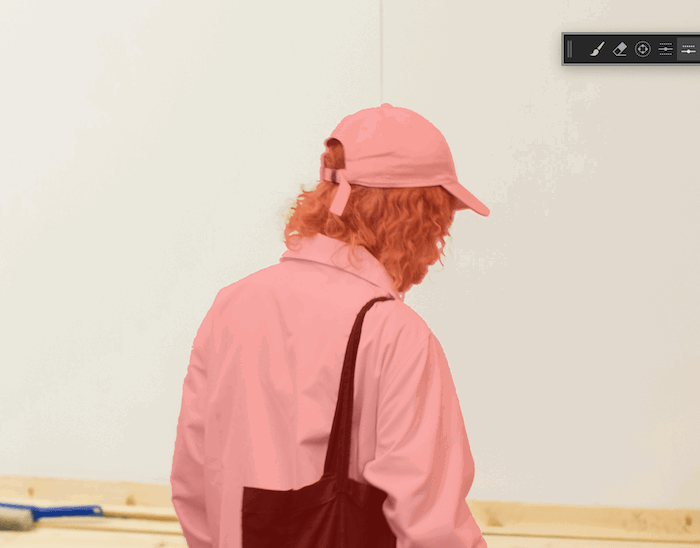
I did find the rendering times to be a bit slow when creating these masks. And it made me rethink the tool’s ease. But it gives great results in a much quicker time than it would take me to draw paths.
Finally, having layers in Exposure X7 means you can produce many masks for many sections of your photo. This further shows the professional quality of the program. It allows you to make complex edits with complex tools.
The noise reduction features are also worth noting. The previous X6 release focused on this software upgrade. And now, Exposure X7 features an improved noise reduction feature.
The main bulk of the editing tool takes place in the panel to the right of the screen in editing mode. A small drop-down menu features four sliders for brightness, detail, color, and smoothness.
By working through these four functions, you can reduce the amount of noise in your image. It is best to zoom into your image to see how the noise changes. But zoom out now and then to see the full image in case your changes are too drastic.
Here is an example of a quick test I did with the noise reduction in a twilight sky. As you can see, Exposure X7 reduces the noise a bit. And the color looks a bit smoother.
Exposure X7 now has an Add Fine Texture tool that contributes to a noise-reduced image. This editing tool is again in the form of simple sliders—one for strength and one for radius.
The tool does a good job of smoothing grain. With this tool, you also have to balance the sharpness and the size of the grain. Increasing the strength of the grain increases the noise. So it is best to find the perfect balance for your image.
Exposure X7 also has a new Hot Pixel Removal tool. This editing tool has a single slider and aims to remove defective pixels from your image. This defective-pixel removal tool works well. And it can save you time instead of using a spot healing brush. The tool can identify these pixels and get rid of them with ease. I can see no faults with this tool.
For photographers who like to create something more than just a photograph, the built-in overlay section may be for you! You may want your image to look like a scrapbook or a weathered, gritty photograph.
In the overlay section, there are three preset effects:
Each section comes with a range of presets and gives you the chance to import your own. You can also perform several transformations on the new overlay. The blend mode options are the most helpful as you can find the desired effect in these options.

Overall, the overlays work great and can be good fun for someone who doesn’t take photography too seriously. The best part about this section is how easy it is. All it takes is a few clicks.
It’s great for people who are new to photo editing. If you wanted to perform the same edit in Photoshop, it would take a lot of time to source the required images. It would also take a lot of skill, knowledge, and practice. Exposure X7 delivers these edits with ease.
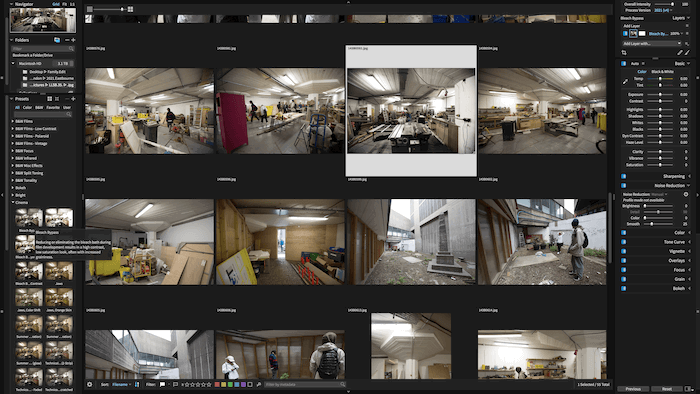
One of the biggest advantages of this photo sorting software is the ability to make, save, and apply creative preset effects to many photos. It is the biggest timesaver for niches like wedding photography, event photography, and much more.
If you select the drop-down menu from your left-hand panel, over 500 presets are offered. Click the section most relevant to your creative style. Then cycle through the examples they give you.
To apply the same preset to many images, make sure you have them all selected. If you created or downloaded a preset, you can find them under the User section.
I like how Exposure X7 gives you thumbnails of each different preset applied to your selected image. No more cycling through each name to see the example. It speeds up the selection process.
For the Fujifilm lovers out there, Exposure X7 even provides a range of presets that look exactly like your favorite film simulations. They are fun and creative options with little fuss.
Exposure X7’s cataloging system may be simple, but it works very well. You don’t import the images into the program. Instead, they exist as a copy of the image until you choose to export or save your file. Instead of importing your files, you “bookmark” folders that automatically bring up any image in this folder.
Even though you don’t upload the images, you can still edit the RAW files. This is helpful if you want to add particular metadata to an image or keywords to help with organizing.
Another important feature of Exposure X7 is the non-destructive editing workflow. That means you can make as many edits as you want while still being able to revert to the original image.
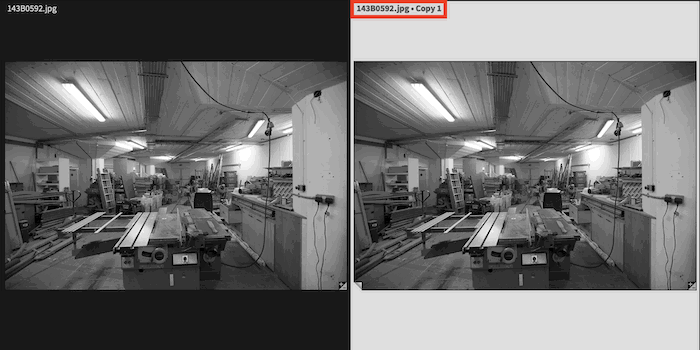
There is also an option to create “virtual copies,” which are duplicates of your image. This allows you to spend time creating different edits for the same image. It lets you make direct comparisons without saving each edit. Then you can return to your favorite one.
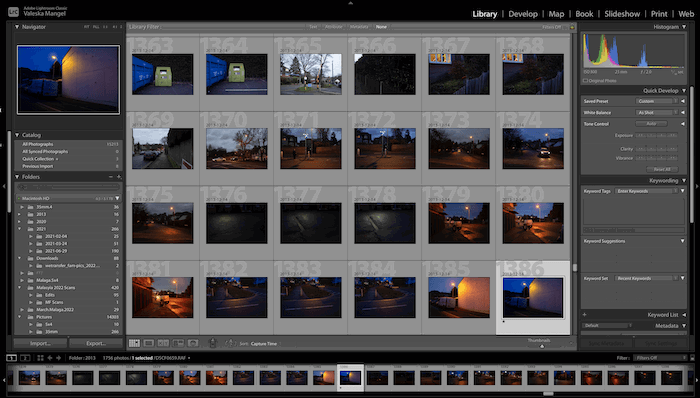
The big competitor for Exposure X7 is the Adobe Creative Cloud plan for Lightroom and Photoshop. You can tell the Exposure X7 developers realized this. They address some of the shortcomings of Adobe products. For instance, Adobe has busy-looking workspaces. And some of its editing tools are more difficult to access.
Price is also an area that Exposure X7 beats Adobe in. Most people know how expensive the Adobe range is.
Exposure X7 is a one-time payment. But the studio updates the program every year. Yet even with paying for an update every year, you will save close to one hundred dollars each year!
Exposure X7 also comes with a 30-day free trial. This gives you enough time to get used to the software and see if it fits your editing style.
But if I compare Exposure X7 and Adobe Lightroom, I still find that my preference still lies with Adobe. This could be due to over 10 years of using Lightroom. But it has more to do with the elegant styling of Adobe’s interface.
I also found loading times tended to be slower with Exposure X7. This is something that can turn me off editing software. But Exposure X7 can be a great, cheap alternative to Lightroom.
My experience with Exposure X7 was positive. The Exposure studio has spent time refining its software. It doesn’t act like Lightroom. But it provides customizable solutions some professional photographers are looking for.
Its performance is excellent across the board. And all the editing tools feel like they were designed with the photographer in mind.
The auto features of many of these tools are especially excellent. The Exposure team realized that not everyone is well-rehearsed in photo editing. So they simplified some major edits to a button click or slider nudge.
The biggest negative I found in Exposure X7 is the loading time. It was not slow, but slow enough to give me time to consider another software. I also noticed the software has smaller support for cameras and lenses than Adobe—particularly for smaller brands. So if you have a niche camera, it may be worth checking their website before buying.
I recommend Adobe software over this one. But if budget is a big factor, I happily recommend Exposure X7. I will keep a close eye on Exposure’s developments. Each upgrade provides even more amazing features!
