Lens flare is a great way to add some extra visual interest to your photos, and it's really easy to do in Photoshop. In this tutorial, we'll show you how to add lens flare using three different methods. So whether you want a subtle glow or something more dramatic, our lens flare Photoshop guide has it covered.
What is a Lens Flare Photoshop?
Before we start with the tutorial, let’s define what lens flares are so we know how they appear.
You’ll see lens flares when you point your camera lens towards a bright source of light. It could be anything from the sun to artificial lighting. Often, they manifest as concentric circles of light in your images. But they could also appear like diamonds, stars, or other shapes depending on the lens you have.
So why do lens flares appear in your photos? It mostly has something to do with your lens.
Your lens has several glass elements inside it. And when the light hits those elements at a certain angle, they end up creating those concentric circles you see in your images.
In general, lens flares can be distracting and ruin your image. But there are other times when they add interest to your pictures. So if the conditions are appropriate, you can use them for creative purposes.

Photo by willsantt from Pexels
How Do You Produce Lens Flare With Your Camera?
Sure, adding lens flare Photoshop is easy. But you’ll save a lot of time if you can produce it manually in the first place.
For portraits, it would be best to stand close to your subject with the light source behind. Backlit situations often result in lens flare.
Make sure that your subject obstructs the light source just enough so you don’t end up blowing out your photos. But at the same time, there should be at least some beams peeking from behind to produce lens flares.
The overall appearance of this effect will depend on your aperture. If you use a wide opening such as f/1.8, expect it to look like a glowing orb. But if you choose a small aperture size such as f/16 or f/22, you can expect a star-shaped effect.
Both types of lens flares look good, so it all depends on your preference which one you want to use. But in general, an orb flare works well with portraits. At the same time, a star-shaped version is ideal for landscapes.
For a cinematic lens flare effect, you can try using an anamorphic lens.
Anamorphic lenses are specific for movie cameras and usually are not compatible with DSLRs or mirrorless cameras. But you can use a thread filter to fit an anamorphic lens on top of your regular lens.
Different anamorphic lenses produce a variety of lens flares. Some provide concentric circles, while others create lines of color across the Screen like the new Star Trek movies.
Why Is it Hard to Add a Lens Flare Effect Manually?
In theory, all you have to do is point your lens towards a light source to add lens flares to your images. But the main issue is that even if you remove your lens hood, modern lenses have a special anti-glare coating that prevents it from happening.
If you look at your lens, you can see it’s not entirely crystal clear. At some angles, you’ll see a thin film of rainbow colors on the glass elements. That’s the anti-glare coating.
But even if your lens has the best anti-glare coating, it doesn’t always prevent flares 100% of the time. That’s why every once in a while, you can expect them to appear in your photos. Unfortunately, there’s no telling if they’ll look good or not.
What Types of Photos are Perfect for Lens Flares?
For a natural-looking result, you need to pick the right photo for a lens flare effect. The light source should be visible in the original image. It could be the sun, studio lights, or even the headlights of a car.
If you’ve ever taken a photo in the direction of the sun, you’ll know a lens flare sometimes appears naturally. Of course, whenever you want it to appear in the frame, it doesn’t. That’s where post-production comes in.
In this example, I’ll show you how to add a lens flare to a photo using a new layer and blending modes. This way, you can always go back to the original photo if you don’t like your Photoshop lens flare.
I’ll use this photo I took in the desert in India as an example.

How Do You Add a Lens Flare Effect in Photoshop?
Even if you do your best to include lens flare manually but fail, what do you do? The secret is to add the Lens Flare effect Photoshop. We’ll show you all the steps below to achieve it.
Step 1: Apply the Lens Flare Filter
So, where is the Lens Flare effect in Photoshop?
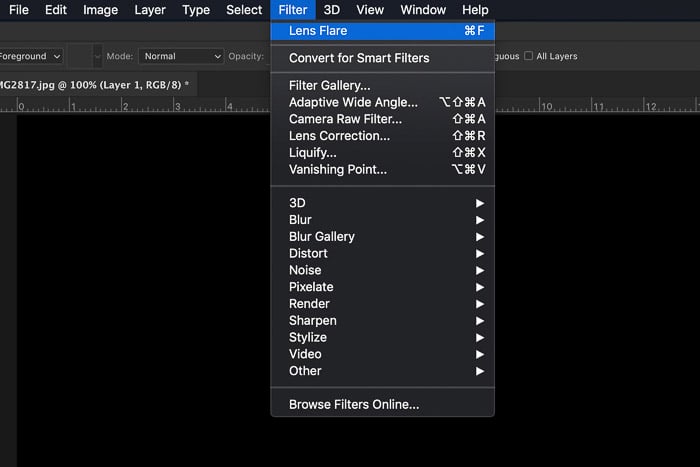
Open the photo and apply the lens flare filter. You can find it in the Filter menu.
Filter > Render > Lens Flare. Or press CTRL+F for the Photoshop CC keyboard shortcut for Windows (Command+F for Mac OS X).
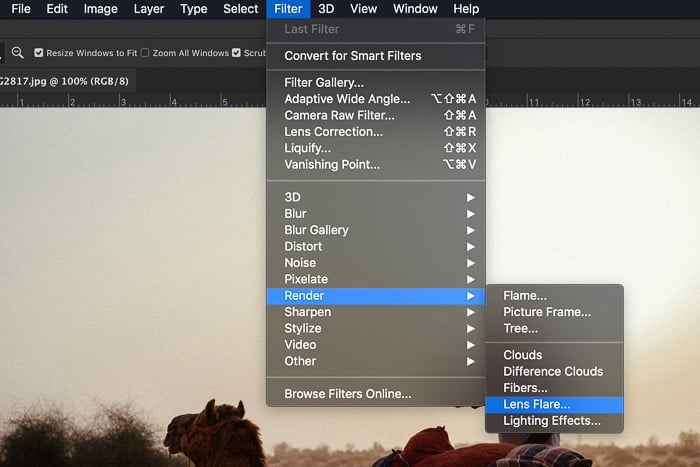 A new window opens up where you can choose between different lens flare looks. The ’50-300mm Zoom’ looks best for my example.
You can also set the brightness of the lens flare and pinpoint the position. Leave the brightness on 100% on the brightness slider.
Position the lens flare somewhere in the light source that’s visible in your photo.
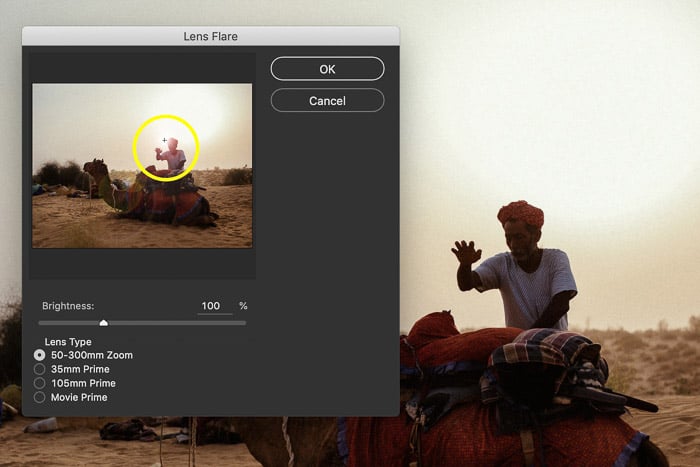 In my case, I want the lens flare right next to the man’s head in the setting sun. Click OK.
The filter is now on the layer of the photo itself, but we want it on a new layer. Don’t worry. This step was only to set the position of the lens flare.
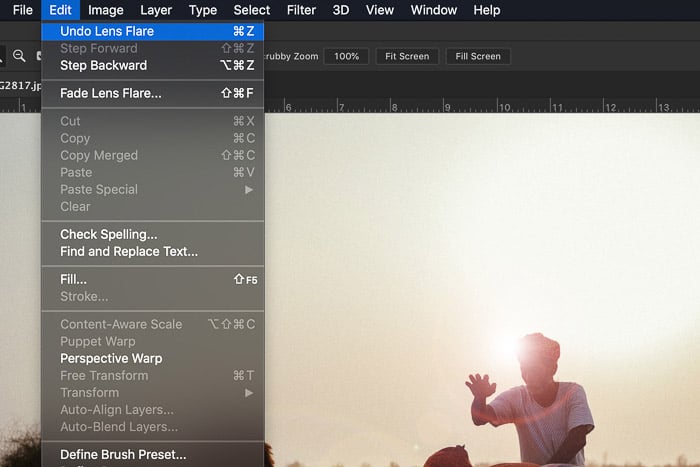
Step 2: Add the Same Lens Flare to a New Layer
First, undo the lens flare you’ve applied by clicking ‘Undo Lens Flare’ in the ‘Edit’ menu.
You can also use the shortcut CTRL + Z for Windows or Command + Z for Mac OS.
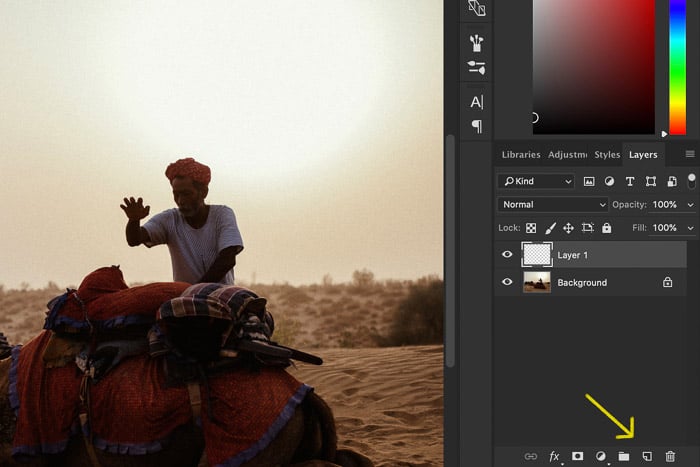
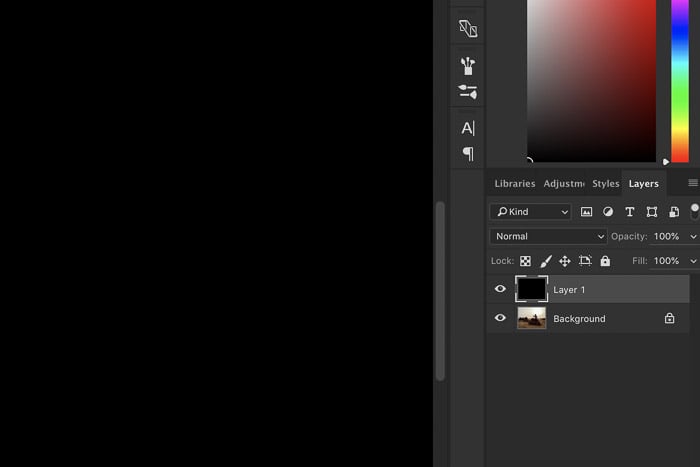
 Add a new layer by clicking on the ‘Create New Layer’ button in the Layers panel. Fill the layer with black using the paint bucket tool.
You have to do this because you can’t apply a lens flare on a new blank layer.
 Apply the same lens flare as before by clicking on ‘Lens Flare’ at the top of the ‘Filter’ drop-down menu.
You’ll always find the most recently applied filter here.
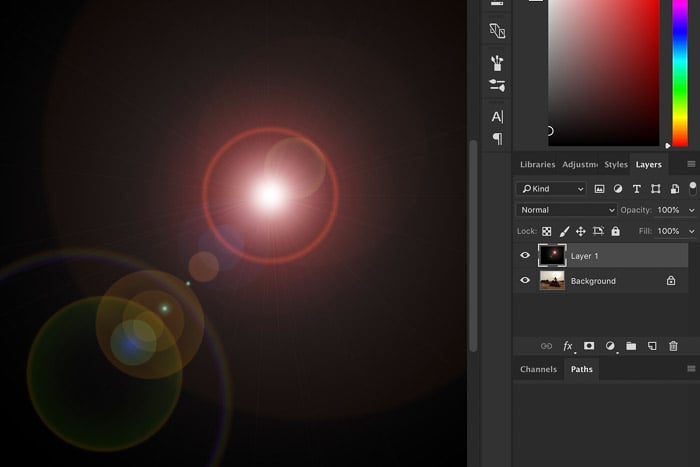
 The lens flare now appears on the black layer.
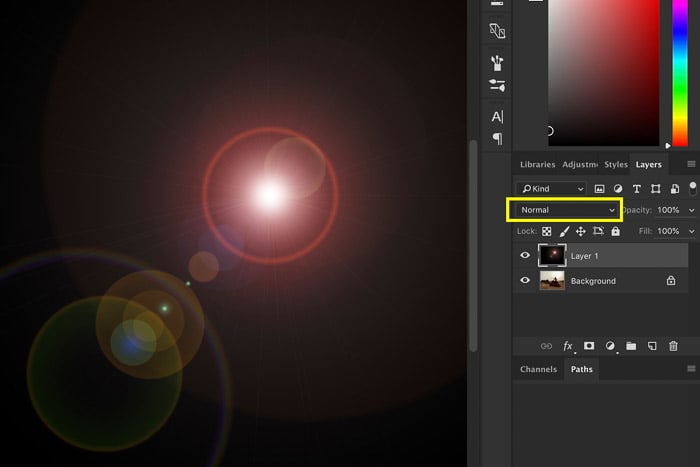
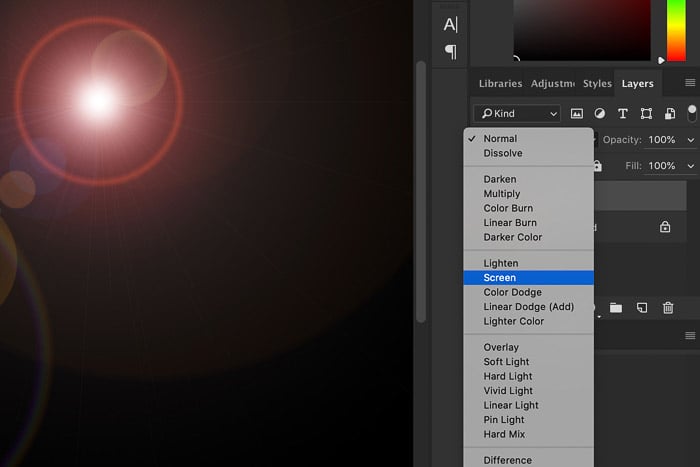
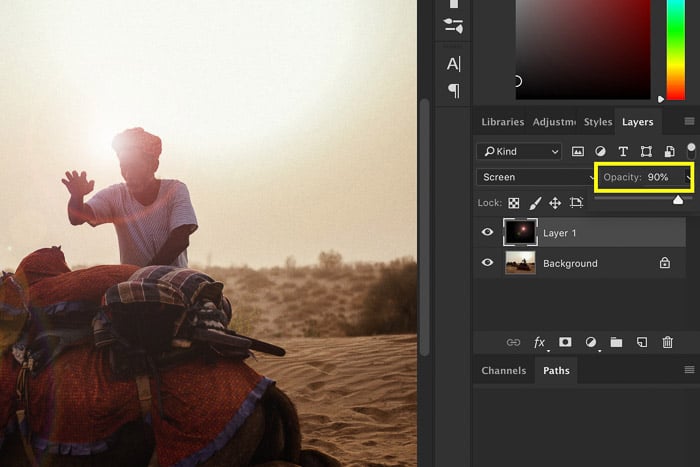
Step 3: Change the Layer Blend Mode
Now, you need to change the blending mode of the layer to remove the black and keep the lens flare. Select the layer with the lens flare and set the layer blending mode to ‘Screen.’
Your photo will appear again, and the lens flare transforms into an overlay.
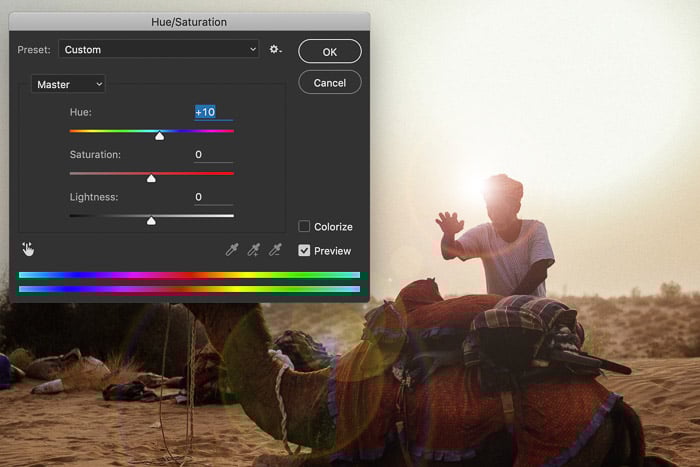
Step 4: Adjust the Color and Intensity of the Lens Flare
To make it perfect, you need to adjust the color and intensity of the lens flare to match the photo.
Use ‘Hue/Saturation…’ to change the color. I made my lens flare slightly more yellow.

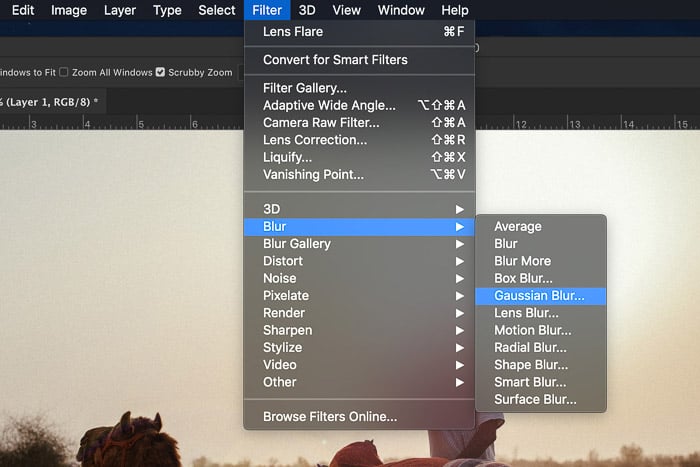
Step 5: Add Other Filters to the Lens Flare
The great thing about using a new layer is that you can apply other filters to the lens flare to make it look even better. For example, adding Blur.
I used a bit of ‘Gaussian Blur‘ in my example.
And here’s the result. A cool looking lens flare for that little extra magic…

How Do You Apply Lens Flare PNG Files to Your Image?
Sometimes, the lens flare effect you want isn’t in Photoshop. So what should you do?
The good news is that you can apply certain PNG files to your photos.
All you have to do is download a PNG of a lens flare from the internet. You then place it as a new layer on your photo and drag it to the area where you want it. Of course, it would be best to move it close to the light source for a more realistic result.
If the lens flares you added don’t blend well with the image, you can always change the Blending Mode. In most cases, Screen works, but you can still scroll and look for other effects until you get the best result.
How Do You Remove Lens Flares in Photoshop?
As we mentioned before, lens flares can sometimes be distracting. So is there any way to remove it? It all depends on the type of lens flare.
Of course, if you added the flare in Photoshop, you can always disable the layer and save the new image.
But what if you added it in-camera? If it’s the type of lens flare that’s visible in most of your image, then you can’t remove it. All you can do is minimise it by increasing Dehaze and lowering your Highlights. But it will still be there.
If your lens flares are just small circles, then it’s all a matter of applying the Healing Brush tool. But if you see bigger orbs obstructing your subject, you may have to use the Clone Stamp tool.
First, you’ll need to copy the image you want and turn it into a new layer. Next, select the Clone Stamp tool in the toolbar. Press Alt + Left Click (Option + Left Click on Mac) on the surface you wish to copy and left-click again to apply what you want to copy on the orb you want to erase.
You need to apply subtle brush strokes to make sure everything looks natural. Remember to copy areas in the photo that closely match the spot that the flare is obstructing. If it’s a person’s skin, search for a location to copy that is the same color and texture. That way, you wouldn’t see any blemishes and discolorations.
But even when you’re careful, you’ll inevitably see bad spots as you edit out the flare. If you see blemishes, consider using the Healing Brush tool to fix them.
This method requires precision and may not always work. So if you don’t want lens flares in your photo, make sure that they don’t appear in the first place when you’re taking pictures. Otherwise, your photo may end up unusable.
Conclusion
Optical lens flares are difficult to achieve on location. Using Photoshop to add one is the perfect solution, and it’s easy to do.
Make sure to only add a lens flare to a photo with a visible light source. The easiest way to start is to use a picture where the sun is visible.
After that, you can move on to apply lens flares to street lights, car lights, and even candle lights.
Want to become an editing pro? Then don’t miss out on our course – Effortless Editing in Lightroom!


