Raw vs JPEG (Everything You Need to Know About Shooting Raw)
When it comes to photography, there are two main file types: RAW and JPEG. RAW files are uncompressed, giving you the most control over your images during post-processing. JPEGs are compressed, meaning they take up less space on your memory card but lose some image quality in the process.
RAW vs JPEG: which file type is right for you? That depends on your needs and preferences. If you want the best possible image quality and don't mind spending extra time editing your photos, go with RAW files. If you want quick and easy editing without sacrificing too much image quality, JPEGs are a good choice.
Comparing RAW vs JPEG—Frequently Asked Questions About Shooting in RAW
I often get asked why I prefer shooting in RAW format instead of JPEG and what the benefits of one over the other are.
This confusion seems to come from what the camera does after you press the shutter release. People also wonder how it will affect their final shot.
In this post, I’ll get through the questions I’m most often asked with regard to shooting RAW vs JPEG.
And maybe I’ll convince you that shooting RAW photography is the way to go.
What Does RAW Stand For?
This isn’t the most asked question I get. But it is the first thing to clear up. It's a bit of a pet peeve of mine, and for good reason too.
A RAW image contains all the raw data of the scene you're capturing. Somehow over the years, professional photographers started referring to them as RAW images though.
Why does this matter? Written this way, the word appears to be an acronym, much like RAM when speaking about computers.
This adds to the confusion people feel towards RAW images, as no one can figure out what it stands for.
That’s because it doesn’t stand for anything! As a strong advocate of making photography accessible to everyone, I’d like to say that this needs to stop.
What to Do About Memory Space
This is the very first thing that memory-conscious photographers worry about. It’s what they always ask when considering a switch to RAW format.
At any stage of your photographic journey, memory use can be a concern. Even more so when you’re starting out with only a few smaller cards available to you. But this shouldn’t keep you from taking full advantage of the utility of RAW pictures.
We all get into photography for the love of creating beautiful images. By shooting JPEG, though, as noble a decision as that may be, you are restricting your photos' potential. I’ll explain why.
When you take any photo with your camera, all the raw data of the scene is being recorded. This is regardless of which shooting mode you have selected. If you're shooting in a RAW file format, all that data is saved straight to your memory for editing later.
But when shooting JPEG, an algorithm jumps in to process that raw data after you’ve pressed the shutter.
Your camera then applies what it thinks is the ideal white balance, color, contrast, and sharpening for the scene in front of you. Once it does that, it saves this image as a JPEG to your memory card and discards all the other raw data. This is why JPEG images have a much smaller file size than RAW images.

RAW files (shown here as a Nikon Electronic File or .NEF) are much larger than JPEG files
Why Raw Data Matters
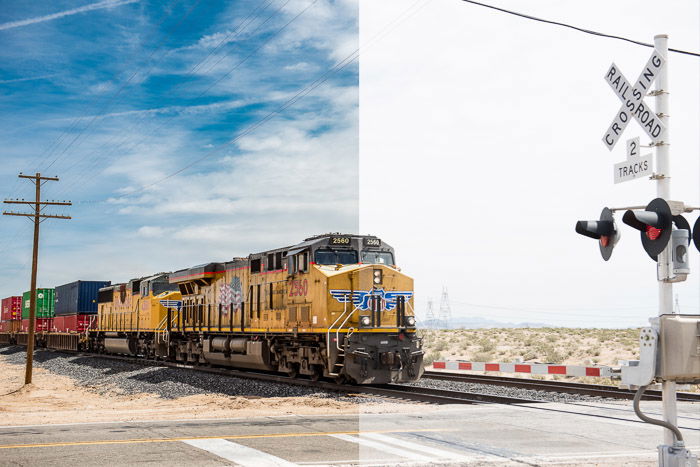
So you’ve been throwing away this useful raw data. The problem with this is that you lose a lot of editing functionality in post-processing. Bright highlights and dark shadows will be difficult to recover.
You’ll also have less scope to change the white balance and the white and black points of your image. This is because the settings chosen by the camera in JPEG mode are “baked in.”
That's not to say that you can’t edit a JPEG image at all, though. It just means that image quality deteriorates quicker when trying to edit. Take the JPEG image below.
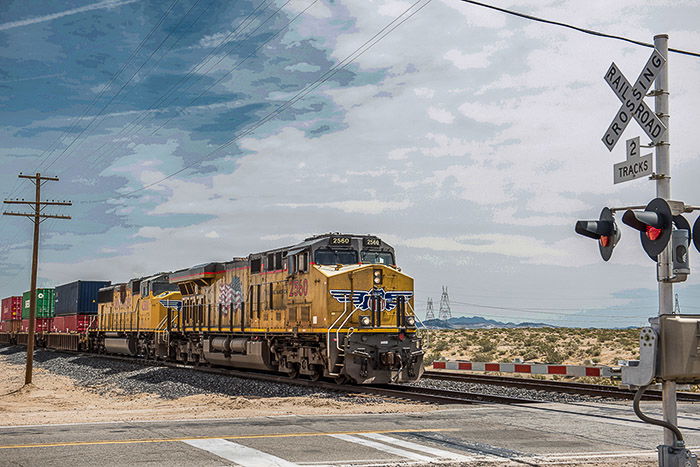
As you can see, the sky has some serious distortion. This happened when I “pulled” the highlights and raised the blue luminance.
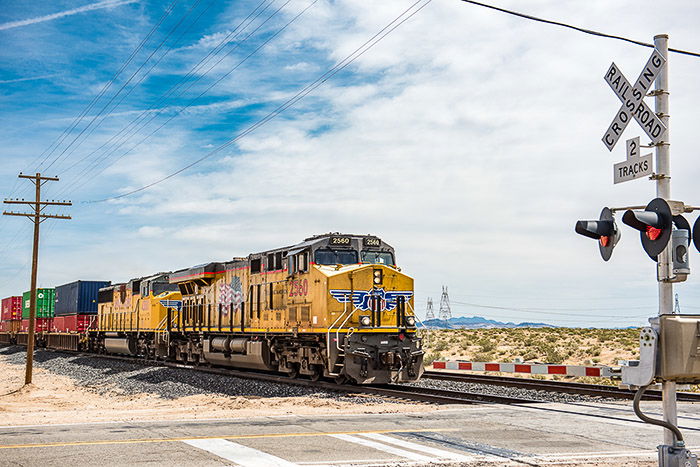
Now compare that to the edited RAW image below. As you can see, that lost raw data makes a huge difference.
Why JPEG Looks Better Straight Out Of the Camera (SOOC)
This is true! RAW images do look flat and dull when first opened on your computer. I had this concern when first starting out.
And now I have the answer. It’s because of the extended dynamic range contained within them. Dynamic range is the amount of tonal range detail in the shot. That means the detail in the darkest shadows or brightest highlights.
Because the RAW photo retains much more of this detail, the images look dull, almost grey, before editing.
You can fix this with a few minor movements of the sliders in post-processing. And you can convert the RAW image to look much better than the JPEG.
This means you are controlling every aspect of how your shot looks. As an example, take a look at the below image of Vasquez Rocks I captured in LA.
I shot this scene using RAW + JPEG mode to show the differences in quality modes. The top image is the straight-out-of-the-camera JPEG version.
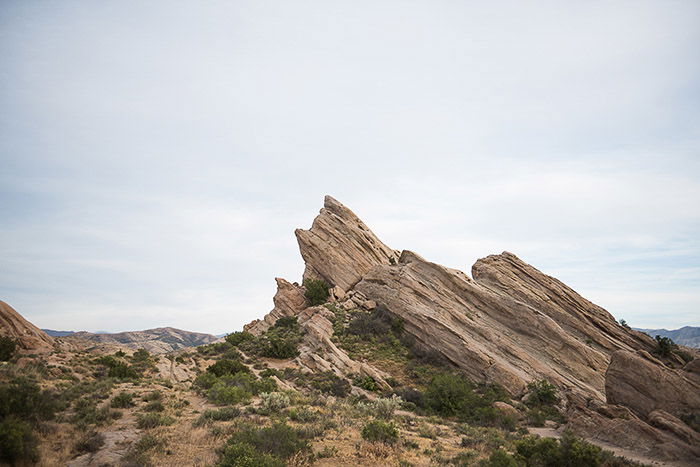
This is an OK shot of a famous spot. And it’s a usable image.
It’s had some contrast and sharpening applied by the camera, but it is otherwise untouched.
Compare that to the RAW image below.
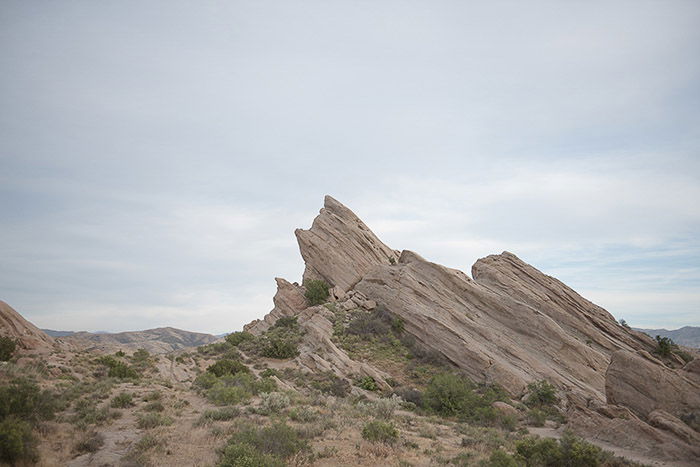
You can see that this image is a lot less vibrant and looks flat. This is because it retains more shadow and highlight detail. But with some very basic editing, you can create a shot like this.
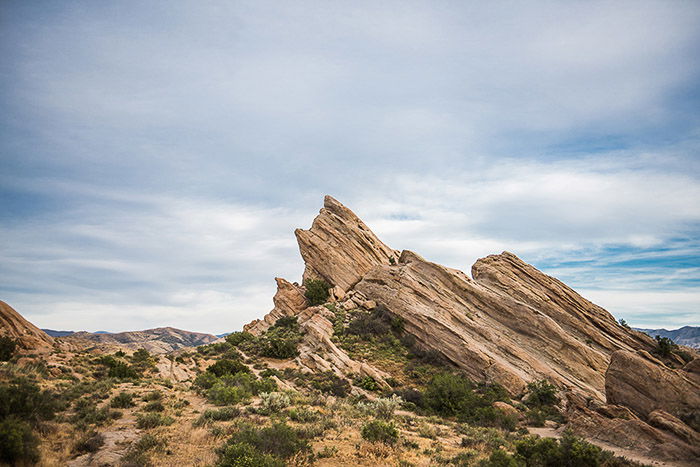
Now, which one would you prefer to print and frame on your wall?
How Much Editing Do RAW Files Really Need?
In two words, not much.
In fact, I created the edited image above by moving no more than eight sliders in Adobe Camera Raw. For those who don’t know what Camera Raw is, it’s a RAW to JPEG converter. It’s what pops up when you drag a raw format into Photoshop.
I applied some sharpening, contrast, and dropped the highlights. I also raised the shadows a little. And I increased the blue luminance a touch to bring some color back to the sky. All of this took me 15 seconds. As a beginner, it might take you a minute.
With very little effort, we can make something much more engaging than our cameras can on their own. When editing your image in Adobe Camera Raw, you are also doing so in a non-destructive way. The RAW format image file creates a “sidecar” file alongside it when you open it.
This records all the edits you make within ACR.
Unless you remove or delete that sidecar file, you can go back to Camera Raw at any stage later and change the image. You can either restore it to its defaults or continue editing.
It's important to note that changes made within the main Photoshop program won't be saved to this sidecar file. You can’t change these later in Camera Raw.
When to Choose RAW over JPEG
Similar to the above question, the one-word answer is “always.” Even shots of a casual family get-together might prove important. Full dynamic range will come in handy.
I’ve lost count of the shots I’ve taken in similar circumstances that have ended up in my portfolio. Or that I’ve sold for stock. A shot may at first seem like nothing special. But it can often turn into a high-quality image after a little post-production.
As an example, this image from a family day out to a steam railway museum looked pretty boring when I took a first look. But after I’d taken a few minutes to edit it, I added it to my stock photo library, and it sold.
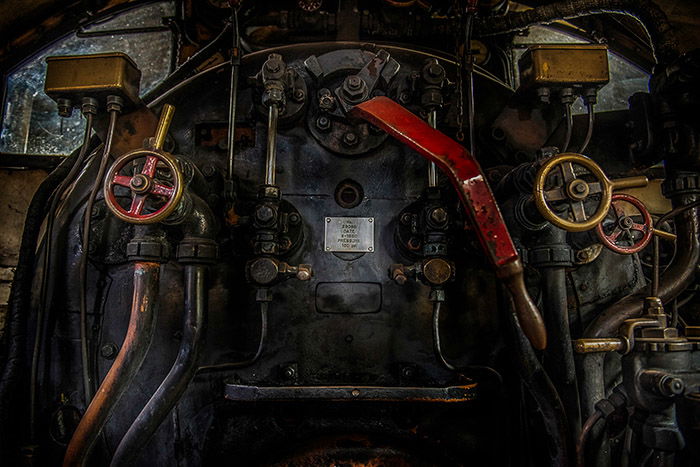
Shooting RAW photography will offer you the greatest potential to enhance your images. Even when you don’t expect you’ll need to.
What About Expensive Photo Editing Software?
In the past, software was prohibitively expensive for hobbyists. Back in the days before Adobe Creative Cloud (CC), a full version of Adobe Photoshop would cost around $800. And that was for a standalone copy of the program.
If you wanted updates, then you’d have to spend another $800 on the latest version a few years later. But with the advent of Adobe CC, everything is now a little more affordable. For around $10 a month, you get access to both Photoshop and Adobe Lightroom. Not only that, but you’ll also get regular updates as they become available.
All you do is download them within the CC app on your device, and away you go. If that’s still too much, then there is yet another option. If your camera has RAW capability, the manufacturer should have its own free RAW processing and editing software.
Granted, it may not give you the power that Adobe (or other) programs do. But it should at least allow you to edit and convert your images.
And most new smartphones can take and edit RAW photos now too. That means even images downloaded to the phone can be edited on the go.RAW editing on mobile is now easier than ever and within everybody’s reach.
Conclusion—RAW vs JPEG
By not shooting RAW format, you're doing your photos a complete disservice. The vast majority of shots taken in JPEG will look OK as far as snapshots go.
But to boost your images, you need to retain the ability to fully enhance them yourself. Allowing the camera to make all post-processing decisions for you also takes away part of the fun of capturing images.
That's the skill and mastery involved in learning how to get the best out of them in your chosen photo editor. The only way to do that is to shoot RAW.
