By mastering your sports photography settings, you’ll be able to capture any sporting event with confidence. Whether you’re covering a school sports day or the FA Cup final, knowing the best settings for sports photography helps you capture pro-level results.
While being one of the most popular, sports is also one of the most challenging photography subjects. Get the settings wrong, and your images can end up blurry. There’s always a lot of movement, so you need to know what you’re doing with your camera to capture sharp shots.
This article looks at the best camera settings for sports photography. We examine everything from shutter speed to white balance. Once we’re done, you’ll be the master of your camera settings and great for any sporting event.

With fast-moving subjects, difficult lighting conditions, and restrictive viewing positions, sports photography isn’t easy.
However, you can overcome these problems by mastering your camera settings. You need to understand shutter speed, aperture, and ISO. But you also need to know about more advanced settings like white balance and AF modes.
We look at all the important settings right here, so let’s get started.
Shutter speed is one of the three main exposure settings on your camera. Along with aperture and ISO, they make up the exposure triangle. Every photographer needs to know about these settings and how they relate to each other.
Shutter speed is perhaps the most important of the three settings when it comes to sports photography.
The camera shutter speed determines the length of time the shutter is open. With a slow shutter speed, the shutter is open for longer and more light enters the camera. A fast shutter speed only opens the shutter for a short period, so less light enters.
You might be tempted to use slower shutter speeds to let in more light, but shutter speed also affects motion blur. This is where moving elements within your image appear blurry.
The longer the shutter is open, the higher the risk of motion blur. Using a faster shutter speed reduces the risk because the sensor is exposed to light for less time. It freezes the action, giving you sharper shots with moving subjects.
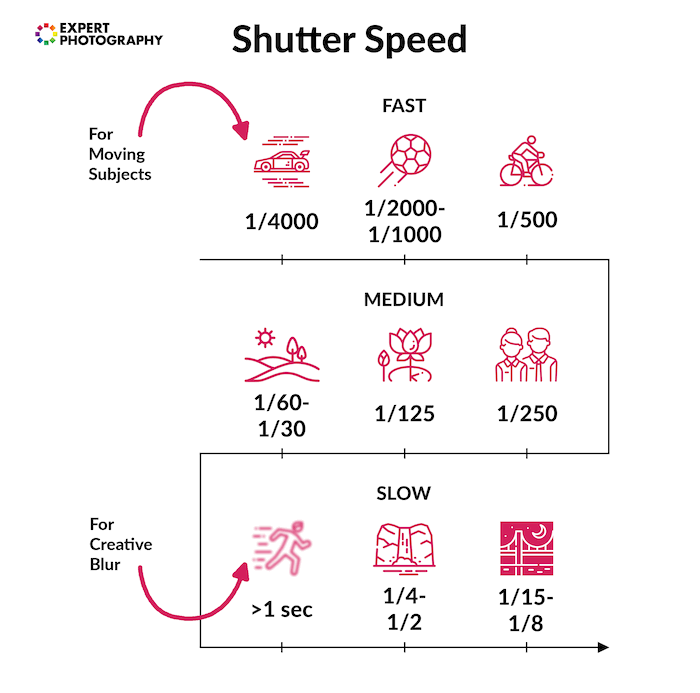
The shutter speed scale varies from camera to camera. But you don’t want to use anything below 1/250 for sports photography. Even this might be too slow for very fast action.
1/500 might be enough for most amateur events, but it’s best to go as high as possible. The faster it is, the sharper your shots will be.
You can use a slow shutter speed if you want to use motion blur as a creative effect. But generally, use a fast setting for sharper sports photographs.
You’ll have no problem using a fast shutter speed when shooting outside on a bright, sunny day. But you might encounter problems when shooting floodlit games, indoor events, or matches in bad weather. Thankfully, we solutions to help you shoot in any of these situations.

The aperture is the adjustable hole in the lens that allows light to pass through to the camera’s sensor. The bigger the aperture, the more light passes through. Use a small aperture, and the camera receives less light.
It’s important to understand aperture from an exposure point of view. But aperture also controls your depth of field, which determines how much of your scene is in focus.
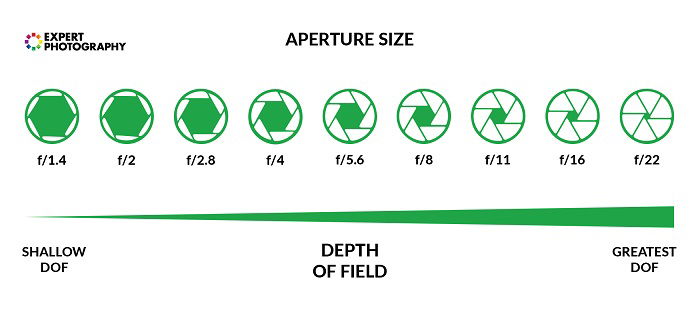
If you have a shallow depth of field, only your subject will be in focus. The foreground and background will be out of focus. With a deep depth of field, everything in your scene will be in focus.
If you want a narrow depth of field for a blurred background, use a wider aperture. Use a narrow aperture for a deep depth of field with everything in focus.
You can use a narrow or deep depth of field when shooting sports photography. You can make a creative choice depending on the subject and situation.
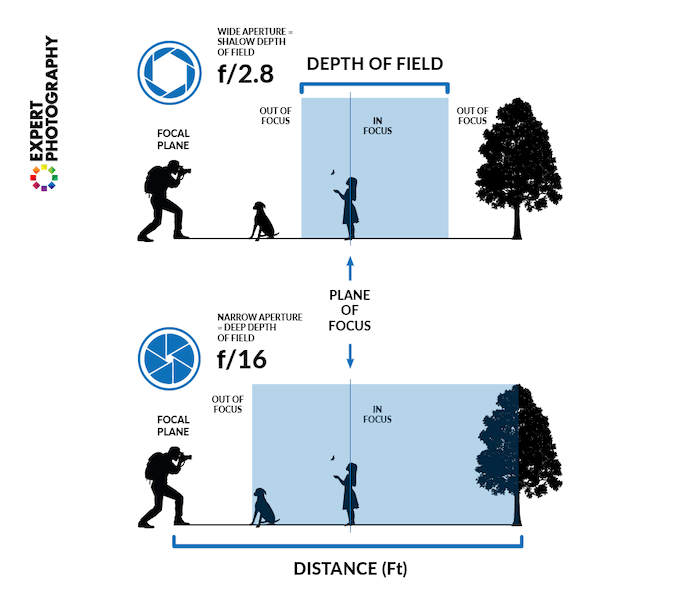
If you’re shooting a close-up of an individual athlete, you can use a wide aperture to create a blurred background. This will make them standout in a busy environment. An aperture of f/4.5 or wider will give you a nice background blur.
Shooting a wider shot of the event? It’s best to use a smaller aperture to keep more of the scene looking sharp. Lighting conditions might limit your aperture choices, but aim for f/8 or f/11 for wider shots.
ISO tells us how sensitive the camera sensor is to light. The higher the number, the more sensitive it is. A low ISO setting means the sensor is less sensitive and needs more light to fully exposure the image.
Using a higher ISO is great if you’re shooting in low light. However, the higher your ISO, the more likely you are to experience digital noise in your images.
Digital noise is the grainy texture in your images when the camera struggles for light. It can also look like pixelation in extreme cases. This is why photographers want to keep their ISO as low as possible.
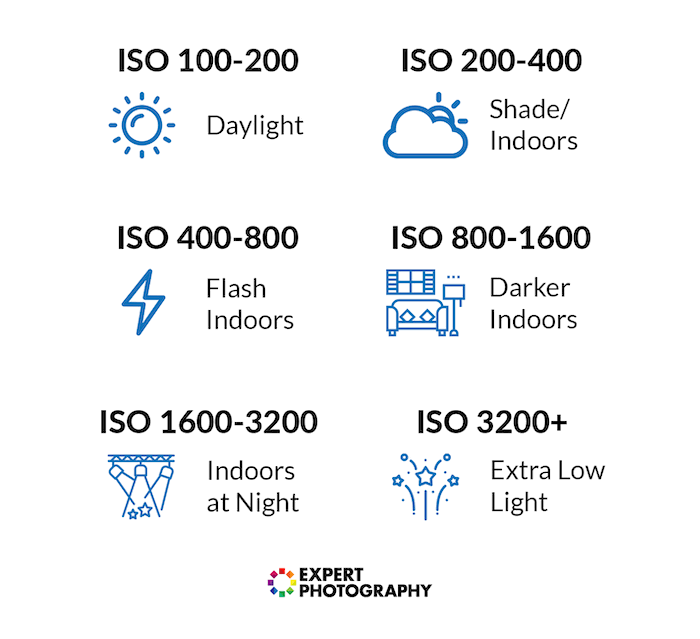
This isn’t easy with sports photography. If you’re shooting an outdoor event in sunny weather, you can keep your ISO at 100 or 200 for maximum image quality. But life isn’t always so simple.
When covering indoor events, floodlit matches in the evening, or experiencing bad weather, you will have to increase your ISO.
800 ISO should be OK on overcast days. That will also be OK for indoor events with bright artificial lighting. But you might have to stretch to 12,000 or 16,000 if the lighting is poor. You can stretch higher if your camera has good low-light performance and controls noise.

A fast and responsive autofocus system is a godsend for sports photographers. But even if your camera is well-equipped in the AF department, you still need to select the correct AF mode to get the best results.
One of the most important AF mode for sports photographers is Servo AF (Canon) or AF-C (Nikon and Sony). This is where you select a focus point on the touchscreen or half-press the shutter button to find focus. The camera then keeps that focus point in focus.
You can select individual players, or you can select specific areas of the scene. For example, in soccer, you can select the areas around the goal before a corner kick is taken, anticipating the action as the ball is crossed into the box.
Most modern mirrorless cameras now have AF Tracking. This is where the AF system actually tracks moving subjects, which is ideal for the fast-paced action of sports photography.
Switch to AF Tracking mode, then select your AF point in the LCD or half-press the shutter button to lock onto your subject. Then the camera follows your subject as they move, keeping the in focus the whole time.
Mirrorless cameras also now have head, face, and/or eye-detection focusing. With head-detection AF mode, the camera can find and lock onto human heads. This is great for focusing on athletes in a busy environment.
Face and eye-detection modes work in a similar way, only they are more refined. These are the best options if you’re shooting more tightly composed shots of individual sports players.
When selecting the AF mode, you need to think about the type of shots you’re taking. Servo AI is ideal for predicting the action, allowing you to focus on specific areas. AF tracking is perfect for covering one athlete. Then the head and face detection modes allow you to capture detailed shots of individuals.

Back button focusing is where you use a button on the back of the camera to focus. Usually, you have to half-press the shutter button to make the camera focus. This works well in most cases but can cause problems when shooting sports.
When shutter button supports AF, the camera will refocus every time you take a picture. If you’ve moved or elements within your scene have moved, this can be a problem. The camera might try to focus on something other than your intended subject, and you might miss your shot.
By detaching focusing from the shutter, you can focus your shot and then take a picture without refocusing each time you press it. You can compose, focus, and then take the picture.
Back button focusing works best in Servo AF mode. It allows you to find the focus point you want without the risk of the camera refocusing on another player or object. Even if there’s a lot of movement, with players coming in and out of shot, you can still keep the focus point you want.
Burst mode allows you to capture several images in quick succession. You don’t need lightning-fast fingers, as the camera will keep snapping exposures as long as you hold down the shutter button. It’s the perfect shooting mode for those blink-and-you-miss-it sporting moments.
The maximum continuous shoot speed varies from camera to camera. Older DSLRs tend to have slower burst speeds than mirrorless cameras. DSLR cameras also have less autofocus support when shooting in burst.
Most mirrorless cameras have good AF support in burst mode. You can shoot with Servo AF or AF tracking, helping to keep moving subjects in focus while you’re bursting.
Newer mirrorless cameras also have the choice of the mechanical or electronic shutter. Some cameras can reach astronomical burst speed with the electronic shutter, but that’s not always best for sports photography.
When you use the mechanical shutter, the shutter in front of the sensor opens and closes. For the electronic shutter, the shutter stays open while the sensor turns on and off. With no moving parts, the electronic shutter can achieve much quicker burst speeds.
However, despite the faster shooting speeds, the electronic shutter is more prone to distortion when shooting movement. Fast-moving objects can appear bent or warped, ruining the quality of your images.
You get no such distortion from the mechanical shutter. That’s why it’s often better to sacrifice a few more frames per second for sharper images with no distortion.

Most of the photography advice you see online tells you to shoot in RAW format. RAW files do collect more information, giving you more power in post-production. But shooting in RAW isn’t the best option for sports photography.
JPEG files are compressed, contain less information, and offer fewer editing options. On the plus side, however, they are much smaller than RAW files. That’s good news for sports photographers.
Because RAW images hold so much info, they take up more space on your memory card. This is especially true if you’re using a high-resolution camera. That means your memory cards will fill up fast.
If you’re shooting RAW images at 15 fps in burst mode, you might use up all your memory in a matter of minutes. Of course, we recommend carrying plenty of SD cards at all times. But there’s a risk you could miss a vital moment when changing your SD cards.
Shooting in JPEG format allows you to capture more images before having to change the memory card. You can keep your focus on the game, so you won’t miss any important moments.
It’s worth sacrificing the extra info of a RAW file when capturing sports. Sports images usually don’t need much editing. You can add a preset or make a few adjustments. But generally, what’s going on in the image is more important than the image itself.
You can also open JPEG images on any device. You don’t need specialist software, so you can transfer images from your camera to your smartphone using Wi-Fi. That means you can upload your sports shots to social media during the game, giving fans live updates.

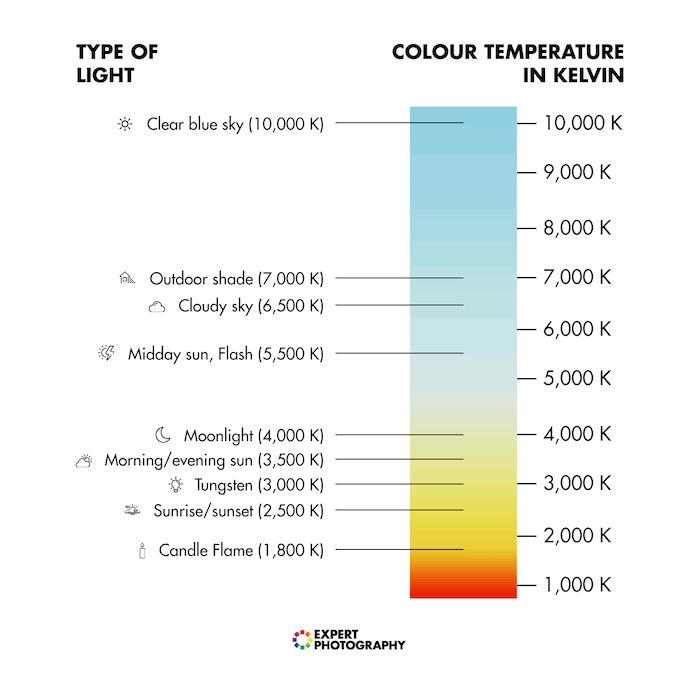
The white balance controls the color temperature of your images. It controls whether your images look “cold” or “warm” and allows you to get natural-looking images under any lighting conditions.
We measure color temperature in Kelvins. Cold light has a high Kelvin level, and warm light has a low Kelvin level.
This relates to sports photography because different types of light sources generate different-temperature light. Sunlight and artificial lights have different temperatures. Even sunlight at different times of day can differ in temperature.
That means you have to adjust your white balance depending on where and when your shooting. Are you shooting outdoors in the middle of the day? Is it an indoor event with bright artificial lights? Or is the sporting event taking place during the golden hour?
These different situations call for different white balance settings. All cameras are set to auto white balance as default, and this works well in most situations. But setting the white balance manually will give you pro-looking images in any situation.
Different cameras and brands have different white balance modes. Some have scenario-based settings, like “daylight,” “overcast,” or “artificial.” Others let you select a specific color temperature or Kelvin level.
The key is to select the correct white balance for your environment. This will give your images natural-looking colors whether you’re outdoors or indoors.

Image stabilization (IS) features can be a great help to sports photographers. IS allows you to use slower shutter speeds when shooting in low light and reduces camera shake when using a telephoto lens.
Not all cameras and lenses have image stabilization. These features are more common in high-end gear, but we are seeing them more and more in gear towards the entry-level end.
As we’ve already discussed, sports photographers need to use a fast shutter speed. And if you’re shooting at a high shutter speed, about 1/500 or faster, you won’t need image stabilization.
However, conditions can sometimes force you to lower your shutter speed. If you’re shooting in low light and your telephoto lens has a slow max aperture, this might force your shutter speed down. This is where image stabilization can be useful.
Whether on your camera or your lens, the image stabilization counteracts camera shake to give you sharper images. You can use a 1/250 shutter speed and still capture sharp images.
Some cameras have only one image stabilization mode, which tries to combat movement in all directions. But other cameras have more IS modes.
For example, one mode allows for horizontal camera movement but corrects vertical movement. This is perfect for side-to-side panning shots. The other option allows vertical movement but corrects horizontal movement. You might use this mode for Olympic diving.

Learning the best sports photography settings is absolutely vital when shooting fast action. But sports photography is a tough discipline, and knowing your settings will only take you so far if you don’t have the right gear.
This might be heartbreaking for those on a tight budget. But you don’t have to buy all the top equipment all at once. You can take a step-by-step approach, building up your gear gradually.
If you are interesting in upgrading your equipment for to improve your sports photography, we can help you on your way. Check out the following article for more information.
If you’ve read this article carefully, you’ll have a pretty good idea of what to look for in a camera for sports photography.
Of course, image quality is always important. But a fast and reliable autofocus system has to be a top priority. You need Servo AF/AF-C or AF Tracking modes. Head and face-recognition is also helpful.
Look for a camera with a fast burst mode. And don’t be fools by a rapid-first burst with the electronic shutter. A quick burst rate with the mechanical shutter is what a sports photographer really needs.
Built-in image stabilization is another handy feature. It’s not essential, but useful if you have it.
See our full article on the camera for sports photography to find out more.
Sports photographers like to use telephoto lenses. The magnification allows them to capture close-up images of athletes from the sidelines. They don’t have to endanger themselves or the players by venturing on to the pitch or court.
Zoom lenses are also common because they give you more flexibility. Things can change quickly in sport, and a photographer needs to be able to adapt to what’s happening. A wide zoom range allows them to recompose their shots without having to move.
You also need a lens with a fast maximum aperture. This allows more light into the camera, allowing you to use faster shutter speeds.
Some sports lenses also have optical stabilization system. Again, this is handy for indoor sporting events.
Our article on the best lenses for sports photography is a must read for sports fans. You can also see our brand-specific articles below:
Additional support can be really useful in sports photography, helping you keep your shutter speed high and your ISO low. But tripods are too static and cumbersome for sports photography. That’s why sports photographers prefer monopods.
A monopod gives you extra stability, but also allows you to move around quickly and unencumbered. You can move from location to location with easy, but you still have the added support when you take the shot.
See all the best monopods for sports photography in this full-length article.

From shutter speed to white balance, learning the key sports photography settings helps you capture any action-packed event with confidence and panache.
Sports photography isn’t an easy discpline, but we’ve given you a lot of information to absorb. The key is to take it step by step. Focus on one setting at a time, then move on when you’re confident.
Practice is essential, so look for opportunities to snap sports shots before any major event. Take this theory and turn it into practical competence by doing the reps. Whether it’s the Super Bowl or a Sunday League fixture, you’ll be ready to capture the action.


