Is it possible to create a pure white photography background ‘in camera’?
Common practice for white background photography is to use post processing. But I’m here to tell you it’s not all about Photoshop.
You can do it in camera.
In this article, I’ll show you two methods to create a white photography background. There’s little to no post-production involved.
The Best Settings for Capturing High-Quality White Photography Backgrounds
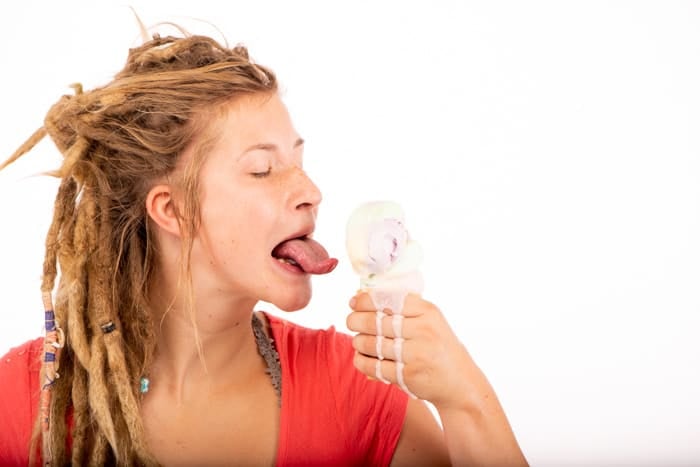
Having more light on a white background than on your subject is the key to creating a pure white background. The background must be at least three stops brighter than your subject.
It is also important to take your exposure meter reading only from your subject. Avoid including the background.
Use the spot meter setting on your camera to ensure you are only making a reading from your subject.
Photographing a portrait you will want the person’s face to be well exposed.
Take a spot meter reading from your subject’s face. Check if you have your setting correct for your subject to be well exposed. Then check the light on the white background.
Is it close to the amount of light on your subject? If there is not three stops or more of difference, you will need to add more light to your background.

© Kevin Landwer-Johan
Most Common Problems With White Background Photography
Placing your subject too close to the background during a photo shoot is the main problem.
This can cause the subject to cast shadows onto the background. It can also mean spill light from the background affects your subject.
You might be working in a small photo studio or room. This means you won’t have enough space between your subject and background.
Placing lights in front of your subject will cause shadow to be cast on the background.
You can add lights from the front to help reduce or get rid of the shadow. This may result in light from them spilling onto your subject.
If the light is uneven the whole of the background may appear to be pure white. At this point, you should check your camera’s histogram.
If the spike on the right is not hard up against the right hand edge, you do not have a pure white background. Even if the histogram shows a spike hard against the right side, you may not have a clean white background.
The histogram is showing a representation of the tone range in all the pixels. It doesn’t show you where the tones are in the image.
Checking your image on a computer is the most accurate way to find out if your background is pure white.
© Kevin Landwer-Johan
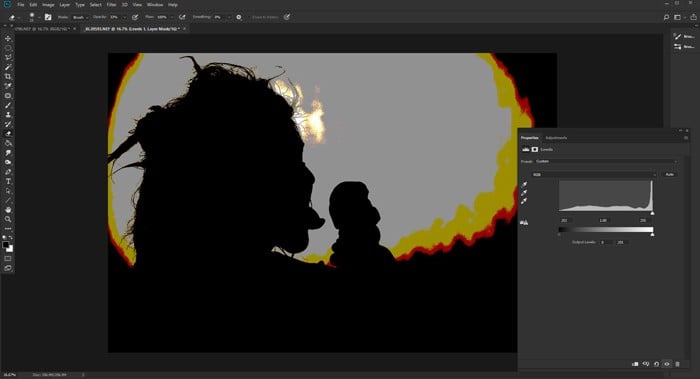
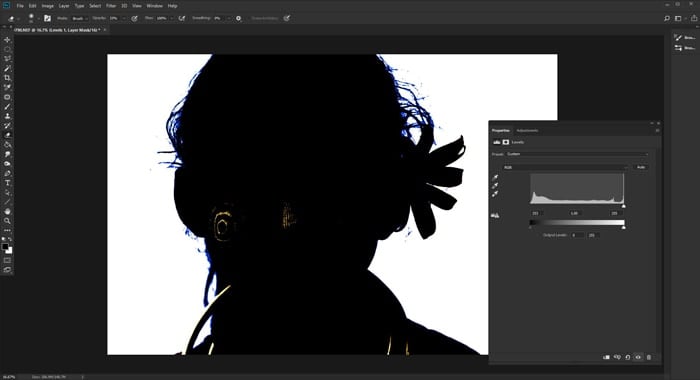
In this studio photo the background light was not even. The light drops off around the edges of the frame.
So I opened the image in Photoshop and added a Levels Adjustment Layer. The problem became more obvious.
The black, red and yellow areas show where the background is not a clean white.
How to Fix This Problem
One technique is to light your background from behind. This will get rid of shadows. And it will reduce the amount of light spilling onto your subject.
Even when your subject is close to the background, you will have more control of shadows and spill light.
Backlighting the background can make it bright enough and evenly lit. This mean you won’t need to post process or a photo editing software.
I have used this technique to make super white background portrait photography both in the studio and outdoors.

© Kevin Landwer-Johan
White Background Photography in the Studio
Using enough strobes and the right background material is key in studio photography. If you do not have enough lights you will not be able to make enough of the background surface pure white or like a white seamless paper.
Having the right background material is also important. I use plastic sheeting for outdoor signs. It comes as wide as three meters and has a textured side.
The texturing helps diffuse the light. The plastic is semi-translucent, so light can pass through it. You can experiment with other background semi-translucent materials.
I always use manual mode and spot metering when I am making portrait photography like this. If you are using an auto or semi-auto mode you will need to use exposure lock for best results.

© Kevin Landwer-Johan
The Step by Step Process
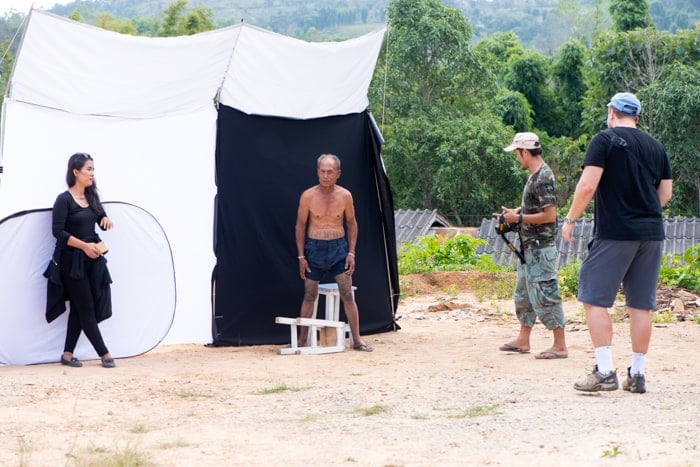
Set up your background about one meter from a white wall or other white surface in your photography studio.
Place two or more high powered strobes behind the background. And add wide dish reflectors on them. Point them at the wall, away from the background. Set them to max output.
The size of the background you are using will determine how many strobes you will need.
It’s important to set the lights facing away from the background. They will bounce off the wall and light the background evenly.
If the two light stands were set up facing the background, there’d be two hot spots on it.
Stand in front of the background and take a photo of it with your exposure set so you can see some tone in it. If you are using a textured background you should see some of it. Take note of your exposure settings.
If the light is not even, move your strobes and keep testing.
You need to check the position of your lights. They should spread even light across as much of the background surface as possible.
Your exposure settings for the background might be 1/250th of a second, f22 and ISO 100.
Set up one or more lights and reflectors for the style of portrait you want to make.
Control the output of the lights so there is at least three stops less light on your subject.
Your camera settings will be 1/250th of a second at f8 and ISO 100 or the equivalent.
Take some test photos and check them over. Is your subject well exposed? Is the background pure white everywhere you can see it? Or is there too much light spilling from the background onto the subject?
You will have to check the photos on a computer to ensure the background is pure white. To do this adjust the brightness levels or curves from the left side (dark pixels) to the right side.
If some of the background darkens or turns black your background is not pure white. You need to adjust the light levels and exposure and/or make the spread of the light more even.
Move your subject further away from the background if there is too much light on them.
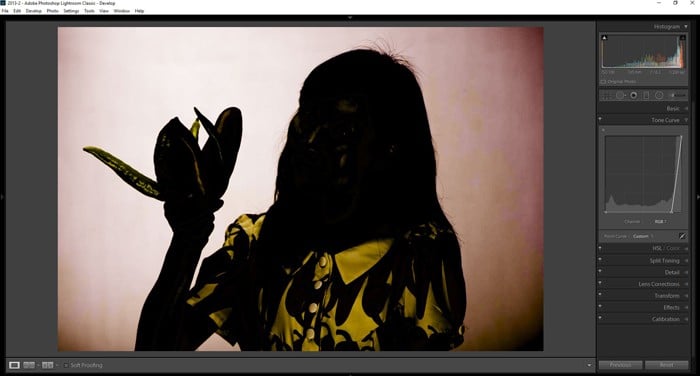
I made the photo below using this method. The small areas of background visible through her hat and hair complicated things.
They would have been very difficult to clean up in Photoshop if the background had not been pure white.
Instead, all I had to do was balance the color and tweak the white levels in Lightroom.

© Kevin Landwer-Johan
White Background Photography for Studio Product Shoots
Product catalogs and websites like Amazon need a pure white background for products. You can do this by backlighting your subject.
Photographing product on an opaque white background often results in shadows.
It’s common for studio photographers who do work for catalogs to have a light table. This consists of a sheet of white acetate. You can bend this to provide a horizontal surface and a vertical background. Lights placed under and behind this table get rid of the shadows from top lighting.
Careful balance of the front and back lights is essential. Light spill from the tabletop can cause problems if your product is on the acetate.
It is easier to post process white products to clean the background. A clean white backlit background with white products is not usually possible. You won’t be able to get the correct light balance and avoid light spill.
Often it is quicker and easier to photograph white products on an opaque background.
This product series was easier to make on an opaque background because of their light color. With the backlighting method, I couldn’t get enough definition in the edges.
A better result was possible by cleaning the background with Photoshop.
The photo below is before post-processing.

© Kevin Landwer-Johan
White Background Photography Outdoors
Creating white background photographs outdoors requires the right setup. But it is less reliant on equipment than the studio method I have described.
In fact, you can achieve it without using any electric light sources. The sun, reflector and the right kind of white photography background is all you need.
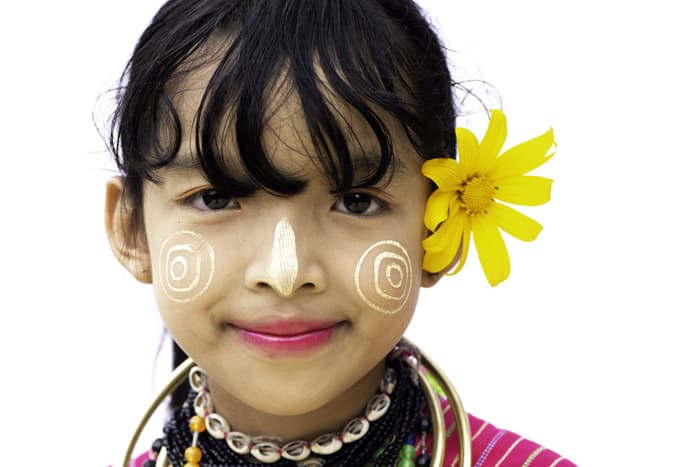
I often work outdoors with my natural light studio. Whenever I’m taking portraits, I have a black and a white background.
The white background allows me to get that clean white look in-camera.
For my outdoor studio I use a piece of white stretch fabric. I attach the fabric to backdrop stands so there are no wrinkles or creases in it. Creased fabric will result in an uneven light on the background. It will also not render pure white.
I always set the studio up so the sun lights the background fabric evenly from behind. In full sunshine, the white background fabric is always at least three stops brighter than my subject.
The result of all this is a pure white background.
I use the same technique I do in the studio to measure the light and make my exposure setting. Again, being most careful not to read any light from the background.
Usually, I have a good deal of space to work in when I’m outdoors. This allows me to move the subject closer or farther from the background as needed.
© Kevin Landwer-Johan
For front lighting setup, I rely on light reflecting from the ground. To ensure I get a clean white light. I will lay down some white plastic sheeting. I also use one or two fold out reflectors to bounce some light back into my subject’s face.
You can also use white card, polystyrene board or any white or light surface as a reflector.
Backlighting the background with the sun is the same as doing it in the studio. There must be more light on the background than there is reflecting off your subject. You must also have your camera exposure settings right.
One advantage is that the sun provides ample light to cover even a huge background. The biggest disadvantage is that you have no control over it.
You can read more about this technique and how I also achieve a pure black background in this article.
© Kevin Landwer-Johan
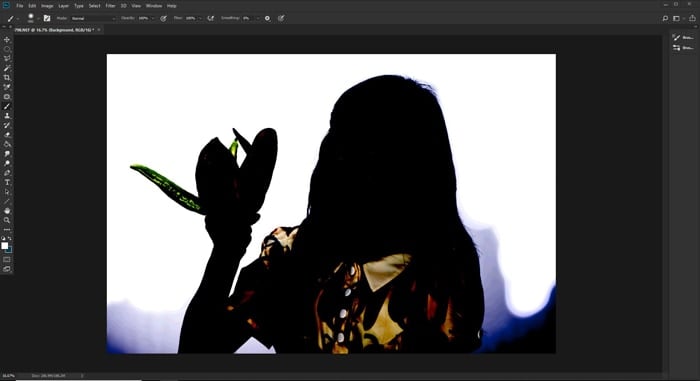
I took this photo with my outdoor studio and it has a pure white background.
I did make some minor post processing tweaks to it in Lightroom. But these were to ensure the colors were balanced well and the background was clean.
Here is the image in Photoshop after adjusting the Levels. You can see that the background is pure white.
Post-Processing White Background Photos
Minor post-processing can fix a backlit background that is not pure white.

© Kevin Landwer-Johan
In Lightroom I use the White and Highlight sliders in the Basic Panel. Sliding these towards the right will lighten the background.
Pay attention to your subject while you are making these changes. If your subject is being affected too much, edit the image in Photoshop.
Once I’ve switched to Photoshop, I will add a Levels Adjustment Layer and move the sliders most of the way to the right. This will allow me to see where any dark areas are.
Next I use the Dodge tool set to affect the highlight range. With the Range set to affect only highlights, there is little risk of your main subject being affected. I set the exposure for this tool at 100%.
I then dodge over the areas of the background that are not pure white yet. The effect the Dodge Tool has is to further lighten the background.
If you are not seeing any change, check that you have the image layer selected, not the Adjustment Layer.
You may have to work over the same area many times if it is quite dark.
If a lot of your background is not clean white, dodge around the edges of your subject. Once the edges are clean, use the Brush Tool and paint in the rest of the background with white.
This will be quicker and easier than using the Dodge Tool.
Conclusion
These methods involve using the balance of light to achieve a pure white background. If you are trying this out you may need to experiment until you have the right conditions.
It was more difficult for me to make this work in the studio than outdoors. Working indoors means more space and lights than usual. Try working with a smaller background and cropping tighter to your subject.
Working outdoors with this method and only using daylight is a lot of fun. It’s also inexpensive. You do not even need to set up a very large white backdrop.
With the right fabric for the background, you can place your subject quite close to it. There will not be much spill light and they will cast no shadow on the background.
It is even possible to do product photography outdoors using this method.


