When I first heard of the Brenizer method I had to Google it to find out what it was. I liked what I saw.
The Brenizer method combines a number of photos, made using a very wide aperture, into a single composition. The results are impressive.
Exploring the Brenizer Method: What’s in a Name?
There aren't many photographers with advanced photography techniques named after them. But photographer Ryan Brenizer is one of them.
Ryan is the New York based wedding photographer who developed the approach. He uses it extensively in his beautiful wedding portraiture.
Why Use the Brenizer Method?
Imagine using a 50mm f/0.8 lens, or 135mm f/1.2. This is what the Brenizer method looks like. Similar to using a large format camera with a fast lens, but with softer bokeh.
If these are pictures you’d be interested in taking, you don’t need to dream of lenses that don't exist. You just need a 50mm or other fast aperture lens and some stitching technique.
Bokeh, like no actual lens can create. Isolating your subject by blurring out the background is a popular photography technique. The Brenizer method will allow you to make photographs beyond the capacity of a single lens.
And that’s because you’re taking several photos and stitching them together.
The technique relies on taking a wide angle portrait with a shallow depth of field.
Image resolution is extreme. The more photos you combine into one image, the bigger you can print it.
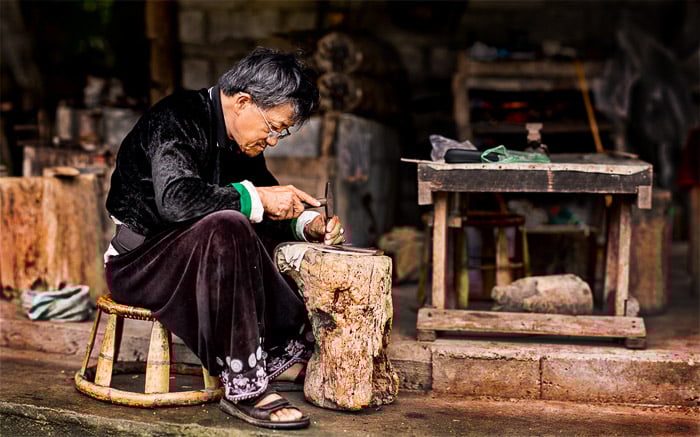
This photo of a Hmong jeweller is made up of eight photos. The original is 15581 X 9731 after being cropped.
It has the appearance of having been made with a 38 mm lens at f0.6 on a full frame camera.
Using the Brenizer method, you can also move beyond the fixed dimensions of a single frame. Horizontal or vertical panoramas are limited only by your imagination.
What You’ll Need to Create the Brenizer Method
The most important equipment choice is to use your widest aperture lens. I used an 85mm f/1.4. A 50mm prime or an f/2.8 zoom are also great. Using a lens wider than 50mm will mean you have parallax problems. It will be difficult to stitch the photos together seamlessly.
Subject and background choice are also important. Photographer Ryan Brenizer used his method predominantly for portraits.
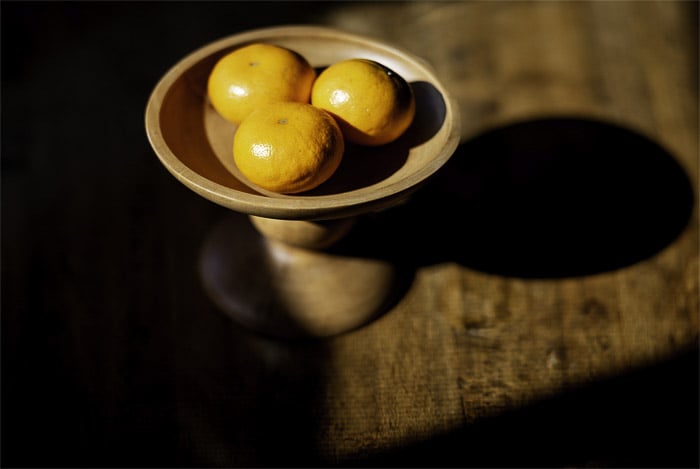
You can use it with any subject you wish to isolate from a background. Starting out, it will be easier to set up a still life.
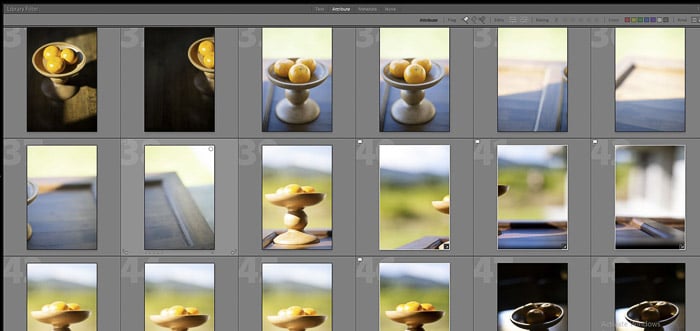
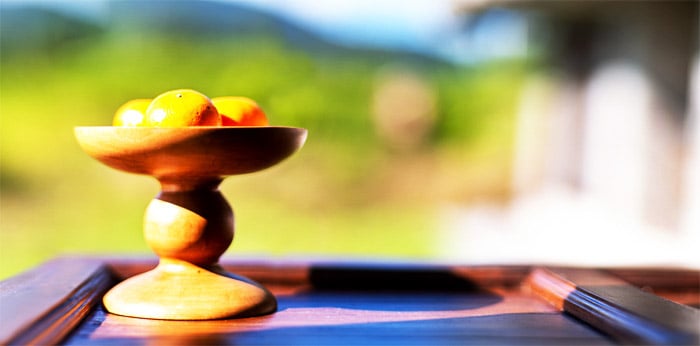
I used a bowl of oranges to illustrate this article.
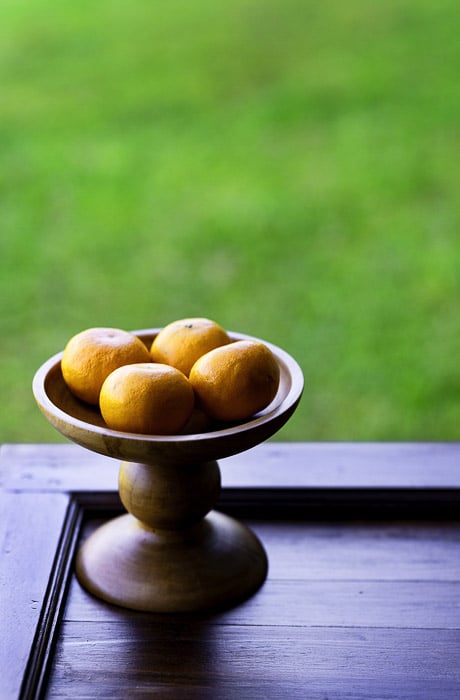
Choose a subject you can experiment with and move around. This will help you build a better understanding of the relationship between it and the background.
Using a tripod can be helpful, but it's not necessary. You just need to be very deliberate when you are taking your series of photos.
The last two things you need are time and software. This is not a fast process, especially when it comes to putting all the images together. I used Adobe Lightroom and Adobe Photoshop to create these examples.
Step 1: Position Your Subject
Visualise your subject in front of the background you want to use. How far away from your main subject is it? How much detail is there in the background?
Remember, the closer your subject is to the background, the less bokeh effect you will notice. Also keep in mind that with the Brenizer method, the bokeh is extreme.
You want your subject to fit in a single frame. This will make it easier when you are starting out with this method.
Step 2: Make a Quick Mock-Up
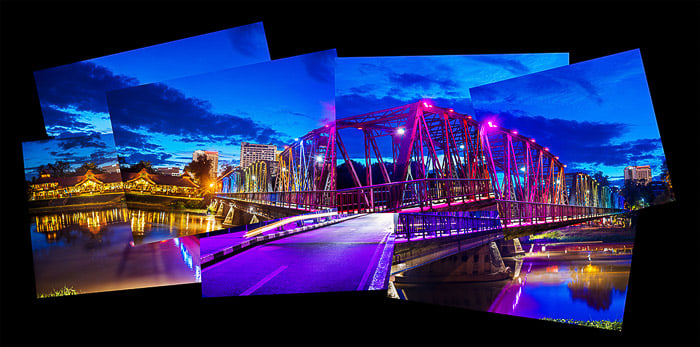
Use your smartphone on panorama mode to make a precursor image. This will help you see what your final stitched image will look like.
Make sure to hold your phone along a straight horizontal line when making the panorama. The edges will get cropped if you don’t.
Pay careful attention to the edges. You must make sure to photograph beyond them so you do not have any gaps in your stitched image.

Step 3: Set Up Your Camera
Manual everything is best. If you rely on automatic settings these may change from frame to frame. The variations will be noticeable when you stitch them and the effect will be ruined.
Set your exposure and white balance for your main subject. Focus on your subject and then switch off your autofocus.
If you use back button focus, use it once to focus on your subject. It's essential for the focus distance to remain constant throughout your series on photos.
I like to save my photos as RAW files. This allows more flexibility in post processing. If you are plane to take a lot of images in one series you may prefer to save them as jpg files.
This will make processing less taxing on your computer.
Step 4: Don't Move!
If you move between frames, the stitching process will not be seamless. Your aim is to have no visible differences between any of the photos you make.
You might find it helpful, especially when making your first few photo series, to use a tripod. Having your camera anchored on a tripod will lower the temptation to move.
I've been making photomontages for many years. It's a similar technique where I take a lot of photos and stitch them together.
I am very familiar with combining multiple photos, even though I produce a more cubist effect. I never use a tripod for this and often change positions when making my photo series.
Being disciplined to stay in one place and keep your camera position as stationary as possible is vital. The more you move your camera the more difficult it will be to stitch the images together.
For the Brenizer method you want seamless joins, not cubist disjointedness.
Step 5: Making Your Photographs
Begin with your main subject. Having it all in one frame is easiest.
Once you have several frames of your subject, check they are sharp. It's always more challenging to nail the focus when using the widest aperture.
Mapping your process in making the background photos is important. Aim to have 30% to 50% overlap between photos.
This will make it easier to stitch them together.
Point your camera at the top left point you want to frame your image. Take your next photo here. Look for something in the frame that's about one third in from the right side.
Now move your camera horizontally to the right and include that detail. Take another photo.
Repeat this process moving from left to right until you have reached where you want the right hand edge of your finished photo to be. Take note of anything in the frame that's 30% to 50% up from the bottom edge.
Tilt your camera down so you can see that detail at the top of your frame. Photograph your next row from right to left.
Consult the panorama you made with your phone. Have you covered the whole area?
Taking more photos than you think you will need is a good habit to get into. Having gaps where you have not covered the whole are will ruin the process.
There are no rules as the how many photos to use with the Brenizer method. You might make one row of photos, or even just two frames.
This will make it easier to stitch but the bokeh effect will not be so impactful.
Pro Tip
Take more than one set of photos. This is the easy part of the process. The more photos you take the more options you have when you get to stitching them.
Change the position of your model and where you’re taking the photos from. Give yourself a different background.
Move your subject closer to and further from the background. This will alter the appearance of the bokeh.
Step 6: Choose Which Images to Stitch
Load your photos into Lightroom or other software that's capable of stitching images together. You can use Photomerge in Photoshop. This works basically the same but you can work with smaller file sizes.
This is helpful if your computer is not so powerful. Working with full size RAW files in Lightroom requires a fast computer with lots of RAM.
Start with one image of your subject. Check the Enable Profile Corrections and select the lens you used. You’ll find these in the develop module under Lens Correction.
Then balance the light, contrast, color, etc., until you are satisfied with your image.
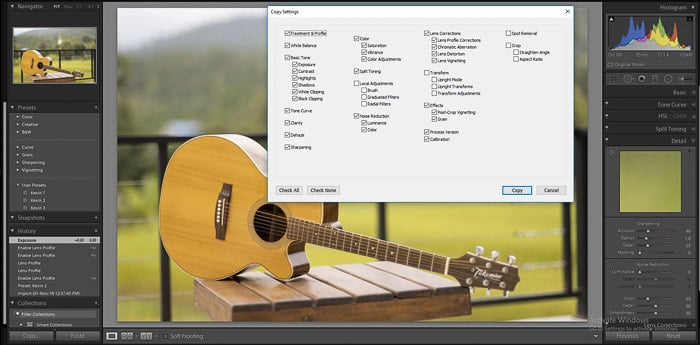
Copy the develop settings by pressing Ctrl+Shift+c on your keyboard. In the window that pops up make sure all the boxes relevant the alterations you made are checked.
Now select all the other photos in your series. Use Ctrl+Shift+v to paste your develop settings to these images.
Step 7: Merge Your Photos
Select all the photos you want to stitch together and use Ctrl+m on your keyboard. This brings up the Panorama Merge Review window.
Lightroom will attempt to merge your photos into a panorama. After a short while you will see the stitched image appear.
There are three Projection options – Spherical, Cylindrical and Perspective. Click on each of these to see which preview shows you the most natural looking image.
Pay attention mostly to how your main subject looks and if it is being distorted in any way.
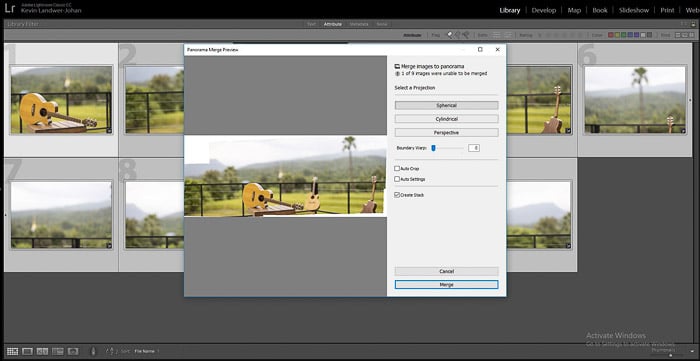
The edges of your panorama will not be straight. Use the Boundary Warp slider or the Auto Crop checkbox to fix this.
Using Boundary Warp may also warp some elements in your photo, so be careful with this. Using Auto Crop will trim your photo and you will lose parts of the edges.
Sometimes you may receive a message telling you there are not enough matching photos for merging. In this case you may not have overlapped you photos enough or you may have gaps in the series.
Once you are satisfied with the way your panorama image looks, click on the Merge button. Lightroom will process the images together and output them as a single photo.
Be patient, it may take a while, especially if you are merging many images.
When The Brenizer Method Goes Wrong
Sometimes the software is not 100% accurate. You might want to stitch your images together manually in Photoshop. Or to try another program to stitch them.
Lightroom and Photoshop would not stitch this series of photos seamlessly for me. I had to manually add the two photos in the right side myself. The reason the software failed to do so has to do with the lack of sharp detail or enough contrast in these photos.
Alternatively, start again. This is why I suggested photographing a still life setup when first trying the Brenizer method. It's easier to go back and take another series of photos if you need to. This will be quicker and easier than manually stitching.
If you missed part of an edge or a corner when you were taking your photos you can clone in that section.
With the soft bokeh effect it’s not difficult to use the stamp tool to fill in the gap. I cloned in the bottom left corner of the photo above as I did not have a photo that included that space.
You may also consider trying to merge your photos in Photoshop, rather than Lightroom.
Another free option is Image Composite Editor (ICE). This is a free download from Microsoft. I've tested a number of image series. At times it stitches them more seamlessly than Lightroom and other times it fails to.
Ryan Brenizer says on his blog that he uses the Autopano Pro software to stitch his images. This software is no longer available from its producers, Kolor by GoPro.
There are many free and paid for image stitching software apps available. You will get somewhat different results from each of them.
To cope with camera angle changes and parallax error the programs must distort images to seamlessly blend them together.
Experiment to find one you like most.
Conclusion: Brenizer Method
The Brenizer method is an advanced photography technique that is not too difficult to master. You only need a camera and prime lens or a suitable zoom.
Brett Maxwell has created a cool computation tool. It calculates the effective focal length and aperture for your Brenizer method photo joiners. You need to input the details of the lens, aperture, original photo dimensions and those of the final stitched image.
It will then come up the lens and f-stop setting for your panorama.

Making photomontages taught me to move outside the single frame mentality. This opens up time and space exploration that are bound with a single frame, traditional photography.
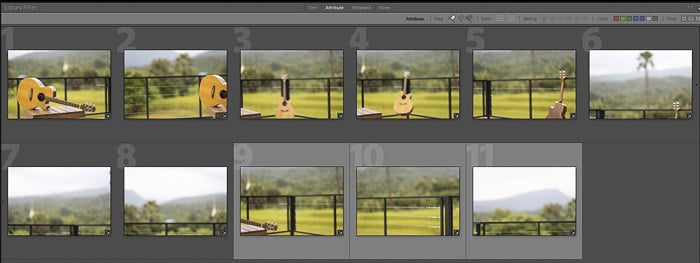
With the Brenizer method you can also experiment making your series of photos over a longer period of time. You can also move subjects and objects around within the area you are photographing. The photo above has the same guitar in it three times.
Next time you are lacking inspiration or want to try a different technique, give the Brenizer method a go. Don't be confined to just what I have written about in this article. Use it as a guide to get you started.
Whenever you combine two or more photos together the boundaries you normally work in as a photographer become limitless.


