What Is a Flash Diffuser? (And How to Use It)
When I first started using a flash for photography, the only thing the flash seemed to do was to create dark shadows on the background and harsh light on the subject. But my dislike of flash photography quickly changed after using a diffuser.
So what are flash diffusers and what do they do? Continue reading for everything you need to know about how to use them for your next shoot!
What Is a Flash Diffuser?
A “naked” camera flash tends to produce hard light that looks unappealing. But using a light modifier for a camera flash creates a softer light with more gradual transitions between highlights and darks.
A light modifier is any semi-translucent material that covers the light source. Subsequently, it spreads the light and softens its intensity.
There are many different types of light modifiers for studio lights and off-camera flashes. You can use umbrellas, beauty dishes, and large softboxes on an off-camera strobe. The only problem is you can’t walk around with an umbrella mounted on top of your camera.
This is where smaller flash diffusers come in. Like other light modifiers, they spread the light over a larger surface area to create soft lighting.
But the difference is that a diffuser for camera flash is typically smaller than regular light modifiers. Since it’s portable, you can bring it anywhere.
What Are the Different Types of Diffusers?
Diffusers are almost as portable as the strobe itself. Made of white translucent plastic, they fit right on top of the flash head. You can use them on-camera as well as off-camera. While they tend to be compact, these lighting accessories still come in a few different shapes and sizes.
Most flashguns have a built-in diffusion panel. You can pull it from the flashgun’s head to help spread the light. Unfortunately, a camera flash with a diffuser doesn’t do very much. You’ll need an additional light source to see the best results.
Dome Flash Diffusers
Dome flash diffusers are one step above built-in flash diffuser panels. These lighting accessories have a translucent dome that spreads the light and helps reduce the intensity.
Mini Softbox
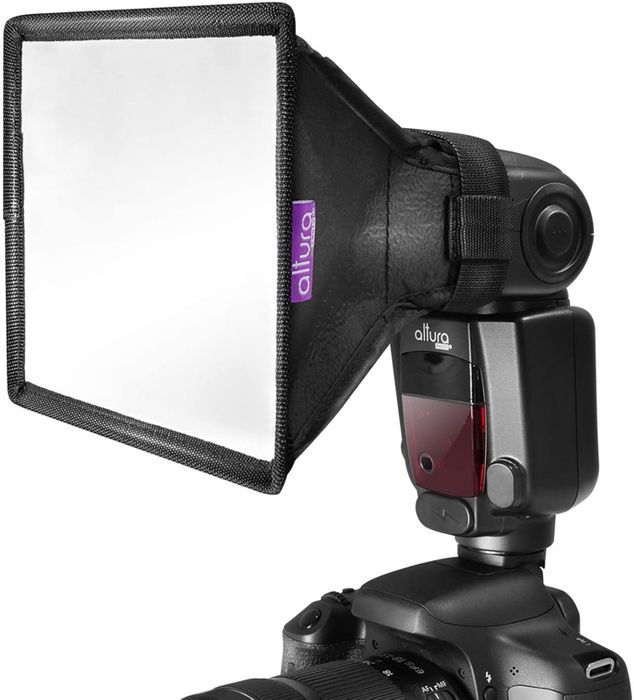
The next option is the mini softbox. A mini softbox is the same as a studio softbox, just smaller. This attachment has a square sheet of diffusion material that sits over the light.
Sphere Flash Diffusers
Sphere flash diffusers create a larger surface area for the light while offering a bit sturdier mount. The most popular options include the Gary Fong Lightsphere and the MagMod MagSphere. I use my MagSphere so often that it rarely comes off my flashgun.
Sphere diffusers tend to be more expensive. But they are easier to use and offer more to soften the light than a dome version.
Bounce Flash Diffusers
Bounce flash diffusers provide a different approach to softening the light. Instead of shooting the strobe toward the subject, they “bounce” the light away from the scene.
Bounce diffusers tend to lose more light than a sphere or softbox. But they can create nice, soft light by bouncing off a much larger surface area.
Pop-Up Flash Diffusers
What if you have a compact camera with a pop-up flash? There are diffusers for that, too.
They’re called pop-up flash diffusers or pop-up flash diffuser cards. These accessories attach to the camera to soften the light coming from a built-in flash.
DIY Diffusers
Some photographers choose to create DIY diffusers instead. They use white plastic containers, velcro, paper, cardboard, and more.
DIY diffusers can improve the look of your light without spending much at all. In general, diffusers are inexpensive. But DIY diffusers are even cheaper if you’re on a budget. And a cheap diffuser is better than no diffuser at all.
What Is the Best Flash Diffuser to Use?
If possible, avoid using an on-flash diffuser. Since it’s just a simple white card, it doesn’t diffuse the light as well as other options.
You should also avoid using DIY diffusers if you’re thinking of doing a professional gig. Don’t get me wrong. They work well, but to the untrained eye, they might look unprofessional. So ditch them for a real one before you start taking pictures of paying clients.
The best options include sphere, bounce, and mini softbox diffusers. They create the softest light, and they work well in most situations.
How Do You Use a Light Diffuser in Photography?
Diffusers are reasonably easy to use. To use a diffuser, all you have to do is strap it on your flashgun’s head, and that’s it. You can even pair them with additional lighting techniques to get even better results.
You need to fit softbox, sphere, dome, and pop-up diffusers over the flashgun with the head pointing toward the subject. The light shoots through the diffusion material.
For bounce diffusers, you’ll need to point the light into the diffuser. The large surface area of the diffuser, not the strobe, should face the subject. Bounce diffusers can vary in use based on the brand you get. Check with the instructions that come with your light modifier.
When I learned to use strobes, I added both a diffuser and manual flash mode. I then went even further with an off-camera flash.
Using Manual mode for your flash lets you turn down the intensity of the strobe yourself. It’ll help the light blend with the rest of the scene, especially when using flash diffusers.
Manual mode uses fractions to turn your flashgun from full power to dim to send the right amount of light. It starts at 1/1, which is full power, then incrementally goes to lower flash outputs.
When I have a diffuser on my flashgun, I often use 1/128 or 1/64 power in an average room or shade. Doing so adds a bit of contrast, catchlights to the eyes, and a bit of fill light.
Those are my flash settings for indoor photography, but you can use a diffuser outside, too. When trying to overpower the sun, I increase the power often to 1/8 or 1/4. Then, I check the image and turn the power up or down as needed.
Conclusion—Flash Diffuser in Photography
A bare flash can be used to create drama and drown out the background light. But diffusers can help the strobe seamlessly blend with the rest of the scene for a more natural look.
Diffusers are essential accessories if you want to add a bit of light, contrast, fill light, or catchlights. Diffusers come in many types. Most are a relatively affordable photography accessory, so consider investing in them.
