Lighting is one of the main challenges of macro photography. Getting the light exactly right or not blocking the subject with your lens can be difficult.
With the right techniques and the right lighting accessories, you can get perfect macro shots every time. Continue reading for everything you need to know about lighting for macro photography.
- Learn to take stunning photos without stepping outside.
- Discover affordable ways to convert any lens for macro shots.
- Explore unique techniques for lighting and composing your subjects.
Macro Photography Lighting
1. Take Macro Shots in the Morning
Macro photography lighting can be challenging when shooting outdoors. You don't have any control over the angle of the light. The best you can do is figure out where the sun is in the sky from the time.
When shooting macro subjects, you don't necessarily have to wait for the golden hour, like in other types of photography. In most cases, you can expect beautiful macro shots with the sun shining about 45 degrees overhead.
Many macro photographers shoot in the morning because flowers look fresh covered in morning dew. And that’s when insects start to appear.
It’s best to avoid shooting at noon when the sun is directly overhead. If you see ugly shadows on your subject, you can wait a few hours when the sunlight isn’t as intense. Or you can find a shaded area that absorbs only some of the harsh overhead light.
If you want to shoot in a specific location, it’s a good idea to visit the spot before the shoot. Go at the same time of day to ensure the lighting is how you want it.
2. Bounce Light With a Reflector
You might be in a spot with bad lighting, no matter the time of day. Consider using lighting equipment such as a reflector. A reflector simply bounces the light to fill in unwanted shadows around your subject.
Just note that using a reflector won’t work if the sun is behind you. You can try moving the reflector into different positions to see how it affects the lighting of your subject.
There are many types of reflectors you can buy. The best ones for macro photography tend to be small and round. They have enough surface area to bounce light but are still small enough to move around when shooting.
If you don't have a reflector, try using white cardboard instead. It’s not as good as a dedicated reflector, but it will work in a pinch. You can also make your own light reflector by mounting aluminum foil to a board.

3. Diffuse the Light to Create Even Lighting
Consider using a diffuser if you have to shoot when the sun is high in the sky. It spreads harsh light to create a softer exposure.
Diffusers are usually made of thin silk-like translucent material that only lets through a portion of the light source. Eliminating some of that harsh light gives you soft, even lighting.
If you don't have a diffuser, you can try using a white umbrella instead. And if you have neither, you can wait for some clouds to block the sun. Clouds also work well as diffusers since they're good at spreading and blocking some of the direct sunlight.
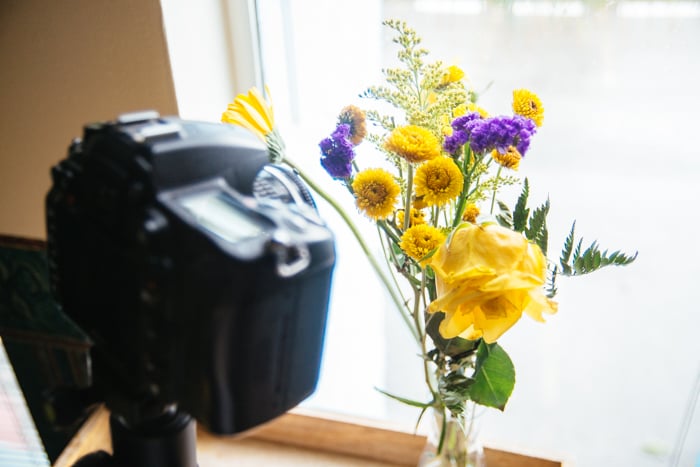
4. Shoot by a Window When Indoors
A window works as a diffuser when shooting indoor macro photos. Since it spreads out the sun’s harsh outdoor light, it creates soft lighting around your subject.
You can shoot by the window almost any time of day. All you have to do is place your subject beside the window for fantastic side lighting. Just make sure the window lets in enough light.
Sometimes, windows let too much light in, potentially overexposing your shots. You can place a curtain over them to diffuse the light, but avoid any patterns that could cast shadows on your subject. The best options have fine stitching and no designs.
You should also avoid windows that cast direct sunlight onto your subject. The harsh light from these windows creates sharp shadows, just like you would when shooting outdoors. You can either look for another window or wait for the sun to move.
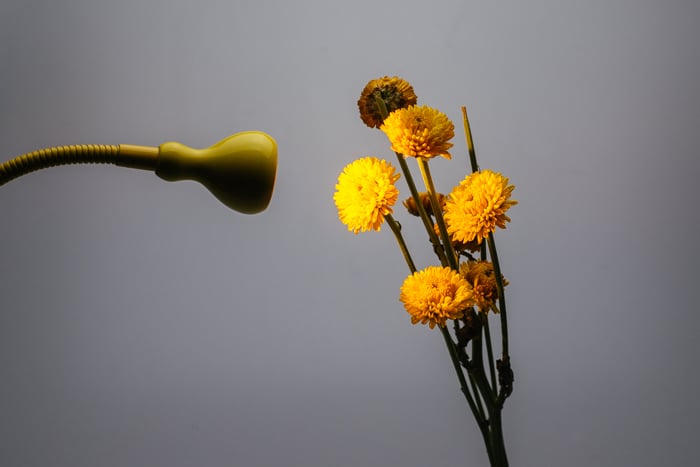
5. Try Desk Lamps for Artificial Lighting
If it’s dark but you still need to take indoor photos, you can try using a simple desk lamp. Any desk lamp works, but the best option is the one with an adjustable neck. This allows you to position it how you need it.
The light bulb you use is also crucial in helping you get the shot you want. Daylight bulbs are best because they replicate the color temperature of the sun. But if you prefer photos with cooler colors, you can also try a white bulb. And if you like warm colors, use bulbs that give out orange or yellowish light instead.
When using artificial light, move it around and experiment with the best angles for lighting your subject. Macro photography is tiny, so make sure to make tiny adjustments in your lighting setup.
Using a tripod is a good idea. Because desk lamps tend to have a weaker light output, you may need to use a slow shutter speed to get the correct exposure. It will also keep your camera stable to avoid motion blur.
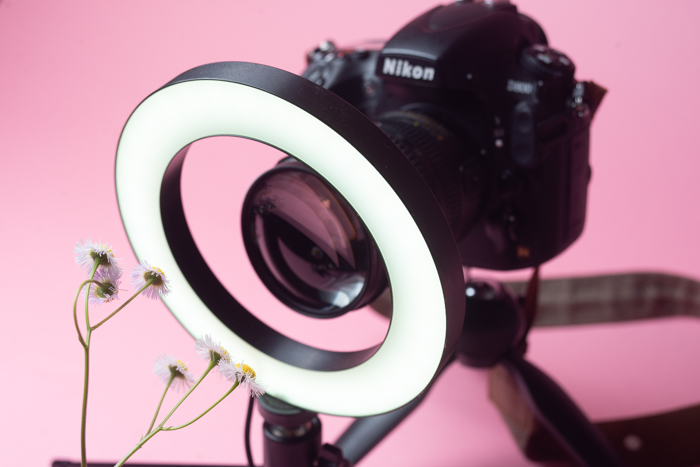
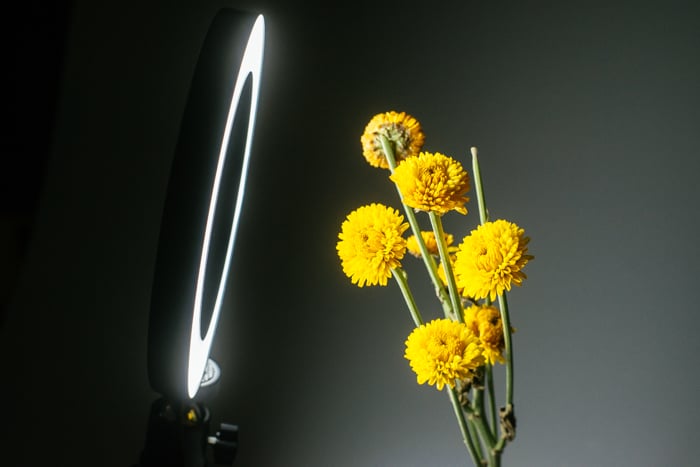
6. Experiment With LEDs for Cooler Artificial Light
Your options aren't just limited to incandescent light bulbs when trying out lighting techniques. You can also use LEDs to illuminate your subjects. And since they're small, they’re perfect for macro lighting. They tend to have a cooler light temperature than other light sources.
Like incandescent light bulbs, LED lights also vary in color temperature. Some appear white and cool, while others look yellow and warm. But there are also bicolor LEDs that let you change the hue of the LED output.
LED panels for photography come in a variety of shapes and sizes. Some are rectangular, while others are round. Some can fit in your pocket, while others may need a stand. Choosing the right one for you depends on your macro lighting needs.
7. Incorporate Flash for Even Brighter Light
If you need a light that's brighter than regular light bulbs or LEDs, then you may need to use flash. Flash is much more challenging to use because it's not continuous light. In other words, you don't see the light it produces until the moment you press the shutter.
That means you'll need to take some test shots to see if you're getting the correct exposure. But its powerful output makes a flash better than a desk lamp or LED. Since it’s bright, it can easily replicate the intensity of the sun in pictures.
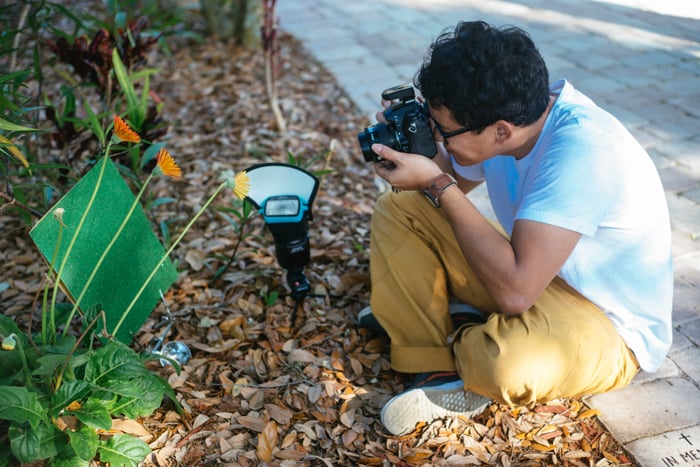
It also allows you to shoot at faster shutter speeds than when using regular light bulbs. There are many types of flashes out there made for various purposes. What you want is a flash unit that's perfect for macro photography.
Regular Speedlites work well for shooting small subjects, but there are also custom units made specifically for macro photography. A macro flash attaches to the hot shoe of your camera, but its lighting element usually extends out in front of the lens.
It’s shaped this way so the lens doesn’t accidentally block the light from the flash. The macro flash's design also evenly illuminates the subject because the flash head is positioned directly in front of the object.
In many ways, shooting with flash is much like shooting with other artificial lights. The only difference is the light isn’t on at all times. Take a few test shots to check the exposure. Adjust the brightness accordingly to make sure your next image is properly lit.
Conclusion—Macro Photography Lighting
Macro photography lighting brings its own set of challenges. But the lighting techniques in this article apply to most macro photography situations. You can always pick which technique works best for the specific shot you have in mind.
As you gain experience shooting macro, you'll see the pros and cons of each lighting setup. Then you can create the perfect lighting for your macro shots.
- Learn to take stunning photos without stepping outside.
- Discover affordable ways to convert any lens for macro shots.
- Explore unique techniques for lighting and composing your subjects.