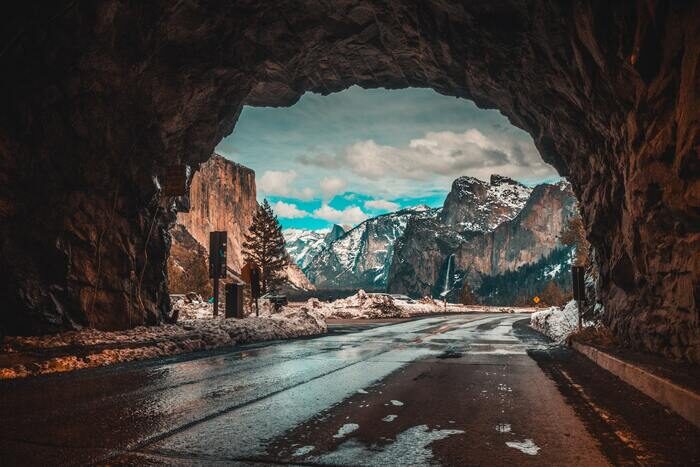
When taking landscape photography, we get inspired by light, land, or a fleeting moment. But what makes fine art landscape photography unique isn't found in the scenery. Artistic photography is found within.
To me, fine art landscape photography is the quintessential way of showing who you are as a photographer.
What Is Fine Art Landscape Photography?
I invite you to embrace photography as a form of art. Instead of specific instructions on how to achieve a certain look, these 10 tips will show you how to be a better artist through fine art photography.
Guy Tal summarizes fine art brilliantly by saying that your photos should be about things, not of things.
Fine art landscape photography is the way you document the land. It's about the connection between you as a photographer and the landscape you're looking at.
Therefore, your vision as an artist is fundamental to creating original photos. It is important to note that creating art is a cognitive process.
1. Pre-Visualize the Final Image
Galen Rowell was one of the proponents of pre-visualizing an image before pressing the shutter. This is the only way to know how your image will look with film photography.
In the digital age, pre-visualization is underappreciated. We tend to look at our images after we shoot them and adjust accordingly. The goal of fine art landscape photography is to have an idea of what your images will look like in the end.
Ask yourself questions like, "What do I want to show in this image" and "How does this composition make me feel?" Then, dial in the camera settings that will add to your answers.
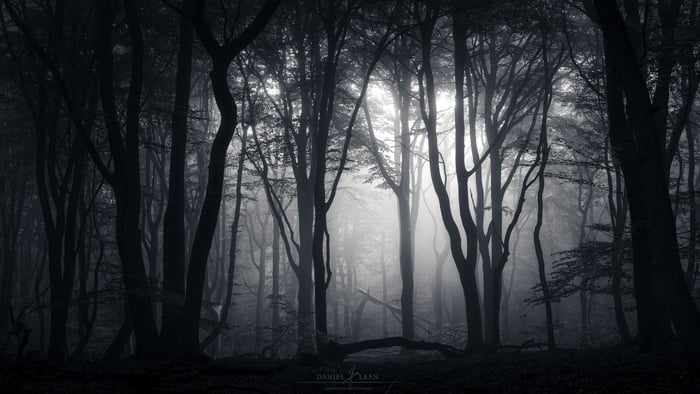
If you feel gloomy or sad, you could help the image by making it a bit darker. Add some negative exposure compensation in your camera’s Aperture Priority mode or shorten the shutter speed in Manual mode.
Creating darker images makes the viewer tap into darker emotions as well.
2. Color and Processing
Another great tool for putting emotion in your fine art landscape photography is color. Control the overall color of the image with the white balance setting of your camera. And don't be afraid of a bit of color cast.
Photos don't always have to be neutral. Bright and warm colors can really add energy and an overall positive feeling. Keep in mind that pictures with warm colors demand attention. On the other hand, cooler tones are easier on the brain.
Also, keep post-processing in mind before you even press the shutter. Look through the viewfinder and think out loud about what you want to do to your image.
Do you want to darken the sky or lift the shadows? Are there distracting elements you would rather not have but cannot omit by slightly altering the composition?
3. Use Storytelling to Send a Message
Fine art photography should be about things. A great tool for storytelling is to show relationships within your art. A small sapling tree in the foreground set against a dead tree in the background could tell a story.
My thoughts run to renewal, rebirth, or the fact that nature will conquer all.
It doesn't always have to be a complex or far-fetched story. It might be difficult to tell stories when you don't have a background in fine arts or photography. Start with these three simple tips:
- A longer shutter speed can suggest movement in grass, waves, and clouds.
- A larger aperture can suggest depth because of the shallow depth of field.
- A motionless subject against a rushing background can evoke chaos and solitude.
Once you get the hang of those, you could try your hand at telling a story through multiple landscape photographs. Show the development of a storm, a change of seasons, the same landscape with or without snow, or what a forest fire has done to your local woodland.
4. Show the Unexpected
Oftentimes I wonder how the greatest photographers keep coming up with interesting subjects and compositions within fine art photography.
Originality is often closer than you think. Pull up a map of your local area. Look for a spot that's interesting geographically. Preferably a spot with some elevation differences, a water feature, or a small woodland.
Topographical maps help me when I'm entering unfamiliar territory. A great online tool that you can use is OpenTopoMap.
Venture to places where others haven't been or show subjects that other photographers have not. Original artwork can surprise and delight us because it activates a part of the brain that is linked to novelty.
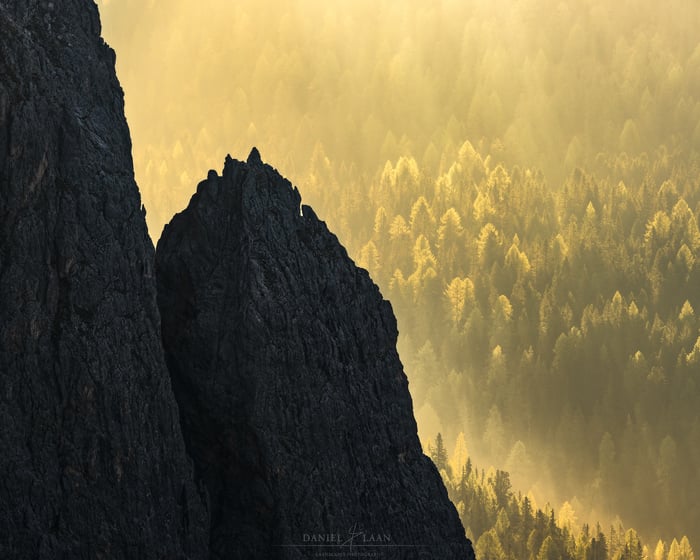
5. Practice With Telephoto Lenses
Because you're zooming in on particular areas in an otherwise wide-open space, you decide what you want to show the viewer. Telephoto lenses are a great tool to help you look at the landscape differently.
Patterns and shapes start to come alive when you have a more intimate view of the landscape.
One trick that I suggest you try is to move the camera around slightly using a ball head on your tripod. Even the tiniest adjustment in pan, tilt, or rotation will have significant results in your composition.
Practicing with a telephoto lens will teach you to pay close attention to composition. As well as any distracting elements along the edges of a photograph.
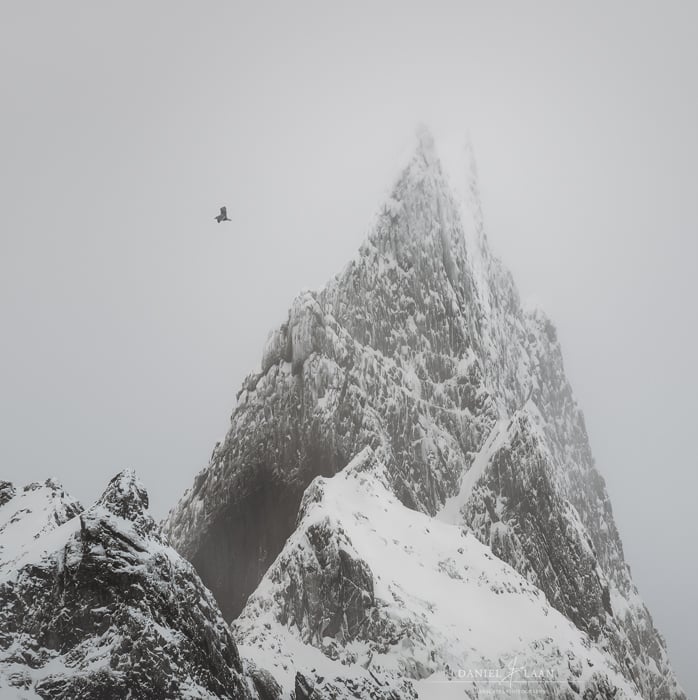
But you don't always have to be close to your subject to create fine-art landscape images.
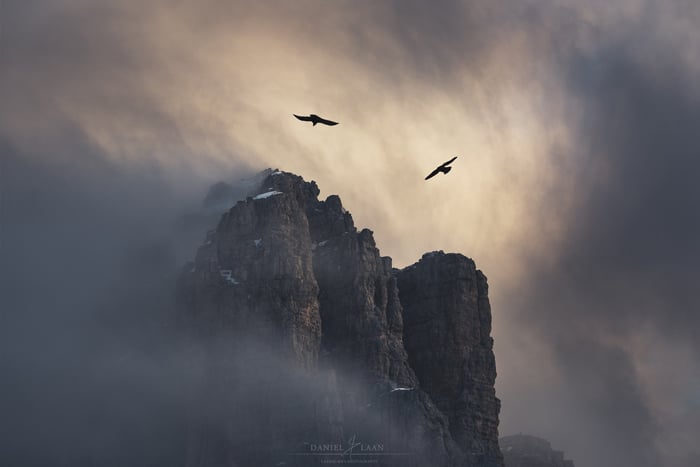
Among my favorite subjects are misty mountain shots. With a focal length of 300 mm or more, I love the way crevices and corries fill the frame. And with some birds, soft morning light, and a flurry of clouds along the summit, it's a recipe for great fine art photography.
6. Always Edit Your Landscapes in Post
I strongly believe post-processing is an inextricable part of fine art photography.
Don't think of post-processing as trickery or faking it. Treat post-processing like a tool for realizing your vision, and amazing things will come from your photography.
If you struggle with the right amount of a particular effect, it's a good idea to pay close attention to the work of photographers you admire. Good post-processing is where taste and skill combine.
When you start out with photography, editing your images can be daunting. There are many settings, sliders, and effects that you can choose from.
I always start by asking, "What was I thinking about when I took this image?" and take it from there.
One of the most powerful tools that you can use is Curves.
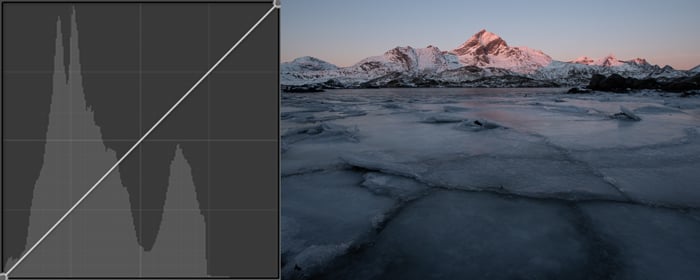
To get your feet wet with Curves, experiment with two points along the curve. The two points that are already there are called the White Point (top right) and the Black Point (bottom left).
Those control how much white or black is allowed in the image. Right in the center, there's the Midpoint. Click in the center of the curve and drag it down to darken the midtones of the image.
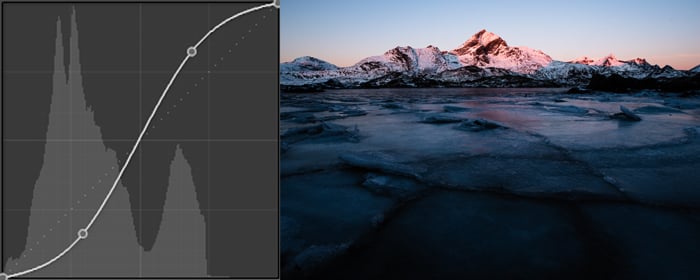
Adding two points along the line, with the first one darkening the image and the second one brightening it, will add contrast to your shot and deepen the colors.
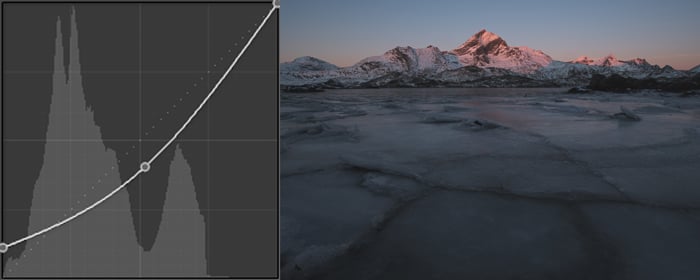
While this S-shaped curve is by far the most utilized curve in landscape photography, I generally stay away from it. Instead, I like to be a bit more creative and add multiple points along the curve to bring out detail where it's needed.

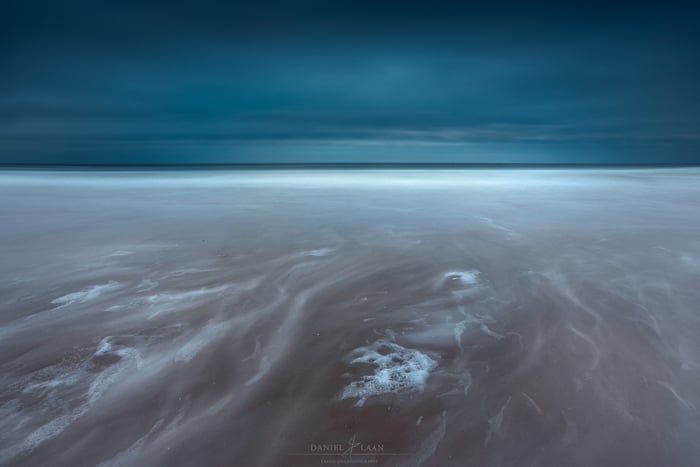
7. Shoot Seascapes for Dynamic Compositions
The sea is a fantastic subject for learning the rules of composition. And you don't need fancy filters to start out with seascape photography. A with the photography equipment you already have will do.
It's a good idea to wait for the sunset before shooting seascapes. Blue hour is the best time of day to learn to drag your shutter speed.
The natural low-light conditions at twilight also add to the atmosphere of the shot. It’s a great time to learn long-exposure photography.
With long-exposure seascape photography, pay close attention to the lines in the water. Also, pay attention to static objects such as the position of the horizon, rocks, and seaweed.
It's essential to practice this with as little subject matter as possible. Eliminate everything that's not needed. A single, small stone might be enough to create a fine art photograph with impact.
8. Black-and-White Landscape Photography: It’s All About Luminosity
One overlooked subgenre of the modern-day landscape photographer is monochrome or black-and-white landscape photography.
Because social media ratings seem to be more important than meaningful images these days, blazing sunsets are all the rage.
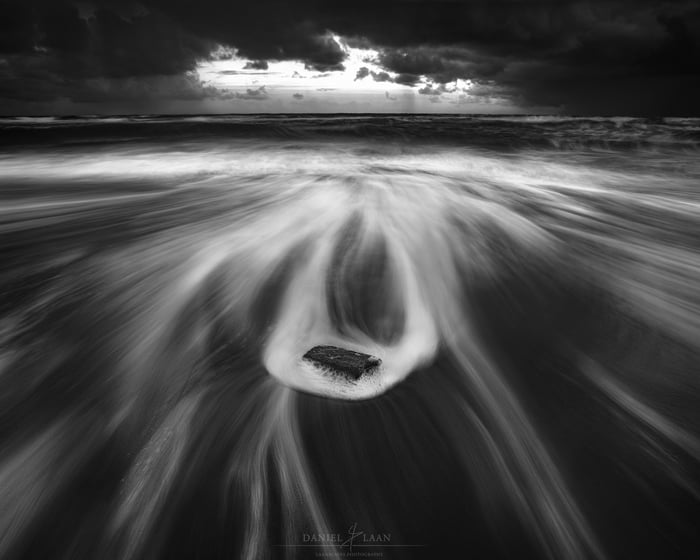
Remember that all photography starts without color. In fact, world-renowned landscape photographers kept shooting in black and white, even as color photography became more prevalent.
Minor White, Philip Hyde, and Ansel Adams were all keen users of black-and-white film. And if you browse their archives, certain things become very apparent in their images.
9. Use Gestalt Principles
- Shape and form: With color gone, the shapes keep us interested in the image. Diagonals suggest speed, while curves and wavy lines make us look longer at that spot.
- Contrast: High contrast suggests harsh lighting and little distance between the viewer and the subject. Low contrast suggests that the subject is far away from us.
- Proximity: Two subjects that are close suggest a relation to each other.
- Similarity: That which is similar to something we know evokes a sense of recognition and association within us.
- Symmetry: A patch of snow on the ground and a cloud in the sky that share their inverse shape strengthen their bond and separation.
- Closure: One line that seemingly continues can tie two separate subjects together. A dead tree that points at the edge of a mountain is a good example of this.
10. Use Negative Space to Create Visual Breathing Room
Negative space will strengthen the positive space. In other words, empty parts of the photograph will emphasize your subject.
Try it yourself by allowing a big part of your photo for the sky. Or experiment with placing your subject further to the left or right.
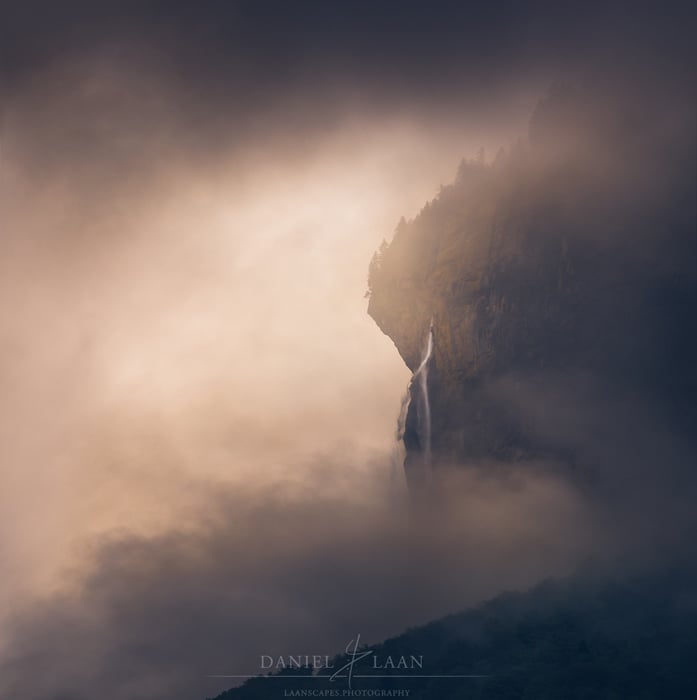
Notice that the emptier the photo, the more abstract it becomes. You could potentially shoot an image of visual nothingness and make a single subject stand out.
A tree among endless snow is a classic example, but the subjects are endless.
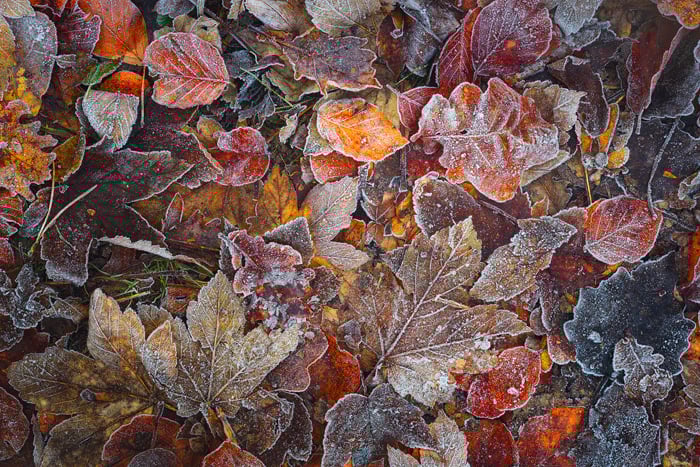
11. Don't Neglect the Small Stuff
One of the things that I've learned from personal experience is that most of us are on the hunt for those trophy shots. But even on your way to those once-in-a-lifetime locations, countless photographic opportunities await.
The icons in landscape photography are those where entire busloads of expensive camera equipment get unloaded multiple times a day. Every day.
When I visit these locations with a group, I tell them to pay attention to things that can improve the photo compared to other photos with the same composition.
It could be a lone flower, a strange-looking ice formation, or even another photographer composing their shot. Such images invoke both recognition and novelty and are often quite powerful.
Originality is often closer than you think, even in these commonly photographed areas. So next time you're at Horseshoe Bend in Arizona or Skógafoss in Iceland, try to look for foreground subject matter that's different or temporary. Composing the temporary versus the timeless is another great tool in your arsenal.
A couple of inspirational photographers of intimate landscapes are Bruce Omori, Alex Noriega, and Guy Tal. Have a look around on their websites for photography inspiration on patterns in the landscape.
12. Return to The Same Subjects
For many, photography is a form of collection. But building a catalog of visual memories isn't what fine art photography is about.
It is very much about the chase of perfection. Simon Baxter teaches about persistence in his insightful landscape photography videos.
Consider returning to the same subject in different conditions. Or when the light or the season isn't fitting the subject. If you're out scouting with your camera, it takes discipline to return when the light is better—even if it means getting up at 4 AM.
It's not a bad idea to shoot a quick photo of a composition you have in mind. But don't spend too much time doing so. Baxter regularly uses his phone to do these quick and dirty snapshots.
Conclusion: Fine Art Landscape Photography Tips
We've covered various subjects that will make you a more keen observer and a better photographer. But before I leave you to put all this into practice, I'll take a quick moment to summarize the most important points.
- Ask yourself questions out loud if you have to. Opening up an internal dialogue about your photos will make you critical and observant.
- Pay attention to the smaller things around you. If you've found the mountain you want to photograph, think about how you want to proceed and what foreground subject would best add to your story.
- Less really is more. Practice with negative space and gradually see that your images will become more powerful.
- Practice composition in black and white. Removing color can make the rules of composition more prominent and dynamic.
- Don't be afraid to experiment. Go to places where no one has. And spend time learning the ropes of post-processing your images.