If you’re looking to learn how to edit food photos in Lightroom, you’ve come to the right place. In this tutorial, we’ll show you how to make simple adjustments that will improve your images dramatically. We’ll walk you through each step of the process, from importing your photos to exporting them for use online or in print. So whether you’re a beginner or an experienced photographer, you’ll be able to follow along and create stunning food photos using Lightroom.
Edit Food Photos: Develop Your Lightroom Workflow
Adobe has organised the tools into panels, taking workflow into account. You start with the adjustments in the top panel and make your way down one by one.
In general, this is a good approach. But there are a few changes in Lightroom that I recommend making to every photo when you get started with food photo editing.
In every area of photography, the workflow is very personal. After you’ve been editing for some time, you will find the workflow that works best for you.
Get Your Colors Right with White Balance
Getting the colors right is a very important aspect of editing your food photography. After all, you want to make the food as appealing as possible.
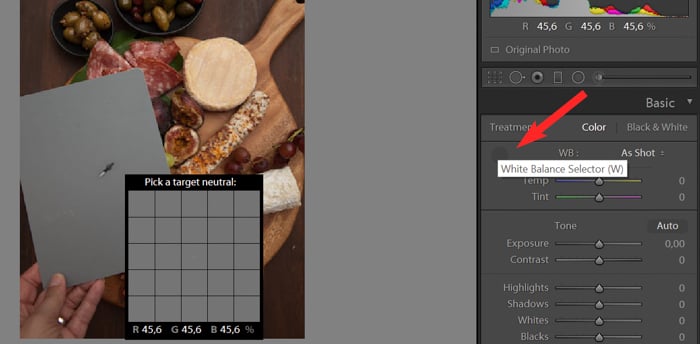
I recommend using a grey card when adjusting your white balance. This removes incorrect color casts and ensures that your whites are actually white.
A grey card is a piece of grey plastic you can buy at a photography supply store. It’s exactly 18% grey, which is what your camera looks for when metering a scene. For this reason, you can’t use any old grey item.
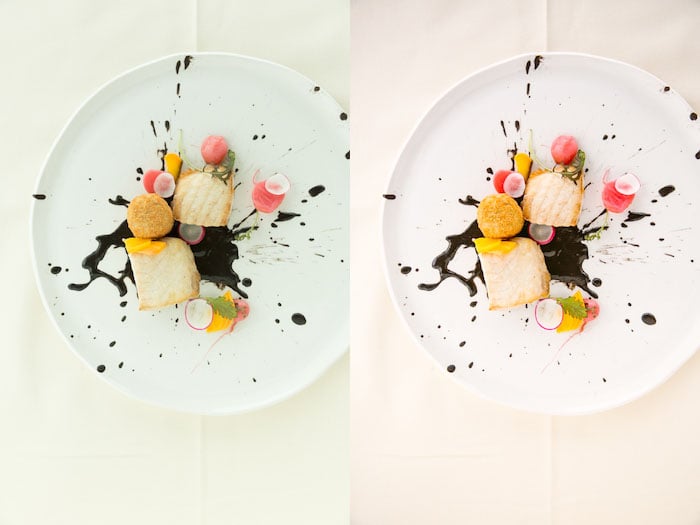
For my example image, I placed the grey card in my scene facing my lens and took a shot. Later in Lightroom, I used the eyedropper tool in the Basic Panel. Clicking on an area of the grey card changed the white balance.
The image on the right is the final version, with a few other edits. You can see how the white surface of the cheese looks less yellow and more realistic.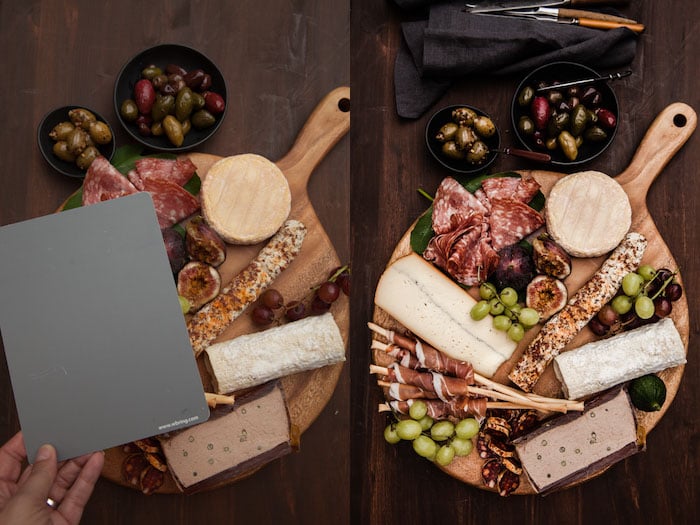
You might be shooting somewhere with uncontrollable overhead lights, such as a restaurant. The color temperature of those lights will confuse your camera and create an unwanted color cast. This can contaminate your food photography.
I shot the image below in a restaurant with lots of windows and natural light. The additional artificial lighting in the restaurant made the image look green. By moving the tint slider to the right, I was able to remove this green cast.
If you don’t have a lot of whites in your image, you can also edit your white balance by using the eyedropper tool.
Clicking on a neutral area in the image will automatically edit the color temperature of the whole photo. But you should not rely on it when shooting whites, as the rendering isn’t always accurate.
Set the Mood with Exposure
The next slider is Exposure, which affects the brightness throughout your image. I often use this slider at the beginning of my editing process and may scale it back once I have made my other adjustments.
For moody, darker food photography, I advise you to underexpose your photos slightly in-camera. This way, you can get the most out of your shadows. That doesn’t apply if your work is bright and bold, or light and airy. You may be working with a file that requires barely any tweaking when it comes to exposure.
There is only so far you can push this slider, so the goal is to always get your exposure right in-camera. After a point, your whites blow out and you start losing too much detail in the shadows.
I don’t recommend using more than +1.00 exposure for food photography.
Use Contrast to Bring Your Photos to Life
By nature, digital files are flat, so one of the goals of editing is to bring them to life. A way to reach this is boosting contrast in the Basic Panel or under Point Curve in the Tone Curve Panel.
Consistent contrast choices will come to define your style of food photography. For example, my editing style is of high contrast and bright food. Other food photographers prefer a more muted or softer approach.
Feel free to experiment with different styles until you are satisfied with the result.
Balance Your Highlights, Shadows, Whites and Blacks
You should edit the under and overexposed parts of the picture. The important thing to remember is that you don’t want to blow out your whites or lose detail in the dark parts.
Bringing the highlights down and lifting the shadows will give your food photography a good start.
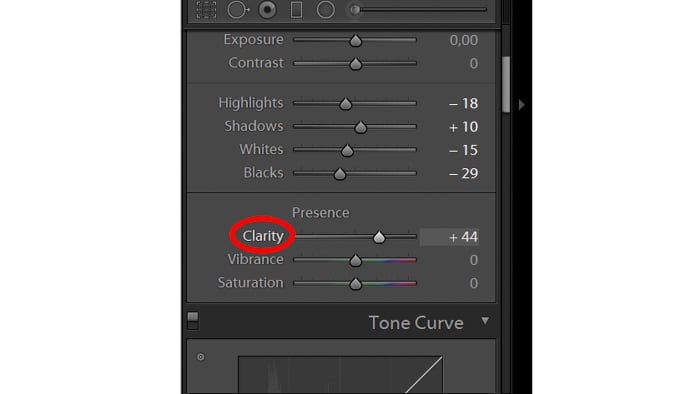
Emphasise Your Subject with Clarity
Clarity is an important slider when using Lightroom for food photography. It gives your image contrast in the mid-tones and adds detail. Although you shouldn’t edit a portrait with 50+ clarity, I use this with my food photos on a regular basis.
But there can be too much of a good thing. Excessive use of clarity can make food look dry and unappealing. You don’t want your image to look “crunchy”.
For the image of the cinnamon sugar doughnuts below, I kept my clarity at +38 because the image was quite dark.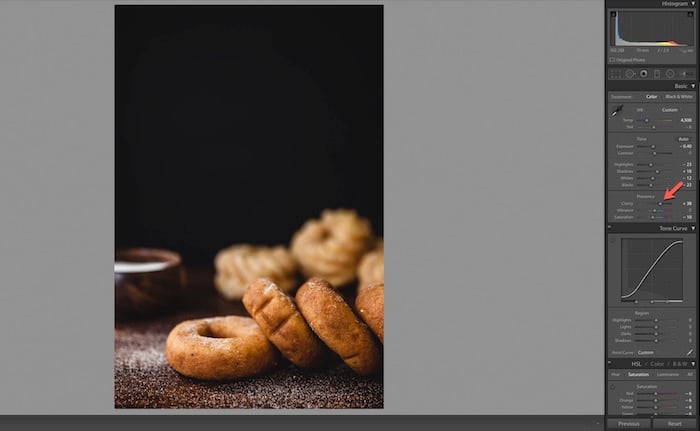
Adjust Colors with Vibrance and Saturation
Food photography tends to involve more color treatment than other photography genres.
Saturation is a slider I recommend using with great care. As opposed to vibrance, saturation affects the intensity of all colors. Red becomes redder, green becomes greener and so on.
The problem is, the saturation slider cranks up the color saturation in the whole image. This can make the picture look overdone and garish. For this reason, if I use the slider at all, I only nudge it up a tad to about +4 or +5.
Vibrance is a better tool for your editing than saturation, as it’s more subtle. It adjusts the less saturated colors without intensifying the already saturated ones.
Edit Tone Curve for the Biggest Visual Impact
The Tone Curve panel is the most powerful tool when using Lightroom. It gives food photographers the most power over the visual impact of a photo but can be the most difficult to master. You may find that the Tone Curve is where you end up doing most of your tweaking before you settle on a final look.
The Tone Curve is a square graph that maps out where the tones in your images lie. The bottom axis of the Tone Curve starts with Shadows at the far left and ends with Highlights in the far right. The Midtones fall in the middle, ranging from darker to lighter.
The tones get darker as you move lower, and brighter as you move up the axis. You can control the lightness and darkness of your tones by adjusting the Point curve itself.
If you don’t have much experience with using Lightroom, start with the Region sliders. They will have the same effect. At the same time, they ensure you don’t ruin your image with incorrect adjustments.

To make adjustments to the curve, click on the area you want to edit in your image, and bring the point up or down.
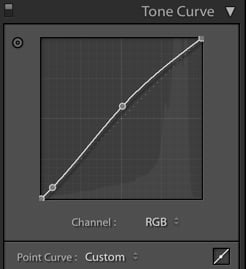
When it comes to food photography, it’s crucial to draw attention to the subject. That is why you should first assess the mid-tones in your image. Are they bright already? If not, click on the middle of the tone curve and bring the point up.
If they are already bright or too bright, you want to bring the curve down a bit. Commonly, you will find your curve looking somewhat like a soft S.
You can also achieve the popular matte look using Lightroom. In the Tone Curve panel, you should take the left end of the line -that represents the deepest blacks in the image- and bring it up a little. Then drag down the top right point representing the brightest whites in a scene.
You will notice that there is an RGB option in the lower-right part of the point curve. This helps you edit the Red, Green, and Blue channels of your image separately. It performs the adjustments like brightness and darkness, but on each separate color.
You can use this if you want to edit colors one by one or give your whole image a certain type of color. It’s generally not that useful in food photography, where you want to keep your subjects true to life.
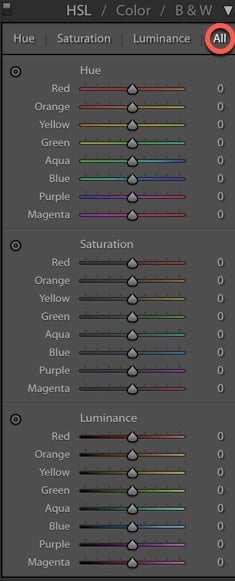
Use HSL to Selectively Edit Colors
HSL stands for Hue, Saturation, and Luminance. This is where you balance the colors in Lightroom. You must make some adjustments in this panel if you want your images to pop.
There are two ways to make these changes in this panel. You can edit them all at once under HSL, or each color one by one under the Color tab.
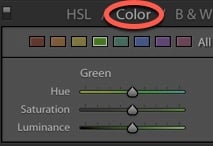
Hue is where you choose how warm or cool you want each color in your image to be. For example, I find that greens usually look a bit off in food photography. So I slide the greens a tad to get them looking more realistic.
To add more warmth to your greens, slide it to the right. For a cooler hue, sliding it to the left will add more blue. Opposed to the Presence panel, these sliders edit each color individually.
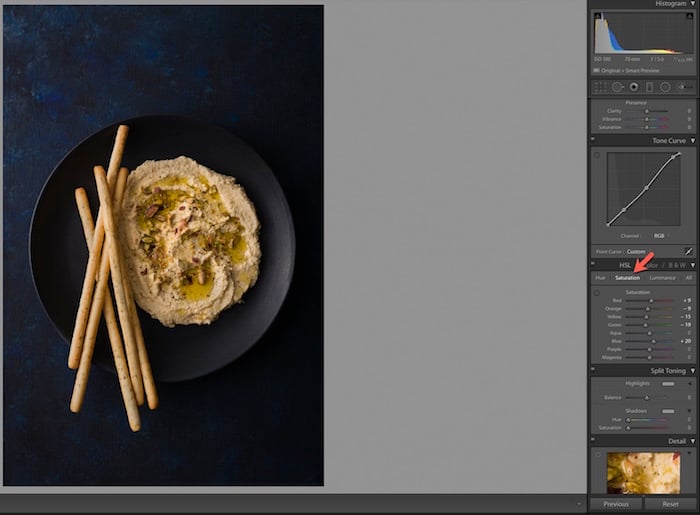
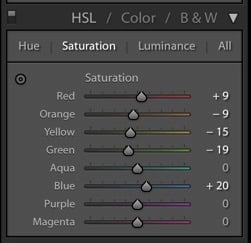
In the image below, I felt that there was too much yellow in the hummus and orange in the breadsticks. That’s why I brought down the saturation of these a bit.
Whether in the Presence panel or the HSL panel, saturation requires a light hand in the field of food photography.
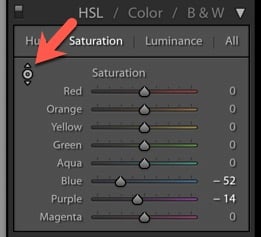
In the HSL panel, Luminance affects the brightness of the color.
This panel also has what we call the Targeted Adjustment Tool. You will find that most colors in your food photography are a combination of more colors.
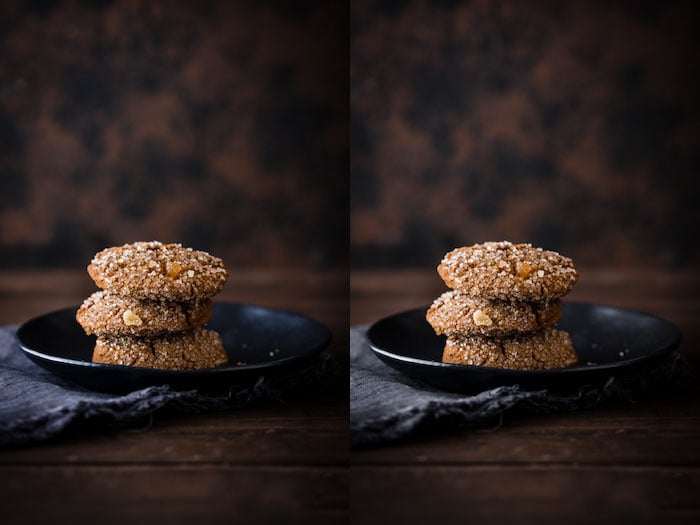
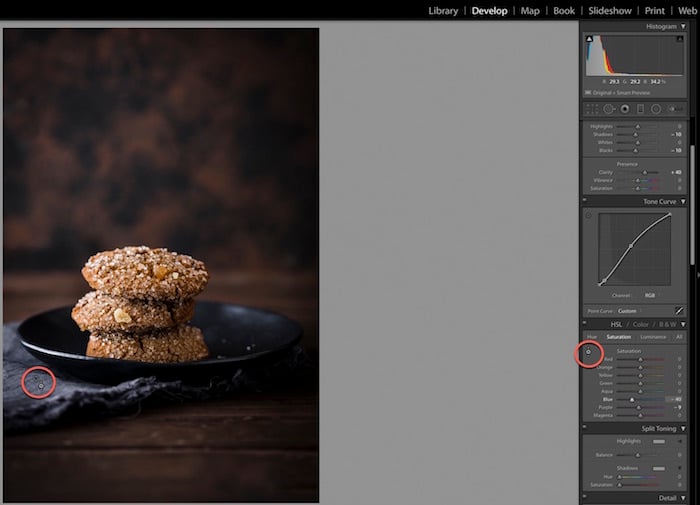
For example, in this photo of ginger cookies, the fabric looks quite blue. It’s a common problem that the render of the fabrics isn’t accurate.
I used the targeted adjustment tool to bring the blues and purples down to the true color of the linen I was using. Of course, it also changed the amount of blue and purple in the whole image. I could have chosen to keep the blues and purples as they were, or edited them to be even stronger.
This is an example of a creative decision that you, as a food photographer can make during editing. The use of this tool makes your images pop, or achieves a more monochromatic look.
You will find the tool in the left-hand corner of the panel.
Click on the tool and move it over to an area on your picture that represents the color you would like to work on. Click again and drag it up or down. The color will change and you will see the sliders edit themselves at the same time.
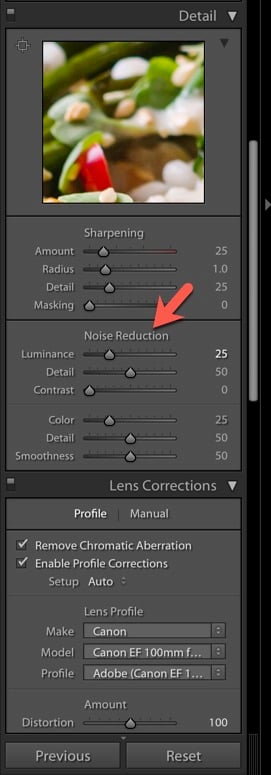
Give Your Pictures a Smoother Look
Noise is the grain that can appear throughout an image. It’s rarely a problem when you are shooting with artificial lights. On the other hand, when working with natural light, grain can appear in your images for several reasons.
Be aware of noise if you are shooting at a higher ISO or you didn’t otherwise get enough light onto your sensor.
You can edit this with the noise slider while using Lightroom. It will minimise the grain and give your food photography a smoother look. As with other sliders in Lightroom, a little goes a long way. Pushing the slider too high can blur the details and get you a plastic look.
For this photo, I set the Noise at 20. Usually, I shoot with artificial light, so I keep my ISO low. You will have more grain in your image the higher up you go with ISO.
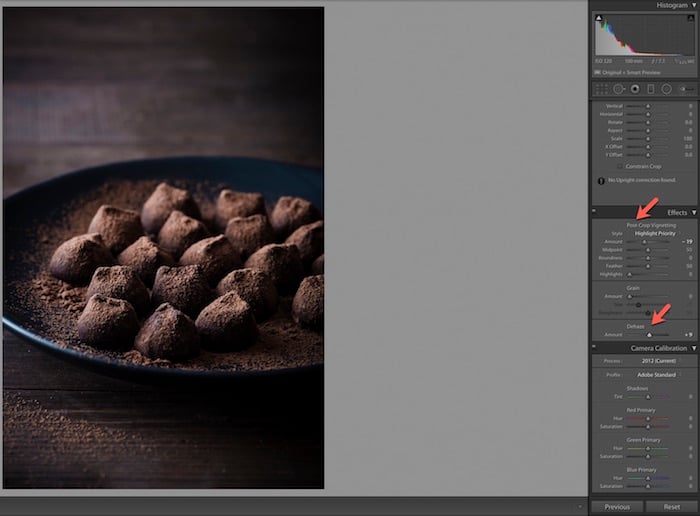
Get Artistic with Post-Crop Vignetting
Post-crop vignette adds a certain atmosphere to food photography. That’s why it can be food photographers’ go-to slider when using Lightroom for editing moody pictures. Sliding it to the left adds darkness in the corners of your image, which can draw the eye into the frame.
You can also control how wide or strong the vignetting appears in the Post Crop Vignetting panel. Keep in mind that vignetting doesn’t work well with every type of food photo.
I rarely recommend using this Lightroom slider for light and airy food photography. The exception is when you make it move a bit to the right to take care of any darkness in the corners of the image. In the ideal case, this will disappear when you are using the Lens Correction button.
We cover all the different styles of food photography in our ebook – Edible Images!
Sharpening – The Final Touch
Sharpening is the final cherry on the cake after you are 100% satisfied with your image.
Far too many food photographers use sharpening as a corrective tool for what it’s not meant to fix. Sharpening adds contrast between pixels and edges. This causes an image to look more refined.
Remember, that sharpening cannot make a blurry photo look sharp. Nor should you apply it to every part of the image.
The mistake that can ruin your food photography is sharpening the whole image. When using Lightroom, you should be careful with this tool. Sharpening will not make every part of the photo look better. We want to sharpen the food, but not necessarily the background and all the props.
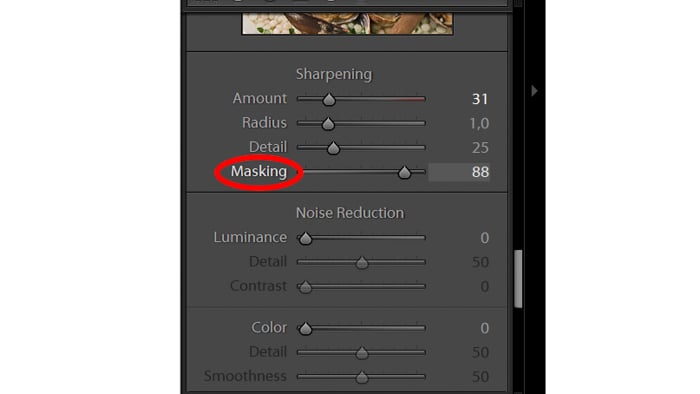
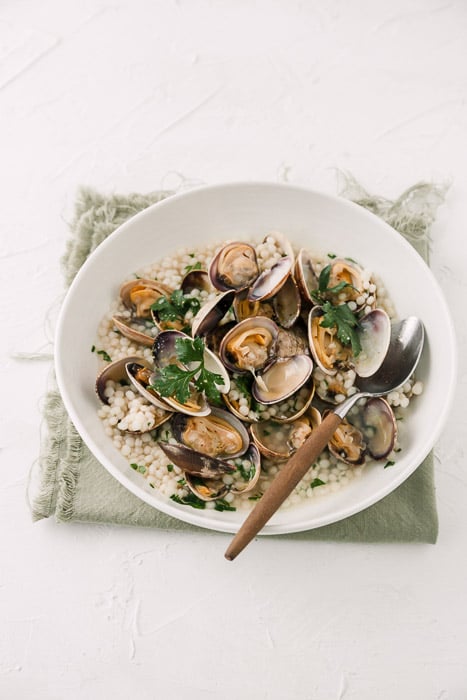
To sharpen only certain parts of your image, hold down the alt/option key. After this, click on the Masking slider under Sharpening in the Detail panel.
Drag the slider and you will see the image go black and white, almost like an x-ray. The white area shows you the area where it is sharpening.
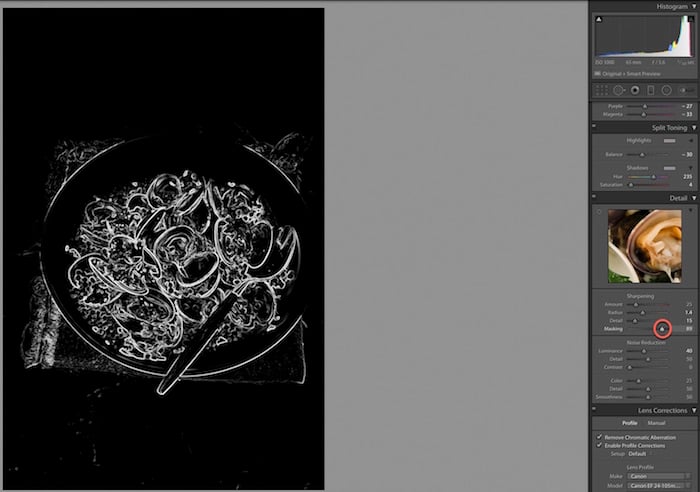
You can see in the image of the clams, I sharpened the clams and the edges of the bowl. I didn’t find it necessary to sharpen too much of the linen or the background.
Don’t forget that the amount of sharpening you need to apply depends on the medium in which your image will appear. Print work requires different sharpening than web output.
Tips for Speeding Up Your Workflow
Use Presets to Learn How Sliders Affect the Image
Presets are a saved set of instructions in Lightroom, just like a photo editing recipe. You can apply these to one photo and can add them to other photos.
Presets are particularly popular amongst wedding and portrait photographers. They generally don’t work well with food photography due to the specific needs of each photo.
If you edit with purchased presets, you may find that they need tons of tweaking. So much so that it’s actually easier to not use them. You may also find that you buy a package of presets and only use one or two.
When using Lightroom, presets can be a great starting point. Study the settings of the presets you like. Over time, you will understand how each slider affects the image and gives the final result. Through this process, you will learn which adjustments give you the desired style of food photography.
Sync Your Pictures to Save Time
Once you have finished editing your photo, you can apply the same settings to other images. The way to do it is by saving them or syncing them. This is a huge advantage that using Lightroom has over using Photoshop.
Syncing can save you a lot of time during food photography editing.
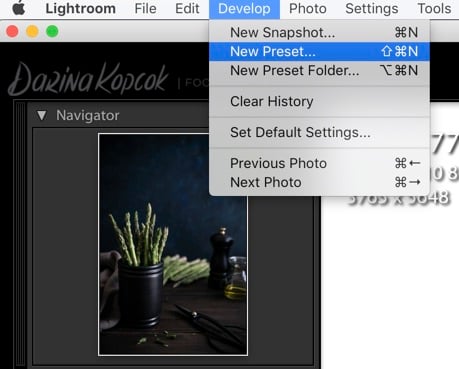
To save the settings, go up to the top right-hand corner of your screen and click on the Develop tab. Choose New Preset from the dropdown menu.
A box will pop up where you can name your preset and check off the settings in your image you wish to save. I often apply the preset to different images when editing. I save everything apart from white balance, graduated and radial filters, and transform. Every image needs specific settings in these areas.
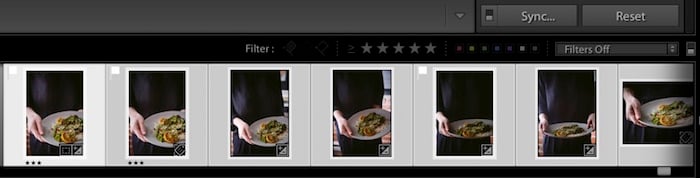
If you are editing several images and want to apply the same setting to all, you can do this by syncing them. To do this, select the food photos you want to apply the settings to.
The Sync button will appear. When you click on it, Lightroom will apply the settings from the first image to the rest of the selected images.
Editing in Lightroom Mobile
Over the past years, Adobe has released the mobile version of Lightroom. It has the same tools as the desktop version, but due to its simplicity, it is relatively faster to sync and save your pictures. This is why it can serve as a great tool for food photography editing.
If you are interested in a step-by-step guide on how to use the Lightroom Mobile, check out this article!
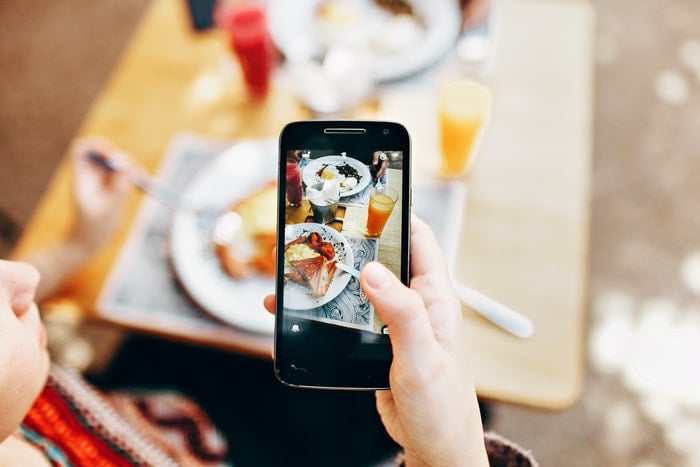
Photo by Helena Lopes from Pexels
Conclusion
Each genre of photography requires its own post-processing approach in Lightroom.
Knowing the tools to approach the settings in Lightroom helps you with your workflow. It also makes your delicious food look as appetising as possible!