Experimental photography is excellent if you’re stuck in a rut or trapped inside because of the weather. Here are 10 techniques you should try for a motivational kick.
In this article, I’ll focus on digital photography rather than film-based photography. Most of the techniques you can do without purchasing extra equipment. All you need is your camera, some everyday items, and Photoshop.
What Is Experimental Photography?
Experimental photography comes from using your camera or post-processing in a non-traditional way. It’s about taking your photographs beyond the norm to create unique art pieces. The sky’s the limit when it comes to experimental photography. It’s all about having fun and making crazy images. There’s no way you can go wrong.
Searching for “experimental photography” or “experimental portraiture” online will blow your mind with beautiful, disturbing images. Some images take a great deal of technical knowledge to achieve. Beginner photographers can also accomplish amazing experimental photography if they have a vision.
© Jenn Mishra
1. Intentional Motion Blur
Intentional motion blur is a technique where you can intentionally move your camera to blur the image. Set a long shutter speed (about a half second) to create a motion effect and move the camera while the shutter is open. You can move the camera side-to-side or up or down, or even spin the camera around.
Photographers with sure hands can set a two-second timer and throw their cameras into the air. Just be sure to catch it!
Zoom blurs are a subcategory of intentional motion blur photography. This technique works best at night. But you can also use a neutral density filter to create zoom blurs during the day. When the shutter opens, smoothly zoom with your lens. Zoom both in and out to get different effects.
2. Light Painting
Light painting uses a light source (like a flashlight) to create light trails in an image. All you need is a dark environment.
Mount your camera on a tripod and set your shutter speed to 30 seconds. While the shutter is open, move a light source through the frame. If you move fast, you will disappear, but the light will burn onto the image.
Run, dance, write. Do anything you’d like!
Incorporate light painting into a portrait for a dynamic background. A stationary person or object will show in the frame. Photos of spinning steel wool are popular online. If you use this experimental photography technique, choose a place that won’t catch fire. Be ready with a fire extinguisher if something goes wrong.
In the photo below, a friend of mine spun burning steel wool with a cooking whisk held by about a half-meter of string. They started walking from the far end of the bridge towards the camera.
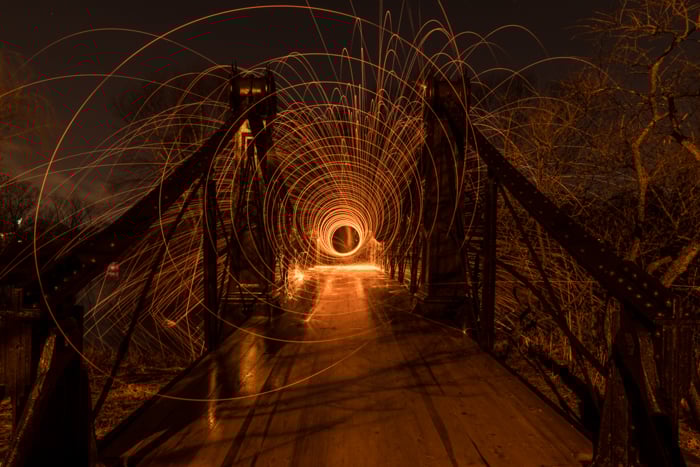
20 seconds at f/11, ISO 320. © Jorge Restrepo
3. Soft Focus
Photographers spend a lot of time trying to get photos in focus. But creating an out-of-focus image sometimes better captures a mood or a shape. Throwing the image out of focus softens the subject, leaving only an impression. This is like Monet painting water lilies.
A very wide aperture (like f/2.8) can create images where most of the frame is out of focus. With impressionistic focus, there’s no need to have any part of the image in focus. Experimental photography techniques like this can be used in a number of environments and photographic genres.
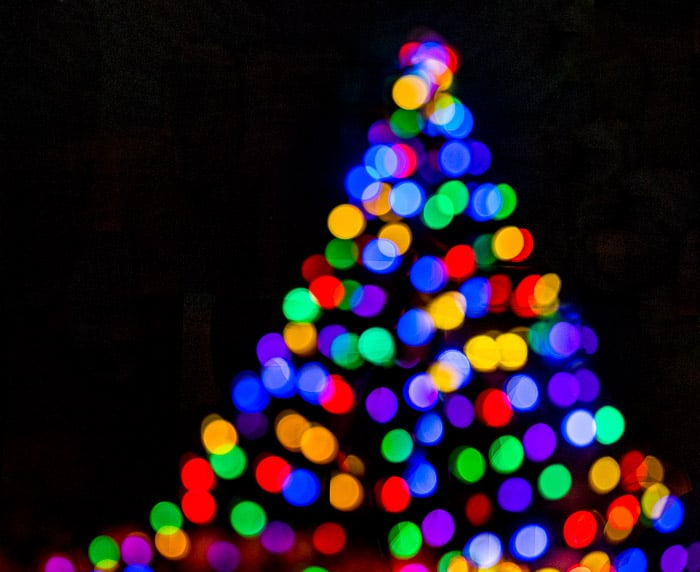
Set your camera on manual focus and experiment with blur. This Christmas tree was much more interesting with its lights out of focus. The in-focus version showed details like the wires connecting the lights. The blurred version is much more subtle.
4. Projected Image
Projecting light, shapes, and colors onto a surface adds dimension to an image. The surface can be anything—a backdrop, an object, or even a person. Some photographers place green screens behind their subjects. The green screen is later replaced with fantastic backdrops.
Using a projection technique can create experimental and even abstract portrait photography. Photographer Eric Burke uses projectors to cast shapes and textures onto his models, which creates photographic body art.
Two projectors were used to create the image below. One projected onto the background and the other on the model. The model’s face was wrapped in a piece of fabric that captured the details of the projection.
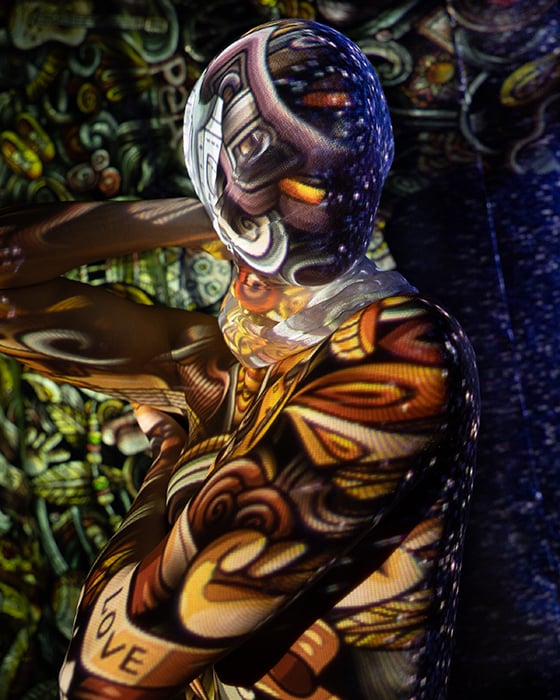
© Eric Burke
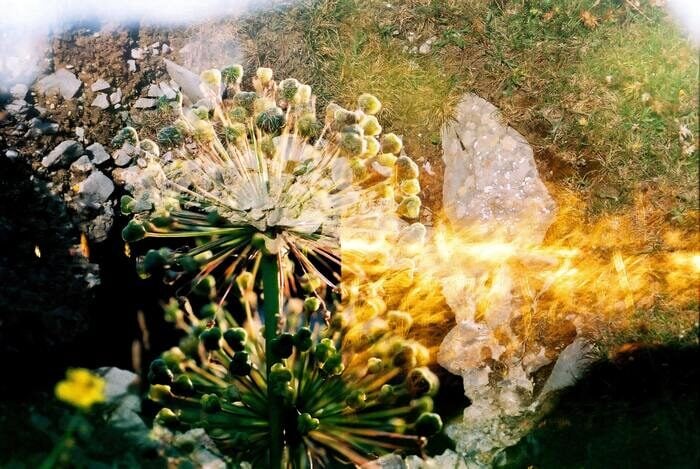
5. Alternative Filters
Filters can be much more than neutral density or polarizing filters. Anything in front of the lens is a filter. Wrap your lens with a sheet of clingfilm or sheer fabric. Or find an opaque surface: an old window with warped glass, a plastic bottle, or flowing water.
Photographing through alternative filters will create unique effects in your images. You can also create unique bokeh effects by cutting a shape in an index card and holding it in front of your camera.
Look around the house and see what you have to play with. Some alternative filters you’ll like, and others you won’t. That’s the fun of experimental photography. It’s all about exploring your artistic voice.
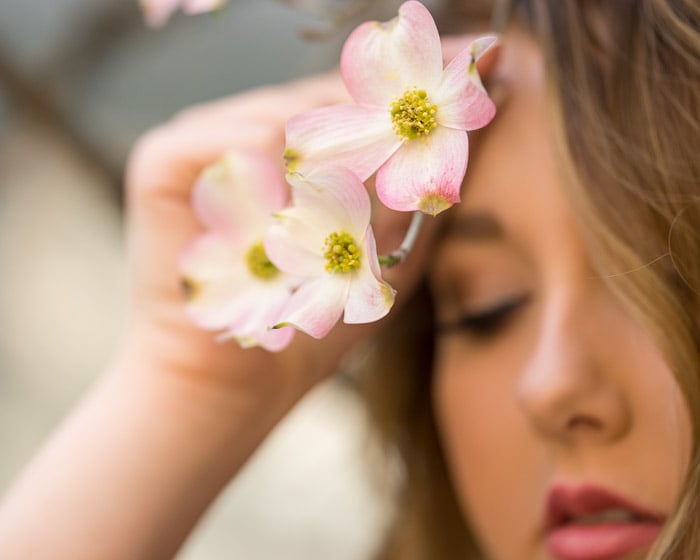
Lens Baby makes a series of lenses with unique effects if you want to pursue these types of looks further. I photographed this model through a glass door. The reflections create a hazy filter.
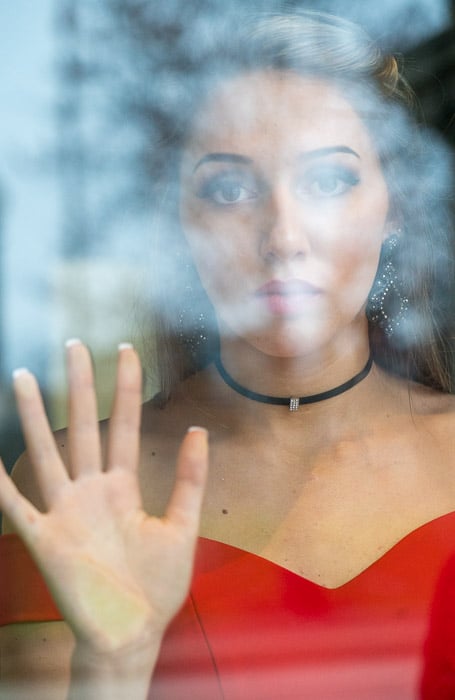
1/160 s, f/4.0, ISO 5000. © Jenn Mishra
6. Double Exposure
Double exposure is when you layering two images on top of each other. You can layer a landscape over a close-up of an animal or flower. Or, layer a cityscape over a portrait. Double exposures can add texture to a picture or add to the story.
Film photographers discovered this technique. A double exposure happens when the shutter is clicked again without advancing the film. It is a great way to play with experimental photography.
Many digital cameras can be set to take double exposures. Since my camera (Sony a7R III) does not do double exposures, I use Photoshop. I created two layers with two different images.
There is usually one primary image and one overlay. I usually reduce the opacity of the overlay. Then, I try different blend modes to merge the photos. In the image below, I layered two photos of the same staircase taken from different angles.
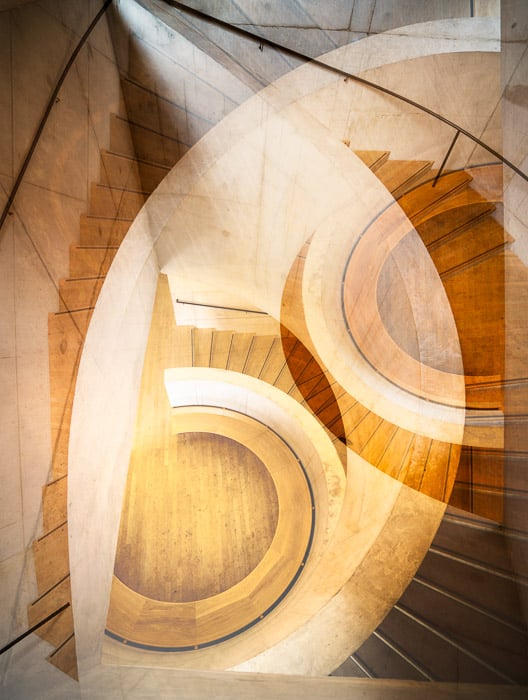
My settings for both photos were 1/30 s, f/4, and ISO 200.
7. Mirroring
Mirroring is copying and flipping an image in Photoshop to create a reflection. Mirroring is one of many alternative photography processes available in Photoshop.
I use this technique to create reflections in the water that may not have existed in reality (but should have!) I copy the image in Photoshop and flip the copy vertically. To make the scene more realistic, I add ripple filters. You can also use the mirroring technique to create unique shapes.
Here is a photo of fireworks over the Gateway Arch with a reflection added in post-processing.
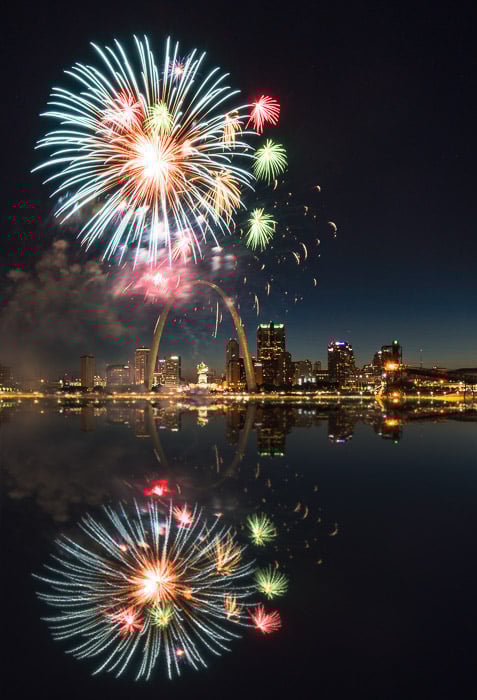
2 seconds, f/11, ISO 100. © Jenn Mishra
8. In-Camera Effects
Many digital cameras have picture effects built into the camera. On my Sony a7II, I have effects like a toy camera, selective color, and posterization. These effects are great for playing with experimental photography.
These effects change the look of your photographs. Some add a color filter, while others add a painterly effect. Select an effect, and your camera will apply this effect to every picture you take.
Look in your camera’s menu to see what picture effects are available. You may have dozens of options to experiment with. Here are six of the effects my camera will add to photos.

Original (top left). From left to right, the effects are posterization, retro, soft focus, miniature, and illustration.
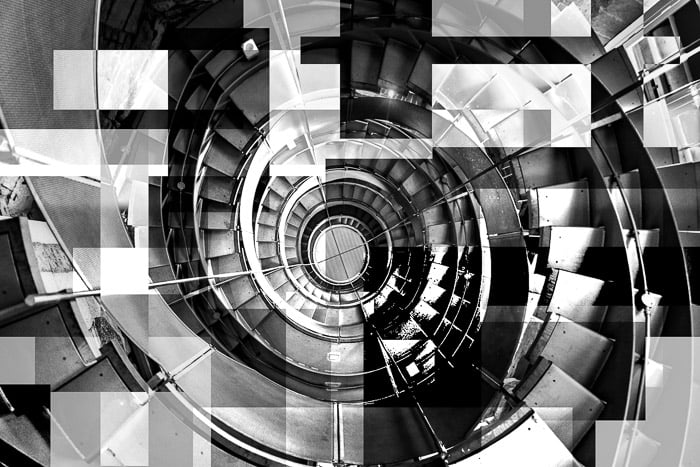
9. Montage
Montages are photographic collages. Images, or parts of images, are layered together to create a new scene. Some photographers seamlessly layer the images, creating a unique world. Other photographers let the viewer see distinct images as separate yet connected.
You can use the photo montage approach to create texturing and depth in images. Slice up a photo and place each extract on its own layer in Photoshop. Then, you can change the blend modes and opacity.
I montaged this spiral staircase by layering slices using different Photoshop techniques. This is a great way to really push experimental photography.
© Jenn Mishra
10. Photoshop Filters
If you need more experimental photography techniques to play with, this final one might keep you busy for a while. Applying Photoshop filters to images can completely change your photos. Let’s look at two popular filters.
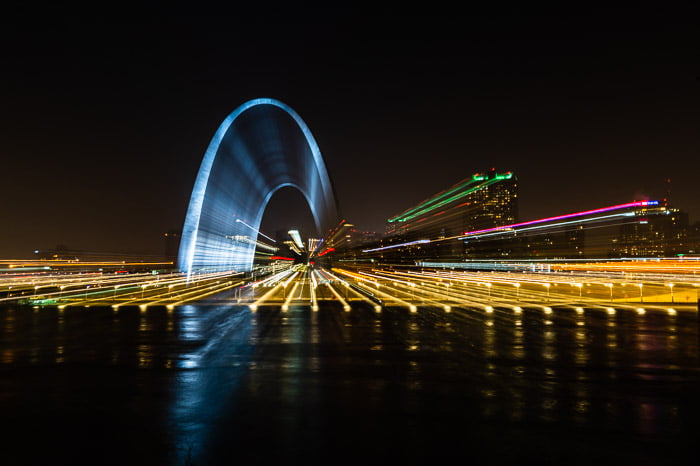
Polar Coordinates
Here’s a fairly easy trick if you’ve ever seen circular images online and wondered how to create these. Apply the polar coordinates filter in Photoshop. Using the photo of the fireworks over the St. Louis Gateway Arch, I created a square crop in Photoshop. Then, I selected Filter > Distort > and Polar Coordinates.
I played with both Rectangular to Polar and Polar to Rectangular choices. I also tried flipping my image upside-down. These options create different effects. Some images work better than others, and that’s part of the experiment. Here is an Image of the St. Louis Gateway Arch under fireworks.
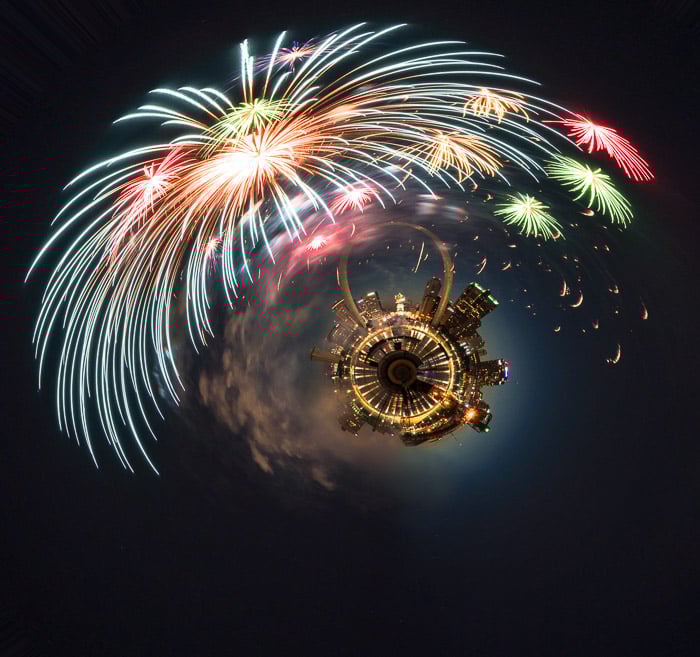
© Jenn Mishra
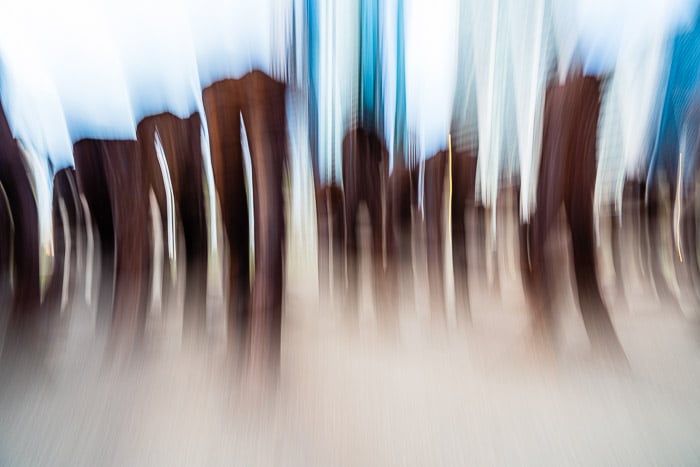
Liquify
Many portrait photographers use the Liquify filter in Photoshop. The filter lets portrait photographers change the size and shape of the model’s face, nose, eyes, etc.
You can create Dali-inspired experimental portraits if you go too far with this tool. But I use the liquify tool to add all kinds of distortions to my images.
Selecting Filters > Lquify in Photoshop will bring up a new editing tool. Play with them all, a little change goes a long way.
If you don’t use Photoshop, look at the tools in your post-processing software. Or try a new photo-processing app. My favorite is the free app Adobe Express. Here is a before-and-after comparison of a photo taken of the supports under a railway bridge. The bottom image shows distortions created in Photoshop’s liquify filter.
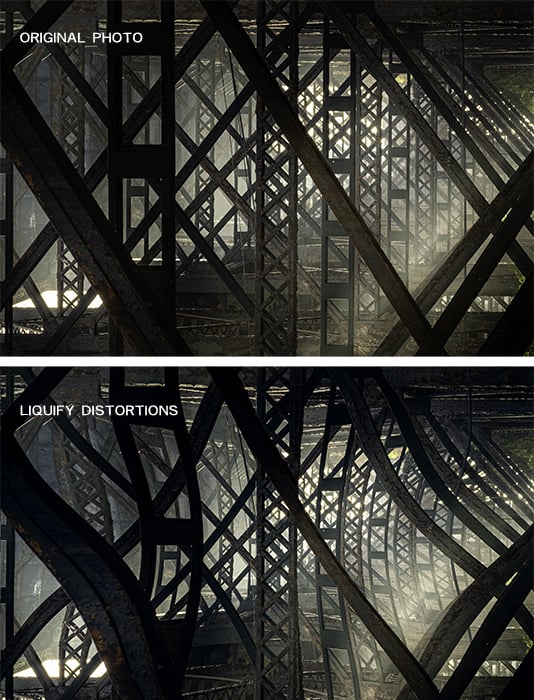
© Jenn Mishra
Conclusion: Experimental Photography
These 10 experimental photography techniques will help spark creative photography ideas. There are also plenty of others you can try.
Play with alternative photo-making equipment like pinhole, toy, or infrared cameras. Or try your hand at alternative film processing techniques.
Experimental digital photography is anything outside the norm. It is about exploring what is possible with your camera and even what can be defined as a "photograph." Have some fun, and use your camera and post-processing tools creatively.