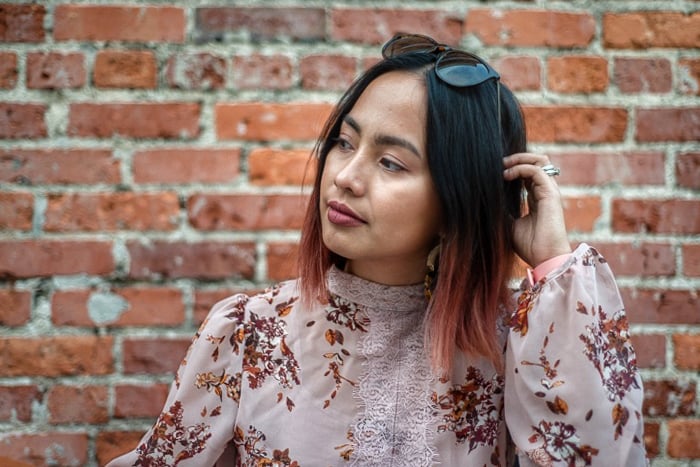
People often think of HDR as a technique exclusively used for landscapes and still lifes. But it's also perfect for taking pictures of people. In this article, we'll show you the step by step process for taking HDR portraits.
Creating Stunning HDR Portraits: What Does HDR Mean in Photos?
Before we teach you the HDR portraits technique, let's discuss what it is and what it does.
Even the best cameras can’t show both highlights and shadows accurately in one shot. That's why when you have to photograph a scene with strong contrasts, you often end up with images that look blown out.
This is where HDR, or High Dynamic Range, comes in. It manipulates a photo so it can display both bright highlights and dark shadows. It’s a great tool to use if you find yourself in a complicated lighting situation.
The secret to HDR's effectiveness is that it combines several photos with different exposures. It uses the dark shadows in one photo and bright highlights in another to create a composite with the perfect lighting.
HDR used to be a complicated technique only used by professionals. But now, most cameras have this feature. And even editing suites such as Photoshop now allow you to seamlessly combine images for HDR with a few simple steps.
Set Your Camera to Manual or Aperture Priority
The first step to creating HDR portraits is to set your exposure settings. This is crucial especially since you need to take several photos with various exposures to create an HDR image.
You can either use Manual or Aperture Priority for this step. Both settings work excellent for HDR photography. Choosing which one to select is all a matter of preference.
If you're still nervous about tinkering with Manual Settings, then Aperture Priority would be perfect for you. Once you're in this mode, all you have to do is select your aperture setting. The camera will then choose the shutter speed for you.
Since you're doing portraits, it would be best to use f/1.8 or f/2 to get the background blur that you want.
If you're comfortable with Manual Mode, then feel free to choose this setting instead of Aperture Priority. Doing so will allow you to adjust your exposure yourself.
Once you choose your aperture, such as f/1.8, adjust your shutter speed accordingly until you get a well-exposed image.
Create a Series of Exposures With Bracketing
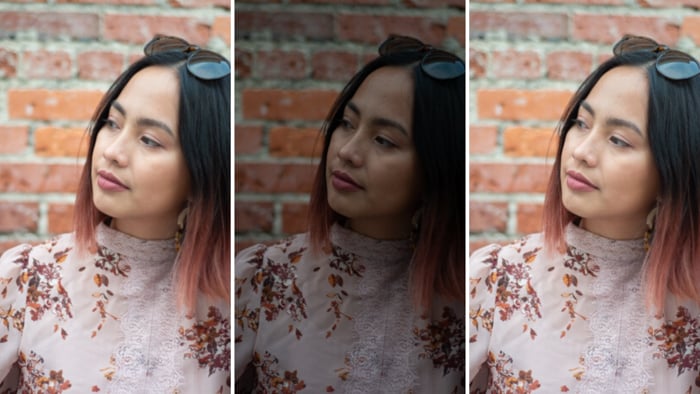
Bracketing is a camera feature that lets you take several images with various exposures. Its purpose is to give you different options when you find yourself in challenging lighting conditions.
Since HDR also requires different exposures, bracketing would be the best option to use. Instead of manually setting the exposure before taking a photo, you can do it all automatically through this feature.
Activating Bracketing differs from one camera to another. Some have buttons that are easy to access, while others are hidden in the menu. Consult your manual to help you find this option on your device.
When activated, your device will give you the option to adjust the number of photos and the exposure increments you require.
In most cases, you get to choose between two to five images that have varying exposures. Three photos are often enough because it lessens the chances of your subject moving while you're shooting.
Bracketing also allows you to adjust the exposure increments. In other words, you get to choose how dark or bright you want each of your subsequent photos to become.
Many cameras let you select up to 5 stops of exposures (five being the most drastic). For HDR portraiture, ½ or 1 stop increments are often enough.
Once you finish adjusting your bracketing settings, all you have to do is press the shutter and hold it. Your camera will then take the number of photos you specified.
When you check your pictures, you should see a sequence of photos with different exposures.
Things to Remember When Shooting HDR Portraits
HDR portraiture is a bit different from regular portraiture. Since you're taking multiple photos, the process is longer and requires some skills to achieve. But don't worry, we'll give you a few tips to make everything easier for you.
Keep Your Camera Still
When taking HDR portraits you'd want everything to stay still. So make sure you set up your camera on a sturdy tripod.
It would also help a lot if you use a remote instead of your fingers to activate the trigger. Doing so will help eliminate the chances of camera shake.
Keep Your Subject Still
Remember that you'll be taking at least three images of your subject. If they end up moving in one of those shots, there's a good chance you won't have a great final photo.
Tell them to stay still for as long as you're taking pictures. It would help a lot if you have them lean against a wall or sit on a chair.
Turn Off Autofocus
If you use autofocus, there's a good chance it may move while you’re shooting even when you don't want it.
To be safe, turn it off and set the focus yourself, instead. That way, the lens will not adjust accidentally once you press the shutter.
Merge Your Images to Create an HDR Photo
There are tons of HDR software out there. But we're going to teach you post-processing HDR techniques using Photoshop because it's the most common editing program around.
Back then, editing HDR required a lot of steps. But thankfully, Photoshop now offers a simple way to do it.
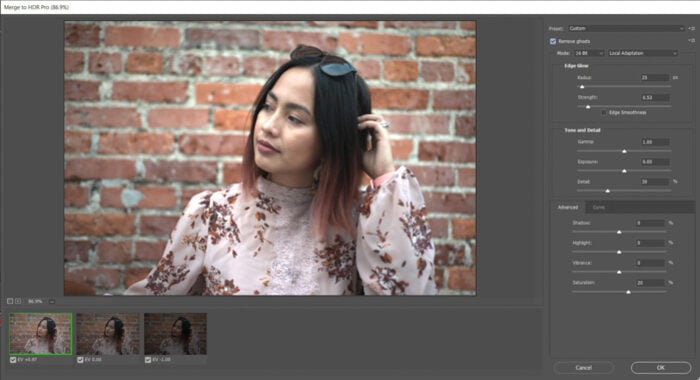
Once you open the program, go to Files, click Automate, and select Merge to HDR Pro. When a dialogue box pops up, click Browse and select the files you want to edit.
Make sure Attempt to Automatically Align Source Images is checked. Doing so lets Photoshop correct the minor movements caused by either your camera or your subject. Then click OK to load the files into the program.
Once the files finish loading, a dialogue box will appear with all the adjustment tools you'll need for HDR. Before you make the adjustments, check Remove Ghosts to eliminate the halos that may happen when merging the images.
Next, go to the first section in the dialogue box which is the Edge Glow. The term simply refers to the halo you typically see in HDR images.
If you want the hyper-edited look, then feel free to bring up the Radius and Strength. But if you prefer a more natural result, then lower the levels instead.
Next, we have Tone and Detail. Adjust the Gamma is for the dark tones and Exposure for the overall brightness of the image. Once you tweak those settings, move the Detail slider to bring back the fine points and the texture of the image.
Finally, we have Advanced and Curve adjustments. This is where you can tweak the Shadow, Highlight, Vibrance, and Saturation of your photo.
Once you're satisfied with the adjustments, click OK and you have an HDR image!
Refine Photos in Photoshop or Lightroom
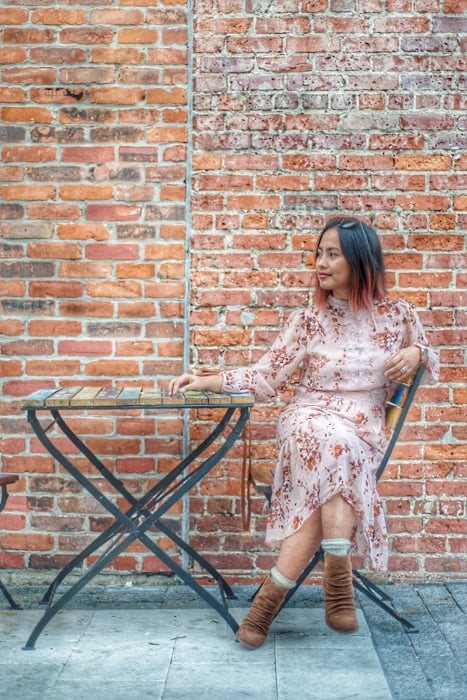
The HDR image that Photoshop produces may not always be perfect. After you merge your images in the program, consider retouching them in Photoshop or Lightroom.
The main adjustments settings you'll need to consider are Exposure, Highlights, and Contrast. Why? Because these are the ones that the HDR program tends to overshoot.
You might find that your image looks a little too dark or the highlights look blown out. Then you'll need to tweak your image some more using the regular editor.
You can further refine your image by adjusting your tone curve. Although Photoshop's HDR feature includes Curve adjustments, it doesn't always create the best results.
If the shadows and highlights still look off after you process the photo in HDR Pro, try moving the Highlights, Lights, Darks, and Shadows sliders.
Try Creating HDR Effects on Your Phone
You might not like using a camera for HDR because the process is too complicated. Then you can try your phone, instead. All you have to do is turn on HDR Mode in your native camera app and start taking pictures.
Apart from your native camera app, there are also tons of programs out there you can use to create HDR. Some of the best ones include Camera +2 and Lightroom Mobile.
You can also fake an HDR look by using HDR apps. Some of the best ones include Photo Editor HDR FX and HDR Max. You can also use regular editing apps such as Snapseed to create the effect.
When using a mobile editing app to create an HDR image, all you need is one picture. Unlike the traditional HDR method, it doesn't combine the shadows and highlights from several files.
Instead, it adds a preset that exaggerates all the details and lighting to create a faux HDR photo.
Of course, every app is different. But generally, most of allow you to adjust the amount of HDR effect you want. So if you don't like strong contrast and saturation, you can lower the levels to make everything look natural.
Conclusion
It's easy to slap on an HDR preset on your phone. Consider learning the real HDR technique. Remember that HDR is more than just the look. It's also about bringing out the details and lighting that would otherwise be impossible to achieve with conventional photography.
Go out there and practice taking HDR portraits. You'll find it useful when you find yourself in tricky lighting conditions.


