Just as there are different types of cameras and lenses for wildlife photography, there are also a variety of filters that can help you take better pictures. Here are nine of the best filters for wildlife photography in 2022.
Camera Bag and Filters For Wildlife Photography
A camera bag is a necessity for wildlife photographers. It will safely carry your camera and accessories. And it will protect your photography gear from the elements.
If you carry around big items, such as a laptop or long telephoto lenses, make sure to check measurements and look for a bag that is big enough for everything.
I personally use the Wandrd Prvke backpack when I am out to shoot wildlife.
It is big enough to hold two telephoto lenses at the same time.
It also has a tripod holder with a quick release strap. This is really handy. It will make your life as a wildlife photographer much easier. Your tripod will always be within easy reach.
In fact, many camera bags don’t have this feature.
Another really great camera backpack is the Manfrotto Pro Light Multiloader.
It also comes with an external tripod holder and won’t break the bank. It has a rain cover and is big enough to hold three wide angle lenses, two camera bodies, and other small camera accessories.
If you are looking for even more space then the Lowepro Whistler BP 450 AW XL Pro Grade is for you. It’s the perfect choice for wildlife and adventurer photographers.
It can hold a pro DSLR (such as the Canon EOS-1DX Mark II or Nikon D4s), up to three lenses, external flashes, action cameras (such as GoPros), outdoor gear (such as ropes, binoculars and torches) and other personal items.
As a wildlife photographer, you should be able to walk or hike long distances freely, so a good camera backpack is just a must!
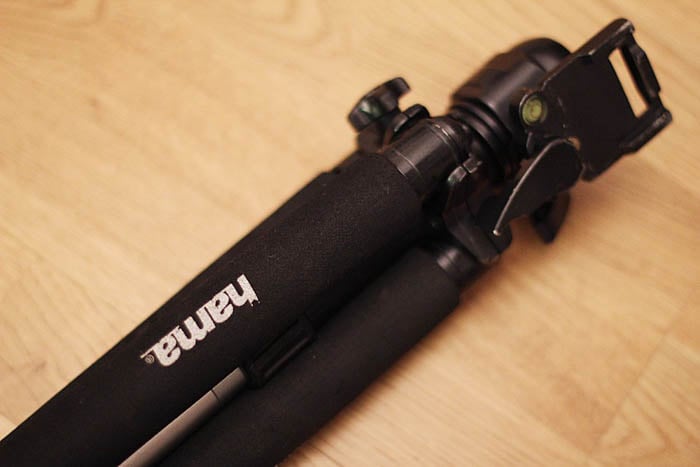
Tripod
A sturdy tripod is another must-have item for wildlife photographers. It’s especially useful if you are shooting under poor light conditions with very long shutter speeds.
There is no chance to get blur free images when using a shutter speed below 1/60s. Not even the calmest hands can manage that.
This is where a tripod comes in handy, to avoid camera shake during exposure. When using a slow shutter speed, even the slightest camera movement can cause blurriness.
As far as models go, I recommend the Manfrotto Traveler BeFree Tripod is for you. It's a very steady all-round tripod, very compact and lightweight, and it has a beautiful design.
It’s suitable for both macro shots and for ground-level photos.
A tripod will allow you to get photos that you never could have otherwise. Before buying a tripod, you could also visit a local camera store to eye up different options. You might even be able to try them before purchase and see if they’ll do the job for you.
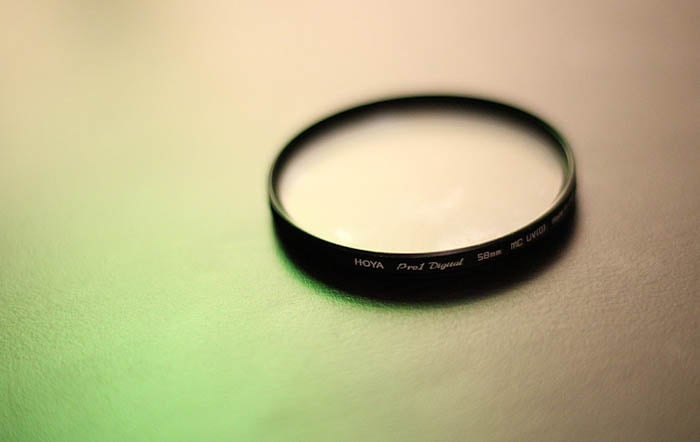
Filter
Filters not only protect the surface of your lens, but also help you get higher-quality images in difficult light conditions.
Choosing the right camera filter is not always easy. Here are a few types of filters useful for wildlife photography:
UV-Filter
Like all filters the UV-filter protects your lens from dirt, moisture, dust and scratches. They also block out unwanted UV light and reduce haziness in images taken in very bright sunny conditions. UV filters are also usually quite cheap.
Polarizing Filter
Polarizing filters are mainly used by landscape photographers to add more contrast to their images, reduce reflections and darken skies. They also increase overall color saturation.
Another good reason to buy a polarizing filter if you’re shooting wildlife is that it will allow you to reduce the haziness in your images. Haze is something landscape photographers often have to deal with.
Neutral Density Filter
These filters are useful in really bright light conditions. They help prevent overexposure. ND filters are also helpful when the contrast between shadows and the highlighted areas is too great for a good quality shot.
Cheap neutral density filters often lead to ghosting. Be sure to buy a high-quality density filter to receive the best image possible.
Also, make sure you know the size of your lens before you buy a filter. Some filters are available in 52mm, 62mm, 72mm or 105mm.
You will usually find the needed filter size on the back of your lens cap. Your filter will also need to be cleaned every now and then. This will affect the image quality if your filter is dirty or full of fingerprints.
Tele-Converter
If you work with long focal lengths to photograph wild animals, a tele converter is another must have. The main idea behind a tele converter is that it will extend the focal lengths of your lens.
Tele converters come in different factors. These vary from 1.4x to 2x. For example, if you are using a 200mm prime lens combined with a tele converter that has a 2x multiplication factor, your 200mm lens will become a 400mm lens. If you combine a 200mm lens with a 1.4x tele converter you will get a focal length of 280mm.
So with a 1.4x tele converter you will get an extra focal length of 40%. And with a 2x tele converter you will double up your focal length. Pretty cool, right?
Yes it surely is! Tele converters unfortunately also have a few disadvantages.
Using a tele converter will automatically decrease the maximum aperture value of your lens. This means if you are using a 1.4x tele converter, you will lose one stop. If you use a 2x tele converter, you will lose two stops.
Also, tele converters generally tend to reduce the sharpness of your images. To avoid that, use high quality tele converters to still have a great overall image quality.
If you are a Canon user and want to double up your focal lengths, the Canon EF 2.0X III Tele Converter is a good choice.
For Nikon users I would recommend the Nikon Auto Focus-S FX TC-20E III tele converter. Like the Canon one, it’s capable of producing excellent sharpness.
When taking images of calm wild animals, a tele converter can be a very useful camera accessory. It will let you photograph subjects without disturbing them.
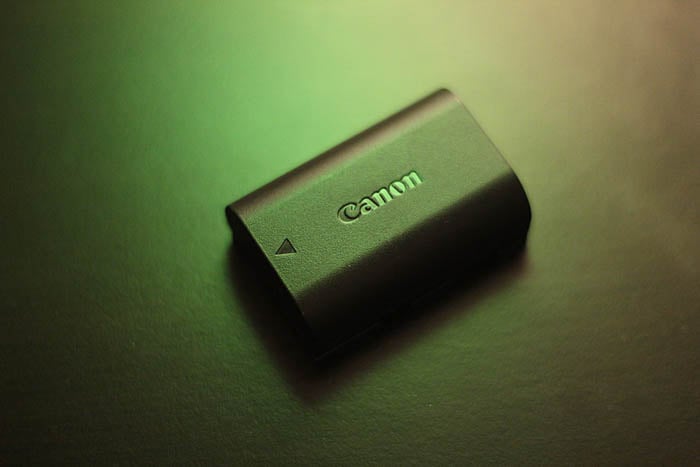
Spare Batteries
Imagine you are on a photo trip and you suddenly realise that you forgot to charge your batteries. That's every photographer’s worst nightmare.
To avoid it, bring along an extra fully charged pack of batteries. If you’re shooting in the cold, this is doubly important as batteries tend to drain faster at lower temperatures.
Also, if your batteries are old, they hold less power. So plan for that as well.
I would recommend not buying cheap third-party batteries to save money. They might not be compatible with your camera body and could cause damage to your camera. And you risk losing your warranty.
So if you’re using a Canon camera, use Canon batteries. Same goes for the other brands, Nikon, Sony, etc.
Another great way to provide your camera with more power is to use battery grips.
Battery grips also provide more comfort, as it will be much easier to hold your camera. Some models even have small compartments to store memory cards or a remote shutter release.
For example, if you shoot with Canon, the Canon Battery Grip BG-E16 is a great choice if you want to double your shooting time.
For Nikon users, I would recommend buying the Nikon MB-D15.
With a battery grip you are on the safe side. You will have twice the battery life you usually have and won’t need to stop in the middle of a shoot to change batteries.
Binoculars
As an outdoor photographer, you should definitely invest in a pair of high quality binoculars.
When it comes to wildlife photography, these are a must for birding and wild animal observation.
I use them when I want to photograph an animal species that I haven't photographed before. Staying in the background at first with my binoculars allows me to observe them and find out more about their behaviour.
Binoculars come in different magnifications, and all of them are identified by 2 numbers. So a 10×42 binocular will have a magnification power of 10. This means that the object of matter will appear 10 times closer than it would normally.
The second number refers to the diameter of the binocular lens. Binoculars with a larger diameter number allow more light to pass into the glass. The will appear much brighter, clearer and you will have a better viewing experience in total.
But mind that the larger the diameter number, the heavier the binocular will be.
For outdoor photographers I would recommend buying binoculars with a magnification power between 7x to 10x.
Make sure your binoculars are also waterproof. This way you’ll be able to observe animals under bad like snow or rain.
Before buying binoculars online always check the reviews. These will help you decide on the best pair. Also, some binocular stores offer the option to test the binoculars before you buy them.
I would definitely recommend that. It’s a good way to make sure the binoculars fit your eyes right and are comfortable to use.
Here are a few binoculars that I would recommend.
From 50$ to 100$:
Wingspan Optics Spectator 8X32
Gosky 10×42 Compact HD
From 100$ to 300$:
Nikon 8252 ACULON A211 10-22×50 Zoom Binocular
Celestron 71332 Nature DX 8×42
Bushnell Legend Ultra HD M-Series 10x 42mm Binoculars
From 300$ to 600$:
Nikon 7548 MONARCH 7 8×42 Binocular
Vortex Optics Viper HD Roof 10×24 Prism Binocular
From 600$ to 1000$:
Nikon MONARCH HG 10X42
Swarovski CL Pocket 10×25 Binoculars Green
Rain Cover
There is no way around using a rain cover for your camera when the weather’s bad. Water can easily harm the electronics of your camera. A cover will protect your gear from rain, snow, fog or other humidity and atmospheric influences that mother nature throws at you!
For photographers who use tele lenses, I would recommend the LensCoat® RainCoat 2 Pro. This provides perfect protection for your camera and your tele lens, not only from rain and snow, but also from sand, dirt, dust and salt.
The LensCoat® RainCoat 2 Pro is very easy to fit on your camera. You will still be able to access to the camera and lens controls.
It is built for lenses ranging from 200mm to 400mm focal lengths.
If you’re on a tighter budget, I would recommend the OP/TECH rainsleeve. It is very cheap and fits lenses up to 18″ L x 7″ diameter.
Photo Blind
Wildlife photography can be quite challenging. As a wildlife photographer I know how hard it is to approach wild animals. I also know that it can also be very rewarding once you get that shot you’ve been dreaming of.
How close you can get to the animals always depends on the certain species you want to photograph. Some wild animals tolerate the presence of humans while others don’t.
Using a photo blind will definitely increase the chances of getting close to wild animals. It’s especially god for photographing shy animals. It allows you to become invisible to them.
Also if you’re photographing endangered species, a photo blind is necessary to avoid disturbing them.
Photo blinds typically have a camouflage pattern. This way you can blend in better with the wildlife that surrounds you. They also have gaps and windows where you can stick out your lens.
Some photo blinds provide more space than others, and those are usually more expensive. Having more space does mean more comfort, or even the possibility to share with another photographer.
I personally use the B.I.G. Bird Watching photo blind. It’s really easy to set up and you can use it under different weather conditions as it’s made out of high quality waterproof material.
It’s not too expensive either and has everything you could need to get close to wild animals.

Additional Memory Cards
I would recommend every photographer always bring along additional memory cards. Just to have enough storage space in case your other memory cards are full.
Memory cards often have limited capacity. If you are shooting in RAW, I would definitely recommend buying a memory card with at least 32GB storage space.
Always find out first which format your camera requires before buying a memory card. The most usual memory card format is SD (Secure Digital). Less common memory cards are CompactFlash cards, CFast cards and XQD cards.
Also, don't buy a memory card with huge capacity like 64GB. I would recommend buying two 32GB memory cards. Just imagine having bought a 64GB memory card that you lose on a photo trip.
If you own a lot of memory cards, a memory card wallet can be a great way to store all of them.
Conclusion
This list of accessories can go on and on. There’s many things that a wildlife photographer needs and as you take more and more pictures of animals, you’ll start figuring out what YOU need.
But these 10 accessories are a must-have for any beginner. And they will cover most of your needs as a wildlife photographer even as you get more advanced.
They’ll help you improve the quality of your pictures, save your spine, and allow you to approach those skittish animals.
In short – these items will make your life easier as a wildlife photographer.


