If you’re a photographer, then you know that Lightroom is one of the most important programs in your workflow. But what if you’re on the go and can’t access your computer? Or maybe you just want to edit photos quickly and easily on your phone? In either case, the Lightroom app is a great solution.
Downloading the Lightroom App: Where to Get the Lightroom Mobile App
Lightroom Mobile version is available on both Android and iPhone. The downloading process is just like any other app. All you have to do is go to the app store and download it.
Is Adobe Lightroom mobile free? Yes, the app is free to download and use. The only caveat is that you'll need an Adobe Creative Cloud account to use all of Lightroom Mobile's features. If you already have a Creative Cloud subscription, all you have to do is sign in. In this way, you don’t have to pay to unlock the editing tools. Otherwise, some features will remain paid functions.
As a paid Creative Cloud subscriber you’ll get mobile access to selective edit tools and the ability to edit raw files. You can also sync your mobile app to any version of Lightroom.
But Lightroom CC Mobile is a powerful app for making photo edits, whether you have an Adobe Creative Cloud subscription or not.
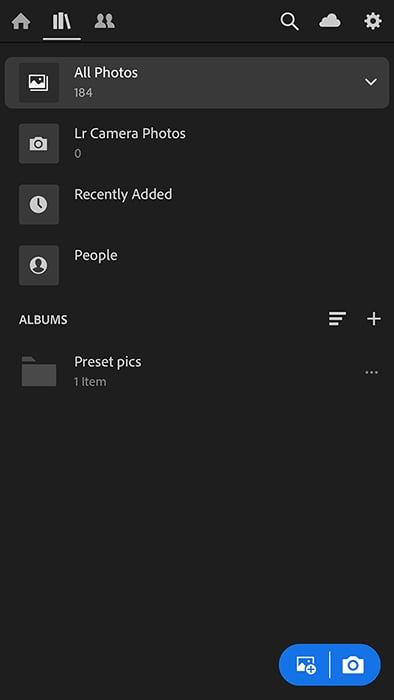
The Lightroom mobile home screen shows your folders for organizing.
In many ways, the photo editor app serves as a supplement to your desktop Lightroom. It allows you to work on your photos even when you're not on your computer.
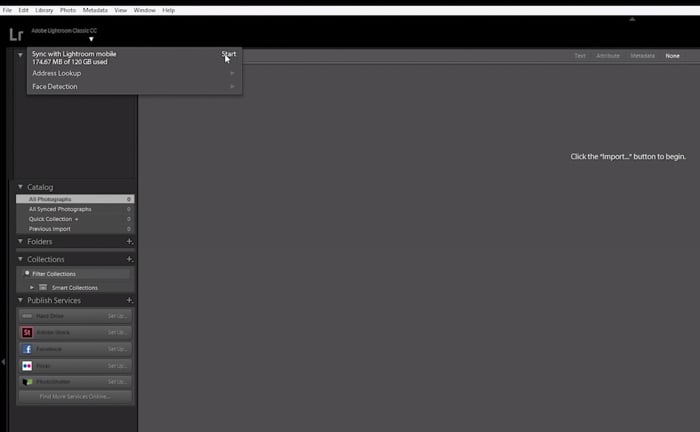
In fact, you can even sync your desktop collection with your phone. To do this, you'll need to open your Lightroom desktop app.
Click the Library tab then click your name in the upper left side of the screen. Then select Sync with Lightroom Mobile, and you're good to go!
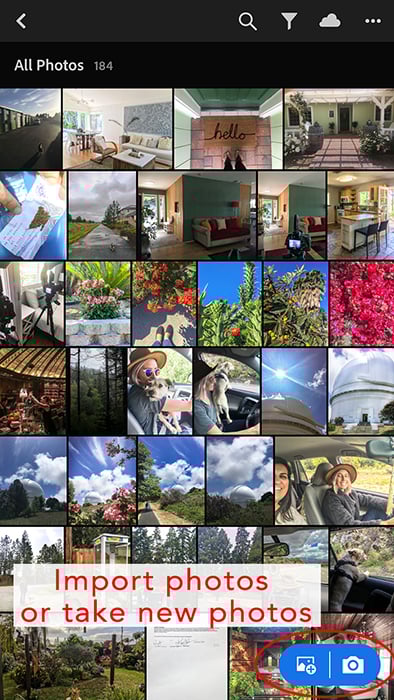
The gallery screen also has the icons at the bottom to import or take photos.
How to Take Pictures With the Lightroom App
Now that you have the Lightroom app on your phone, it's time to learn how to take photos with it.
To start, tap the Lightroom icon on your phone and select the camera icon in the bottom right corner of the screen.
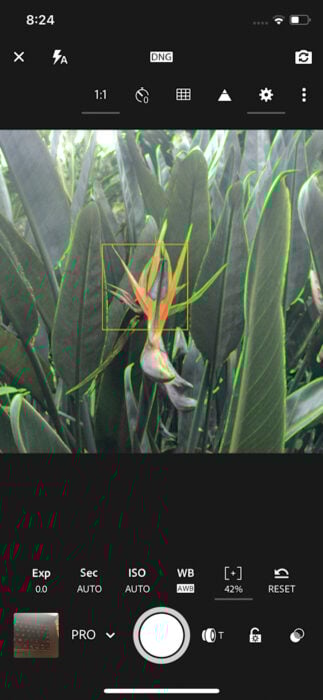
Once you activate the camera, you'll see an interface similar to your regular camera app. It has a big shutter button at the bottom of the screen. There are also a few icons for adjusting various exposure parameters.
We'll show you a few tools you need to use to create perfect photos.
First, look for the file format selector at the top center of the screen. Choose JPG if you don't want to edit your images, and DNG if you need to make some adjustments.
Next, in the lower-left corner of the screen, you can select Auto, Professional, and High Dynamic Range shooting modes. If you choose Auto, then all you have to do is press the shutter and Lightroom will take care of the settings for you.
But if you want more control over your photos, we suggest you select Profesional, instead. Doing so gains you access to different settings such as Exposure, Shutter Speed, and ISO.
You can adjust them by tapping on the tool you want to use and swiping your finger left or right. The changes you make reflect on the screen in real-time. That way, you'll know how bright you want your image.
For landscapes and locations with strong contrast, you can use High Dynamic Range. This mode adjusts the darkest and brightest areas of your image to get the best exposure.
Once you activate this feature, you’ll be able to adjust the Exposure and the White Balance while Lightroom takes care of the rest.
Select your preferred settings. All you have to do at this point is to take photos like you would with your regular phone app. It's that easy!
Use the Lightroom Camera Features for More Control
In the last section, we mentioned plenty of settings you can use when taking photos. But Lightroom has tons of other features that you need to learn.
First, tap the icon with the three dots in the top right corner of the screen. Here you'll find several tools that you'll find useful in taking photos.
The 1:1 icon lets you change the aspect ratio of your image. For instance, you can use 1:1 for Instagram, 4:3 or 3:2 for regular images, and 16:9 for Panorama.
Meanwhile, the Timer icon next to the aspect ratio allows you to activate the timer. You can choose between 2, 5, and 10-second delay for taking pictures.
Unsure about your composition and alignment of your camera? Then tap the Grid icon to guide you in making sure your subject is in the right spot in your frame.
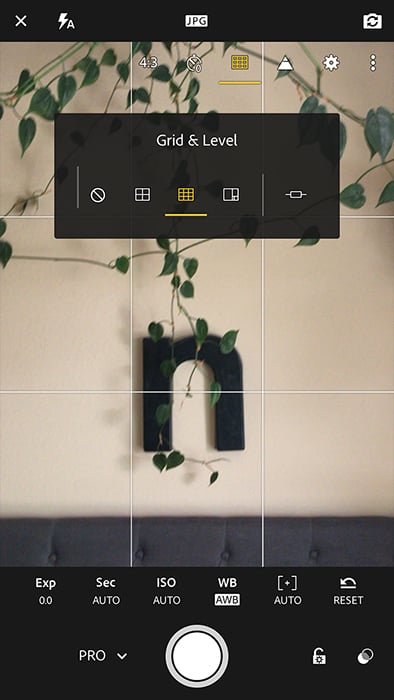
All camera modes offer basic tools, like grid and level overlays, at the top of the screen.
Then you have the Settings, which lets you activate Max Screen Brightness or even Geotag photos. This is also where you activate "Save Unprocessed Original" for your HDR photos.
At the bottom right corner of the screen, you’ll find a lens icon. This is what you tap to zoom in or zoom out.
Right next to the zoom tool is the Exposure Lock icon. Select it if you don’t want your exposure to change even as you move around.
Finally, you have filters. Tap this tool to make changes to the hue of your images. It features several options in color and black and white.
The Lightroom CC mobile app provides incredible tools to control the camera. Much more so than the standard camera on any cell phone.
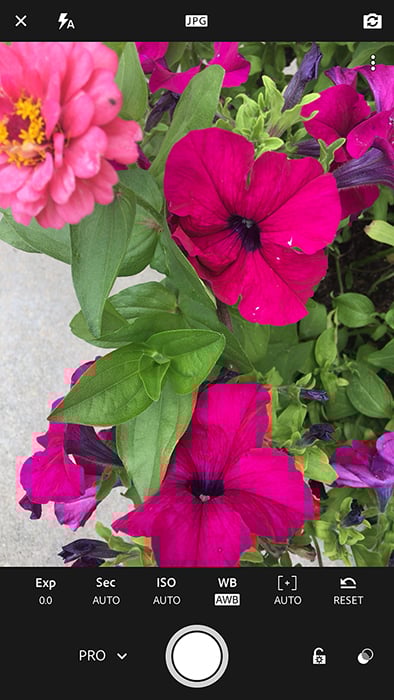
Camera settings can be adjusted by selecting Professional mode and selecting from the tools at the bottom of the screen.
Best Editing Tools to Use in the Lightroom App
Once you finish taking photos, you can go back to the library and select Lr Camera Photos to retouch them. Or if you want to edit an image from your gallery, you can choose the All Photos folder, instead.
After you select an image, several editing tools will then appear from under the screen. We'll list a few features that you may find useful:
Selective allows you to select any particular area in the photo that you want to edit. Once you select it, a + icon appears in the upper left corner of the screen. Tap it and choose between Brush, Radial, or Linear Gradient tools.
Healing tool cleans up the dirt in your photos. The bandaid icon that appears in the upper left corner of the screen removes spots for you. The cloning tool lets you choose which areas to copy over blemishes.
The Crop tool lets you resize, rotate, straighten, and flip your image. This is also where you can choose specific aspect ratios from square to panorama.
Profiles contain the filters that change the color and the mood of your image. It features a variety of selections from black and white to color.
Light has exposure settings including Exposure, Contrast, Highlights, Shadows, Whites, and Blacks.
Color lets you make changes to the White Balance, Temperature, Tint, Vibrance, and Saturation.
Presets has more advanced Color, Black and White, and Creative Filters. This is also where you can add Grain, Sharpening, and Vignetting to your photos.
Effects is where you play with Texture and Clarity and Dehaze. This is also where you can add Vignette and adjust its effects.
Auto is the button you tap if you don't feel like making the edits yourself. If you choose this feature, Lightroom will adjust all the necessary parameters to give you a properly exposed image.
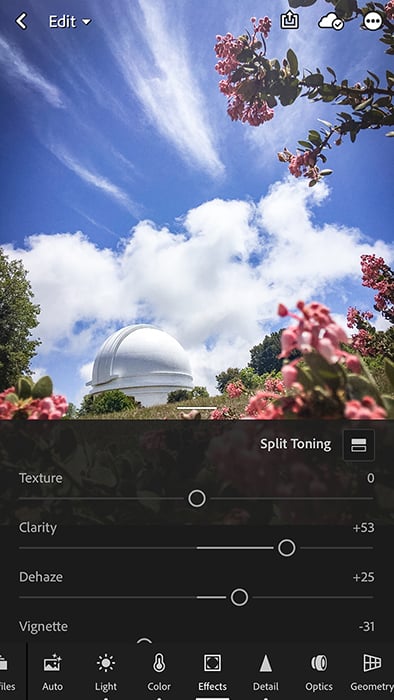
The effects section has tools for things like clarity and vignette.
There is an option to Auto edit. But with so many tools at your disposal, it’s easy to get creative! The last section of tools on the right is for presets.
Lightroom CC mobile does have some handy standard presets installed.
You can actually add your own presets from Lightroom Classic into Lightroom CC Mobile! To do this, you want to first import those presets into the Lightroom CC desktop version. Then you can sync the desktop version to your mobile app.
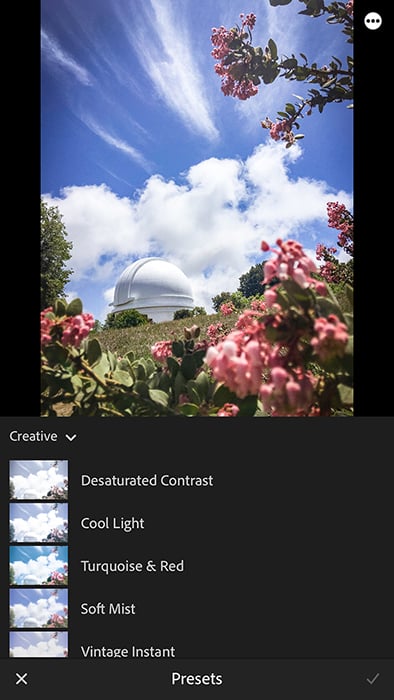
Presets can also be used in Lightroom mobile!
Save and Share Your Images Directly From Lightroom
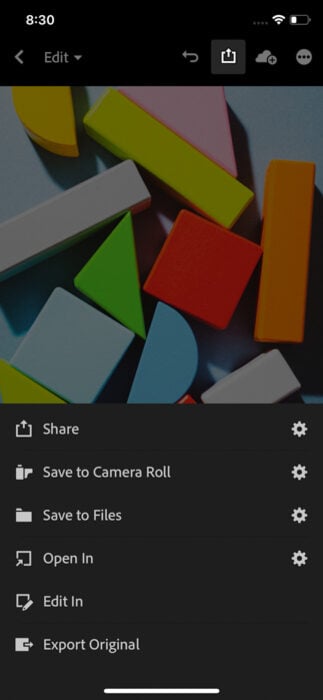
After you edit your photo, you can save it by tapping the Save icon in the top right corner of the screen.
Lightroom lets you choose several options when it comes to saving your image. You can either share it, save it to Camera Roll, or save it to Files.
If you want to share your image to your favourite social media site, then you'll need to select Share.
To include your file to your iPhone's Camera Roll, then choose Save to Camera Roll. If you want to save your edited picture directly to your phone, then tap Save to Files.
After you select any of the options we mentioned, a popup menu will appear on the screen asking you to choose image size.
If you only want to share it on social media, then feel free to choose small-2048px. But if you want a high-resolution image, then pick “Maximum available.”
You also have the option to open the file on social media platforms like VSCO or Instagram. You can even edit it on Photoshop Fix by selecting Liquify or Healing in Photoshop Fix. To do this, you'll need to download the Photoshop Mobile app as well.
And how about if you need to learn how to get photos from iPhone to computer? You can backup your files by tapping the Cloud icon next to the Save icon. All you have to do is select Resume Syncing, and Lightroom will transfer your image to your iCloud.
You can then access your iCloud account on your desktop or laptop and download your files from there.
Organizing your photos is quite simple on the app as well. You can use the icon on the far right to send a photo to an existing folder. If you want to create new folders, go to the app home screen and click on the + sign.
Name your new folder and click ok. It’s that simple! You can now add photos to that folder after editing. Or you can directly import photos into that folder before applying any edits.
How to Sync Lightroom Mobile With Your Computer
IIn the previous sections, we mentioned that you can transfer files between Lightroom Mobile and your desktop or other devices.
Now, we'll show you the step by step process on how to move photos between your desktop and phone.
Before you do any transfers, you need to activate Sync With Lightroom Mobile on your computer.
Once you confirm the PC-iPhone sync, you'll need to go to the Lightroom collections on your computer. Look for the folders you wish to access on your phone. Click on the Firebolt icon to transfer those files to your device.
Note that you need to be selective about which files to sync with your phone. If you choose all the folders from your desktop collection, expect your phone to bog down or even crash.
Only choose the folders that you think you'll want to share via social media. There's no point of having a bunch of photos on your smartphone that you won’t need.
Although not necessary, we recommend you create a separate collection on your desktop for Lightroom Mobile. That way, you don't have to activate so many folders that you want to sync with your iPhone.
To create a new collection, select the photos that you want and look for the Collections section in the Navigator panel. Click the + icon and select Create Collection. Rename your folder and press Create.
If you don't want to sync a collection with your phone anymore, click the Firebolt icon again to deactivate it. You can also click on a collection and select Sync with Lightroom Mobile to deselect it.
Conclusion
Lightroom is a highly capable app that you need to have as a photographer. Not only will you get to shoot and edit photos with it, but it also lets you share files seamlessly to many other devices.
If you have an Adobe account, take advantage of it because you get to use all of its features for free. Check out our course on how to effortlessly edit your images in Lightroom too!
Looking for more smartphone tips? Check out our recommendations for the best camera phone next! We also have a great post on how to use the Lightroom dehaze feature!