If you’re looking for an excellent photo editing software, you have a lot of great options to choose from. But two of the most popular are Luminar and Lightroom. Luminar vs Lightroom is a hot contest. But which one is right for you?
Luminar is a relatively new program that has quickly gained a following among photographers for its ease of use and wide range of features. Lightroom, on the other hand, has been around for many years and is considered by many to be the gold standard in photo editing software.
So how do you decide which one is right for you? Here’s a look at some of the key differences between Luminar and Lightroom
Luminar Vs Lightroom: Comparing What Each Has to Offer
Luminar is an umbrella of advanced photo editing programs by the Ukrainian-based company Skylum. The programs join Skylum’s popular Aurora HDR software. Luminar is relatively new to the scene. They first launched the Mac OS version in 2016. And the company quickly produced a PC version and caught up with the established competition. It’s no accident that the program has won several awards.
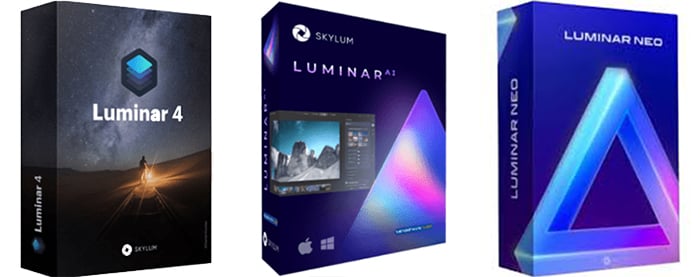
Luminar is a stand-alone program, or you can use it as a plug-in with Adobe Lightroom or Photoshop. Confusingly, there are several editing programs under the Luminar name—Luminar 4, Luminar AI, and Luminar Neo.
At first glance, they seem to be upgrades, with Neo being the most recent version. But, while the programs have overlapping features, they are separate programs. As you can see from the numbering system, Skylum does not market Luminar AI as Luminar 5.
In this article, I first compare the more established (but discontinued) Luminar 4 and Lightroom. You can read our full review of Luminar 4. But we will touch on the features of the newer Luminar offerings too. We will also compare Luminar with Photoshop and the more recent versions of Luminar vs. Lightroom.
What is Adobe Lightroom?
Adobe Lightroom is one of the most popular post-processing programs on the market. But Lightroom is not just one program, even though we sometimes talk about it that way. Lightroom has different versions, including Lightroom Classic and the mobile-friendly Lightroom CC. In this review, we are looking at the Lightroom Classic version.
In 2007, Adobe released Lightroom. This program isolated the tools in Photoshop most useful for photo editing. In many ways, it’s a streamlined version of Photoshop. It features most of the Photoshop tools photographers need. But Adobe redesigned Lightroom’s user interface to make standard photographic adjustments easier.
Many people think of Lightroom as being lesser than Photoshop. But Lightroom is not a younger version of Photoshop. The programs have developed side-by-side—each having weaknesses and strengths.
Adobe changed to a subscription model in 2013. With the Adobe Creative Cloud, you pay for the program each year. Many photographers did not like this change. They started looking for an alternative photo editor to get out of the Adobe payment cycle. If you are one of these photographers, Luminar may be the ideal program for you.
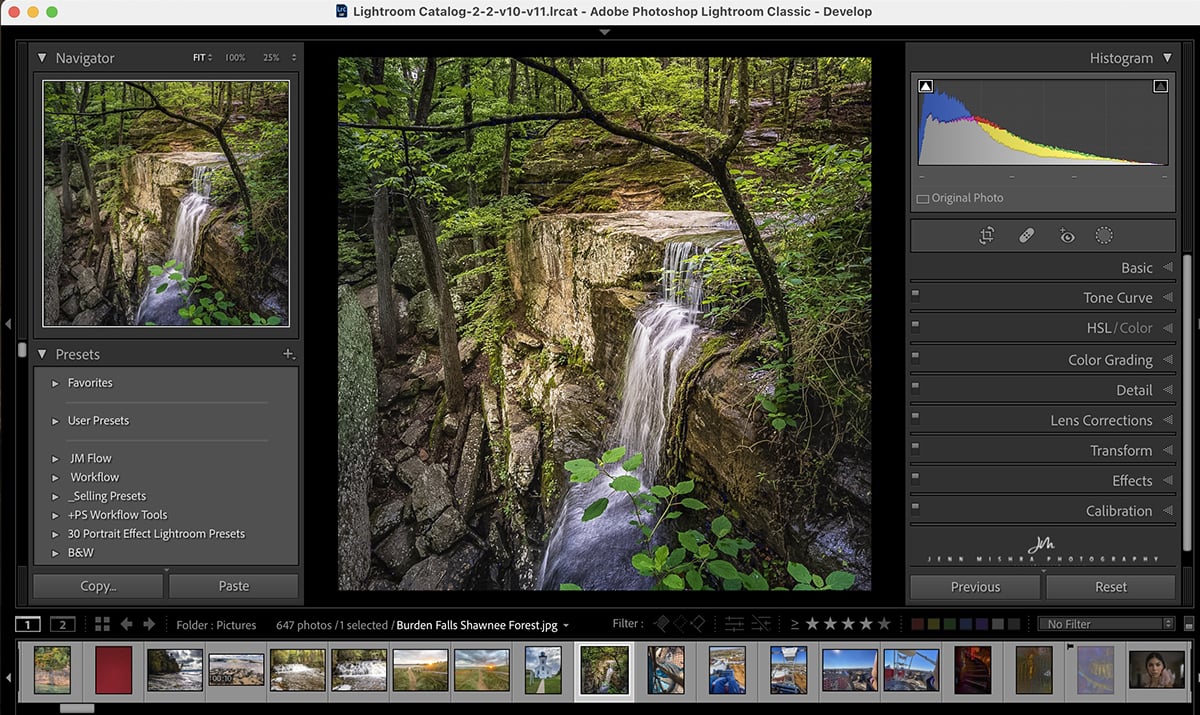
The Develop module in Lightroom Classic
Luminar vs. Lightroom: Luminar 4
Let’s first compare the main features of each program you should consider.
Workspace
Luminar 4 has an easy-to-use interface. You can open the program and get started right away. Click a few buttons, and you are off! Lightroom makes complete sense after you learn the program. But there is a lot to unpack when you start. You need even more training to use Photoshop.
Both Luminar and Lightroom work with RAW files. But unlike Lightroom, you do not have to import images in Luminar. Just point Luminar towards a photo or a folder and start editing. Both programs work non-destructively, meaning that your original image is never changed. You can always go back to the original and start again.
The Luminar workspace is clean. Tools along the top bar let you crop, zoom, search, export, and apply a preset (called Looks in Lumimar 4). In the top-right corner, the Edit button takes you to the editing tools, and the Info button shows the photo’s metadata.

Luminar 4 Add Media options
Library Catalog System
Like Lightroom, Luminar 4 has a catalog or DAM (Digital Asset Management) system. Not all editing software has a way to manage your photos. So, both Luminar 4 and Lightroom get top points for this feature.
You can tag photos with flags, stars, and colors. Then sort and search for the images that you want to edit. You can also create albums.
The Info icon opens your metadata. This feature is where Lightroom has a big leg-up. In Luminar 4, you can see the basic metadata of your file. But you cannot edit the data. You cannot add keywords or IPTC metadata.
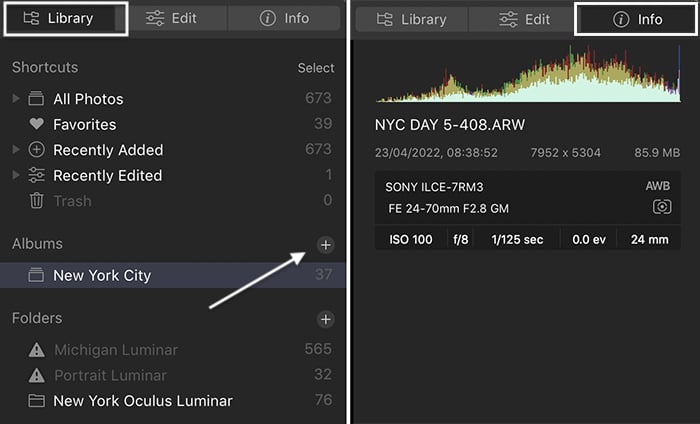
Luminar 4 Library and Info panels
In Lightroom, you have more control over metadata. You can easily add data to your images, like copyright information and keywords. This metadata travels with your photo when you post it online. And you can search for this information. Want to know which shots you took with a specific lens or camera? Lightroom will find them.
Lightroom wins this category. But digital asset management tools are not the sexy part of photo editing.
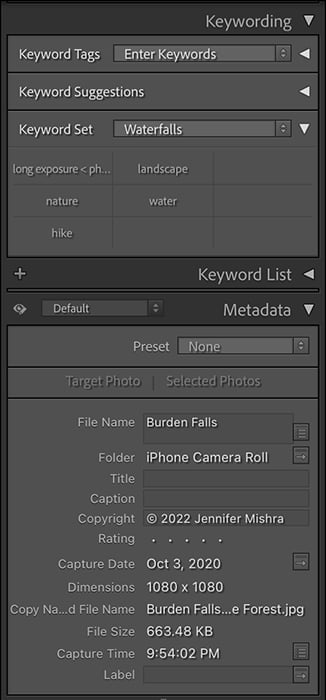
Lightroom Classic panels
Photo Editing Tools
Click the Edit button in Luminar 4 to switch to the photo editing workspace. Like the Develop module in Lightroom, the workspace is divided into panels.
Most tools overlap between the two programs, but they are organized differently. In Luminar, the tools panels are Essentials, Creative, Portrait, and Professional. More tools are under the Layers and Canvas icons. Lightroom organizes the editing panels into Basic, Tone Curve, HSL/Color, Color Grading, Detail, Lens Corrections, Transform, Effects, and Calibration.
Luminar 4 uses friendly labels. When you open a panel, you first see the basic tools, with the option to see more advanced settings. This keeps the platform clean and uncluttered. If you are new to post-processing or want to make a simple tweak, this moves the more advanced tools out of the way.
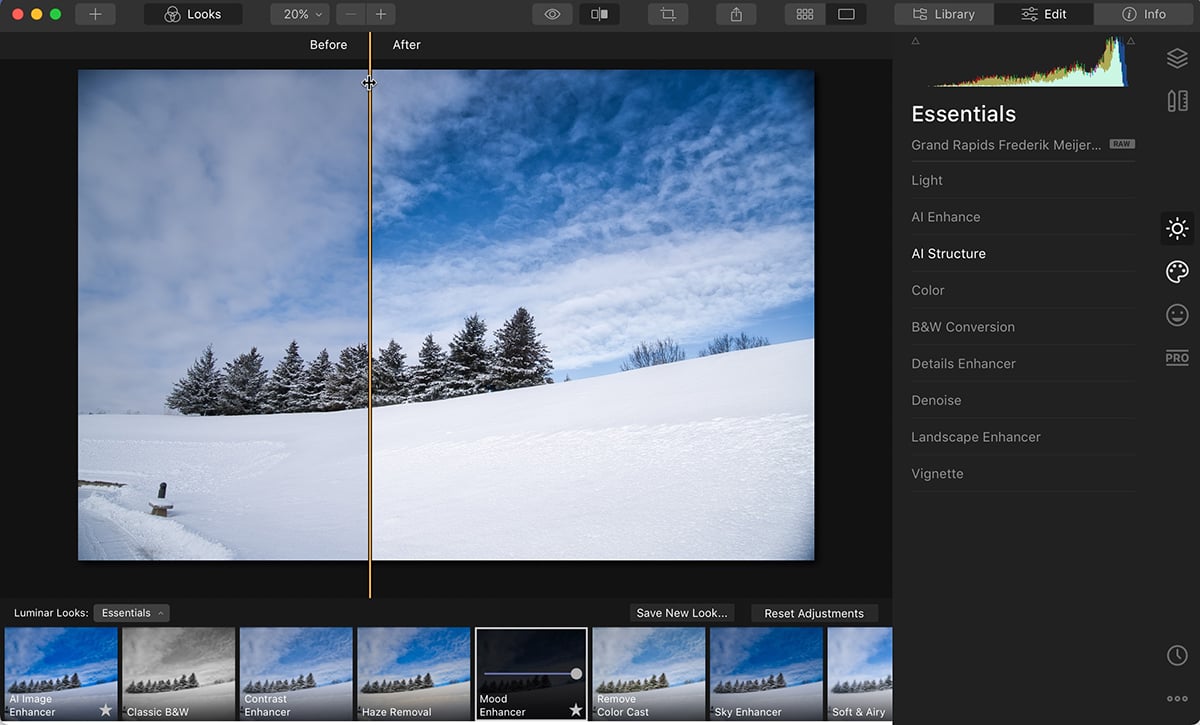
Luminar 4 Edit workspace
But as you scan down Luminar’s panels, you see a few AI treats. AI Enhance, AI Structure, and Landscape Enhancer are handy one-click artificial intelligence tools. These set Luminar.
There are also some hidden advanced tools. For instance, you can create an Orton effect, something you cannot easily do in Lightroom. The Orton effect is great for portraits. But you can also use it in landscape photography.
Luminar does the work with one click. And there are plenty of opportunities to adjust the result if you want. But the software usually gives you pro-level results straight off.
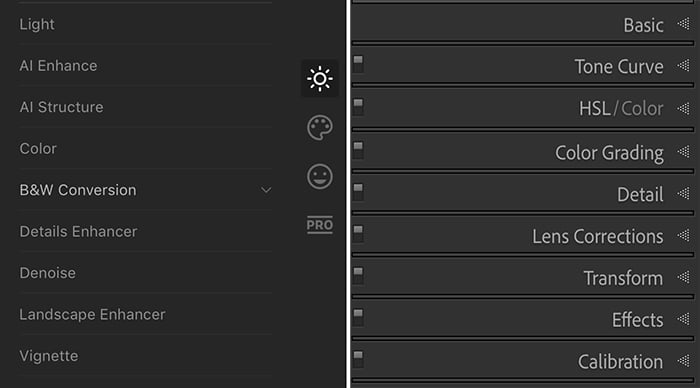
Luminar 4 Essential (left) vs. Lightroom Classic Develop options (right).
Like Lightroom masking, you can mask sections of your image in Luminar 4. But unlike Lightroom, Luminar’s masking tools are in the tool panels, so you do not need to move to a separate workspace to mask.
Under the Canvas icon are the tools you use to crop and adjust the geometry of your photo. If those are not enough, open the Professional panel. There, you will find more subtle and detailed tools. You can adjust gradients or control contrast in the highlights, midtones, and shadows. Plus, you can easily dodge and burn and enhance colors.
Lightroom feels like it has more photo editing tools. And there are probably tools in Lightroom Classic that are not in Luminar 4. But if there are, they are not tools I use very often. I cannot think of one tool that I am missing. Luminar 4 includes the right tools and puts them at your fingertips.
Creative Tools
The Creative tools in Luminar 4 are nothing short of amazing. You can replace skies, add sunrays, and give your photo a textured overlay. You can create a dramatic look or a glow. You can add atmosphere with fog or birds to the sky with AI Augmented Sky.
There is nothing similar in Lightroom’s workspace. You must go to Photoshop for what Luminar 4 can do for your image.
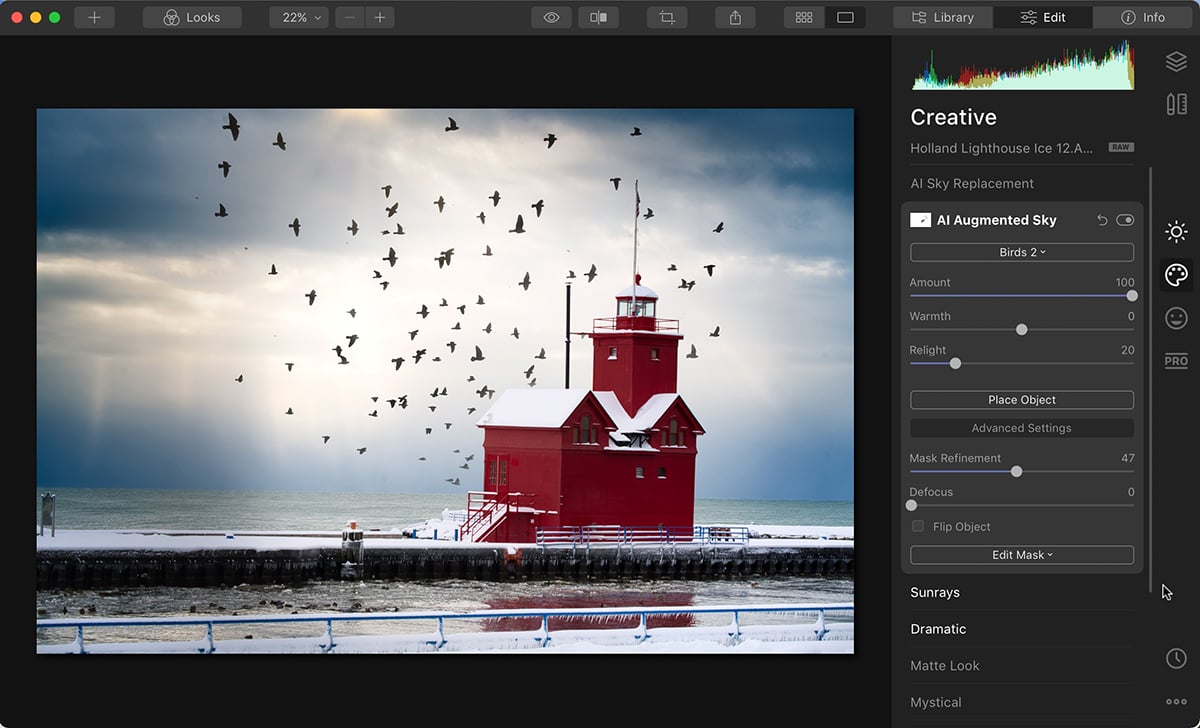
searchd sky and added birds using Luminar 4 AI Augmented Sky tool
Advanced portrait tools in Luminar 4 use artificial intelligence to enhance skin and let you adjust facial features. Lightroom has nothing like this. You have to use Photoshop’s liquify tool to change facial features.
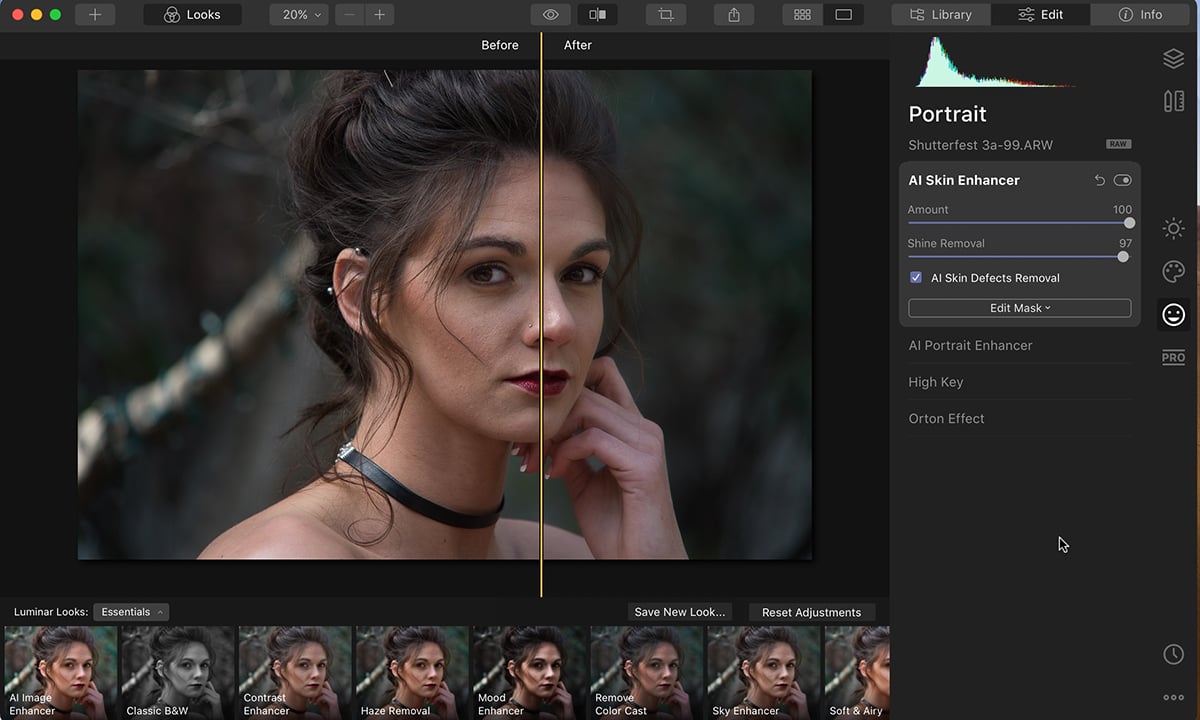
Luminar 4 Face AI tools
Adobe divides photo editing into two parts. In Lightroom, you can change features of the image like exposure and color. But to change the image at the pixel level, like replacing the sky, you must go to Photoshop. But many photographers struggle with the complexity of Photoshop.
With Luminar, you can add advanced effects—some quite difficult to achieve in Photoshop—with a few tweaks. With this feature alone, Luminar 4 has Lightroom beat by a mile.
Verdict: Luminar 4 vs. Lightroom
The result of our Luminar vs. Lightroom comparison is a tie. Both programs perform well and have different strengths.
For general photo editing, it’s hard to find something not to like in Luminar 4. You can quickly apply a Look. Or you can move into the Essentials panel and do the adjustments yourself. If you are feeling creative, go to the Creative panel! The AI helps you create a spectacular image.
Luminar 4 has an easy-to-navigate workspace with the basic editing powers of Lightroom. Plus, it has advanced creativity effects that are difficult to achieve, even in Photoshop. Lightroom has more export options. But the program bogs down a bit with legacy features like Slideshow and Book. Luminar is much more streamlined.
The only thing missing in Luminar is a more robust cataloging system. I use keywords a lot, so this is a deal-breaker for me. Photographers with fewer images may not mind the asset management shortcomings.
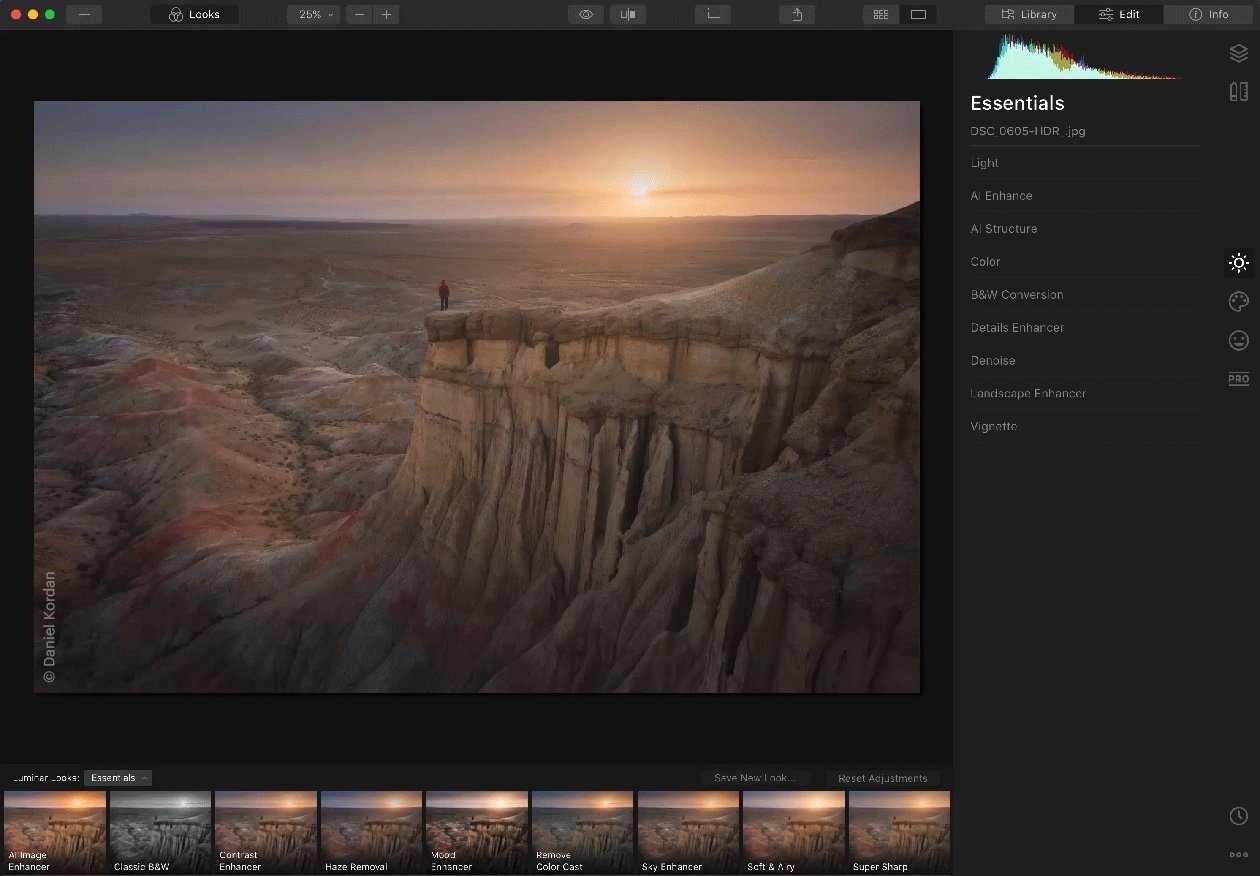
Luminar 4 Looks (presets)
Choose Luminar products if you like their AI tools or do not want to be on a subscription plan. But choose Lightroom if you have an extensive catalog and use metadata a lot.
But you do not have to choose between the programs. Luminar products work as stand-alone programs or plug-ins to Adobe Lightroom and Photoshop.
So is Luminar 4 better than Lightroom? They are both great programs. Each has a strength. Personally, I use both. But most photographers will be happy with either.
Luminar can definitely replace Lightroom as your primary photo editor. The only problem is getting your hands on this program.
Luminar vs. Adobe Photoshop
Luminar is most like Lightroom. You use sliders to adjust the features of your image. But in some ways, Lumimar is like Adobe Photoshop. So is Luminar as good as Photoshop?
In Luminar 4, you can work with layers like Photoshop. Add a new adjustment layer and everything you change in the other panels applies to this layer.
You can toggle it on and off like you would in Photoshop. You can mask certain areas of your photo to apply these edits selectively. You can even change the blending modes.
But the best part of Luminar is that the layers work in the background. If you find layers too complex, simply ignore them. They are tucked away under the Layers icon.
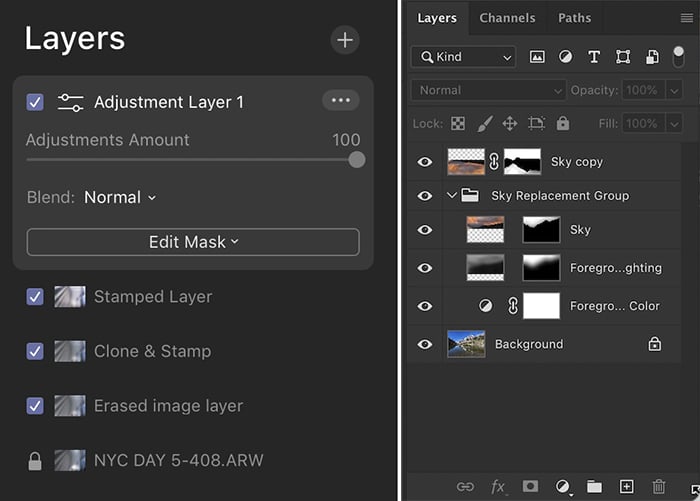
Luminar 4 Layers panel (left) vs. Photoshop’s Layers panel (right)
By default, Luminar creates new layers when you clone or erase something from your image. This means you are always working non-destructively. Toggle off the erase or clone layer to return to your original photo.
The Clone and Erase tools in Lightroom and Photoshop work much better than Luminar 4. But if you are just doing a little tweak, Luminar is quick and gets the job done.
This is what Luminar can do
You can replicate many of Luminar’s creative effects in Photoshop. But you need advanced Photoshop skills for some of them. Want to add some sunrays to your image? In Luminar 4, this is a simple click. In Photoshop, you need a tutorial, extra brushes, and a lot of time.
Both Luminar 4 and Photoshop let you adjust facial features in portraits. But in Photoshop, you must know where to look for the tools. They are not immediately at your fingertips.
Overall, Photoshop has more photo editing power than Luminar 4. But it’s not as intuitive. If you are only editing photos and do not enjoy working through tutorials, Luminar 4 is the better fit for you.
Luminar vs. Lightroom: Luminar AI
Skylum is moving on from Luminar 4. They have replaced the program with Luminar AI. So let’s look at the differences between the programs.
At first glance, Luminar AI looks like a skinny version of Luminar 4. There is a library and basic cataloging system. But it’s not as advanced as either Luminar 4 or Lightroom.
There are some terminology differences. For instance, the preset “Looks” are now “Templates,” and there seem to be more of them. Also, the program suggests templates that may work well with your photo.
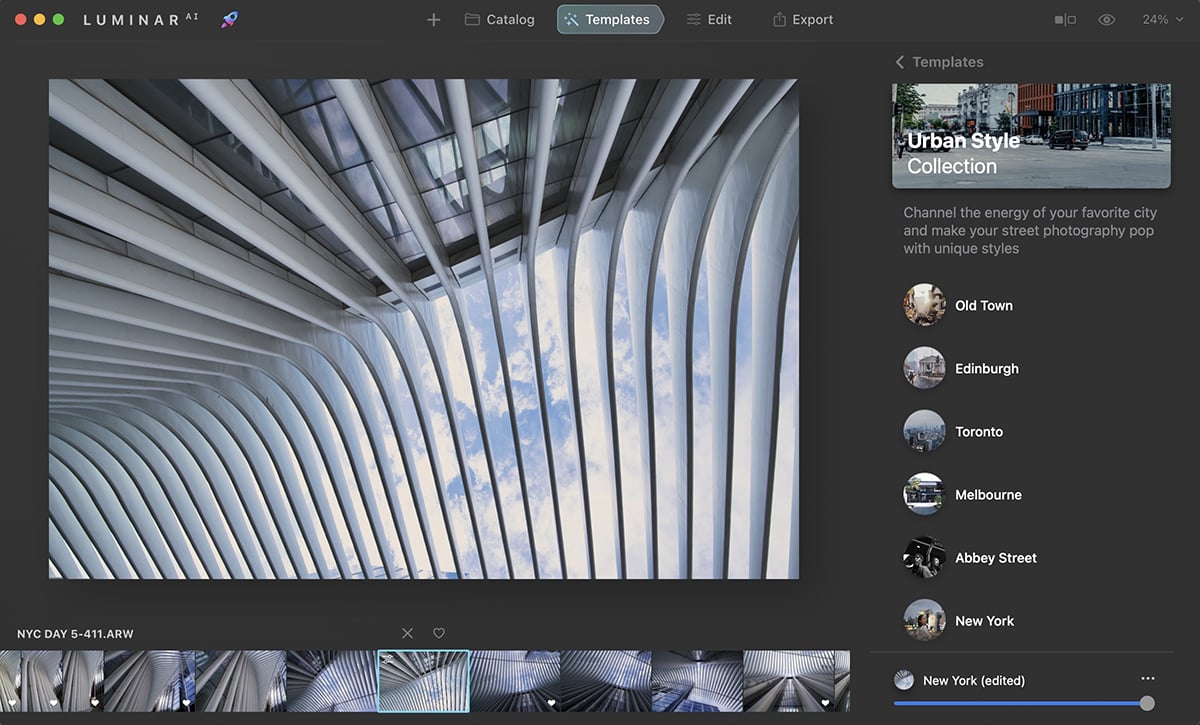
Luminar AI templates
The interface is visually updated with a splash of color. The workspace is simplified even further, making it even more streamlined. And the program responds faster.
As with Luminar 4, this program divides photo editing tools into panels. The panels in Luminar AI are somewhat restructured. The editing tools are now under one photo editing icon. For instance, cropping and geometry are under the Essentials section. Scroll down to find the popular Creative and Portrait tools.
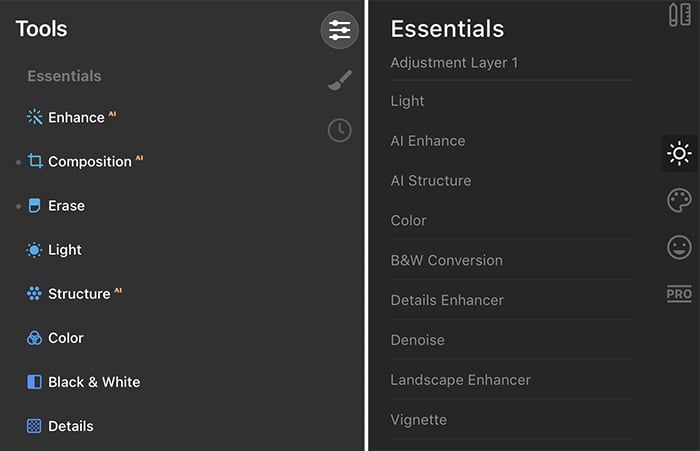
Editing tools in Luminar AI (left) vs. Luminar 4 (right)
In Luminar AI, the masking tools are under a separate menu like Lightroom. In Luminar 4, masking is integrated into each tool. Placing the masking tools into another panel removes redundancy in the program. But I like the integrated masking in Luminar 4.
Missing from Luminar AI is the Layers panel found in Luminar 4. This makes Luminar AI feel more like Lightroom and less like Photoshop.
You also have more options when exporting. You can resize, change the color space, and sharpen the image. You can send the file to your email, messages, or popular photo sites like SmugMug and 500px. But export options in Lightroom Classic are still more advanced.
In many ways, Luminar AI simplifies Luminar 4. But it loses a little bit of what makes the program special. Read our full review of Luminar AI.
Luminar vs. Lightroom: Luminar Neo
Skylum released Luminar NEO in early 2022 with a lot of fanfare. But how different is the program from Luminar 4 and Luminar AI?
If you have used other Luminar programs, the workspace feels familiar. Layers are back, and there are masking options with each tool. But the best additions are the new AI tools.
Composition AI crops automatically and adjusts perspective. You can add bokeh to portrait backgrounds and completely relight a scene. Portrait photographers will love the Face AI tool. This quickly adjusts facial features and smooths skin.
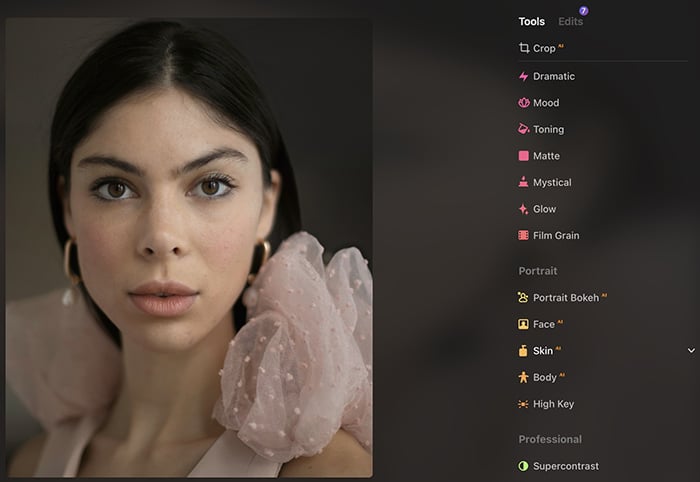
Luminar NEO Portrait AI tool
There’s no doubt that Luminar NEO has some great new features. The Power Line AI and automatic dust spot cleaning make my heart flutter! How many hours in Photoshop have I spent removing dust spots and powerlines!
You can also add a new layer with pre-loaded textures and lighting effects.
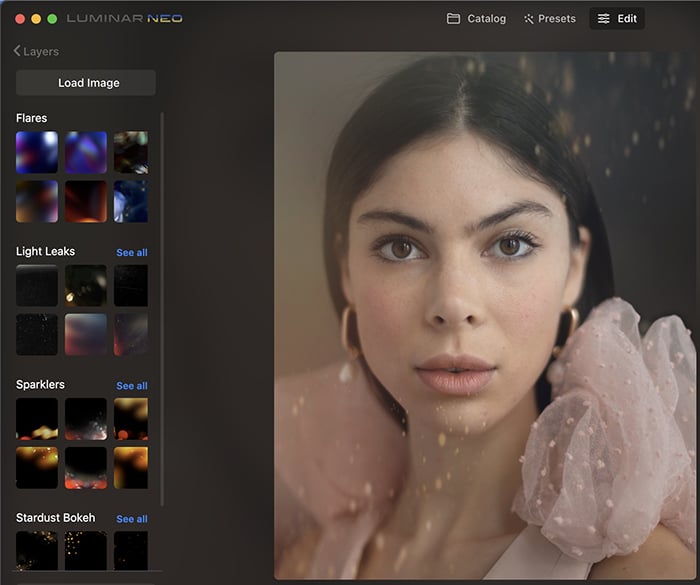
Luminar NEO textures and effects
With all the AI tools, you can manually adjust the results. So you can use the tools without fear of ruining your photo.
But Neo is not without some issues. It runs slow on my computer, and the cataloging system seems to have taken a step backward.
While Adobe seems content with Lightroom, Skylum is thinking ahead with Luminar Neo. You can read our full review of Luminar Neo for more info.
Buying Luminar Photo Editing Software
Luminar 4, Luminar AI, and Luminar NEO are all product offerings on the Skylum website. But if you choose Luminar 4, you are redirected to Luminar AI.
Despite being described as a sequel to Luminar 4, Luminar AI feels like a pared-down version. Neo has some new features, but it’s not a significant departure from the older Luminar software.
Luminar’s marketing plan is confusing. You can try Luminar AI free for 30 days. Unfortunately, there is no trial for Luminar Neo. But the company offers a 30-day money-back guarantee.
Luminar vs. Lightroom: License vs. Subscription
Luminar comes as a perpetual license. This means when you buy any Luminar product, it’s yours. There is no subscription to use the software.
The flip side is that you do not get automatic upgrades. I own Luminar AI but had to buy Luminar NEO separately.
Skylum keeps the program fresh by offering new skies, looks, LUTs, and overlays. They have perks for existing customers, or you can visit their marketplace for a bit of inspiration. You can also get a membership in Luminar X. This includes assets and tutorials.
The good news is that you can buy Luminar AI or Luminar Neo for less than a one-year Adobe subscription. It’s a great deal if you are looking for a photo editor that you do not have to pay for every year!
If you want to buy a program and not worry about upgrades and subscriptions, Luminar NEO is for you. If you want the latest version and a big support community, Lightroom might be a better fit.
But you can have your cake and eat it too! Luminar products work as plug-ins in Lightroom and Photoshop. I subscribe to the Adobe Photography plan and own Luminar AI and Neo. I often send an image to Luminar and add a sunray or other lighting effect. And saving the file returns it to where I started with Adobe.
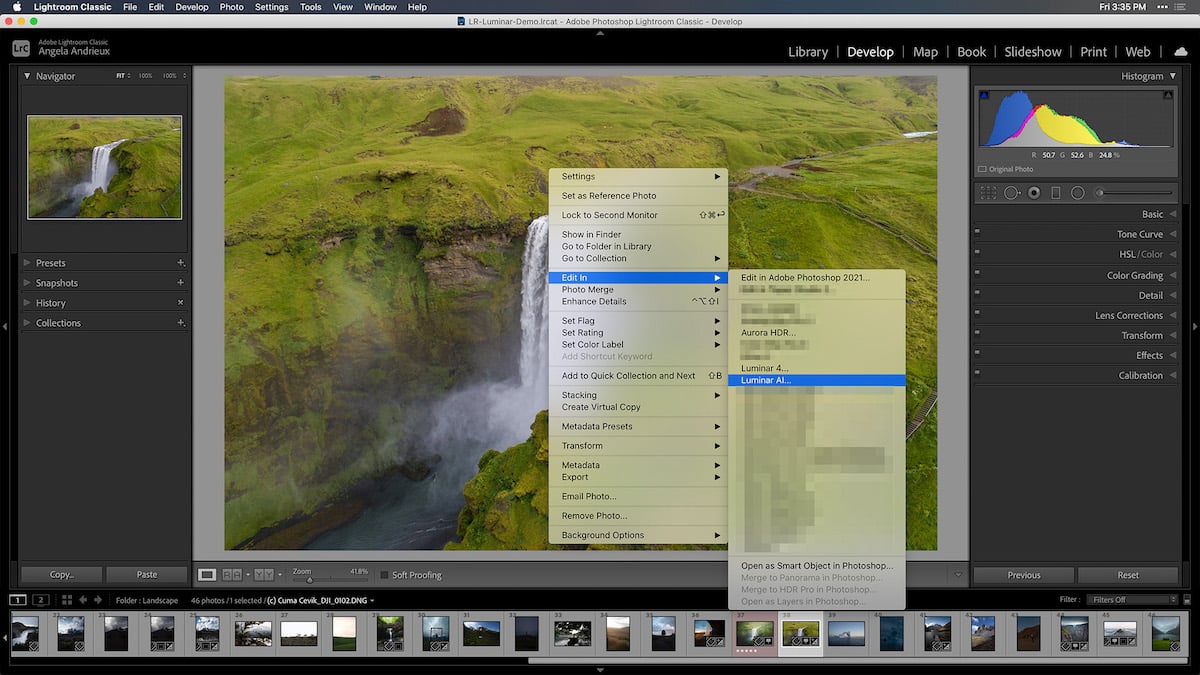
Luminar AI plug-in in Lightroom Classic
Conclusion: Luminar Vs Lightroom
If you are looking for photo editing programs as an alternative to the Adobe Creative Cloud, Luminar might be what you are looking for. Luminar 4 is being discontinued. But Luminar NEO is ready to take its place.
In a head-to-head Luminar vs. Lightroom, the photo editors run neck and neck. Professional photographers may prefer the Adobe Creative Cloud for stability and cataloging. But they are missing out on the easy-to-use AI and creative photo editing tools. There is no reason not to try out Luminar products at their current prices.
For a quick and easy software roadmap, check out our Effortless Editing with Lightroom course!


