Our article explains some of the most common portrait lighting setups and how to use them. And our portrait lighting setup diagrams make everything easy to understand. We’ll also provide some tips on adjusting your light sources to create different effects.
It’s best to learn how to use portrait lighting setups to take your portrait photography skills to the next level. A good portrait lighting setup can make all the difference between a good photo and a fantastic one.
Portrait Lighting Setup Diagrams
We will take you through two main portrait lighting setups and some examples:
But first, we discuss the different types of light we use when shooting portraits.
Natural Light vs Studio Light
Often, portrait lighting setups can be intimidating for beginners. Most will think that working with ambient light will be easier.
This, unfortunately, is not always the case. Dedicated artificial lights have two important advantages:
- More flexibility and creativity in lighting your model
- More control over exposure than ambient light
You must match your camera settings to the ambient light for a correct exposure. This is true even when mixing an on-camera flash and ambient light. The risk is that you may use too slow of a shutter speed, particularly if you are not using fast f/1.4 to f/2.8 lenses.
Instead, you can set your aperture, ISO, and shutter speed with artificial lights. My go-to settings are f/8, 1/125 s, ISO 200. And you can adjust the light power to suit your needs. It’s easier, and I can shoot with any lens available—cheap kit lenses included.
Balancing flash and ambient light outdoors. Settings: f/4.5, 1/80 s, ISO 200.
Hard Light vs Soft Light
When it comes to portrait lighting, there’s hard and soft light:
- Hard light casts strong, dark, and defined shadows.
- Soft light produces lighter shadows. There’s a more gradual transition between dark and bright areas of the image.
What makes portrait photography lighting hard or soft is not its source. It’s the ratio between the apparent size of its source and the subject’s. A bare flashgun will produce a harder light when you photograph people.
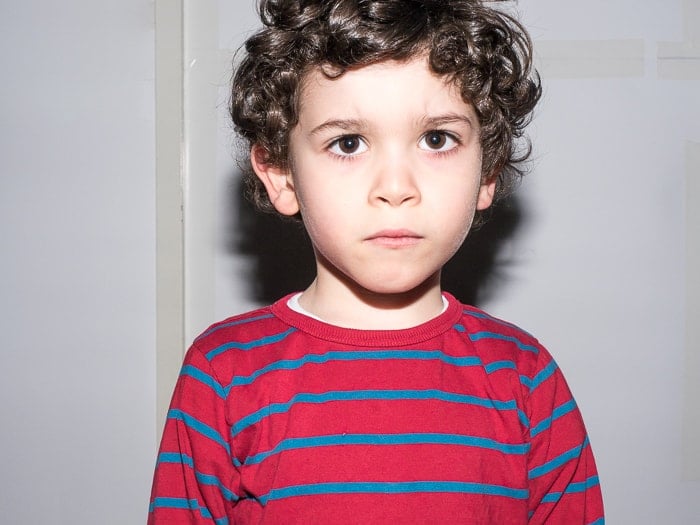
A direct flash produced a hard light on my son, with defined shadows under his chin and in the background.
Light modifiers soften the flashlight. You can use umbrellas, softboxes, or a flash bounced off a white wall.
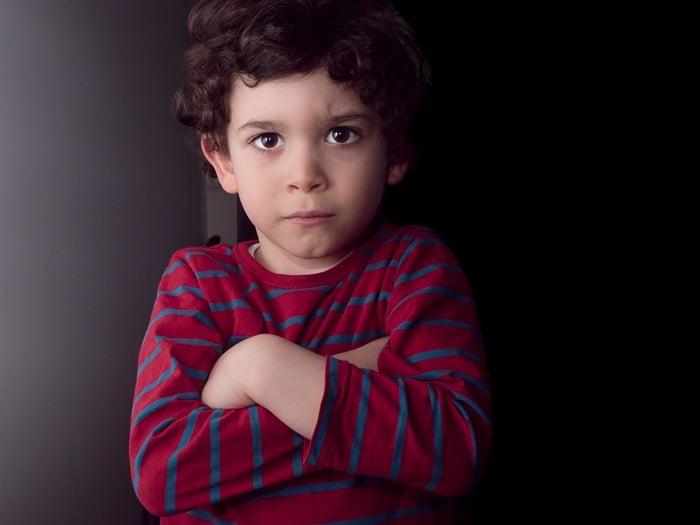
Bouncing the on-camera flashlight off the wall gave me a much softer and more pleasant light.
The last thing to know about light is that its intensity decreases following the inverse square law. Say the distance between the light source and the subject doubles. Every time this happens, the light intensity on the subject decreases by a factor of four.
This calculation results in a “light fall-off.” This is an effect often used in portraiture to better control the light pattern on your model.
Low Key Light vs High Key Light
These two lighting styles dictate the mood of the final image. Some light patterns and subjects work better with a low-key style. Others deliver better, high-key results, depending on what you’re going for.
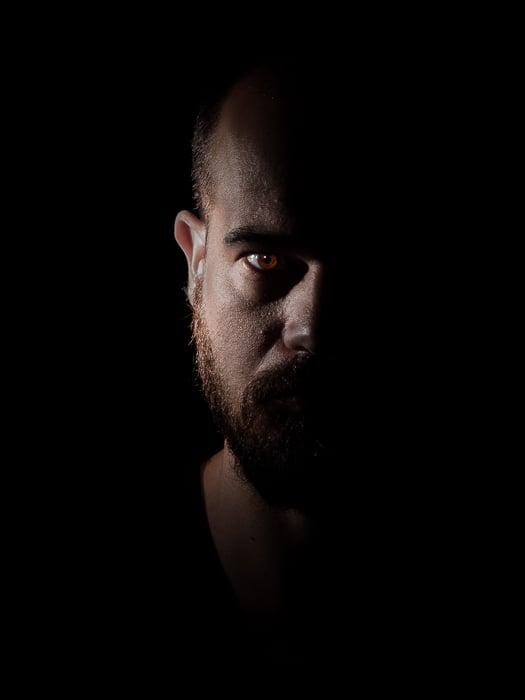
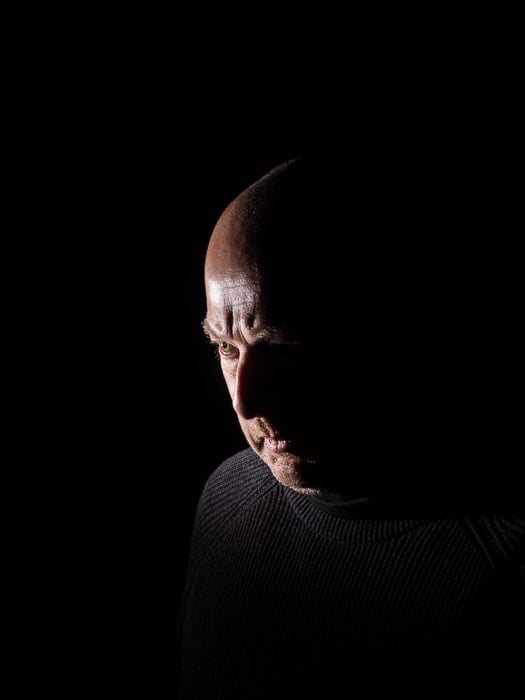
In a low-key portrait, about 80% of the tones across the image are dark. This style conveys a dark, powerful, dramatic, or mysterious mood with the right light.
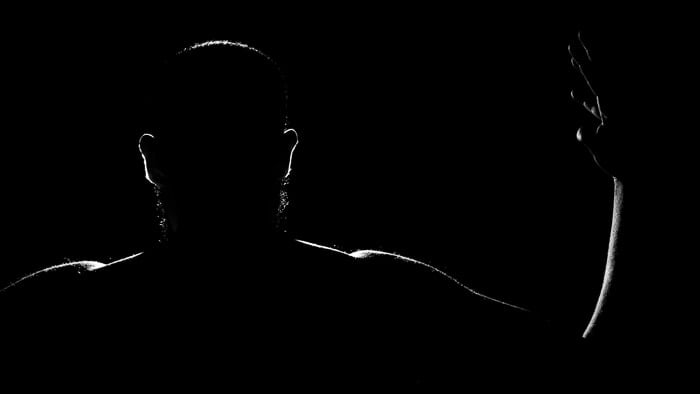
Below is an extremely low-key self-portrait. It is my tribute to the Night King portrayed in the promotional Game of Thrones season 7 poster. For a nice tutorial, read our article about how to shoot low-key portraiture.
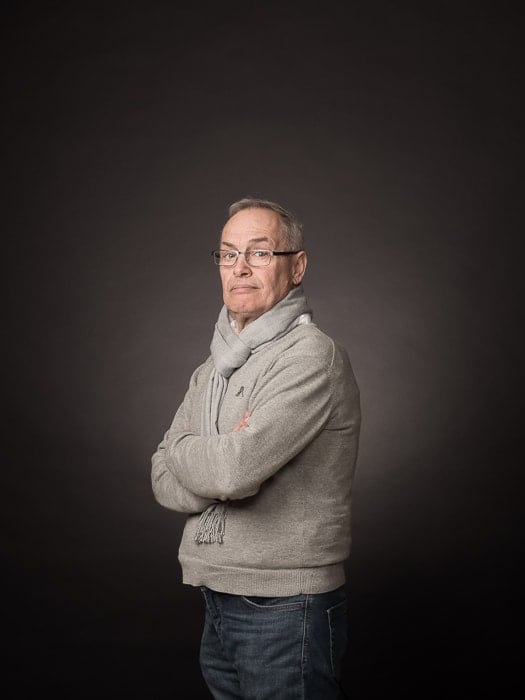
High-key images have most of the tones on the bright side of the scale. This creates a more lively and joyful mood. It is not by chance that most stock images portraying people are high-key. The same is true for newborn and toddler portraits.
You must light up your background for high-key images, or it will appear grey. You want your background to be white when taking headshots or newborn portraits. Use a large softbox (with a flash inside) or a window as a background.
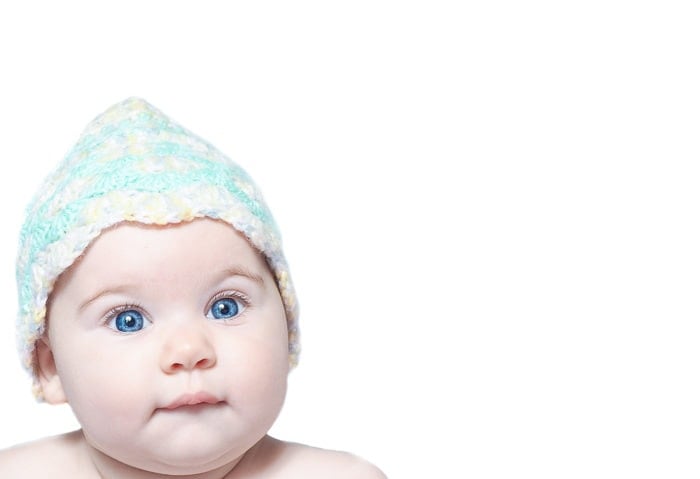
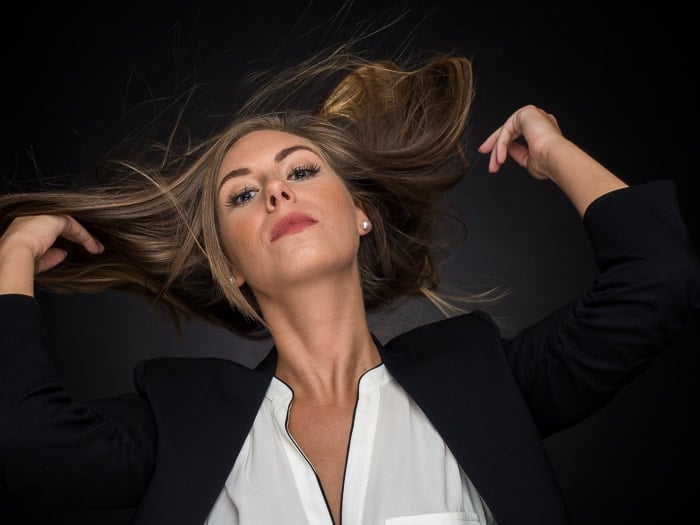
High-key portraits, with their bright backgrounds, bring a lighter mood to images.
How to Use Single-Light Setups
Working with a single light source is a great way to learn classic lighting patterns. It also lets you concentrate more on the artistic side of portraiture.
The portrait lighting setup diagram below shows the relative position of a single flash, camera, and model. It will help you create some of the most common lighting setups used in studio portrait photography:
We have a concise glossary for portrait photography lighting terms if you need further explanation.
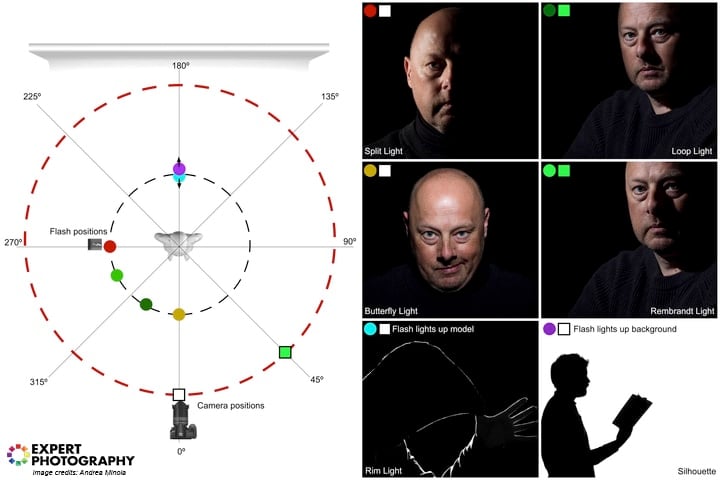
Colored circles show the single flash positions. Colored squares show the camera position.
Each portrait lighting setup using a single flash creates a distinct light pattern on your model (pictured above). This depends on the specific position of the light relative to the model’s nose. The position of the camera affects the face’s lighting-to-shadow ratio.
Moving the camera to the side did not change the butterfly light pattern on my face.
Moving the camera to the dark side of my model resulted in a short-lit image.
How to Use Multiple-Light Setups
This is how professional portrait photographers make studio portraits. More subtle and complicated light patterns are possible with several lights. You can also separate your model from the background with more than one light.
The various lights in such setups get their names from their function:
- Key Light: This is the main light for the scene. It determines the light pattern and is the first number listed in lighting ratios. (E.g., in a 4:1 lighting ratio, the key light is the number 4.)
- Fill Light: Used to fill (lighten) the shadows, fill lights are generally weaker than the key light. This is the second number listed in lighting ratios. (E.g., in a 4:1 lighting ratio, the fill light is the number 1).
- Rim Light (Hair or Separation): These lights keep your model from blending in with the background. They are usually placed to the side, behind the model. And they highlight parts of their figure and contours.
- Background Light: A background light is particularly useful for high-key portraits. You can also use it as a separation light in light setups with several lights. Or, together with some colored gels, it can alter the color of the background.
Several lights also make it easy to alter the contrast in the image. They change the ratio of light between the key light and the fill lights.
High-contrast images, with a key-to-fill lighting ratio of 8:1 or more, best suit male models. More balanced ratios, like 4:1 or 3:1 or less, are more appropriate for female models. Keep in mind that these are guidelines. In photography, bending or breaking the rules is acceptable.
Classic clamshell lighting (pictured below) is also a go-to setup. A key light, a fill light, and a background light are often used.
Clamshell lighting setup
7 Best Portrait Lighting Setups
Let’s see how to put these basic portrait lighting concepts discussed above into practice. Here are nine portrait lighting setups for you to try. We provide diagrams and examples showing the typical light patterns associated with each setup.
1. Split Lighting
Split lighting is the quintessential example of side lighting. It’s also the simplest of all lighting setups.
The diagram below illustrates the split lighting setup. Line up a single, bare flash with your model’s shoulder, and take the photo from in front of your model. The background light is optional.

Portrait lighting setup diagram for split light
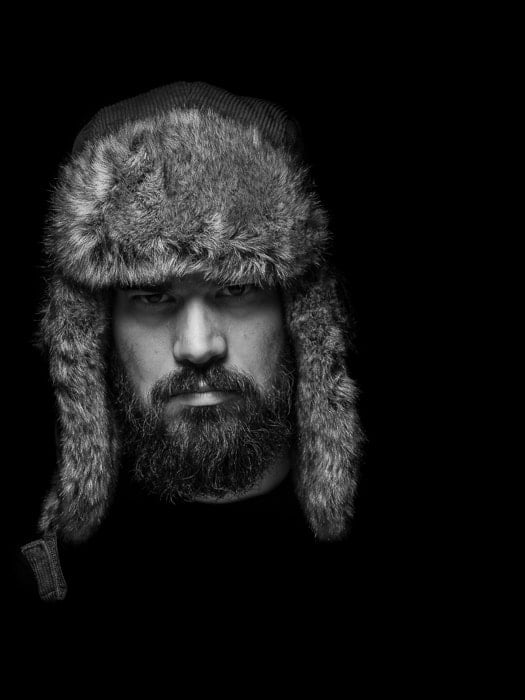
This high-contrast light pattern is often used to create portraits in a low-key style. Extreme split lighting produces highly contrasted images. It is often used with male models and for low-key, black-and-white portraits like the one below.
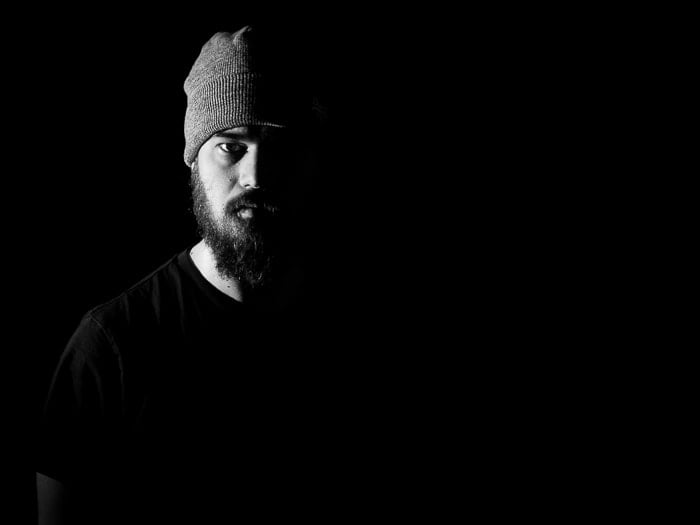
Split-light setup
2. Indoor Split-Lighting Portraits With Natural Light
It is possible to shoot great indoor portraiture using only natural light from a window. A classic way to create split lighting for portraits is to use natural light from a window and a circular reflector.
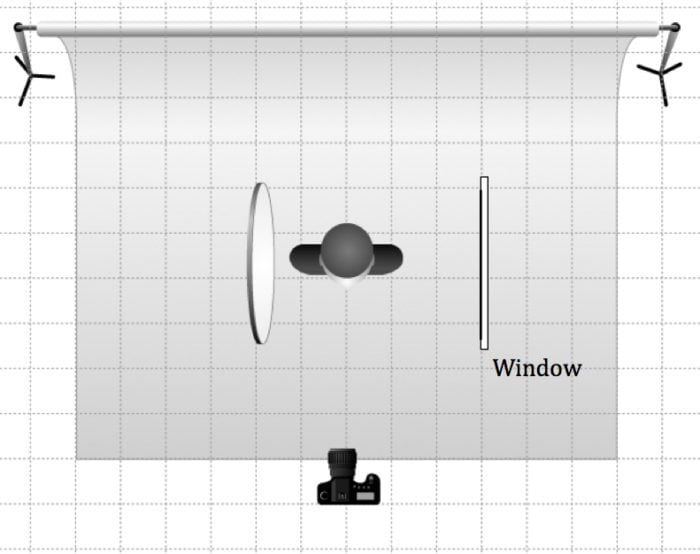
Portrait lighting setup diagram for split light with a reflector (left) and natural window light (right)
Of all lighting setups, split lighting is the easiest to recreate with ambient light. Having your model sit next to a window is the easiest way to use split lighting with natural light.
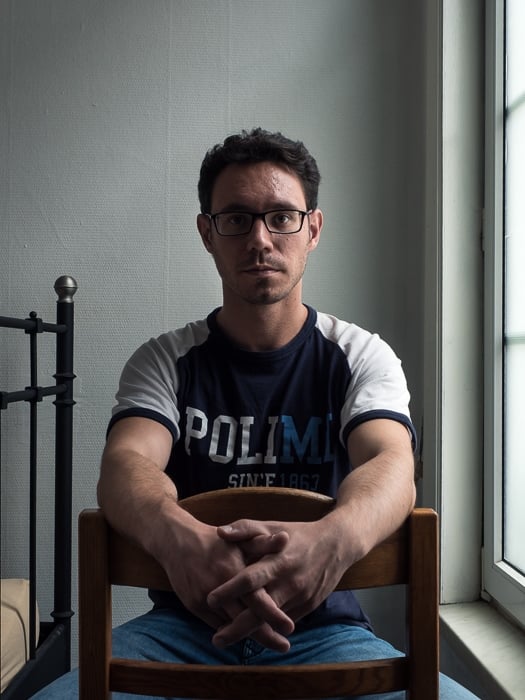
Split lighting with window light. 21mm, f/8, 1/30 s, ISO 100.
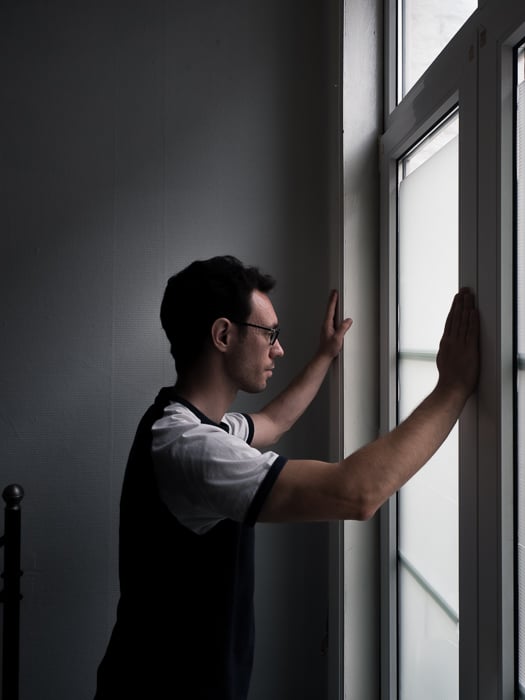
You can place a reflector on the opposite side of the model (facing the window). This works as a fill light to brighten the shadows and create more balanced images.

Subtle split lighting, created with a reflector in place of a fill light.
When working with ambient light, you have to pay attention to the environment you are shooting in. The surroundings will be visible in the image. Keep that portrait background uncluttered and non-distracting. And use the model’s surroundings to stage the portrait and set its mood.
The real challenge is to keep the shutter speed high. This way, your model will look sharp while you avoid underexposing your scene too much. The empty background in the photo below, with a hint of a bed in the room and a big window, produced a spare, minimal feel.
14mm, f/5, 1/30 s, ISO 100
3. Hero Lighting
An interesting variation of split lighting is when you mirror the flash setup, as shown in the diagram below. This creates the so-called “hero” lighting pattern. This setup takes its name from the powerful mood it conveys. It produces a strong shadow in the middle of your model’s face.
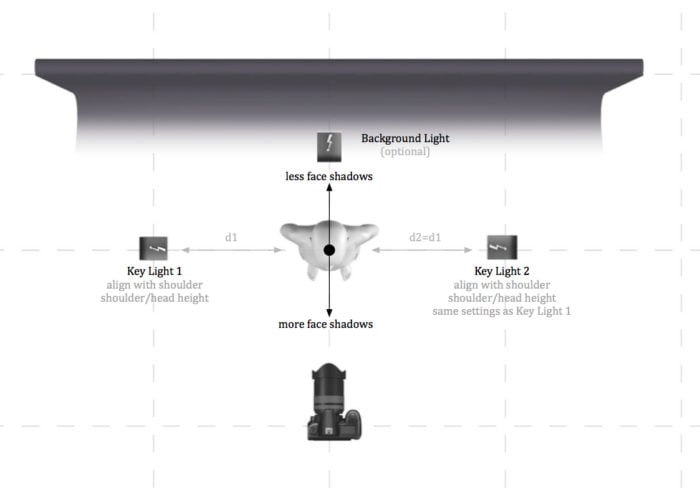
Portrait lighting setup diagram for hero light
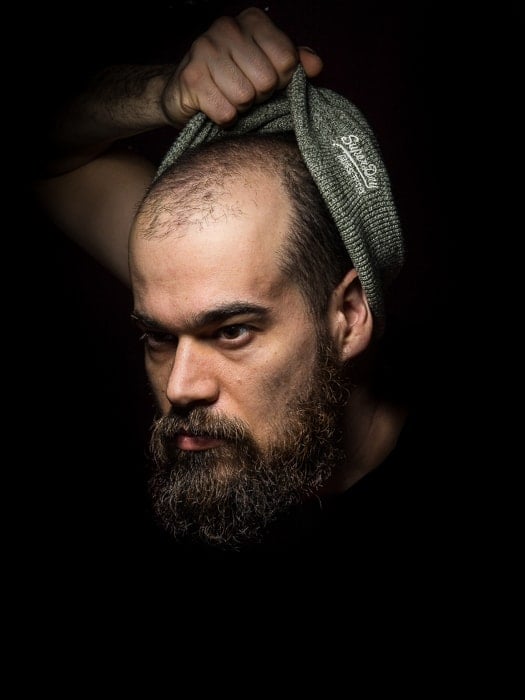
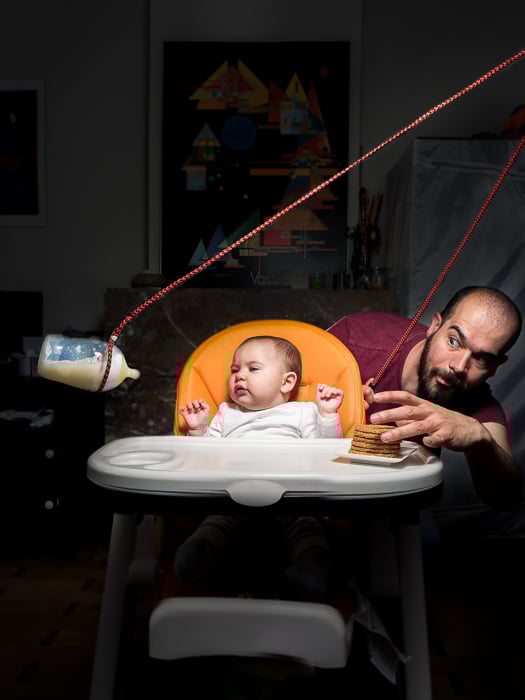
You can control the shadow’s thickness by positioning the model. Position the model behind the lights for a thinner shadow, like in my photo below. (Despite using hero lighting, I lost the battle with my six-month-old daughter.)
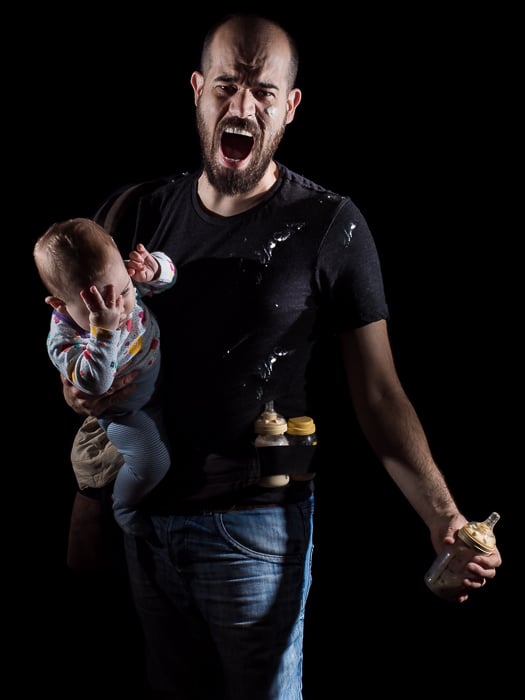
Hero-light setup with the model behind the lights
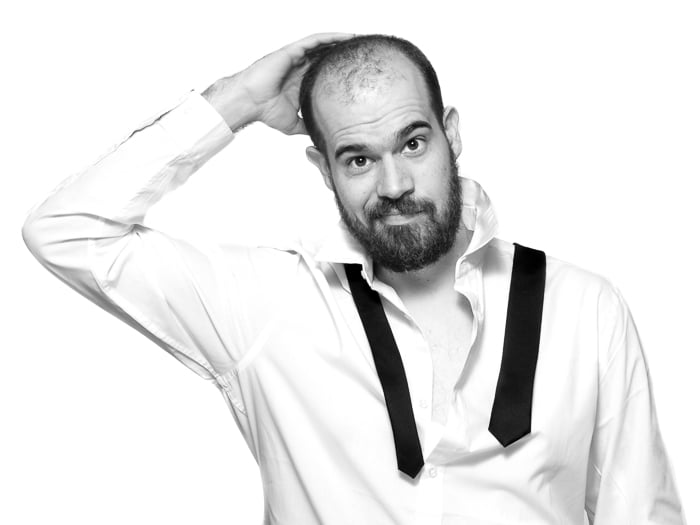
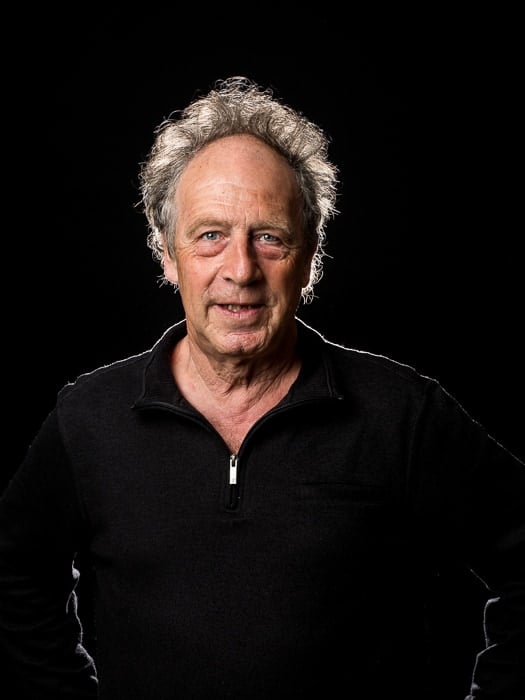
Put your subject in front of the lights to create a larger shadow. In the portrait below, the model was in front of the lights. You can tell this from the broad shadow on his face and torso. A strong, confident pose is best highlighted by hero lighting.
Hero-light setup with the model in front of the lights
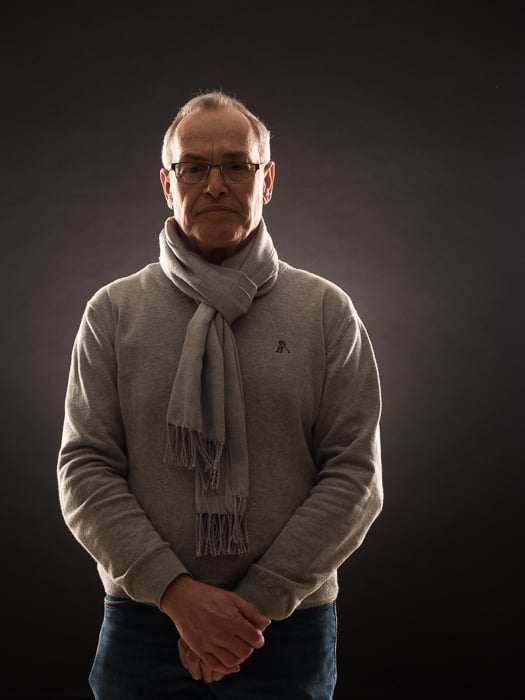
4. Loop Lighting or Rembrandt Lighting
Every article on flash portraiture proposes this simple one-light setup. It suits both male and female models. The portrait is particularly striking if you use a light modifier, like an umbrella or a softbox, to create soft light.
Here is a diagram of a classic one-light setup to create a soft loop lighting or Rembrandt lighting on your model. The background light is optional.
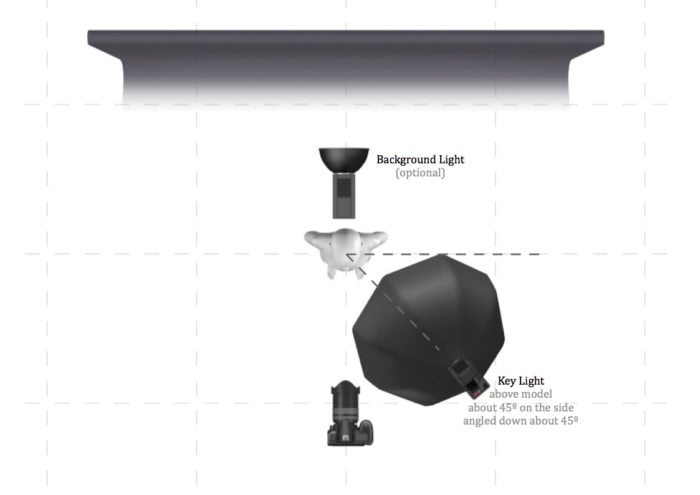
Portrait lighting setup diagram for loop light or Rembrandt light
You can add a separation light to keep your model from blending in with the background. This creates the most classic of the two-light setups.
And if you are after a more punchy look and feel, try replacing your umbrella with a grid. This produces a tighter splash of light. Here is a classic portrait with the loop lighting setup, using a medium-sized umbrella to soften the light.
Loop light setup
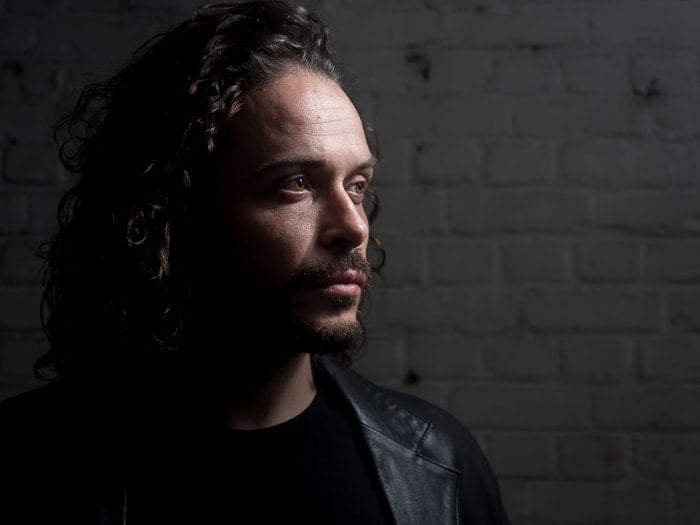
5. Butterfly Lighting and Clamshell Lighting
Butterfly lighting was very popular in the 30s among Hollywood photographers. The portrait light diagram below shows the butterfly lighting setup with an optional background light.
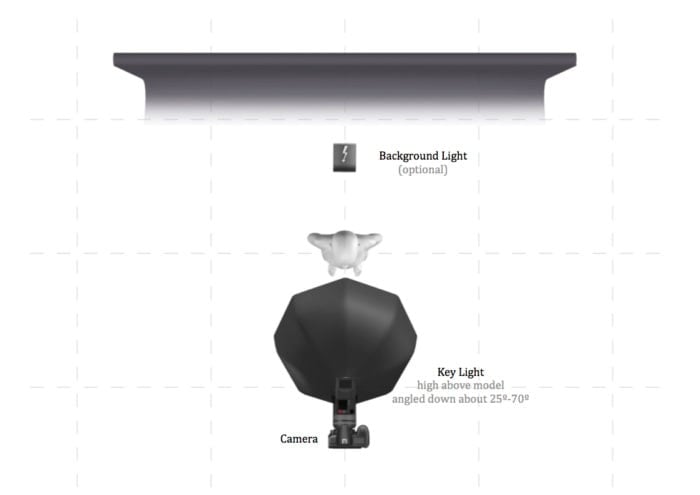
Portrait lighting setup diagram for butterfly light
It casts a small, butterfly-shaped shadow cast under the model’s nose. When shooting a female model, use an umbrella or a softbox to soften the light. As you can see, the butterfly portrait lighting setup can leave deep shadows. These appear under the model’s chin, cheekbones, and nose.
Self-portrait using butterfly lighting.
To disperse those shadows in the butterfly lighting setup, add a fill light under the key light, lighting the model from below. This is a clamshell setup. It is a go-to lighting setup that will never disappoint you.
Clamshell is a classic portrait lighting setup that will never let you down. In the portrait below, the two lights leave two distinct catchlights in the model’s eyes.
Clamshell portrait lighting setup
Usually, the fill light is weaker than the key light to leave some gentle shadows. It can be either a reflector or a second flashgun (set to a lower power than the key light).
A clamshell lighting setup using a reflector as fill light leaves some light shadows on the model. This portrait lighting pattern suits both low-key and high-key styles.
Clamshell portrait lighting setup
6. Rim Lighting
Create rim lighting with a single light or with two (diagram below). It depends on how much of the model’s contour you want to highlight.
Setting this up is a no-brainer. Hide a flashgun behind the model to light them from behind. If you want to highlight a complete figure, you need two lights. Place one on either side of your model, pointing back at them.
To have a nice, thin rim light highlighting only the contour of your model’s figure, mind your flash power. Too much and the light will spill over the contour and light their anterior side (the front).
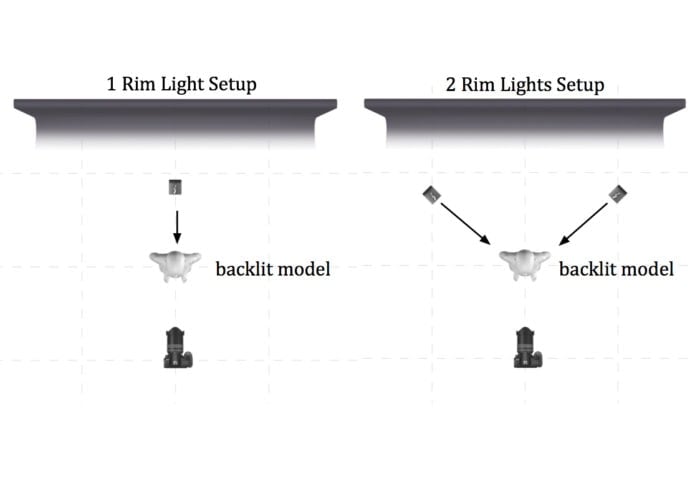
Portrait lighting setup diagram for rim light
You can use rim light to create images with a dark, mysterious, and sometimes abstract feeling. Rim light alone can produce great moody, low-key portraits.
You can also use it as a separation light. Combined with other lights, a rim light does an excellent job separating your model from the background, as seen in the photo below.
Two rim lights to create separation
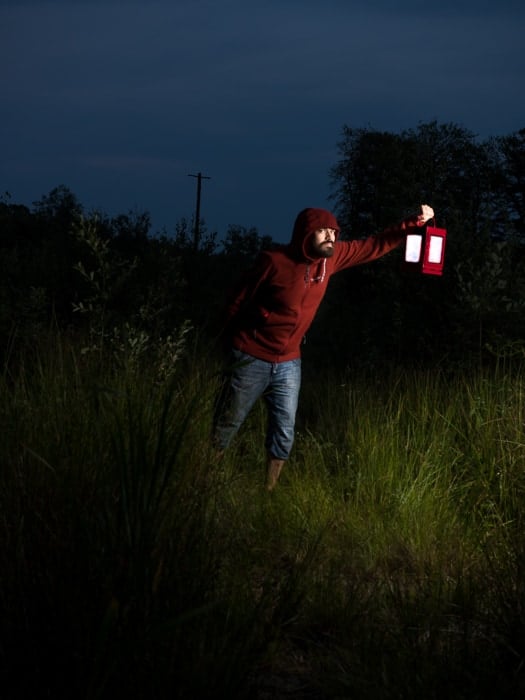
7. Balancing Flash and Ambient Light
We tend to suppress ambient light when doing flash photography in the studio. This is so it does not affect our portrait lighting setup. Sometimes, though, you may want to combine flash and ambient light.
First meter for the ambient light with aperture, ISO, and shutter speed. Then, match that reading with your flash.
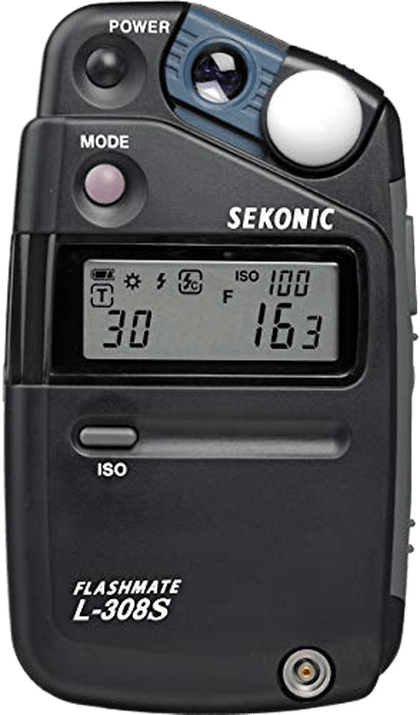
A flash meter like the Sekonic L-308s is a welcome accessory when working with flashlights. This is especially true when you are mixing them with ambient light. If you are unfamiliar with studio equipment, read our article about creating a home studio.
For this environmental portrait, I used the butterfly lighting setup.
Conclusion: Portrait Lighting Setup Diagrams
Our post gives you all the information you need to deliver striking portraits in several styles. But a last word of advice. Don’t get stuck on the “this or that” portrait lighting setup.
These lighting patterns are a starting point for exploration. Don’t be afraid to improvise and experiment with your light sources. And never forget to have fun!
We have an easy tutorial on creating a DIY Lightbox and tips on environmental portrait lighting that you should check out, too. We also have an inspiring article on achieving cinematic-looking portraits you can check out!


