Dramatic landscape photography can be breathtakingly beautiful. Capturing the power and beauty of nature in a photograph is an art form that can be incredibly rewarding. But it takes skill and knowledge to create truly stunning photos.
Here are our 11 tips to help you take your landscape photography to the next level.
Top Dramatic Landscape Photography Tips
The list of our top tips below will help you take your dramatic landscape photography to the next level!
1. Shoot at the Right Time of Day
The idea that you can just show up at any time of the day and get the best photo isn’t exactly the case. Those who want to be successful in photography know that their day is going to revolve around photography.
That might mean going to bed early to wake up for sunrise. Or rescheduling your evening meal for the sunset. These are the things you might have to do to get the best landscape photos.
So what are the best times of day to take photos? Every location is different, of course, but these are the most common times of day to shoot.
- The golden hour—This is the hour before sunset or after sunrise. Those amazing colors that reach the horizon often make for amazing landscape photos. If you photograph with the sun behind you, then this golden hour light can bathe a scene in a very nice warm light. With the sun at a lower angle, you will get sidelight onto mountains. These will add more drama and interest due to the shadows they cast.
- The blue hour—The blue hour is a period of time after sunset and before sunrise when the sky goes a deep blue. The length of time this light is present varies. If you’re on the equator, the blue hour can be short. The farther you are from the equator, the longer it will last. Photographs during blue hour are typically for cityscape scenes. Some natural landscapes work really well in this light.
- Other times—The above two are the most common times to photograph, but they’re not the only time. There are amazing landscape photos of the Milky Way, which of course, will be taken in the middle of the night. It’s best not to photograph in the hard light of midday. A day with cotton-white clouds or dramatic thunderstorm clouds are both great for landscape images.
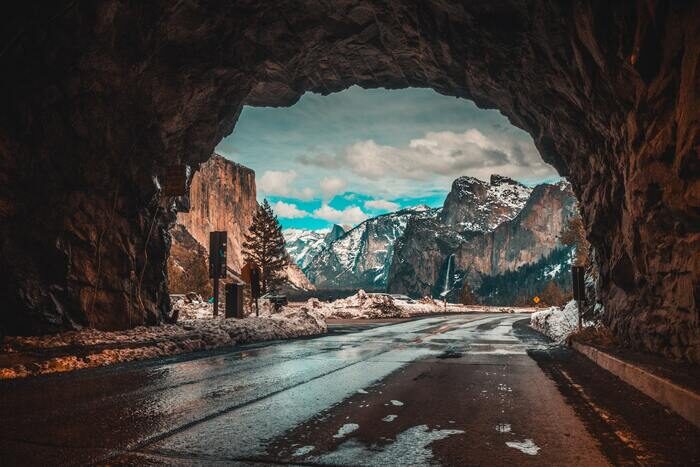
Getting to a location at the right time of year can really help. This photo benefits a lot from the autumn colors. It would also look great with snow.
2. Photograph at the Right Time of Year
There is nothing worse than getting to a location at the wrong time of year. There are landscapes that come alive with the seasons. Think of the transformative effect all those autumn leaves could have on a place.
There are other seasonal shifts that you should be aware of. Below is a list of these that you should keep in mind.
Use the internet to research these seasonal shifts. If possible, look for the date a previous photo was taken so you can aim to get the same conditions.
- Milky Way—In the northern hemisphere, the Milky Way season runs from around March until September. This is a nighttime photo. It shifts from an early morning photo to a late evening photo as the season progresses. You need to know where the Milky Way will be in the sky, as this will also shift. Check out the PhotoPills app for help finding it.
- The sun angle—There is a reason Stonehenge’s pillars line up the way they do. That’s because they record the angle of the sun as the year progresses. The sun’s angle can have a dramatic effect on your photo. Knowing when to visit a location when the sun angle is most interesting is important.
- The seasons—You might be in a temperate location with four seasons or in the tropics where there is a dry and a monsoon season. The local changes these seasons can bring to landscape photography could make or break your photo.
- Agriculture—The change of seasons changes the way agriculture looks. Things like rice paddies look great with the many reflection pools they have in spring. The golden yellows of the fully grown paddies in autumn ahead of harvest are also beautiful. Knowing when the harvest will be is important.
Any kind of long exposure, which can be common for landscapes, needs a tripod.
3. Always Bring a Tripod
If you’re taking landscape photography seriously, you’ll always want to keep a tripod with you. A tripod is a fantastic investment for almost any photographer. But landscape photography practically requires one.
Having a tripod for landscape photography is important for many reasons.
- Long exposure—Using long exposure for landscape photography can add much more drama to your photos. This is especially true when there are moving objects like swaying tall grass or a flowing river.
- Bracketing—Many landscape photos benefit from a post-processing technique called digital blending. You’ll need a series of bracketed photos of different exposure values.
- Sharper images—Using a tripod will get rid of most chances of camera shake, particularly if you use a remote shutter.
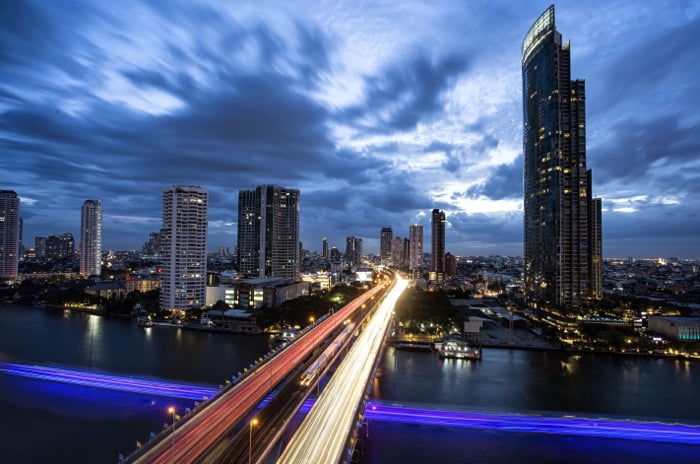
The bridge acts as the main subject of the image.
4. Include a Main Subject to Create Interest
One of the most important things you can do is include a main subject in your photo. A main subject will ground your landscape photo and tell a narrative.
You still need to look for good composition when placing the main subject within your scene. Things like following the rule of thirds and leading lines can emphasize your main subject.
The following are examples of good main subjects in a landscape photo.
- A lone tree—A classic in landscape photography. This can provide interest as it changes through the seasons.
- A lighthouse—A favorite for coastal photographers. It’s a great way of adding narrative to what are usually minimalist coastal scenes.
- A person—A fisherman or someone silhouetted against the horizon can add to the story. It also gives your landscape a sense of scale.
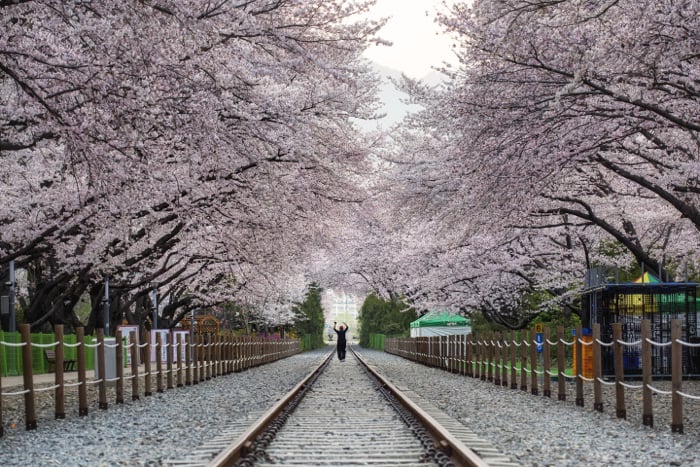
This photo has strong leading lines leading up to the main subject, a person walking along the tracks.
5. Ensure the Horizon Line Is Level
If you’re not patient when taking a landscape photo, it’s easy to get the horizon line wrong. Landscape photographers will use a wide-angle lens.
With these lenses, it’s even easier to get the horizon line wrong. There are several methods available to you that can fix this problem, though.
- Electronic level—Use the built-in electronic level sensor with a digital display on your viewfinder.
- Bubble level—A lot of tripods come with a bubble level, which can be used to make sure your camera is level.
- Post-processing—If you happen to have a good photo that you got the horizon crooked on, then there is still hope. You can straighten the horizon using almost any post-processing software. But you will lose some detail on the edge of the image to do this.
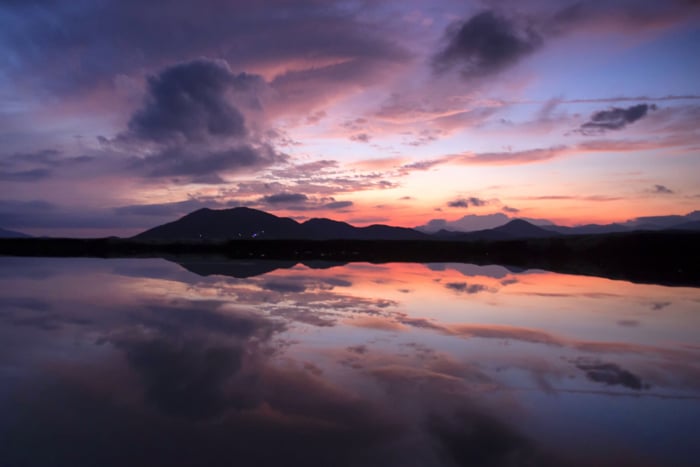
The reflection and a straight horizon line form the interest in this photo. It was taken the day ahead of a typhoon, and this led to an interesting sky.
6. Always Check Local Weather Conditions
You can plan everything ahead of time. But one thing that’s more difficult to plan is the weather on the day of the shoot. You’ll need some luck when it comes to this. If you have several days available to visit a location, you can plan to visit when the weather is at its best.
Look to check your local online or through an app for landscape photography. Some of these services offer up-to-the-minute satellite imagery, giving you the location of clouds, rain, and thunderstorms.
You can use this to decide whether visiting a place is a good idea on any given day. Another local condition that you will need to think about if you’re a coastal photographer is the tide. You can plan this ahead of time by checking a local tide timetable.
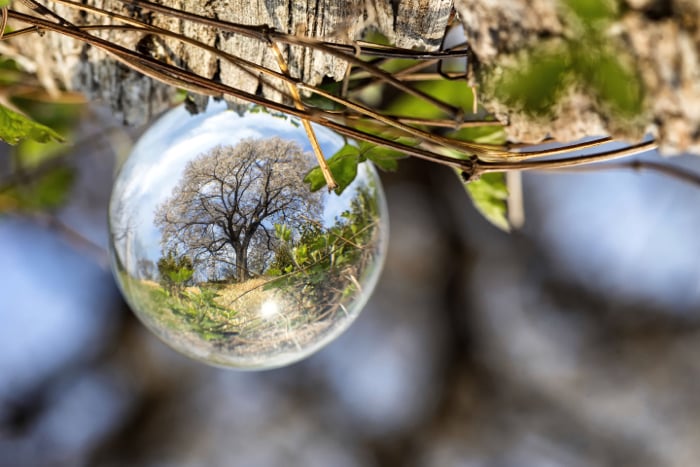
Using different techniques for landscape photography is a great way of producing unique results.
7. Use Unique Angles From Popular Vantage Points
There is often a great angle or viewpoint that every photographer visits. There’s no reason you shouldn’t also take photos from this position. But it won’t get you the most creative results.
Instead, visit a famous landmark. Study it for other potential angles or ways you can take a photo to make it more unique.
It may not take much to get something different from other photographers, so try out these ideas.
- Creative technique—Adding something different to your scene by using infrared filters or a lensball!
- Vertical orientation—Many landscape photos are taken horizontally. Try changing it up by using a vertical orientation. See how you can frame that differently from the normal photo.
- Exploring nearby—Take a walk away from the tried and trusted angle. You can usually find your own point of view and get an equally striking photo of a famous location.
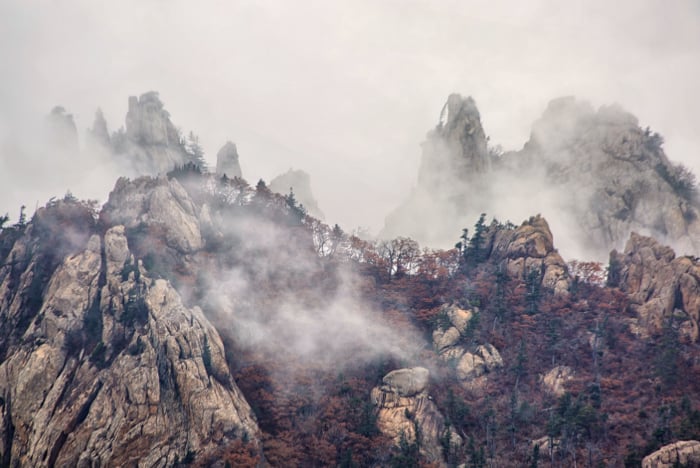
This mountain range was a place I revisited. On this occasion there was beautiful mist drift across the peaks.
8. Revisit a Previous Location
When a location is on the other side of the world, it’s difficult to revisit it. But that’s not the case when it comes to your own neighborhood, where you can and should revisit.
Your photography will evolve with time. You’ll pick up different equipment and learn new ways to process images.
When you return to a previous location, you’ll also know the go-to spots already. You can reuse those or find somewhere new, knowing you have a backup location if the new one doesn’t work.
Photographing from the same location is also a great way to measure your improvement as a photographer.
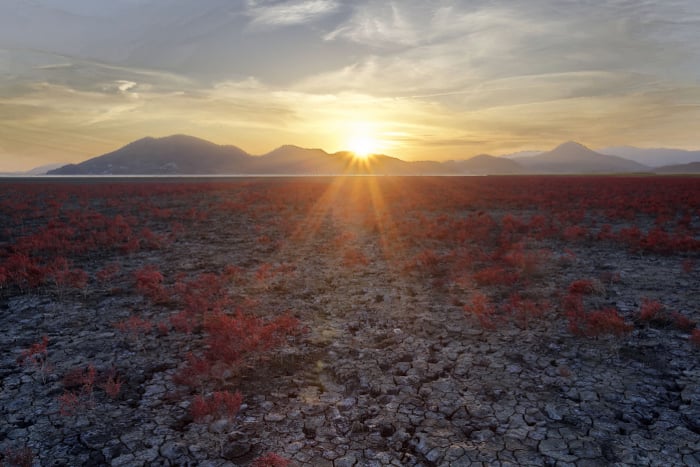
The salt marsh plants are seasonal and may not have been there on another visit.
9. Take the Photo While You Have the Chance!
There are many things you can plan ahead for in photography. But a spontaneous moment can give your photography the special element that elevates it.
When something catches your eye, there is a reason. And you need to be in that moment to capture it. Stop the car or take a pause on your hike and take the time to unpack your camera. You don’t know if you’ll get the chance to retake this shot.
So what are these transient moments that you need to take advantage of?
- People or animals—These will almost certainly not be in the same place on a revisit. If their presence makes the photo, make sure you take that photo.
- The weather—Eventually, the weather will repeat itself, but you may be waiting for a long time for that to happen. If you see morning mist, rays of light coming through dramatic clouds, or a rainbow, it’s time to stop and get the camera out.
This photo uses digital blending to balance light across the frame. The light trail from the boat needed several images to complete the trail, with layer masking used to add sections of the boat’s light trail across the entire frame.
10. Edit Your Photos In Post
The idea that you can get the best photos straight out of the camera is false. You should aim to get the best result you can before needing to use further post-processing. But all photos will benefit from editing them.
In landscape photography, there are a few steps that you should follow to get the best results.
- Digital blending—A lot of landscape photos are taken towards the sun. This can result in either a blown-out sky or a foreground that’s too dark. Correct this by bracketing your photos. Then blend them together using luminosity masks. This will result in one image correctly exposed across the frame.
- Enhancements—Adding or removing contrast, saturation, and vibrancy will affect the mood of your photo.
- Sharpness—You can achieve greater sharpness using sharpening programs like NIK Sharpener Pro. Sharper photos will stand out much more.
- Noise—Post-processing can actually add noise to your photo, especially programs that sharpen. Use noise reduction programs like Adobe Lightroom’s AI denoise feature to remove this noise.
11. Use the Correct Camera Settings for Landscape Photography
Learning to use the correct camera settings on your camera is very important.
Many cameras have the default landscape mode. As a new photographer, this might seem the logical setting to use when it comes to landscape photography. But you’re handing over control of the photograph to your camera.
You want to be in control of your camera, not the other way around.
- Aperture—In most cases, you’ll want sharp focus across your frame for a landscape photo. For landscape photography, f/8 or f/11 are good choices when it comes to aperture. Depending on your lens, you will have a different aperture sweet spot for best sharpness. Find out what that is, and then use this as your aperture setting.
- Shutter speed—Shutter speed is less important for landscape photos because the scene usually doesn’t have much movement. That is unless you’re shooting swaying tall grass or a flowing river. Then you will want to use a slow shutter speed to create motion blur.
Common Questions All New Landscape Photographers Ask
How Can I Improve My Landscape Photography?
The best way to improve your landscape photography is to bring the right equipment. This means a tripod, a wide-angle lens, and a high-quality camera body.
You also need to have thoroughly done your research on the location. Look at seasonal conditions and weather conditions for the day you want to shoot.
What Should I Look For in Landscape Photography?
You’re looking for a strong composition. Use leading lines, reflections, or the rule of thirds to achieve this.
Including a main subject in your frame will improve your image by creating a narrative.
How Do You Photograph a Dramatic Landscape?
The best way to photograph dramatic landscapes is to visit dramatic locations. Look for areas with a volcanic past or even one that is currently volcanic.
The most dramatic landscapes are shot where the earth is most active. Another option might be the coastline, where coastal erosion can create interesting features.
How Can I Improve My Nature Photography?
Nature photography is a slightly different field to landscape. But there is a lot of crossover. To get the best nature photography, you need to know the season, the weather, and even wild animal behavior or migration patterns.
Once you have all this knowledge, you’ll be able to visit the location at the best time. Be patient, but at the same time, prepare for that spontaneous moment of capture.
Conclusion—Dramatic Landscape Photography
Lots of people take landscape photos. But knowing a few tips and tricks will help you make photos that stand out from the crowd.
Sometimes you need to meticulously pre-plan everything. Other times a spontaneous shoot will give you the best landscape photos.