What are the best newborn photography camera settings? How do you keep the photo sharp but the background blurred? The best baby photography settings blur out the distractions. They freeze any movement for sharp memories of those first few months of a child’s life… Here’s what you need to know to freeze time and capture great newborn photos!
Newborn and infant photography captures the rapid growth in the first few months of life. Nothing quite makes a person wish for the ability to freeze time like holding a newborn baby. But while pausing the space-time continuum isn’t possible, freezing that moment is. You just need a camera!
What Are the Best Newborn Photography Camera Settings?
In infant photography, you need to consider the exposure settings. You should also consider settings such as white balance and focus settings. So let’s dive deeper into what those settings entail.
3 Basic Camera Settings
A photograph’s exposure relies on three basic camera settings:
- Shutter speed, or the length of the exposure
- Aperture, or the size of the opening in the lens
- ISO, or the sensitivity of the camera sensor
Below, we go more in-depth on each of these camera settings for newborn photography.
Where to Set Up for Newborn Photography
Any image’s camera settings largely depend on the available light in the scene. For that reason, you should, ideally, set up for infant photography near a large window.
Place the baby so that the window light naturally falls on their face. The light from the sun doesn’t come from the ground, for example. So never place the baby’s toes toward the window.
You might photograph unposed images, such as newborn photos in the hospital. If so, open any window blinds during the day or at night. And turn on all the available lights in the room. That extra light helps you get the most flexibility with your camera settings.
After you have prepared the room, start with the camera settings. These will remain unchanged for the entire shoot.
The Type of Image Files to Use
The first setting to consider is file type—JPEG or RAW. If you plan on editing the photos, RAW is the best option. A RAW photo is much more flexible inside a good photo editor than a JPEG.
The only problem is that you must edit RAW photos first with a compatible program. But JPEGs are ready to print and share straight from the camera.
If you don’t plan on editing, use a JPEG. (RAW can sometimes also slow the camera down. But it isn’t an issue with most infant photography.)
White Balance Settings for Newborn Photography
The white balance setting also remains the same as long as the light remains the same. But the white balance may change if you photograph outside… like when the sun goes behind the clouds, for example.
Auto white balance works for most infant photos, especially with the camera set to RAW mode. If your photos turn out too blue or too orange, you can adjust the white balance to match the lighting in the room. The settings are named after the light they are best for, like cloudy or fluorescent.
Best Focus Settings for Newborn Photography
You can also set up autofocus settings at the beginning of the photoshoot. An autofocus (AF) area mode determines what area of the photo the camera focuses on. But the best autofocus setting for infant photography is a single-point autofocus mode. This lets you custom-set the focal point.
You put this focal point on the baby’s eye in most cases. There are exceptions, such as focusing on those baby toes or that wisp of baby hair in a close-up photo. You can also use Eye AF if your camera has it. This automatically finds and focuses on the eyes for you.
Other than the autofocus area, you want to tell the camera whether to focus once or to focus continuously. For still or sleeping babies, set the autofocus to AF-S or One-Shot (single or single-area AF).
You might photograph older babies that crawl or move in any way. This changes the distance from their face to the camera. In this case, use the AF-C or Al-Servo focus mode (continuous AF).
You also want to turn on the camera’s burst mode for active babies. If you keep the shutter button pressed, your camera takes photos in quick succession.
Best Exposure Settings for Newborn Photography
The exposure settings often change during a newborn photo shoot or a session with an older baby. Options like whether to shoot RAW or JPEG won’t change that much.
You should use manual mode or aperture priority mode for newborn photography. The first allows you to change all three exposure settings. But the latter one adjusts some of the settings for you. Manual offers more control. Aperture priority is faster and easier for beginners to grasp.
Shutter Speed Settings for Newborn Photography
The camera’s shutter speed lets you freeze any motion in the photo. But if you are taking photos of a sleeping infant, the only motion you need to freeze is any camera shake.
In this case, you want to use a fast shutter speed. Its number should be greater than the length of your lens. For example, if you shoot with a 100mm lens, set the shutter speed to at least 1/100 s.
The more active the baby is, the faster the shutter speed should be. A relatively still, smiling, and awake baby needs a faster shutter speed than a sleeping baby. It’s ideal to start at speeds above 1/160 s.
Crawling babies need an even faster shutter speed of at least 1/250 s. You can use even faster shutter speeds if there is plenty of light in the scene.
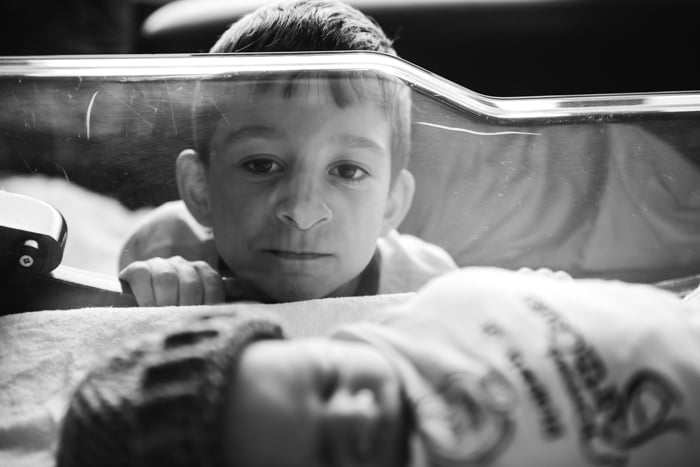
This f/2.8 aperture gets big brother in focus, but not the baby.
Aperture Settings for Newborn Photography
The lens aperture determines how blurry the background and foreground are. To get that out-of-focus background, you want a wide-open lens or a low f-stop number, such as f/2.8.
But the wider the aperture, the harder it is to get everything focused. You might photograph a baby with another member of the family. An aperture of f/2.8 will likely leave at least one person somewhat soft and out-of-focus.
If the aperture is really wide and the baby isn’t facing the camera, one eye will be in focus while the other eye is not.
The closer you are to the baby, the narrower you need to make the aperture to keep the subject sharp. If you are doing a close-up of baby toes, you may want to step down the aperture instead of shooting wide open.
Start with these aperture settings. Adjust as needed for the depth of field or how light or dark the image is:
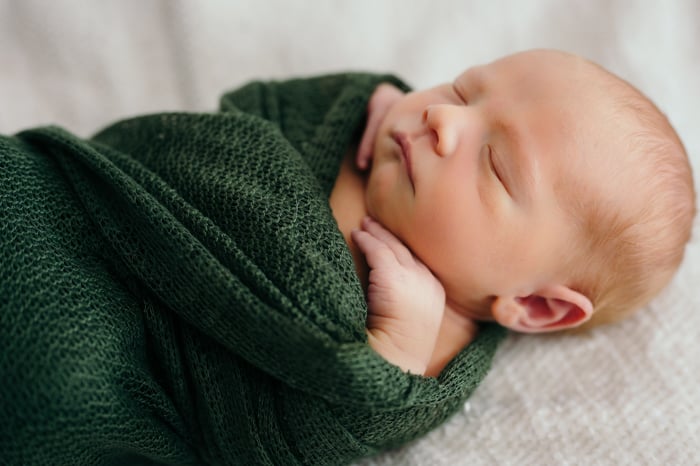
- f/2.8 and lower: This creates soft, creamy backgrounds for baby portraits. It’s ideally used with both eyes the same distance from the camera to keep them sharp.
- f/4: This creates a still, soft background. But you have an easier time getting the baby in sharp focus. This setting is also good for close-ups.
- f/8 and higher: Use this to photograph the baby with other family members. This keeps everyone in sharp focus.
Light and Best ISO Exposure Settings for Newborn Photography
Both shutter speed and aperture also affect how light or dark the image is. Faster shutter speeds and narrower apertures create a darker photo. Slower speeds and wider apertures create a lighter photo.
ISO helps balance out the exposure. It lets you use the best shutter speed and aperture for the photo and still get a well-exposed image.
Lower ISO numbers are less sensitive to light. This creates darker images, while higher ISO numbers will lighten the image. The trade-off is that higher ISO settings reduce image quality. It introduces noise or grain in the image.
Every camera is a little bit different. Most modern DSLRs and mirrorless cameras can handle at least ISO 3200. And you won’t get terrible image quality. Some can go higher. So feel free to test your gear out at higher settings and see what results you get.
In general, you should use the lowest ISO setting. It should allow you to use a high shutter speed to freeze the motion.
In manual mode, you can adjust all three settings. The exposure meter in the camera helps guide your camera setting to get proper exposure.
You want to keep an eye on the meter (usually at the bottom or side of the viewfinder). Or you might want to take an occasional look at the LCD to ensure you don’t need to adjust your settings.
Aperture priority (the A or Av mode on the mode dial) is often easier for beginners to work with. It can offer more control than you think. Inside the camera menu, turn on auto ISO and set a minimum shutter speed based on whether the baby is still or on the go.
With auto ISO and that shutter speed limit in place, you can focus just on adjusting the aperture. The camera ensures the shutter speed is at or above what you selected. And it ensures the ISO is the lowest possible to balance out the shutter speed and aperture.
In aperture priority mode, use the exposure compensation setting. These brighten or darken the image if the photo is too light or too dark. A positive value brightens the image, while a negative one darkens the image.
Newborn Photography Camera Settings Questions
Babies don’t come with an instruction manual. But your camera does! Each camera varies a bit on where you find each setting. After you understand the settings you must adjust, look at your camera’s manual if you can’t find them.
Here are the answers to some of the most common infant photography settings.
What is the Best Camera for Newborn Baby Photography?
DSLR or mirrorless cameras are ideal for newborn photography. They have larger sensors and more advanced controls. You don’t need the market’s fastest, most advanced mirrorless camera. Even an entry-level interchangeable lens camera will capture good baby pictures.
Check out our current recommendations for the best DSLRs and best mirrorless cameras.
When Should You Take Baby Pictures?
The best time to take those sleepy newborn photos is between 7 to14 days after birth. But since babies are always changing. So taking photos regularly is a great idea.
Conclusion
Newborn baby photography captures the constant growth before tiny toes become teenage feet. But the best newborn photography camera settings vary based on the scene’s light. The perfect camera settings for an indoor shoot are way too bright for an outdoor shoot. That’s why learning exposure basics is essential.
It’s important to know how much of the image you want to be in focus and how much movement is in the scene. This also plays a role in determining where the camera settings should be for the shot. By balancing shutter speed, aperture, and ISO, you can freeze the sweet moments with an infant. Check out some great tips for shooting DIY newborn photos with your smartphone next!


