Equivalence is one of the most important concepts in photography. But what is equivalence? It's the principle that says a photograph can be created by any combination of focal length, aperture, and shutter speed as long as the exposure is equivalent.
In other words, you can use any combination of settings to create a photo that will look exactly the same when it's printed. This opens up a world of possibilities for creative photographers who want to experiment with their images.
- Master manual mode to capture moments you’re proud of.
- Overcome the frustration of missed shots with quick exposure settings.
- Benefit from visuals with hundreds of images and illustrations.
What Is Equivalence?
Photography gear is diverse. One can easily get lost in the wilderness of different sensor sizes, focal lengths, and camera types.
This diversity is why equivalence exists – to help standardise everything.
It does this by comparing everything to a set point. That point is the full frame sensor and full frame camera systems.
Why Should You Care About Equivalence?
Equivalence is a topic that not only confuses people, but some also think that it’s useless.
They are not entirely wrong.
If you’re only familiar with one camera system (say, Micro Four Thirds), and haven’t used a different system, it will mean nothing to you.
If you’re at the start of your journey in photography, it’s not the most important concept to understand.
Photography is not all about technical gear, specifications, and calculations. These are part of it, but no one will ever judge your photos based on the equipment you’re using.
They are tools.
You should, however, know your tools, especially if you want to become an expert.
Equivalence helps with that. Using equivalence, you can compare and choose the best tools for your needs.
So, let’s jump in it. Expect some maths and numbers, but in an easy-to-digest, comprehensive form.
Photography Terms to Clarify
First, I must clarify a few photography terms. Most of them are used in everyday photography, but there are some you have probably never heard.
To avoid confusion later on, it’s crucial that you fully understand them.
Camera Terms
Format refers to standard sensor sizes. The most common are full frame, APS-C and Micro Four Thirds format cameras. There are also smaller ones used in phones and compact cameras.
Sensor Size. The area of any sensor, given by the length of its sides. The size of a full frame sensor is 36mm x 24mm.
Sensor Diagonal. The length of a sensor’s diagonal is used to calculate the crop factor. Can be directly calculated from the two sides with the Pythagorean theorem.
Sensor Plane. The plane at which the sensor or film is within a camera. You can find it on your camera at the ∅ symbol.
Crop Factor. The ratio of the full frame diagonal compared to any given format’s sensor diagonal.
Pixel. A tiny, light-sensitive detector. Pixels are the smallest component affecting image data. There are millions of them on a camera sensor – they build the image.
Pixel Count. The number of pixels found on a sensor. It’s usually given in megapixels, MPs – 1,000,000 pixels.
Pixel Size. The physical size of a single pixel. It is the length of one side, in micrometres, μms. The bigger a pixel is, the more light it can collect – resulting in lower noise, generally.
ISO. Commonly referred to as ‘sensitivity’, which is only half-true. It’s a setting that fills the inconsistencies in exposure among different formats and pixel sizes. We’ll examine it in detail.
Signal-to-Noise Ratio (SNR) is the ratio of valuable light information (signal) and random information (noise) on an image. With less light comes a lower SNR, so relatively more noise.
Lens Terms
Focal length. A physical property of a lens, given in millimetres. It’s in inverse proportion with the lens’ angle of view – however, it doesn’t determine it on its own.
The angle of view. Abbreviated as AoV. The angle (vertical, horizontal, or diagonal) that a focal length on a given format produces. Field of View (FoV) is very similar. They can be used interchangeably.
Depth of Field. Abbreviated as DoF, it refers to the area (depth) in acceptable focus. It’s determined by subject distance and aperture size only. Focal length or sensor size do not influence depth of field.
Projection. The area that a lens’ image covers at the plane of the film or sensor.
Point of Convergence. The point in a lens where all incoming light that’s in focus converges in a point. Usually the location of the iris.
Iris / Diaphragm. A mechanical part of a lens, located near the point of convergence. It narrows down or opens up the size of the aperture. Sometimes called aperture, which is suitable in everyday use, but not here.
Aperture. The opening of the lens at the point of convergence.
Aperture Size. As the aperture is circular, we can give its size using its diameter, in millimetres– a critical factor when it comes to calculating equivalence.
Relative Aperture. The ratio of the focal length and the aperture size. Commonly given in f-stops. A vital part of the exposure.
T-Stop. The f-stop corrected by the actual ratio of light transmittance. T-Stop gives an accurate measurement of the light passing through a lens.
Flange Distance. The distance from the sensor to the lens mount in a camera system.
Coverage. The size of the circle of projection coming from a lens. Measured at the sensor plane. It tells you if a lens covers a format, or you should expect black corners.
Format. The sensor format that a given lens is designed for.
Resolution. An aspect of optical quality in a lens. Measured by comparing the lens to a ‘perfect lens’, displayed by MTF charts. It refers to the sharpness of a lens.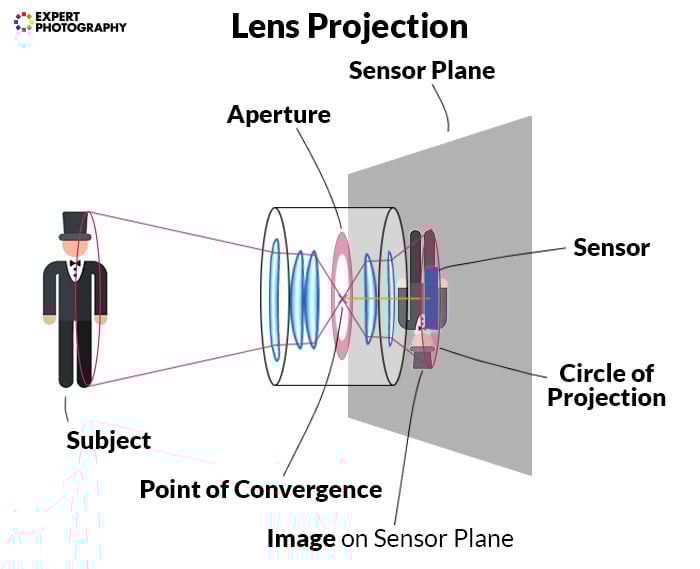
The Importance of the Full Frame Standard
So, why is everything compared to full frame, and why is there even a need for this?
There are multiple answers to this question.
In the past century, 35mm film was the most popular format. This format represents a balance between low price, portability, image quality and performance.
Most photographers are familiar with how focal lengths ‘look’ on a 35mm film camera. Almost every photography book and guide created in the 20th century uses 35mm as a base.
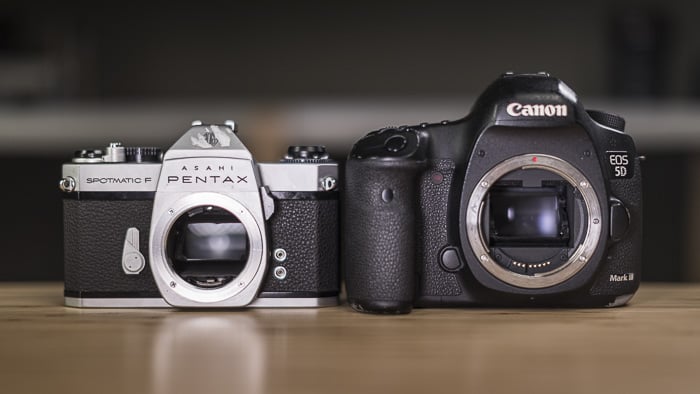
35mm Full Frame – Film and Digital
You can also adapt lenses to different formats. You could use an adapter to attach an old 35mm-film lens onto an APS-C body. Or, you could use a full frame Canon EF lens on an APS-C Canon EF camera.
This adaptability brings the need for a common reference point.
Full frame was (until recently) the largest format everyday photographers could afford.
Medium format was out of reach for everyone except top professionals. So, it makes sense to go with full frame as a benchmark.
The Crop Factor
Crop factor is a phrase that you’ve undoubtedly heard before. It refers to the ratio of a given sensor’s size compared to full frame. It’s calculated using the diagonals.
Most of today’s digital cameras don’t have a full frame sensor. Instead, they feature smaller, less expensive sensors.
These sensors are what you’ll find in DSLRs and mirrorless cameras that you can grab from the shelf in your local tech store.
How much smaller they are in comparison to full frame varies. There are common sizes, though. The most widespread are the following:
- Compact cameras and smartphones all use sensors with dimensions less than 13mm x 9mm. Their crop factor varies between 3x and 8x.
- Micro Four Thirds (MFT or M4/3) – This is also the name of a camera system. These are the smallest sensors you’ll find in interchangeable lens cameras, measuring 17.3mm x 13mm. The diagonal is 21.6mm, exactly half of full frame. Its crop factor is thus 2x. Aspect ratio is different from full frame’s 3:2; instead, it’s 4:3.
- APS-C – Larger than MFT. Not an exact size. APS-C sensors measure between 22x15mm and 25x19mm. Aspect ratio is 3:2, same as full frame. Crop factor here is 1.5-1.7x.
- APS-H – A 29.2mm x 20.2 mm sized format, which is now mostly extinct. It has a 1.3x crop factor.
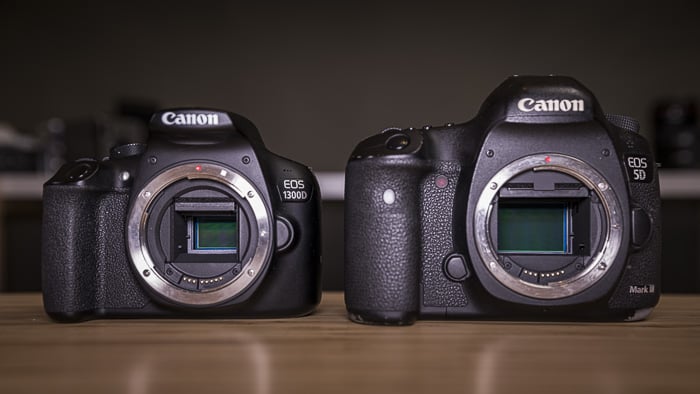
An APS-C and a full frame Canon camera
If you compare the diagonals of these sensors to the full frame diagonal of 43mm, you get the crop factor.
The crop factor is in decimal form. A crop of 1.6x means that the sensor is 1.6x smaller than full frame. A crop of 0.8x means that a sensor is bigger than full frame, by 1 / 0.8.
The crop factor of full frame is 1.0x.
Effect of Crop Factor on Field of View (Focal Length)
The crop factor tells us many things. Its most noticeable impact is the change in the field of view.
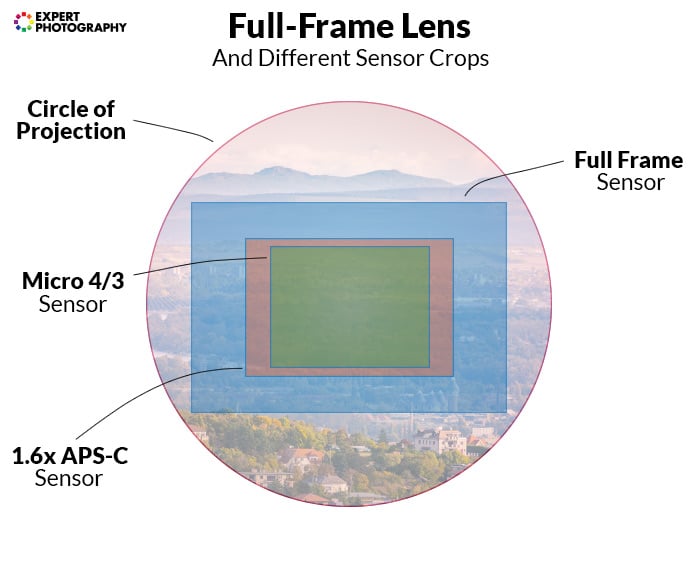
A photographic lens has limited projection. The projection is a circle. Its size varies, depending on how far from the lens you measure it. We measure it on the imaging plane or sensor plane.
Camera lenses are designed with a particular format in mind. A full frame lens has to cover the size of a full frame sensor, and a bit more (for better quality). So, it’s projection is designed to be wide enough to do so.
This means that if there are no other obstructing elements, you can easily mount a full frame lens on a smaller sensor, too.
But that lens won’t behave like it would on a full frame camera. The crop factor will crop its field of view.
The chances are that you’re doing this all the time. The most popular prime lens, the nifty fifty (50mm f/1.8) covers full frame sensors. It was designed for film cameras.
When you mount it on a smaller digital camera, you’re not using the entire lens!
Take a look at how different sensors ‘crop’:
What Does This Crop Factor Mean in Real Life?
Crop factor is not a problem. You can utilise the effect of crop factor to serve your needs. It might even lead to an increase in sharpness, in specific lenses.
For example, I often use a Canon EF 24-105mm f/4 IS lens. It’s a sharp lens. But it has strong spherical aberration towards the image corners, which causes blur in these areas.
When I mount the lens on a cropped-sensor camera, those corners are cropped out. So, the overall sharpness of the images is better.
This is how you can most easily understand the field of view crop:
Telephoto effects are amplified – a telephoto lens becomes even more telephoto on a smaller sensor.
It’s valid on the other side, too. A wide-angle lens designed for full frame (say, a 24mm f/1.4) will look tighter on a crop camera.
Keep this in mind when choosing your lenses.
If you multiply the real focal length of a lens with the crop factor, you get the equivalent focal length. It shows you what focal length would provide the same field of view on a full frame camera.
Remember that focal length is a property of only the lens. Because of this, lenses designed for crop sensors are marked with their real focal length, and not the equivalent one.
An 18-55mm kit lens is designed for APS-C cameras. APS-C crop is around 1.6x. Thus, the combination provides the same view that a 28-90mm lens would on full frame.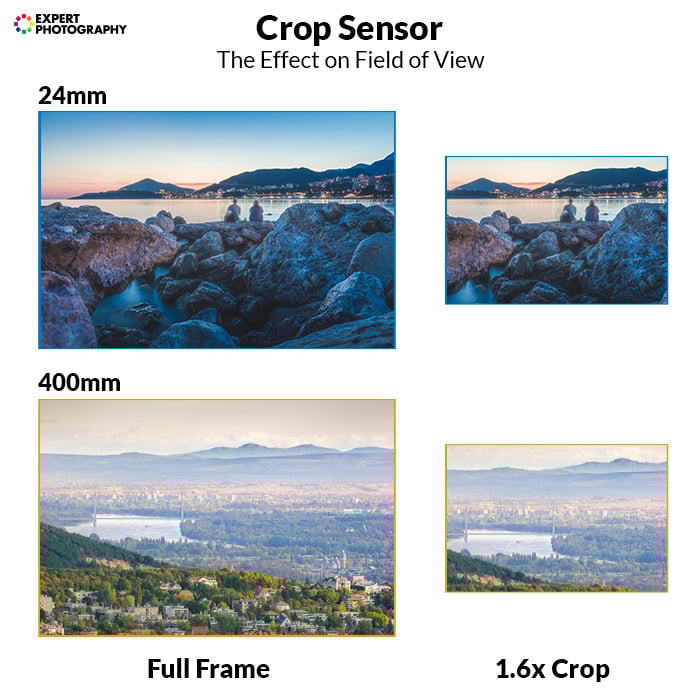
So, crop factor’s effect on the field of view is not good or bad – but it’s essential to see it.
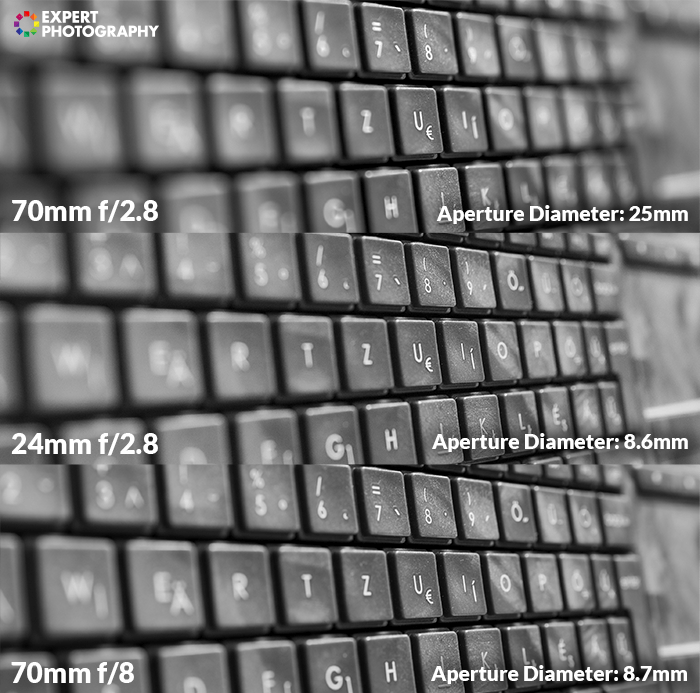
Effect of Crop Factor on Aperture
As you saw earlier, we have to make a critical distinction between the relative aperture and aperture size.
Relative aperture is the one that you use every day. It’s a vital part of exposure. It’s relative because it’s the ratio of focal length and aperture size.
Aperture size, on the other hand, refers to the physical size of the aperture.
It’s expressed with the diameter. From that, we could calculate the actual area, using the πr2 formula. The diameter is twice the radius, so the area is π(d/2)2.
This calculation implies that aperture is indeed affected by the crop factor, by the power of two. Let me explain.
The Physics Behind the Crop Factor
We have two lenses. The 25mm f/1.8 is a popular choice for Micro Four Thirds cameras. The 50mm f/1.8 lens is often the go-to prime for full frame cameras.<img class=”aligncenter wp-image-237745 size-full” src=”https://expertphotography.com/img/2019/12/equivalence-1.8-lenses.jpg” alt=”an Olympus 25mm f/1.8 lens and Canon 50mm f/1.8 lens” width=”700″ height=”489″ />
The 25mm f/1.8 has an aperture diameter of 14mm, while the 50mm f/1.8 has a diameter of 28mm. The 25mm lens has a quarter of the aperture size at f/1.8 compared to the 50mm lens.
They still let the same amount of light through. But, the 25mm gathers that amount of light from a four times greater area.
Let’s mount these onto the M4/3 and the full frame cameras, in order, to get a similar field of view.
At a 2x crop, you’re cropping out 3/4 of the 25mm’s coverage, and thus of its light.
If you don’t believe that you lose light in the process, think about it this way: Light is energy. You can’t have the same amount of energy in a smaller and larger area at the same time.
This fact means that at the same f-stop (relative aperture) and field of view, the M4/3 camera gets 1/4 the light that full frame does.
To write this in a general formula, you get (crop factor)2 less light on a crop sensor at the same f-stop.
How Can You Avoid the Crop Factor?
Simple. Look for a lens with matching field of view and identical aperture size for your crop camera.
So, a 50mm f/2 on full frame is equivalent to a 25mm f/1 on Micro Four Thirds.
This rule, though, only applies to the field of view and total light (and depth of field). Sharpness and detail are affected by other aspects, more on them later.
Below you can see some sensor size and lens combinations that receive the same amount of light. They give the same field of view. They also have the same depth of field if other factors are held constant.

Effect of Crop Factor on Depth of Field and Background Blur
Let’s bust a big myth, first.
Depth of field is not affected by either sensor size or focal length. What affects it is how you accommodate changes in sensor size and focal length.
It is solely determined by two factors: focusing distance and aperture size.
But there’s a twist.
We often use f-stop to measure aperture. At a constant f-stop, an increase in focal length introduces an increase in aperture size. This gives the illusion that focal length affects depth of field.
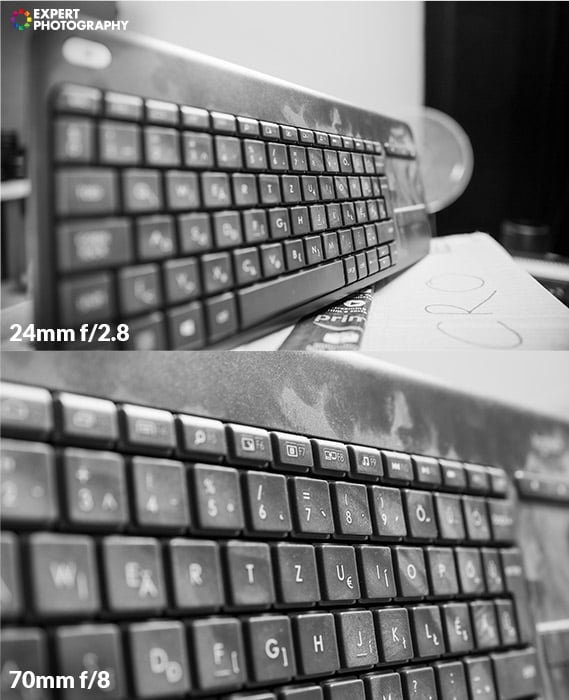
To illustrate this, I used a 24-70mm f/2.8 lens. All three images are from the same position. I cropped into the 24mm shot to match the 70mm. This cropping has the same effect that a 3x crop factor would have.
The two images on the bottom have the same aperture size. Their depth of field is the same.
The two images on the top have the same relative aperture (f-stop). In that case, their depth of field differs. The larger, 25mm aperture setting at 70mm f/2.8 gives a shallower depth of field.
Note: If you want to know the precise amount of DoF, you’d need to calculate with the circle of confusion. I left it out here because in this article I only compare DoF, not calculate the actual amount of it.
Using Equivalent Lenses to Keep Blur and Bokeh Constant
As you increase the focal length, background blur increases. This rule is valid even with a fixed aperture size (proportionally decreasing f-stop).
Longer, telephoto focal lengths bring more background compression on any format.
And what’s in the background most of the time?
You guessed it right: blur.
So, the only thing that happens is the blur getting more apparent. If you use equivalent lenses throughout different formats, the amount of blur will be the same.
The second image appears to have less DoF – but it just has more apparent bokeh
Changing Field of View and F-Stop With Focal Reducers and Teleconverters
Want to use full frame lenses on smaller sensors in a near-equivalent way? You have an option
Focal reducers or speed boosters are optical lens adapters, also called focal reducers.
In essence, they decrease the whole optical system’s focal length.
They alter the projection of a lens to fall on a smaller area, which results in higher light density on that area.
So, when you attach a focal reducer, you not only widen the field of view but also increase f-stop. Hence the name.
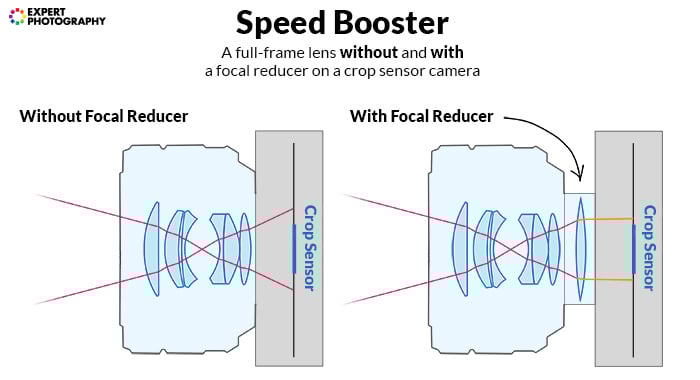
Focal reducer used with a 50mm f/1.8 lens and a Micro Four Thirds camera
There are also solutions for the inverse of this. If you want to have more reach on your telephoto lens without swapping to a smaller sensor, use a teleconverter.
It increases the focal length by intervening in the optical system. It decreases the field of view and f-stop.
Both speed boosters and teleconverters can degrade the optical quality. If you choose either of them, be aware of this. It’s best to buy from renowned manufacturers or from the camera manufacturer itself.
Metabones, for example, offers excellent speed boosters for Micro Four Thirds cameras. With those, you can use full frame lenses with a 0.71 or 0.64 crop in focal length and f-stop. This booster almost gives back their full frame behaviour.
For the reasons explained before, neither speed boosters or teleconverters affect depth of field.
Effect of Crop Factor on ISO
Evidently (from aperture equivalence) you can see that crop factor applies for ISO too. F-stop disguises the real aperture size – the camera has to correct for that.
You might not notice it, but the proof is right in front of your eye.
Let’s see the physics.
An Illustrative Example of the Effect of Crop Factor on ISO
Take two rectangles (not sensors, yet). One is the size of a micro four-thirds (MFT) sensor. The other is the size of a full frame sensor.
Place them on a wall, stacked on each other with the smaller one above.
Now, place a projector at a close distance. Project an image with even brightness on the rectangles on the wall.
In this situation, the projector and the rectangles behave like a camera system.
The system has a light source – the projector’s lamp, which projects a certain amount of light.
It has a lens, inside the projector. Weird place for a camera lens, but works identically.
And, it has a sensor, in the form of planar rectangles on the wall.
The projection is circular-shaped. Note: in real camera systems, it always is. Some parts in the lens might cut it to a rectangular form. The glass itself always projects a circular image.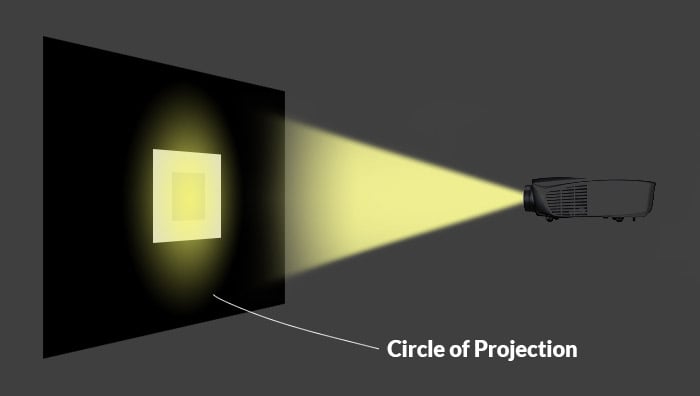
Its light hits the rectangles evenly. There’s a total amount of light coming out from the projector every second. Evidently, the rectangles don’t get all of it.
The bigger rectangle cuts out a section from the projection. It doesn’t ‘sense’ it, as it falls out of its coverage. The amount of light that hits the big rectangle is already less than the total amount.
The smaller rectangle is placed inside the bigger one – and its coverage is even smaller. So, it cuts an even smaller part of the total projection.
If the brightness of the projection is even, the density of light is the same everywhere. This means that smaller areas get proportionally less light than bigger regions.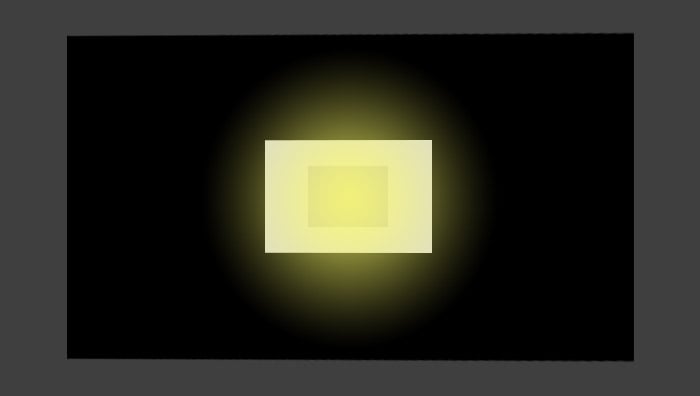
Calculation
We can express this in numbers. We have to calculate areas of our rectangles to get the proportion of light falling on each of them.
The area of the MFT-sized rectangle is 2,24 cm2, while the area of the full-frame-sized one is 8,64 cm2.
Divide the two, and you’ll see that the total amount of light falling on the full frame rectangle is 3.85x more than what’s falling onto the MFT-sized one.
This number is (unsurprisingly) close to MFT’s crop factor of 22. The reason why it’s not fully equal is the different aspect ratios. For the following, we’ll round it up to 4.
If we were to calculate with APS-C, this would be 1.52 = 2.25.
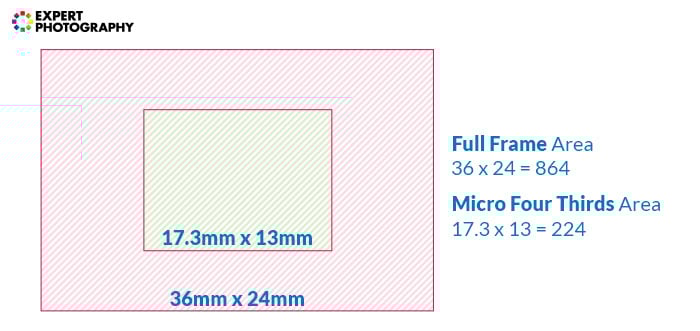
What Does ISO Equivalence Mean in Practice?
Let’s swap the rectangles for real sensors. We don’t have to know the pixel count on them – we’re only calculating with their areas, and with their total light perception.
Yet, we have to assume that they have identical pixel count – we don’t want extra variables yet. For comparing noise levels, we also assume that both sensors use similar technology, and their age and wear level are the same.
I might surprise you with this. ISO level is not the same on every camera. An ISO value doesn’t represent any defined sensitivity level.
Instead, the ISO standard is based on exposure value and scene luminance. It’s standardised in two ANSI exposure guides from 1973 and 1986.
ISO values are thus not determined by the level of amplification or sensitivity. They are determined by external circumstances.
This means that if a sensor gets less light from a particular scene than another sensor, it has to be more sensitive to reach the same ISO value.
Let’s go back to the MFT and full frame example. At equivalent focal length and same f-stop, an MFT sensor gets 4x less light in any given scene than a full frame sensor.
This means that the data from the MFT sensor has to be amplified 4x more to reach the same exposure. Thus, any ISO level on MFT is 4x more amplified than on full frame sensors.
So, let’s illustrate this with two camera setups. One is an MFT sensor, with a 25mm f/2 lens. The other is a full frame sensor with a 50mm f/2 lens. Again, for the sake of excluding unnecessary variables, we assume they have the same T-stops.
We shoot an image of a subject with both setups. We set them to manual mode: both to f/2, 1/100s and ISO 100. The exposures will be identical.
Noise Levels
However, if you zoom in to 100% on both, you’ll recognise one thing. Noise levels will be, by a good chance, noticeably higher on the MFT sensor. Just as if they were shot at ISO 400 on a full frame machine.
Which is exactly what happened. To give a correct exposure at ISO 100, the MFT camera had to be as sensitive as the full frame camera would be at ISO 400.
You can approach this differently, too. On a smaller sensor, the signal-to-noise ratio will be lower. So, to bring the signal up to a set level, you have to raise noise levels, too.
Now, this is not, by any means, a problem. It’s just physics. In good lighting, any sensor performs well, without noticeable noise. You’ll only notice this when you shoot low light or print your images in large sizes.
It’s also not uncommon that noise levels are very different even on same-generation, same-size sensors. The reason lies in technology variation, advancements, and pricing differences.
So, what’s the point of ISO?
ISO is a useful setting because the same set of exposures will work across all cameras. But, it does disguise how much light the sensor gets.
Pixel-Level Effects
Up until now, we simplified. We assumed that sensors work like film, a contiguous surface sensitive to light.
They are not that. Sensors have pixels. Pixels themselves have a size – and that size includes useful and not useful areas.
So, let’s bring in megapixels into this thought process.
Hopefully, I’ve already convinced you that a bigger surface means more light. The same applies to pixels.
Bigger pixels gather more light – smaller pixels gather less light (if everything else remains the same.)
So, if we’re not interested in full-area ISO effects, but rather pixel-level effects, we have to consider pixel size.
A 24MP full frame camera has bigger pixels than a 24MP crop camera (say, an MFT one).
24MP on MFT means twice the pixel density. A full frame camera at 96MP would have the same density.
In that case, we could emulate every optical property of the MFT sensor using the middle 1/4 of the full frame sensor.
Zoomed in to 100%, they would also have the same noise levels.
Effect of Equivalence on Detail
Now, sharpness and lens resolution are a very different question. Equivalence influences detail in a different way than other elements. The detail is not determined (although affected) by the aperture.
For measuring lens resolution, we often use so-called MTF charts. These charts compare the given lens to a ‘perfect lens’ – one that has no optical deficiencies whatsoever.
Another thing that MTF charts provide is the option to disclude sensor size from the variables. They usually measure the full frame projection, but you can simply ignore the parts you’re not interested in.
They give an objective, absolute verdict on lens performance.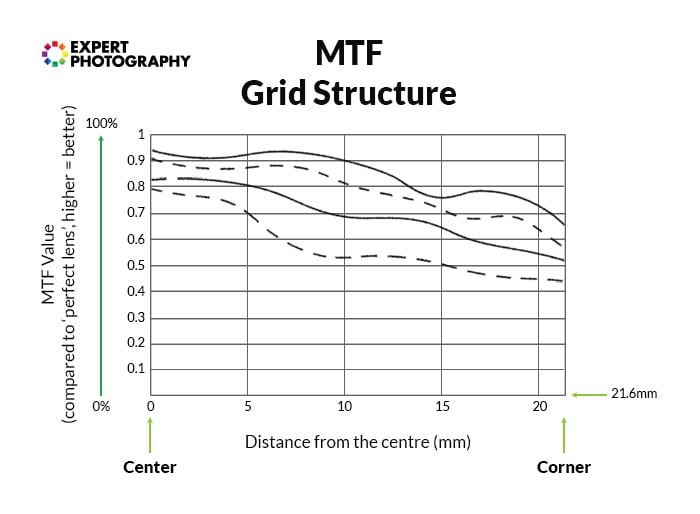
Let’s suppose again that we have a larger and a smaller sensor with the same pixel count. The larger one has larger pixels. The smaller one has smaller pixels.
We attach two otherwise equivalent lenses to the two cameras. A shorter focal length, lower f-stop lens goes onto the smaller sensor. A longer, higher f-stop lens mounts onto the bigger one.
What we can see is that the smaller lens has to be sharper to provide the same level of resolution and detail.
This, in addition to ISO equivalence and manufacturing difficulties, results in bigger sensors having a higher pixel count.
Smaller cameras are not worth being equipped with high-pixel-count sensors. If not for ISO reasons, then for lens performance reasons.
The practical limit nowadays is around 20MP for Micro Four Thirds cameras. It’s a bit higher, 30MP for APS-C cameras, and around 60MP for full frame ones.
If you want to go even bigger, the medium format Fujifilm GFX 100 offers 100MP. That’s 100MP of real detail if paired with the right lenses.
Compact cameras and smartphones are a different story. They have tiny sensors, but high pixel counts.
For one part, they have fixed (often prime) lenses, which might be more optimised for their exact sensor counterparts.
But they are also relying more on advanced algorithms, interpolation and other tricks. These only improve apparent sharpness, not real detail. So no, a 20MP smartphone doesn’t have the same detail as a 20MP Micro Four Thirds camera, let alone a full frame one.
Note: For the same reason, some interpret depth of field as a function of sensor size. If we include the variable of circle of confusion, that’s true. However, that’s the topic of a different, similarly long article, and I don’t want to complicate this one even more.
Using Equivalence to Choose the Right Tools
So, what can you do with all this new knowledge?
First, you now know how to pick equivalent lenses for different formats, if they actually exist.
But there are physical limitations. A full frame 24mm f/1.4’s equivalent on MFT would be a 12mm f/0.7. No such lens exists.
You’re now also familiar with interrelations that wouldn’t otherwise be clear.
Depth of field equivalence is an excellent example of this – hardly anyone knows how it works. (Even the relevant Wikipedia page is overcomplicated, although it’s usually accurate in photography topics.)
Also, if you want to emulate a specific format’s look on another system – from now on, you’ll know how to do it.
When someone says that ‘a 50mm lens is a 75mm lens on a DX sensor’, you now understand it. You also know that’s it’s only half the truth.
Conclusion
To be fair – equivalence is not something you crucially need to know to pursue photography. You can get stunning results with just using your gear and hardly thinking about it.
But if you want to know what’s behind photography – this is something you can’t miss. Equivalence is a core knowledge that influences camera manufacturers and buyers equally.
- Master manual mode to capture moments you’re proud of.
- Overcome the frustration of missed shots with quick exposure settings.
- Benefit from visuals with hundreds of images and illustrations.