I wouldn’t say there are any ‘best’ time-lapse photography settings. These can vary depending on the camera and the subject – just like conventional photography. There are, however, some general principles regarding time-lapse settings.
Let’s start by considering the issue of timing and then talk about exposure settings.
Time-Lapse Settings: Frame Rate
A video is just a sequence of still images shown in quick succession. If we view the sequence at a too slow speed, the result will exhibit an annoying flicker.
Speed the sequence up sufficiently and an effect called the phi phenomenon will generate the illusion of a smooth fluid motion. This happens at around 12 frames per seconds.
As a reference, most contemporary films are shot at 24 fps, which most people agree looks natural.
You don’t have to worry too much about the frame rate when you’re shooting your time lapse sequence. This is decided later on when all the images are combined into the final video.
You will, however, need to consider how fast the action is taking place. Otherwise, you’ll end up with a series of stills as shown here:
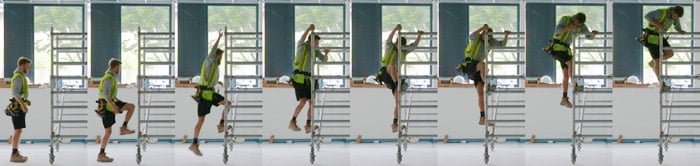
The rate at which you photograph your subject depends on how fast it’s moving. A high speed video camera can take hundreds of frames per second to slow down the action. Normal video is shot at around 25 or 30 frames per second. Time lapse rates can be anything from around one frame per second to one frame every few hours.
In the past, different frame rates and TV standards made it difficult to share videos and view them on different devices. Today, with digital TV, we can view just about any video on our computer. The most common frame rates are 24 fps, 25 fps and 30 fps.
Let’s assume our time lapse video will be viewed at 25 fps. This means we need to take 25 photos for each second of our final time lapse video.
If you’re just beginning to experiment with time lapse photography, don’t try to make an epic feature film. Instead, aim for something more achievable – lasting say 30 seconds.
If we want to make a 30 second long production we will need 30 seconds x 25 fps = 750 photos. Ideally, we’d like to capture all these images on a single memory card.
Memory Card Capacity
You can shoot JPEG images if you want to fit as many images as possible onto a given media card. I would, however, recommend that you shoot raw for maximum post-production flexibility.
Check the file size of a single raw photo for your chosen camera. Make sure you have room for 750 such images on your memory card.
For example, on a Canon 5D Mk III the raw file size is around 30MB. Multiplying 30MB by 750 gives 22,500MB or 22.5 GB. A 32GB memory card will easily handle this many raw images.
Once you’ve set your camera’s image size and quality settings, the number of remaining shots should be visible on your camera’s LCD.
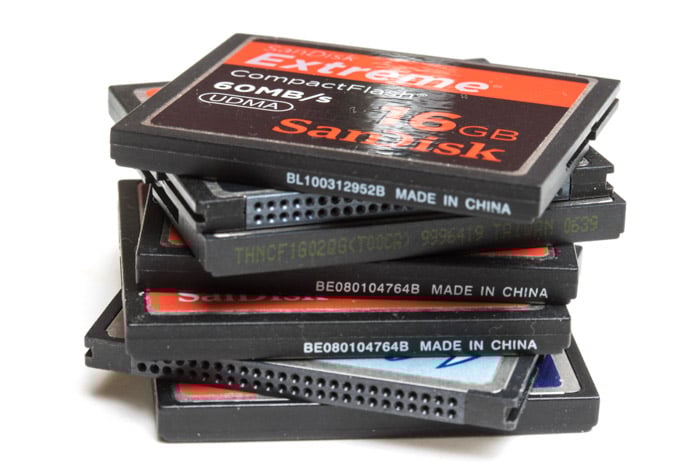
You will not be recording a burst of images in rapid succession. This means that the write speed of the media cards you use for time lapse (CF or SD) is not as important as their capacity.
If you don’t have a high capacity memory card, you can just keep an eye on the remaining exposures. Swap in a new smaller capacity card each time you run out.
For time lapse, a high capacity card doesn’t have to be of the expensive high speed variety. It’s the capacity that counts – not the write speed.
Time-Lapse Interval
So we want to produce a 30 second time-lapse video and we want to take 750 separate photos. Now, you have to decide on the length of the actual photo shoot. The length of the shoot depends on the subject.
Filming a flower opening may take a day or two. A major construction project could involve months. Long time lapse projects can get complicated. You will need to consider how to keep the camera powered up for long periods and how to cope with changing light levels. And you’ll need to arrange for images to be automatically transferred to a hard drive.
For these reasons, it’s best to start with a relatively short term subject that you can shoot for an hour or two. This could be something like boats on a river, a cityscape or just cloud formations.
Calculating the Shooting Interval
Let’s suppose we wanted to film two hours of activity of our chosen subject. The interval we need to program into our camera or external intervalometer is just two hours (2 x 60 x 60 = 7200 seconds) divided by the number of shots in our sequence. We’ve determined this is going to be 750.
That gives us 7200 seconds divided by 750 images which equals 9.6 seconds. We can just round this up and get the camera to take one shot every ten seconds until we have 750 photos on the card.
If you don’t want to do the maths yourself, there are plenty of handy time lapse calculators you can download to your phone. Some are free and others, like the PhotoPills app, require a modest payment.
The PhotoPills app is usually associated with planning night-time photography. It’s actually a Swiss Army knife for photographers that includes a time lapse calculator among its many useful tools.
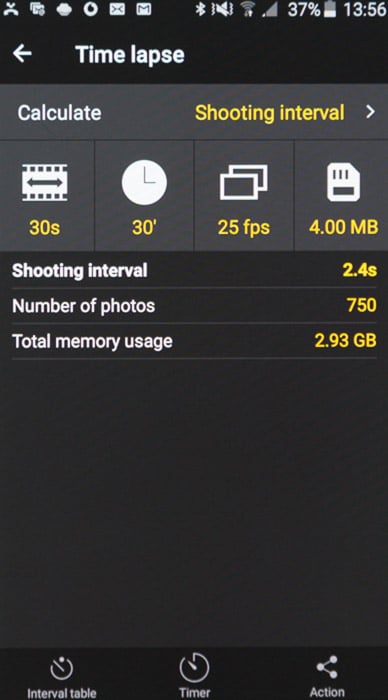
The PhotoPills time lapse calculator does all the maths for you.
In this case, a finished time lapse of 30 seconds capturing 30 minutes of real-time action to be viewed at 25 fps where each image is 4MB in size, gives a shooting interval of 2.4 seconds until 750 photos have been taken. All this will require a memory card with a capacity of at least 2.93GB.
DSLR Time-Lapse Photography
DSLR cameras are not specifically designed for time-lapse photography. This presents some practical limitations when shooting images for a time -lapse video. In our example, the camera would be clicking away at one shot every ten seconds. This means that later we can compress two hours of shooting into thirty seconds of video.
This would produce a video that appears to run at 240 times the normal speed. It can be somewhat manic and unnerving. If instead we wanted to capture the same time period but make it appear to be just twenty times normal speed, our two hour session would have to replay in 7200 / 20 = 360 seconds.
This would require 360 seconds x 25fps = 9000 shots. In order to fit 9000 shots into a two hour shoot, we would need to take one photo every 0.8 seconds.
Few people want to so casually add 9000 to their shutter count. And 9000 raw images at 30MB a pop would need 270GB of storage!
This is a worst-case scenario. If you were shooting JPEG images, each one is more likely to be just four or five MB. When multiplied by 9000, it is still a considerable amount of disc space.
Using a DSLR to capture many high resolution images and combining them into a video in post certainly has its limitations. The big advantage of this method is that it can give extremely high quality results. This is because of the dynamic range and resolution it offers.
Resolution is a very important and fundamental setting for time lapse. Let’s consider this in a little more detail.
DSLR vs Video Resolution
Two of the most fundamental settings on any camera are the image size (resolution) and image format (JPEG vs raw). Image resolution is related to the density of pixels on your camera’s sensor or on the display device. The higher the resolution, the more fine detail you can see.
Computer monitors, TVs and cameras have for years been following a relentless path toward ever greater resolution. However, there is no standardisation between the resolution of your flat screen TV and that of your camera.
The average DSLR has a much higher resolution than a 4K UHD TV (and a different aspect ratio). This means that we don’t always have to shoot at the full resolution afforded by our camera.
Here’s a scale comparison of some TV screen resolutions and the resolution of a typical DSLR.

A single image from a Canon 5D Mk III has far more pixels than needed to show on a full HD or even a 4K Ultra HD TV screen. The Canon 80D has an APS-C (cropped) sensor but still sports 6000 x 4000 pixels.
The background image shows the size in pixels that you’d typically obtain from a modern DSLR. The overlays show the pixel dimensions for both full HD and 4K Ultra HD video. As you can see, the image from the camera is much larger than that actually needed to display on an HD TV – even a so called ‘4K’ TV.
Clearly, some image size reduction and cropping will be required. This will prepare your time lapse images for their intended display.
When your images are all larger than needed for the video format you’ve chosen, you will have the ability to introduce zoom and pan effects in post-production. This is known as the ‘Ken Burns’ effect. It can add interest to any video originally shot from a fixed perspective.
If you want to produce a video to show on a full HD TV (1920 x 1080), notice that the image from the camera is around ten times bigger than it really needs to be. If you want to introduce some subtle zoom and pan effects, this is probably excessively large for that.
Remember that making videos from many hundreds of images places a significant workload on your computer. It also takes up a great deal of storage space. Processing images that are larger than they need to be will only make video production slow and frustrating. One way to make the whole process more streamlined is to set your camera to work at a lower resolution.
Check the ‘Image Quality’ settings on your camera. This is the screen that enables you to select the size and compression of the JPEG images your camera makes. For most cameras that shoot raw, you can also select the raw resolution.
In this example, I’ve selected a medium resolution raw setting: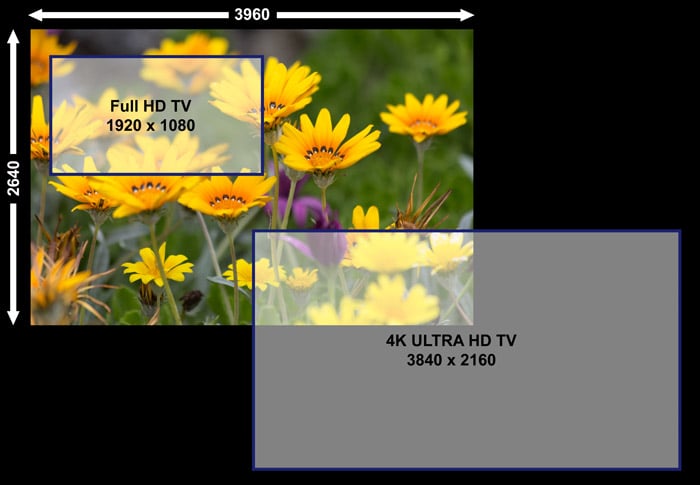
At this setting, the raw image is still large enough to more than fill the screen on a 4K UHD TV. It can also supply plenty of room for zooming and panning effects if you want to make a video for a standard HD TV. The file size it produces is half that of the full resolution setting.
You’ll be able to store twice as many images on the same media card. And your computer will process them more easily while you retain the full dynamic range afforded by using raw files.
Raw vs JPEG
You should always aim to keep as much information in your images as you can during the workflow. This keeps your creative options open.
We’ve already seen that we don’t always need to capture the full resolution a DSLR camera offers. What we do want is to maintain maximum ability to adjust shadows and highlights in each image. This is particularly important if the camera is photographing a high contrast scene or one where the lighting conditions change considerably during the shoot.
Raw files contain the maximum definition when recording the brightness in the scene (known as dynamic range). They are also able to distinguish between many more brightness levels than a JPEG image.
Your monitor (and indeed your eyes) cannot show that full tonal range. But it does give your computer a major advantage when it comes to tonal adjustments without causing gaps in the image histogram that can otherwise lead to ‘banding’.
Camera Settings for Individual Photos
So far, we’ve considered only the fundamental settings associated with the length and the resolution of your finished video. Since we’re concentrating on making a time lapse video from a series of still photos, we now need to turn our attention to the settings needed for each individual photo.
Again, there are no ‘correct’ time-lapse settings. These depend on the subject and in this respect, it’s no different to any still photograph.
However, as you’ll be taking hundreds of images, an important consideration is consistency from one image to the next. This helps to avoid flickering or other transient effects when we view the sequence of images at the intended frame rate.
Unless you want to photograph a situation where the lighting level is going to change significantly during the shoot, such as a sunset, you should aim to maintain a constant exposure value. This means selecting a shutter speed and aperture that works well for your chosen subject. And then using those same settings for all the other images in the shoot.
The only way to ensure values don’t change is to set your camera to Manual Mode.
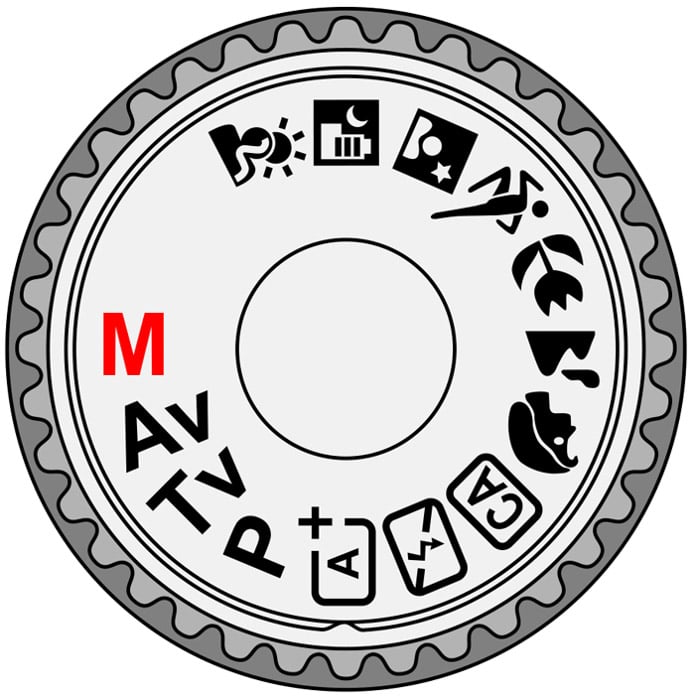
In order to obtain consistent exposures and help avoid flicker, set your camera mode dial to Manual. Adjust the aperture and ISO, aperture and shutter speed just once. Take a test shot before you start recording your sequence and adjust for the ideal exposure by checking the histogram.
If you set your camera to a semi-automatic mode such as aperture or shutter priority, the camera will calculate a new exposure value for each photo . This will be based on whatever is happening in the scene at the time.
It can make a noticeable difference in exposure as subjects in your scene move around. This is particularly relevant if your metering is set to spot or centre-weighted mode. Allowing the camera to alter the aperture can also introduce unwanted depth-of-field changes.
Another setting that should generally remain fixed is focus. You certainly don’t want the camera to auto-focus on different parts of the scene as subjects move around from one frame to another.
I use back button focus (BBF). This way I can set the focus once by pressing the AF button and know it won’t change during the shoot. Unless you’ve specifically set BBF on your camera, it will attempt to auto focus when the shutter button is half-pressed or when the intervalometer triggers an exposure. To avoid this, switch your lens to manual focus mode.
What Shutter Speed Should I set?
If you set your camera to ‘Movie Mode’ to make a real-time video directly in the camera, you would typically be shooting at a frame rate of 25 fps. This means that the effective shutter speed for each frame in the image cannot be slower than 1/25 second. The exposure wouldn’t otherwise be complete before the next frame in the sequence needed to be shot.
There is, however, nothing to stop you from selecting a much faster exposure.
This range of exposure time is expanded all the more when you make your video from a series of single photos. The effective shutter speed can approach the selected shooting interval.
For example, if you’re taking one photo every ten seconds, the shutter speed you select for each photo could be anything from eight seconds up to the fastest value your camera affords (light levels permitting). Note that you can’t set the shutter speed to be exactly ten seconds in this example. We have to give the shutter time to close and open again.
For subjects that are moving very slowly (such as a flower opening), the shutter speed is not that critical. The subject is unlikely to be moving to any degree during the exposure. And the camera will almost certainly be on a tripod.
Let’s say you’re shooting a night-time movie of the stars. Your slowest shutter speed will be limited by the onset of star trails and the fastest shutter speed by the available light and lens aperture.
The situation is rather different when shooting cars at a busy interchange during the day. You might have determined that you need to take one photo of the interchange every five seconds and want to know the best shutter speed to use.
Theoretically, your shutter speed could be anything from say 1/4000 sec to as slow as 4 seconds. What difference will this make to the final video?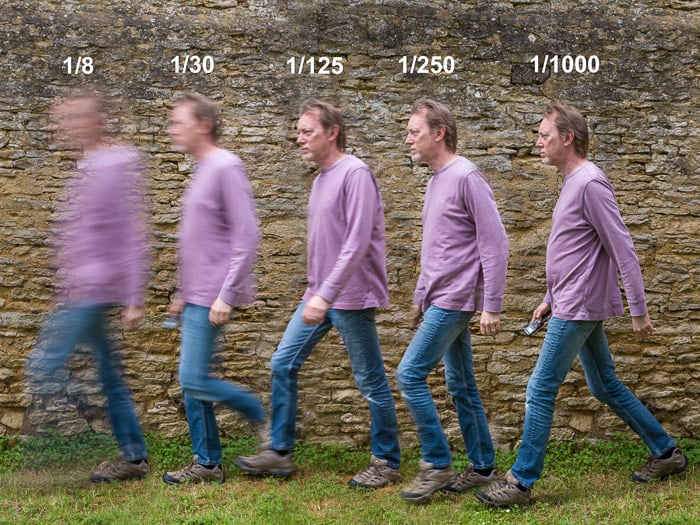
The answer is largely one of artistic interpretation. What impression are you trying to convey? If each exposure is relatively fast (say 1/1000 sec), then your video will essentially comprise a series of still photos of cars. When viewed individually, they’ll look like they’re all stationary. Viewed in sequence, they will appear to jump from one position to another in a very unnatural manner.
If you were really watching a video of a morning commute at 200 mph, you’d expect each frame to show at least some motion blur. For a more fluid fast motion effect, reduce the shutter speed to say 1/15 sec or even slower. You can see the effect of changing the shutter speed for a subject moving at the same rate in the header image.
You might find that you can’t achieve a slow enough shutter speed for the effect you want to achieve. This often happens when shooting in bright sunlight. If you do run into this problem, invest in a neutral density filter. This will cut down the light by several stops and allow you to use a slower shutter speed. We also have a great article on using a ND filter to remove people from long exposure shots which you can check here.
If you’re after some inspiration for time-lapse photography subject ideas, check out our tips on urban or adventure photography for a start! We also have a great tutorial on how to create a time-lapse with Photoshop.


