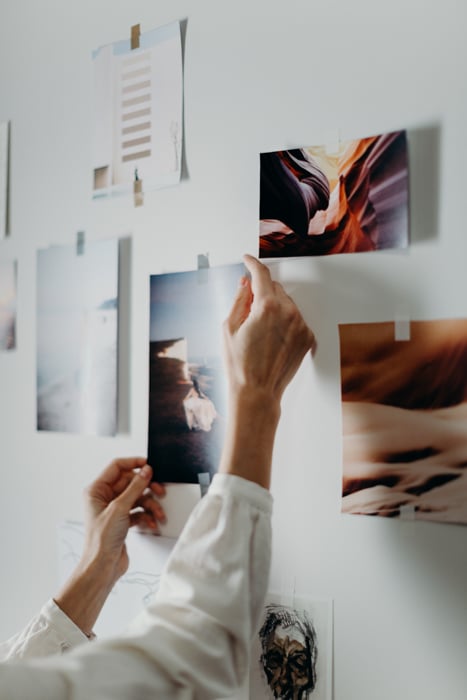
Starting with photography may not be easy but it sure is rewarding. There are multiple aspects a beginner has to learn. Learning how to edit photos is one of them.
There are endless questions when it comes to software and basic editing tips. With a smart approach, this process can be liberating. In this article, let’s talk the most important photo editing tips and break down the process for you.
Edit Photos to Find Your Unique Style
Starting out, the most important thing is choosing a style that you want to apply to your photos. Having a consistent style has many advantages. It gives your images a signature look, and people immediately recognise your photos.
It also makes your life easier, because you know what to do with the image each time you start editing.
Get Inspired by Other Photographers
Creating a style starts with finding inspiration. Find photographers whose images appeal to your taste. Try to define which elements in their photos grab your attention. Is it the gorgeous lighting? Or maybe the artist uses colors to tell a story? What speaks to you when you look at their work?
Be Bold and Experiment
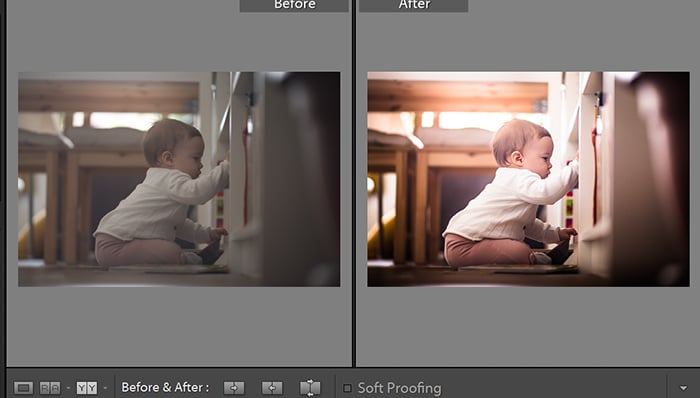
If something catches your eye, think of implementing it into your photographs. Don’t set limits on yourself. Try out presets, watch tutorials, look at other photographers’ before-and-after photos. The only right style of editing is one that suits you best. So don’t be afraid to experiment till you’re happy.
Shoot in RAW for High-Quality Photo Editing
Shooting in RAW gives you a major head start compared to using JPEG. It is a lossless format. This means that it keeps all the image data that the camera captures, as opposed to the compressed JPEG files.
Even though RAW files need a lot more storage space, they bring out the best in your pictures during editing. It is much easier to correct white balance, add sharpness, or rectify overexposed areas.
Before taking photos, set the camera’s settings to shoot in RAW. You might want to edit your images and still have the convenience of small JPEG files. It’s possible. Simply set your camera to saving every photo in both formats.
Choosing the Best Photo Editing Software
The first step to getting started in post-processing is choosing your software. It works wonders to get familiar with the interface and features of one specific programme before you start editing.
Take your time to explore what the software has to offer. In doing so, you will not have to think about every single step. Your editing process will become intuitive and your workflow, more efficient with time.
Using the combination of several programmes has its advantages. But for beginners, we recommend learning one editing software in-depth. Too many programmes at once can be mind-numbing. Each software offers something unique and operates differently.
No matter what you choose, make sure that the programme supports RAW files. As mentioned earlier, this format makes editing a breeze. Also, the image should be uncompressed. This ensures that you won’t lose quality after editing. This gives you more freedom when fixing images to show your personal style. It is also easier to work with local adjustments and layers.
There are a few points to consider before picking which software you are going to use.
Choosing a Paid Software
Pricing is also something you should look at before deciding with a programme. Some brands – such as Adobe– offer a monthly subscription plan that allows you to use several programmes for that price.
Others, like DxO PhotoLab, work as a one-time purchase. It is possible to choose between the basic and premium version, depending on your needs.
Apart from the above-mentioned examples, some of the most important paid software include Capture One, Affinity Photo, and Luminar.

Choosing a Free Software
If you are just getting started, you might not want to invest in an editing software yet. Luckily, there are some great alternatives that you can download or use online for free.
Our recommendations are GIMP, RawTherapee, Canva, Fotor, and Darktable.
We tried these out ourselves. If you want to learn more about these programmes, check out this article!
Crop for More Balanced Images
Before adding edits to the photo, it is better to crop if necessary. This ensures that you don’t have to deal with the image ratio and composition later.
Some photographers are against cropping their image. They see it as a compositional failure and a loss in image resolution. But this is not always true. Cropping can be a useful tool in enhancing your images.
You can crop off unnecessary items, such as branches of a tree in the corner. It is also possible to tweak the composition by cropping and repositioning the photo.
There are regular aspect ratios (for example 5:7, 3:2, 4:3 etc.) that all of the editing programmes share. These originate from film photography, where every type of film had their own format. It is worth sticking to them, as these are the formats used for printing images.
Experiment With Local And General Adjustments
Before going too deep, you should experiment with the basic slider adjustments. Play around with exposure, contrast, highlights, shadows, clarity, saturation. See how much each of them affects the image. It’s fascinating to learn how useful these simple tools can be.
If you want to get a basic idea of what to adjust at first, use free presets in your images. When adding presets, you can see how they are operating and which sliders get adjusted. You can use these to learn how to adjust the images in your own way.
Once you are familiar with the general adjustments, you can try some of the local ones. Selective saturation, graduated filter, radial filter, cloning tool, or adjustment brush are all very useful tools to define your own style. In the long run, experimenting can also help evolve your style.
After plenty of practice, you’ll need just a glance at the image to know what edits to make.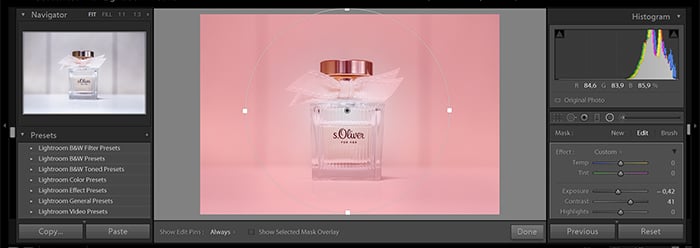
Adjust the White Balance of Your Image
White balance stands for the correctness of the colors in your image. It involves adjusting color temperature and tint. Adjusting the with white balance has two goals. One is that the colors become realistic, and the second, that the whites in your photo remain white.
There are white balance sliders in most photo editing programmes. But you can also work with individual HSL sliders to adjust each color separately.
Some software even offer a white balance selector tool. This is a pipette with which you click on the part of the photo that is meant to be white. Based on the tones, the pipette estimates how much white balance adjustment it needs and automatically edits it for you.
Experiment With Unique Color Variations
This process helps you develop your editing style. Apart from lighting, choice of color is the main factor that defines the style of your photos. Find inspiring photographers and analyse what makes their editing so outstanding.
Decide how you want to edit your images, whether you want warm or cold tones, saturated or faded colors. Adjust HSL and selective colors in a way that conflicts your usual style. Be careful when adjusting the hue, saturation, vibrance etc. However, don’t hesitate to push your boundaries and achieve new results.

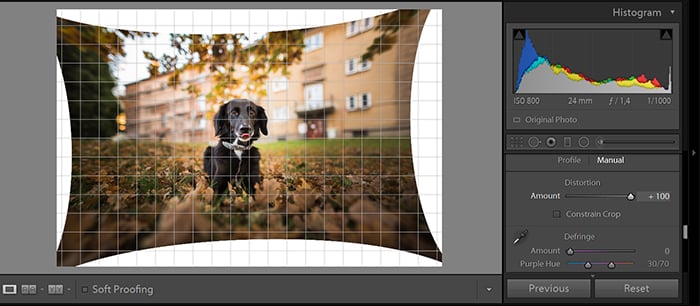
Aim For Perspective Correction and Straightening
Having a correct perspective hugely contributes to the value of an image. Perspective plays a part in the composition of the image. It also guides the viewer’s eyes through the picture.
When shooting with a wide-angle lens, perspective distortion is often a problem. Luckily, you can fix it in most editing programmes. This helps the photo resemble what we naturally see with our eyes.
Straightening is also an important tool to remember when correcting perspective. You should aim for having at least one exactly horizontal or vertical line in your photo.
When it comes to landscapes, this line is usually the horizon. Meanwhile, with portraits, this can be a textured background or the walls of a house.
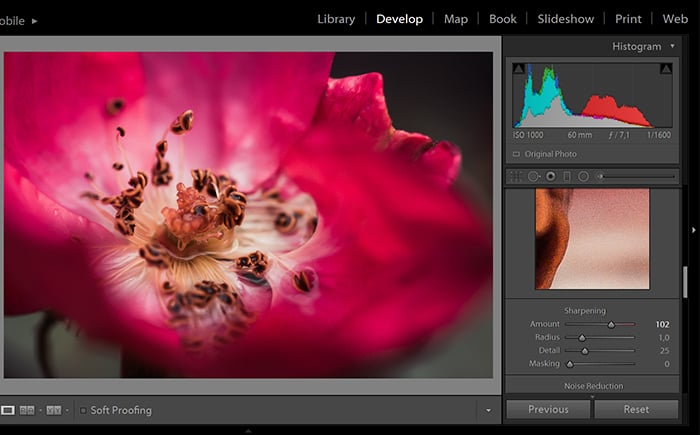
Sharpen Your Photos
Sharpening photos is a necessity when you are aiming to print them because. You may already have noticed that prints highlight every detail. Therefore, the only time you should oversharpen an image is before printing. It might seem excessive at the time but trust the process. The prints will come out great.
RAW images often lose sharpness compared to when they are in JPEG format. Luckily, you can easily fix this in post-processing.
You have the chance to adjust the amount of sharpening, but you have to be mindful about it. If you oversharpen the image, it will be super visible. This will eventually lead to a forced and unnatural look. Adding too much sharpness also makes the photo grainier, which you should avoid.
Avoid Over-Editing Your Pictures
While editing images can significantly improve photo quality, it can also get out of hand. In the beginning, it’s easy to get carried away and make excessive adjustments in the photos.
This results in an overdone look and is especially common in the case of HDR photos and portrait retouch.
When editing photos, less is more. Comparing your original photo to the final image helps you identify when you have edited the photo too much.
If you notice yourself doing so, don’t worry. Most beginners experience this phase when they are learning editing programmes. After consistent practice, this tendency will fade away, and you will end up with much more refined results each time.
Develop Your Editing Workflow
A great workflow is important for three reasons.
First, it gives you structure. Knowing exactly what and how to do saves you time when processing your images.
Second, it ensures that your photos are organised and categorized, and you are aware of which tools you can use for which purpose. Many editing programmes also allow you to have customized workspaces, which means you can tailor the interface to your needs. You can also make use of presets in order to speed up your editing process.
Finally, it also helps you with consistency when it comes to your file names, sizes, and watermarks.
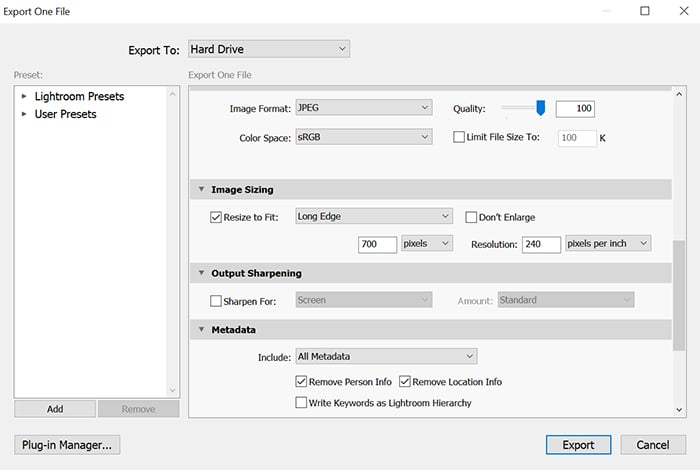
Export Your Images
Exporting images plays a crucial part in an efficient editing process. Having a saved set of settings for different purposes allows you to save time and stay efficient.
Different output goals require differently sized photos. Whether you are planning to print your images or upload them to the internet, it is essential to resize your photo. Adding output sharpening also can come in handy, especially for printing purposes.
Choosing the right file format when exporting is just as important. In most cases, it is enough to save photos in JPEG format, as it is suitable for most digital purposes. However, sometimes you might want to save non-compressed image data for further editing.
This is where TIFF and PSD files come in. They allow you to save your editing progress and at the same time, retain information and quality. TIFF files are often the go-to files if you want to print out your images.
You can also add a watermark during exporting. Softwares such as DxO or Lightroom allow you to save a custom watermark that you can apply to the photo with one click.
Conclusion: Edit Photos
Photo-editing is like a double-edged sword. When you try to learn too much too soon, it may feel like a never-ending pursuit. However, if you focus on one aspect at a time and pace yourself, the joys of this process are never-ending.
If you consider our photo-editing tips and dive right into it, you’ll always be on track to achieving your editing goals.
One thing is for certain, photo-editing is all about preserving the details.
If your goal is to enhance the sharpness of your images using basic editing tools, check out our Effortless Editing with Lightroom course. It also lets you explore photo editing in greater depth and make the best use of the Lightroom workspace.


